Table of Contents
Advertisement
Advertisement
Table of Contents

Related Manuals for Lloydspharmacy BM75


Summary of Contents for Lloydspharmacy BM75
-
Page 1: Blood Pressure
Advanced Blood Pressure Monitor + HealthManager App User Manual BM75... -
Page 3: Table Of Contents
Contents Introduction Important information Parts Information on the display USB Interface Setting up your blood pressure monitor 9-10 Using your blood pressure monitor 11-14 Evaluating your Results 15 -17 Displaying and deleting measurements 18-19 Transferring measurements Cleaning your blood pressure monitor Rectifying faults Specifications 22-23... -
Page 4: Introduction
Introduction Thank you for purchasing the LloydsPharmacy Advanced Blood Pressure Monitor. Please read these instructions for use carefully and keep them for later use, be sure to make them accessible to other users. The upper arm blood pressure monitor is used for non-invasive measurement and monitoring of adults arterial blood pressure. -
Page 5: Important Information
Important information Signs and symbols The following symbols are used in these instructions Caution The name and address of the manufacturer Permissible transport and storage Storage Note temperature. Permissible transport and 60°C Note on important information storage humidity. -10°C RH 10-90% Operating Permissible operating temperature and humidity Follow instructions for use... - Page 6 Important information Advice on use • In order to ensure comparable values, always measure your blood pressure at the same time of day. • Before every measurement, relax for about five minutes. • If you want to perform several measurements on the same person, wait five minutes between each measurement. •...
- Page 7 Important information • Do not allow sustained pressure in the cuff or frequent measurements. The resulting restriction of the blood flow may cause injury. • Ensure that the cuff is not placed on an arm in which the arteries or veins are undergoing medical treatment, e.g. intravascular access or therapy, or an arteriovenous (AV) shunt.
-
Page 8: Important Information
Important information Advice on batteries • Please use 4 x AAA batteries supplied • Remove the batteries if the device is not in use for long periods of time • Do not mix old and new batteries or different types of batteries •... -
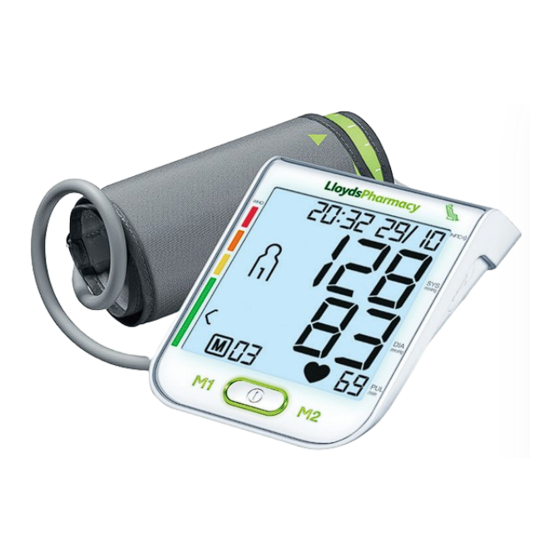
Page 9: Parts
Parts Cuff tube Cuff Cuff connector Cuff holder Cuff holder (insert cuff holder into position shown) Resting indicator display NFC detection zone Connection for cuff connector Connection for mains charger and USB interface (left-hand side) (optional) Display WHO scale (World Health Organization) Start/stop button Memory buttons M1/M2 (Touch screen) -
Page 10: Information On The Display
Information on the Display Date / time Cardiac arrhythmia symbol Systolic pressure WHO classification Multi-user memory Diastolic pressure Battery replacement symbol Pulse value Number of memory space/ Pulse symbol memory display average Release air (arrow) value ( ), morning ( evening (... -
Page 11: Usb Interface
USB Interface The blood pressure monitor also allows you to transfer your measured values to a PC. To do this, you need a regular USB cable (included) and the HealthManager PC software. The software can be downloaded free of charge from the download area under Service at www.beurer.com System requirements for the Beurer HealthManager PC software 1. -
Page 12: Setting Up Your Blood Pressure Monitor
Setting up your Blood Pressure Monitor 1. Inserting the batteries • Remove the battery compartment lid on the rear of the device. • Insert four 1.5 V AAA (alkaline type LR03) batteries. Make sure that the batteries are inserted the correct way round observing the correct polarity. Do not use rechargeable batteries. -
Page 13: Setting Up Your Blood Pressure Monitor
Setting up your Blood Pressure Monitor 2. Setting the date and time If you press and hold the M1 or M2 memory button, you can set the values more quickly. Setting the hour format, date and time. This menu allows you to set the following functions, one after another. - Page 14 How to use your Blood Pressure Monitor Measuring blood pressure Your first test We recommend that for your first test you test both arms. This will determine which arm should be used for future measurements. Take note of your systolic (higher number) reading on both arms. The arm that gives you the higher systolic reading should be used for future testing.
- Page 15 How to use your Blood Pressure Monitor • Then insert the mains plug into the mains socket. • After using the blood pressure monitor, unplug from the mains socket first and then disconnect it from the blood pressure monitor. As soon as you unplug the mains, the blood pressure monitor loses the date and time setting but the saved measurements are retained.
-
Page 16: Using Your Blood Pressure Monitor
Important: The unit may only be operated with the original cuff. The cuff is suitable for an arm circumference of 24 to 36 cm. A larger cuff for upper-arm circumferences of 35 to 44 cm can be obtained from www.lloydspharmacy.com Correct posture •... - Page 17 Using your Blood Pressure Monitor • appears if the measurement could not As described on page 13, attach the cuff and adopt the be performed properly. Observe page 21 on posture in which you want to perform the measurement. error messages/troubleshooting in •...
-
Page 18: Evaluating Your Results
Evaluating Your Results Cardiac arrhythmia: This instrument can identify possible cardiac arrhythmia disorders during measurement and if necessary indicates the measurement with the flashing icon This may be an indicator for arrhythmia. Arrhythmia is a condition where the heart rhythm is abnormal as a result of defects in the bioelectrical system controlling the heart beat. - Page 19 Evaluating Your Results The classification on the display and the scale on the unit show which category the recorded blood pressure values fall into. If the values of systole and diastole fall into two different WHO categories (e.g. systole in the ‘High normal’ category and diastole in the ‘Normal’...
- Page 20 Evaluating your Results GREEN: Haemodynamic stability Measurement of the systolic and diastolic pressure is increased when the circulatory system is sufficiently at rest and is a very reliable indicator of resting blood pressure. However, if there is an indication that the circulatory system is not sufficiently at rest (haemodynamic instability), the symbol lights up red.
-
Page 21: Displaying And Deleting Measurements
Displaying and Deleting Measurements The accuracy of the resting blood pressure results is reduced in these users. Like any medical measurement method, the precision of the HSD diagnosis is limited and can lead to incorrect results in some cases. The blood pressure measurements taken when the circulatory system was at rest represent particularly reliable results. -
Page 22: Displaying And Deleting Measurements
Displaying and Deleting Measurements • When the relevant memory button (M1 or M2) is pressed again, the last individual measurement is displayed (in this example, measurement 03). • When the relevant memory button (M1 or M2) is pressed again, you can view your individual measurements. •... -
Page 23: Transferring Measurements
Transferring Measurements USB interface Connect the blood pressure monitor to your PC using the USB cable. No data transfer may be launched whilst performing a measurement. PC is shown on the display. Begin the data transfer in the “HealthManager” PC software. During the data transfer, an animation is shown on the display. -
Page 24: Cleaning Your Blood Pressure Monitor
Cleaning your Blood Pressure Monitor • Clean your device and cuff carefully only with a slightly moistened cloth. • The frequency of cleaning depends on the contamination level of the device. • Clean the blood pressure device and cuff as soon as any dirt appears on the device. •... -
Page 25: Specifications
Specifications Model no. BM 75 Measurement method Oscillometric, non-invasive blood Permissible operating +10 °C to + 40 °C, 15 % – 85 % relative air conditions humidity (non-condensing) presure measurement on the upper arm Measurement range Cuff pressure 0 – 300 mmHg, Permissible storage - 10 °C to + 60 °C, 10 % –... -
Page 26: Specifications
Model no: FW7575M/UK/6/06 Input: 100-240V 50-60Hz Output: 6V DC 600mA, only in connection with LloydsPharmacy blood pressure monitor. Supplier: Friwo Gerätebau GmbH Protection: This device is double insulated and protected against short circuit and overload by a primary thermal fuse. -
Page 27: Electromagnetic Compatibility Information
Guidance and manufacturers declaration – electromagnetic emissions The BM75 is intended for use in the electromagnetic environment specified below. The customer or the user of the BM75 should assure that it is used in such an environment. Emissions test Compli- Electromagnetic environment –... - Page 28 Table 2 Guidance and manufacturer’s declaration – electromagnetic immunity The BM75 is intended for use in the electromagnetic environment specified below. The customer or the user of the BM75 should assure that it is used in such an environment. Immunity test...
- Page 29 Table 3 Guidance and manufacturer’s declaration – electromagnetic immunity The BM75 is intended for use in the electromagnetic environment specified below. The customer or the user of the BM75 should assure that it is used in such an environment. Immunity test...
- Page 30 Recommended separation distances between portable and mobile RF communications equipment and the BM75 The BM75 is intended for use in an electromagnetic environment in which radiated RF disturbances are controlled. The customer or the user of the BM75 can help prevent electromagnetic interference by maintaining a minimum distance between portable and mobile RF communications equipment (transmitters) and the BM75 as recommended below, according to the maximum output power of the communications equipment.
- Page 32 751.541-0814 - Beurer GmbH, Söflinger Str. 218, 89077 Ulm, Germany V12 - 141204...
Need help?
Do you have a question about the BM75 and is the answer not in the manual?
Questions and answers