Table of Contents
Advertisement
Quick Links
Advertisement
Table of Contents

Related Manuals for Seaward Supernova Elite


Summary of Contents for Seaward Supernova Elite
- Page 1 Seaward Supernova Elite Portable Appliance Tester Instruction Manual Bracken Hill, South West Industrial Estate, Peterlee, Co. Durham SR8 2SW. England. Tel: +44 (0)191-586 3511 Fax: +44 (0)191-586 0227 www.seaward.co.uk sales@seaward.co.uk calibration@seaward.co.uk...
- Page 3 Seaward Supernova Elite Portable Appliance Tester Instruction Manual 283A556 November 2009 October 2013 © 2009 Seaward Electronic Ltd. © 2013 Seaward Electronic Ltd. Issue 1 Issue 2...
- Page 4 Limited Warranty & Limitation of Liability SEAWARD Electronic Limited guarantees this product for a period of 1 year. The period of warranty will be effective from the day of delivery. © Copyright 2009 © Copyright 2013 All rights reserved. Nothing from this edition may be multiplied, or...
-
Page 5: Table Of Contents
Table of Contents Disposal of Old Product............. 1 Declaration of Conformity............2 Before Starting................3 Safety ..................4 CHAPTER 1 INTRODUCING THE TESTER ....6 Introduction................6 Your Portable Appliance Tester ..........7 The Top Panel..............8 The Keyboard ................9 Definitions................ - Page 6 Table of Contents How to view Test Results ............34 Appliance Number............34 Site Name..............34 Location Name .............. 35 User Name ..............35 Test Status ..............36 Storage Status .............. 36 Date From ..............36 Date To................36 Search ................37 Search Result..............
- Page 7 Table of Contents To print barcode testcodes ........... 53 Edit Test Settings ............54 Edit Site List ..............60 Edit Location List............61 Change Date / Time ............62 Edit Phone Book List............. 62 Change Password............66 Set Brightness............... 66 Factory Settings ............
- Page 8 Table of Contents User Maintenance ..............80 CHAPTER 6 ACCESSORIES........81 Standard Accessories ............. 81 Optional Accessories............... 82 CHAPTER 7 SPECIFICATIONS........83 Earth Bond Test ..............83 Earth Screen Test ..............83 Insulation Test ................. 84 Substitute Leakage Test............84 Flash Test................
- Page 9 Table of Contents Leakage Test................91 Touch Leakage Test..............91 Load Test................. 92 RCD Test................. 92 APPENDIX B REFERENCE INFORMATION....93 Factory-set Test Sequences ........... 93 Testcode Tables..............95...
-
Page 11: Disposal Of Old Product
Disposal of Old Product Disposal of Old Product This product has been designed and manufactured with high quality materials and components that can be recycled and reused. When the crossed out wheelie bin symbol is attached to a product it means the product is covered by the European Directive 2002/96/EC. -
Page 12: Declaration Of Conformity
Declaration of Conformity for the Seaward Supernova Elite Portable Appliance Tester Manufactured by: Seaward Electronic Ltd, Bracken Hill, South West Industrial Estate Peterlee, County Durham, SR8 2SW, England Statement of Conformity Based on test results using appropriate standards, the product is in... -
Page 13: Before Starting
Seaward Electronic reserve the right to update the software in instruments returned to themselves for repair or otherwise, without notifying the customer previously. -
Page 14: Safety
Safety Safety Note Please read the following Safety Instructions before use ! Safety Precautions The manual contains specific warning and caution statements where they apply. A Warning will identify the conditions and actions that pose hazard(s) to the user. A caution will identify the conditions and actions that may damage the Tester. - Page 15 It is essential that this manual is read fully before proceeding with any tests. Should the Tester behave abnormally do not continue with the testing. Disconnect immediately and contact Seaward Electronic for servicing (see Chapter 5 - Maintaining the Tester).
-
Page 16: Chapter 1 Introducing The Tester
Introduction Chapter 1 Introducing the Tester Introduction The Seaward Supernova Elite Portable Appliance Tester is a powerful tool to assist in the analysis of the safety of portable electrical and electronic equipment. A range of tests are provided, with innovative features to aid difficult test situations, which allow testing of a wide variety of equipment. -
Page 17: Your Portable Appliance Tester
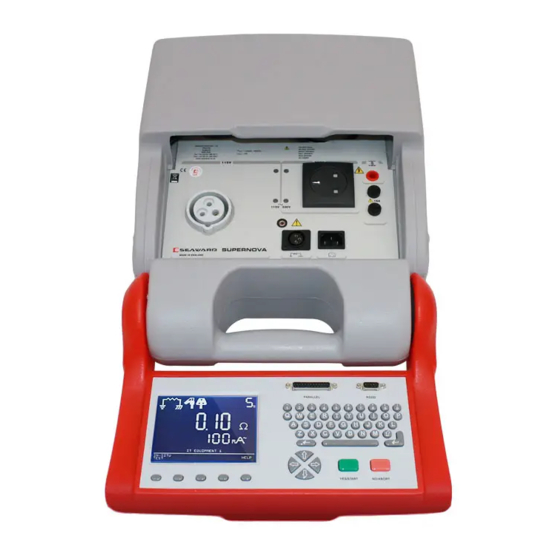
Your Portable Appliance Tester Your Portable Appliance Tester Your Portable Appliance Tester Item Number Part Supernova Elite Tester Earth bond lead 115V Adapter (UK only) Flash probe Instruction manual Evaluation disc Computer download lead Dual serial port adaptor... -
Page 18: The Top Panel
The Top Panel Item Number Part 110V/115V socket 230V socket Class 2 Flash Probe connector Remote Probe sense socket Earth Bond lead connector IEC Lead connector Fuses Indicators for selected sockets and mains on. -
Page 19: The Keyboard
The Keyboard The Keyboard The Keyboard Item Number Part Alpha-numeric Keyboard Cursor keys Green / Red keys Fast keys RS232 port Parallel port The user is provided with a 320 x 240 1/4 VGA Graphical Liquid Crystal Display (LCD). The keyboard consists of an alpha-numeric keyboard, together with specific function keys. - Page 20 The Supernova Elite also has the ability to use non-standard characters, which can be displayed by pressing the ‘Symbols’ key during text entry. Simply use the cursor keys to highlight the required character and press the Green button. You can also use numeric keys 1-9 to move you to extreme points of the symbol matrix.
-
Page 21: Definitions
The keys with symbols to the left of the keyboard. These are used to select menu options displayed on the screen. Tester - The Seaward Supernova Elite Portable Appliance Tester Un-powered Tests - The EUT is the subject of electrical tests using stimuli generated within the Tester. -
Page 22: Quick Reference
Quick Reference Quick Reference Editing the date in all modes On delivery of the Supernova Elite it is necessary to ensure that the correct date and time are stored. Once stored the date/time is retained in memory and does not need to be entered again. To edit the date: from the MAIN MENU select SETUP, select, CHANGE DATE/TIME, use the cursor keys to highlight the digit to be changed. - Page 23 Quick Reference Quick Reference Storing System Data System Data consists of everything changed from within the SETUP MENU. To store the System Data return to the MAIN MENU from the SETUP MENU. The unit will then display the message STORING SYSTEM DATA.
-
Page 24: Chapter 2 Connecting The Tester
Quick Reference Quick Reference Chapter 2 Connecting the Tester The Tester can be powered by either a 110V or 230V supply. The supply must include an earth connection via a 3 pin mains plug. When switched on, the Tester will carry out a short self-test procedure (approximately 2 seconds). -
Page 25: Chapter 3 Using The Tester
Introduction Introduction Chapter 3 Using the Tester Introduction Once the start-up procedure of the Tester has been completed, the following screen will appear: - -------MAIN MENU------- NEW TEST VIEW TEST RESULTS DOWNLOAD RESULTS SETUP MEMORY OPTIONS CHANGE USER REMOTE MODE ACCESSORIES USER : John Thursday 4 March 2001 09:03... -
Page 26: Fast Key Menus
Fast Key Menus Fast Key Menus Fast Key Menus To facilitate a fast access to commonly used options on the menus, use the ‘fast’ keys on the keyboard. These are located below the display. These correspond to the key name on the bottom of the screen. -
Page 27: How To Perform Automatic Tests
If you need to change the current Site use the cursor keys to highlight SITE and press Enter to change the Site Name. ------SITE LIST------ SEAWARD SITE 2 SITE 3 Use the cursor keys to highlight a site name and press enter to select... -
Page 28: Re -Test Period
How to perform Automatic Tests How to perform Automatic Tests If you need to change the current Location use the cursor keys to highlight LOCATION and press Enter to change the Location Name ---LOCATION LIST-- WORKSHOP LOCATION 2 LOCATION 3 Use the cursor keys to highlight a location name and press enter to select the desired option. -
Page 29: Test Settings
How to perform Automatic Tests How to perform Automatic Tests Note for PATGuard Plus Users Re-test periods are downloaded with test results and are compared with re-test periods of existing Assets on PATGuard Plus or used as the re-test period for new Assets. This is to ensure that re-test periods are ‘synchronized’... -
Page 30: Default Sequence
How to perform Automatic Tests How to perform Automatic Tests Default Sequence When you first enter this menu all of the previous values are displayed and one of the field descriptions is highlighted. ---------------DEFAULT SEQUENCE EDITOR----------------- OUTPUT LIMIT DUR NUM SOCKET 230V VISUAL... - Page 31 This is an Earth Bond Test where the EUT is not plugged into the Tester power socket but remains powered up from its normal power socket. For this test to be correctly carried out, the Supernova Elite is required to be powered from an adjacent socket to the EUT’s power socket.
- Page 32 How to perform Automatic Tests How to perform Automatic Tests There are two stages to this test: 1. An Earth Bond Test to the socket earth. This is carried out by connecting the Earth Bond lead to the socket screw (which should be earthed) or an adjacent building earth to the EUT.
-
Page 33: Use Testcodes
How to perform Automatic Tests How to perform Automatic Tests Use Testcodes This option bypasses the need to edit a specific test sequence, allowing direct entry of a Testcode through the keyboard or a barcode scanner. ---------------ENTER TESTCODES------------------------- OUTPUT LIMIT DUR NUM SOCKET 230V... - Page 34 How to perform Automatic Tests How to perform Automatic Tests Visual Test If a visual test is included as part of the test sequence, the following screen will be displayed: - VISUAL RESULT INSPECTION COVER / CASE POWER CORD PLUG The first inspection (COVER / CASE) will be pre-selected on entering this screen.
- Page 35 This is an Earth Bond Test where the EUT is not plugged into the Tester power socket but remains powered up from its normal power socket. For this test to be correctly carried out, the Supernova Elite is required to be powered from an adjacent socket to the EUT’s power socket.
- Page 36 How to perform Automatic Tests How to perform Automatic Tests There are two stages to this test: 1. An Earth Bond Test to the socket earth. This is carried out by connecting the Earth Bond lead to the socket screw (which should be earthed) or an adjacent building earth to the EUT.
- Page 37 How to perform Automatic Tests How to perform Automatic Tests Add Comments When you have completed testing the EUT you can enter comments. The Test Results can be reviewed before entering any comments by selecting the REVIEW RESULTS Fast key. It is also possible to compare the new Test Results with any previous Test Results stored in memory for the same Appliance at the same Site.
-
Page 38: Options After Test
How to perform Automatic Tests How to perform Automatic Tests The inverse video descriptions are Comments Designators. These are used to remind the user what to enter into each comment line. They are defaulted to correspond with the requirements of the PATSLite software (supplied with the tester). -
Page 39: Main Menu
How to perform Automatic Tests How to perform Automatic Tests Review Test Results Display the results from the test in tabular form: - A fast key is available to VIEW COMMENTS. Use the Red button to return to the previous menu. Results Comparison Selecting this option will cause the tester to search memory for a previously stored test result for the same Appliance and Site. -
Page 40: Abort Actions
How to perform Automatic Tests Write Data to Brain Cell This option can only be used when combined with the Seaward Brain Cell Reader. Full details of this option can be found in the Instruction Manual which is supplied with every Brain Cell Reader. -
Page 41: How To Use The Meter Display
How to use the Meter Display How to use the Meter Display How to use the Meter Display The following screen is displayed prior to tests commencing in both Manual Mode and Automatic Mode:- Ref. Function Number Test Icon Connection Icon Test in Progress Icon Test Duration Counter Primary Display... - Page 42 How to use the Meter Display How to use the Meter Display Test Icon Indicates the test selected. Visual Earth Bond Insulation Substitute Leakage Flash Leakage & Load Touch Leakage Polarity Connection Icon Indicates connection required for external probes. Earth Bond Probe No Probe...
- Page 43 How to use the Meter Display How to use the Meter Display IEC Lead Test in Progress Icon Indicates test in progress with voltage warning. Low Voltage High Voltage Applying Power Test Duration Counter Indicates duration of test. This will count down, when the counter reaches zero if the Tester is still taking a measurement the counter will flash.
-
Page 44: How To View Test Results
Enter an Appliance number to search for specific results. If the ∗ Appliance number field is left blank then the character will be inserted, indicating a search for all appliances. Site Name -------SITE LIST------- OTHER... SEAWARD SITE 2 SITE 3... -
Page 45: Location Name
How to view Test Results How to view Test Results Use the cursor keys to highlight a Site name and press Enter to select the desired option. ∗ Select if you wish your search to include all of the sites. Select ‘Other’... -
Page 46: Test Status
How to view Test Results How to view Test Results Test Status When Test Status is highlighted use the Enter button to select the option required, every time you press the Enter button a different ∗ option will be displayed. This can be PASS, FAIL or which indicates both. -
Page 47: Search
How to view Test Results How to view Test Results This option allows the user to search for test results before the selected date. Use the cursor keys to highlight the digit to be changed. Use the cursor keys to change the value or enter the digits directly using the keypad. - Page 48 How to view Test Results How to view Test Results Appliance Test Results It is possible to view the results obtained for a certain appliance by highlighting the appliance number and pressing the Enter button. A fast key is available to VIEW COMMENTS. Use the Red button to return to the previous menu.
-
Page 49: Entering Manual Mode
How to view Test Results How to view Test Results How to perform Manual Tests Manual mode provides the user with direct access to the tests. In this mode individual tests can be selected and performed. Appliance number, site, location, user can still be assigned to appliances if it is required to store the result. - Page 50 Use the keyboard, compatible Barcode Reader or Brain Cell Reader to enter an Appliance Number. Note ------SELECT SITE------ SEAWARD SITE 2 SITE 3 See Chapter 4 for tips on using barcodes. If you need to change the current Site use the cursor keys to highlight SITE and press Enter to select another Site name.
-
Page 51: Re -Test Period
How to view Test Results How to view Test Results If you need to change the current Location use the cursor keys to highlight LOCATION and press Enter to change the Location name --SELECT LOCATION-- WORKSHOP LOC. 2 LOC. 3 Use the cursor keys to highlight a Location name and press Enter to select the desired option. -
Page 52: Performing A Manual Test
This is an Earth Bond Test where the EUT is not plugged into the Tester power socket but remains powered up from its normal power socket. For this test to be correctly carried out, the Supernova Elite is required to be powered from an adjacent socket to the EUT’s power socket. - Page 53 How to view Test Results How to view Test Results There are two stages to this test: 1. An Earth Bond Test to the socket earth. This is carried out by connecting the Earth Bond lead to the socket screw (which should be earthed) or an adjacent building earth to the EUT.
- Page 54 How to view Test Results How to view Test Results Note When the connection icon is flashing you cannot change any settings. The settings cannot be changed for a test if you have performed that test from within an appliance sequence. For example after selecting Create Appliance No you can only change the Earth Bond settings on the first Earth Bond test, all subsequent Earth Bond test will conform to the same...
- Page 55 How to view Test Results How to view Test Results Enter Comments/Save Results When you have completed testing the EUT, you can enter comments. Other Fast keys are available for use before entering Comments and storing results.
- Page 56 How to view Test Results How to view Test Results Review Results Display the results from the test in tabular form: - A fast key is available to VIEW COMMENTS. Use the Red button to return to the previous menu. Results Comparison Selecting this option will cause the tester to search memory for a previously stored test result for the same Appliance and Site.
-
Page 57: Destination
ROLL PRINTER Download the results to a compatible Roll Printer. Z-MODEM This option can only be used when combined with a Seaward MODEM (283A969). Full details of this option can be found in the manual, which is supplied with every MODEM. -
Page 58: Output Connection
How to view Test Results How to view Test Results TRANSFER PRINTER This option can only be used with the Seaward Test ‘N’ Tag System (308A910). Full details of this option can be found in the manual supplied with every Test ‘N’ Tag System. - Page 59 How to view Test Results How to view Test Results For downloading to a generic A4 printer the user has the option of sending data as a certificate, or a list, or as pass/fail labels. In the certificate format the user has the option to produce one certificate per page or to produce continuous printouts.
-
Page 60: Appliance Number
Site Name -------SITE LIST------- OTHER... SEAWARD SITE 2 SITE 3 Use the cursor keys to highlight a Site name and press Enter to ∗ select the desired option. Select if you wish your search to include all of the sites. -
Page 61: User Name
How to view Test Results How to view Test Results Note If the list contains more locations than the unit can display then use the cursor keys to scroll through the list. User Name ------USER LIST------ OTHER... JOHN USER 3 Use the cursor keys to highlight a User name and press Enter to ∗... -
Page 62: Date From
Date From --------------DATE FROM------------ 01/01/1900 00:00 This option allows the user to search for test results after the selected date. Use the cursor keys to highlight the digit to be changed. Use the (up or down) cursor keys to change the value or enter the digits directly using the keypad. -
Page 63: How To Print Barcode Labels And Testcodes
How to print Barcode Labels and Testcodes How to print Barcode Labels and Testcodes How to print Barcode Labels and Testcodes The Supernova Elite is capable of printing barcode labels in conjunction with a compatible thermal printer (see chapter 6). To Print Barcode Pass/Fail Labels To print barcode pass/fail labels it is necessary to carry out an actual test (see how to perform automatic tests). -
Page 64: Edit Test Settings
How to print Barcode Labels and Testcodes How to print Barcode Labels and Testcodes How to use Setup To set up the Tester, use the cursor keys to highlight the Setup option on the Main Menu and press Enter to display the following menu: - ------------------SETUP------------------ EDIT TEST SETTINGS EDIT USER LIST / OPTIONS... - Page 65 How to print Barcode Labels and Testcodes How to print Barcode Labels and Testcodes Test Settings Editor The TEST SETTINGS EDITOR allows the test sequence for the selected test to be examined and changed if required. ---------------------TEST SETTINGS EDITOR------------------- OUTPUT LIMIT SOCKET 230V...
- Page 66 How to print Barcode Labels and Testcodes How to print Barcode Labels and Testcodes -------------------INSULATION----------------- LIMIT 250V SKIP 500V 0.50MΩ 1.00MΩ 2.00MΩ 4.00MΩ 7.00MΩ 10.00MΩ 50.00MΩ When you first enter this menu all of the previous values and one of the Test Parameter columns are highlighted.
- Page 67 How to print Barcode Labels and Testcodes How to print Barcode Labels and Testcodes Store Settings Use the cursor keys to highlight the OK and press Enter or select the OK Fast key to save the settings and return to the previous menu. Pressing the Red Button will abort all of the changes made and return to the previous menu.
- Page 68 How to print Barcode Labels and Testcodes How to print Barcode Labels and Testcodes Edit User List / Options --------USER LIST-------- JOHN USER 3 Use the cursor keys to highlight a User name and press Enter to select the desired option: - ------------EDIT USER SETTINGS------------ NAME: JOHN USER LEVEL: ADVANCED...
- Page 69 How to print Barcode Labels and Testcodes How to print Barcode Labels and Testcodes User Level Use the cursor keys to highlight a USER LEVEL and press Enter to select the desired option. Novice User Selects the User level as a NOVICE user. This will cause Help screens to be displayed prior to every test.
-
Page 70: Edit Site List
How to print Barcode Labels and Testcodes How to print Barcode Labels and Testcodes Beep on Barcodes Use the cursor keys to highlight the option and press Enter to select the desired option. This option will cause a beep whenever a barcode has been received. -
Page 71: Edit Location List
How to print Barcode Labels and Testcodes How to print Barcode Labels and Testcodes Use the keyboard to edit the name of the Site and press Enter to save and return to the previous menu. Press the Red button to return to the previous menu without saving changes Edit Location List -----EDIT LOCATION LIST----... -
Page 72: Change Date / Time
Select the OK Fast key to store the settings or press the Red button to cancel any changes. Edit Phone Book List This option is used when combined with the Seaward MODEM (283A969). On selecting EDIT PHONE BOOK LIST the User is presented with a PHONE BOOK LIST. -
Page 73: System Configuration
How to print Barcode Labels and Testcodes How to print Barcode Labels and Testcodes System Configuration The SYSTEM CONFIGURATION settings cover the range of system settings available to the User. APPLIANCE ID This option allows the User to predetermine the Appliance Number. Options are: BLANK, REPEAT LAST, INCREMENT LAST. - Page 74 Supernova Elite is powered. AUTO CORRECTED - perform the power tests with the mains correct polarity even if the Supernova Elite is powered from a socket which has the mains polarity reversed. INPUT & REVERSED - this option will perform two power tests for every one selected, one with the correct mains polarity and one with the reverse mains polarity.
- Page 75 Default is OPTIONS. ROLL PRINTER This allows the user to define the roll printer to be used with the Supernova Elite. For barcode printing with the Seaward Thermal Printer (283A954) set to SEAWARD (283A954). DATE AND TIME This allows the user to password protect the date and time. An existing password must be setup before this option will become effective.
-
Page 76: Change Password
Press the Red button to abort any changes made. Factory Settings It is possible to reset the Supernova Elite to the settings which were configured from new. This option will first ask you if you are sure, select Yes to reset or No to abort. -
Page 77: View Memory Used
How to print Barcode Labels and Testcodes How to print Barcode Labels and Testcodes How to use the Memory To use the memory tests and functions, use the cursor keys to highlight the MEMORY OPTIONS on the Main Menu and press Enter to display the following menu:- --------MEMORY OPTIONS-------- VIEW MEMORY USED... -
Page 78: Delete Single Appliance
How to print Barcode Labels and Testcodes How to print Barcode Labels and Testcodes Once the PERFORM MEMORY TEST option is highlighted press the enter button. The memory test checks all of the appliance results against their checksums. If the test passes then no action is taken. If the test fails then the Memory checksum requires updating. -
Page 79: Clear Upload Memory
Locations and Test sequences of equipment previously tested and saved in a PC using Seaward PAT software. To upload data into the Supernova Elite, connect the serial port of the tester to an appropriate port on a PC using the PC download test lead supplied with the tester. -
Page 80: How To Change The User
How to change the User How to change the User From the main menu on the tester use the cursor softkeys to select REMOTE MODE. The tester displays the message ESTABLISHING COMMUNICATION. Using the PAT software user manual instructions detailing upload to the tester, configure the Upload dialogue box for Destination (tester and serial number) and COM port. -
Page 81: Help Provided To The User
How to change the User How to change the User How to use Help The Tester is provided with an on-line help function which can be called up when the test screens are displayed, by pressing the HELP Fast key. Each test will have three or four help pages depending on information content. -
Page 82: The Effect Of User Levels During Test Sequences
How to change the User How to change the User Note: This topic will cover one or two pages depending on the connection options available (Insulation can be Class 1 or Class 2). Each connection option will have a new page of information. -
Page 83: Chapter 4 Tips & Troubleshooting
Power-On Self tests: Power-On Self tests: Chapter 4 Tips & Troubleshooting Power-On Self tests: When the tester is powered on, a number of messages can possibly appear as the Tester performs safety tests on itself and the mains power supply. If a voltage greater than 30V is detected on the neutral input line or the earth is missing then the following message will be displayed. -
Page 84: Safety Tests During Operation
Tester connection is secure. If all the above is checked OK then the Supernova Elite may be faulty. Contact your Seaward Agent for repair. The unit then completes an internal check. If any faults are found... -
Page 85: Temperature Monitoring
Temperature monitoring Temperature monitoring If the low voltage test fails, then either of the following warnings will be displayed: - --------------------WARNING-------------------- APPLIANCE MAY BE SHORT CIRCUIT PRESS THE ENTER BUTTON IF SAFE PRESS THE RED BUTTON TO ABORT --------------------WARNING-------------------- FUSE MAY BE OPEN CIRCUIT OR PRESS THE ENTER BUTTON IF SAFE PRESS THE RED BUTTON TO ABORT These messages mean that the EUT is switched off or the fuse may... -
Page 86: Multiple Earth Connections
This has previously needed the additional earth connections to be isolated. The Supernova Elite tester is capable of testing earth connections in the presence of additional earth paths. This is done automatically by performing a point to point measurement of the earth connection, and measurement of the differential leakage current, rather than the earth lead current. -
Page 87: Downloading To Computer Software
Downloading to Computer Software The Supernova Elite can be setup to be compatible with various software packages. The APLNCE & CNMTS option can be found in SYSTEM CONFIGURATION in the SETUP menu this may need to be set for 10 DIGIT RESTRICTION for non Seaward software. - Page 88 Downloading to Computer Software Downloading to Computer Software Serial Port The serial port uses a standard 9-way D-type connector Description N.C. N.C. N.C. Baud Rate: 9600, 19200, 28800 (selectable) Start Bits: Data Bits Stop Bits: Parity: None Inter-character Delay: 20ms...
-
Page 89: Chapter 5 Maintaining The Tester
Cleaning the Tester Cleaning the Tester Chapter 5 Maintaining the Tester Cleaning the Tester The Tester case can be cleaned with a damp cloth, with if necessary, a small amount of mild detergent. Prevent excessive moisture around the socket panel or in the lead storage area. Do not allow liquid inside the Tester, or near the sockets panel. -
Page 90: User Maintenance
• Maintenance should only be performed by authorised personnel. • There are no user replaceable parts in the Tester. • The unit should be regularly calibrated (at least annually). • For repair or calibration return the instrument to Seaward at:- Seaward Electronic Limited. Bracken Hill... -
Page 91: Chapter 6 Accessories
Standard Accessories Standard Accessories Chapter 6 Accessories A series of standard and optional accessories are available for the Seaward Supernova Elite Tester. The standard accessories are supplied with the Tester. Standard Accessories Accessory Part Number Earth bond test lead 249A908... -
Page 92: Optional Accessories
Optional Accessories Optional Accessories Optional Accessories Accessory Part Number Calibration Checkbox 283A951 Barcode Scanner 194A922 Thermal Label Printer 283A954 Thermal Printer Labels 283A304 Appliance Number Labels (250) 194A307 Serial Printer Lead 283A955 Serial-PC Download Lead (9-9 way) 194A919 Serial-PC Download Lead (9-25way) 194A920 Pass Labels (500) 91B038... -
Page 93: Chapter 7 Specifications
Earth Bond Test Earth Bond Test Chapter 7 Specifications Earth Bond Test Test Voltage * .............6V nominal (no load) Test Current *..…...…...4A, 10A, 25A selectable (into s/c load) Range ................40mΩ - 19.99Ω Resolution................…..0.01Ω Accuracy..........+/- 5% of reading, +/- 2 digits Pass Levels............…....selectable Misc...........….4-wire measurement, floating earth Earth Screen Test... -
Page 94: Insulation Test
Insulation Test Insulation Test Insulation Test Test Voltage * ....500V d.c. or 250V d.c. nominal (0.5MΩ load) Short Circuit Current ..........2mA d.c. maximum Range................100kΩ - 100 MΩ Resolution............…..0.01 MΩ (<100 MΩ) Accuracy..... +/- 5% of reading, +/- 2 digits (100kΩ - 20MΩ) Pass Levels ……...…0.5MΩ, 1MΩ, 2MΩ, 4MΩ, 7MΩ, 10MΩ, 50MΩ... -
Page 95: Leakage
Leakage Leakage Leakage Range................0.1mA - 10.0mA Resolution................…...0.01mA Accuracy..........+/- 5% of reading, +/- 2 digits Pass Levels....….0.25mA, 0.5mA, 0.75mA, 1.5mA, 2.25mA, 2.5mA, 3.0mA, 3.5mA, 9.9mA Touch Leakage Range................0.1mA - 2.0mA Resolution.................…..0.01mA Accuracy..........+/- 10% of reading, +/- 2 digits Pass Levels..........….0.25mA, 0.5mA, 1.0mA Power Tests Socket..Selectable 115V BS4343, BS546 / 230V BS 1363 socket. -
Page 96: Rcd Test
RCD Test RCD Test RCD Test Test Current *…..……………………………………………..30mA Range………….…..……………………………..…………..0-500ms Resolution……..……………………………………………..1ms Accuracy…..……………………………………………..…..+/-3ms Pass Levels.......……………………..200ms, 300ms Mechanical Size............. 450mm x 410mm x 155mm Weight ................... 3.5kg Environmental Operating ..........0ºC to 40ºC (non condensing) Storage ..........-10ºC to 50ºC (non condensing) Maximum R.H ..................90% Supply Rating .......... -
Page 97: Appendix A Purpose Of Tests
Earth Bond Test Earth Bond Test Appendix A Purpose of Tests Earth Bond Test This test is to ensure that the connection between the earth pin in the mains plug of the appliance and the metal casing of the appliance is satisfactory and of sufficiently low resistance. -
Page 98: Insulation Test
Insulation Test Insulation Test Insulation Test Warning 500 V / 250V d.c. test voltage This test is used to verify that adequate insulation exists between the mains supply pins and earth. During the insulation test, a 500V DC voltage is applied between the earth pin and both the live and neutral pins of the appliance mains supply plug. -
Page 99: Flash Test
Flash Test Flash Test Flash Test Warning 1500V/3000V a.c. test voltage This test is used to determine that the insulation is of sufficient strength to prevent breakdown, particularly where high transient voltages are likely. This test can be omitted when testing equipment with component whose voltage withstand rating is insufficient to accommodate the test without damage. -
Page 100: Powered Tests
Powered Tests Powered Tests Powered Tests Warning Mains voltage applied to appliance The following powered tests differ from the previous tests in that they apply mains supply voltage to the appliance to perform their functions:- • Leakage Test • Touch Leakage Test •... -
Page 101: Leakage Test
Leakage Test Leakage Test Leakage Test Warning Mains voltage applied to appliance The Leakage Test shows the current being lost through Leakage as the difference in the currents flowing in the Live and the Neutral conductors. This difference is the total leakage away from the appliance, and is generally equivalent to the current flow through the earth lead of the appliance, and displays the result in milliamps (mA). -
Page 102: Load Test
RCD Test Warning Mains voltage applied to appliance Note: When performing RCD tests disconnect the Supernova Elite from any computers or printers. Failure to do may cause an in-line RCD powering the Supernova Elite to trip. The RCD Test supplies the lead under test connected to the 230V socket with the rated supply voltage. -
Page 103: Appendix B Reference Information
Factory-set Test Sequences Factory-set Test Sequences Appendix B Reference Information Factory-set Test Sequences Name Earth Insulation Leakage Touch Flash Bond Leakage 230V 0.1Ω 1.0MΩ 0.75mA SKIP SKIP HH/PORT 1 230V SKIP 2.0MΩ 0.25mA SKIP SKIP HH/PORT 2 0.1Ω 1.MΩ SKIP SKIP SKIP EQUIPMENT... - Page 104 Factory-set Test Sequences Factory-set Test Sequences HH/PORT 1 110V SKIP 2.0MΩ SKIP 0.25mA SKIP HH/PORT 2 110V SKIP 2.0MΩ SKIP 0.25mA SKIP HH/PORT 2 110V 0.1Ω 1.0MΩ 3.5mA SKIP SKIP MOV/STAT 1 110V 0.1Ω 1.0MΩ 3.5mA SKIP SKIP MOV/STAT 1 110V SKIP 2.0MΩ...
-
Page 105: Testcode Tables
Testcode Tables Testcode Tables Testcode Tables The test sequence code is split into two 10-digit testcodes, this Appendix describes how the two testcodes are broken down. First Testcode: Digit 1 Visual Voltage Inspection/Polarity No Visual Inspection 230V No Polarity Test Visual Inspection 230V No Polarity Test... - Page 106 Testcode Tables Testcode Tables Digit 2 Earth Bond Skip Earth Bond Earth Bond Fault Limit (mΩ) 1.5 mΩ 2.5 mΩ 3.5 mΩ 4.5 mΩ 5.5 mΩ 6.5 mΩ 7.5 mΩ 8.5 mΩ 9.5 mΩ...
- Page 107 Testcode Tables Testcode Tables Digit 3 Earth Bond Current Multiplier x100 x1000 x100 x1000 x100 x1000 100mA a.c. 100mA a.c. x100 100mA a.c. x1000 100mA a.c. Reserved Reserved Reserved Reserved Reserved Reserved Reserved Reserved Reserved Reserved Reserved Reserved Reserved Reserved Reserved Reserved...
- Page 108 Testcode Tables Testcode Tables Digit 4 Insulation Voltage Skip 0.5MΩ 250V d.c. 1.0MΩ 250V d.c. 2.0MΩ 250V d.c. 4.0MΩ 250V d.c. 7.0MΩ 250V d.c. 0.5MΩ 500V d.c. 1.0MΩ 500V d.c. 2.0MΩ 500V d.c. 4.0MΩ 500V d.c. 7.0MΩ 500V d.c. 250V d.c. 10.0MΩ...
- Page 109 Testcode Tables Testcode Tables Digit 6 Flash Skip 1.5mA 2.00mA 2.25mA Digit 7 Leakage Skip 0.25mA 0.50mA 0.75mA 1.50mA 2.25mA 2.50mA 3.00mA 3.50mA 9.90mA 1.00mA Digit 8 Touch Leakage Skip 0.25mA 0.50mA 1.00mA...
- Page 110 Testcode Tables Testcode Tables Digit 9 Earth Bond Test Duration 2s : add 0.0 to the earth bond limit 5s : add 0.0 to the earth bond limit 10s : add 0.0 to the earth bond limit 30s : add 0.0 to the earth bond limit 2s : add 0.1 to the earth bond limit 5s : add 0.1 to the earth bond limit 10s : add 0.1 to the earth bond limit...
- Page 111 Testcode Tables Testcode Tables Digit 10 Insulation Test Duration RCD Test Skip Skip Skip Skip 200ms 200ms 200ms 200ms 300ms 300ms 300ms 300ms Second Testcode Digit 1 Sub-Leakage Test Duration Digit 2 Flash Test Duration...
- Page 112 Testcode Tables Testcode Tables Digit 3 Leakage/Load Test Duration 120s 180s Unlimited Digit 4 Touch Leakage Test Duration 120s 180s Unlimited Digit 5 Number of Earth Bond Tests Unlimited...
- Page 113 Testcode Tables Testcode Tables Digit 6 Number of Insulation Tests Number of RCD Tests Unlimited Unlimited Unlimited...
- Page 114 Testcode Tables Testcode Tables Digit 7 Number of Substitute Leakage Tests Unlimited Digit 8 Number of Flash Tests Unlimited...
- Page 115 Testcode Tables Testcode Tables Digit 9 Number of Load/Leakage Tests Digit 10 Number of Touch Leakage Tests...
- Page 116 Testcode Tables Testcode Tables...
- Page 118 283A556 Rev 2...
Need help?
Do you have a question about the Supernova Elite and is the answer not in the manual?
Questions and answers