barfield DPS1000 User Instruction Manual
Rvsm pitot-static test set
Hide thumbs
Also See for DPS1000:
- User instruction manual (121 pages) ,
- User instruction manual (117 pages) ,
- User instruction manual (106 pages)
Table of Contents
Advertisement
To buy, sell, rent or trade-in this product please click on the link below:
http://www.avionteq.com/Barfield-DPS-1000-Digital-Pitot-Static-Test-Set.aspx
Corporate Headquarters
4101 Northwest 29th Street
Miami, Florida 33142
www.barfieldinc.com
Email:
gsesales@barfieldinc.com
Barfield Inc. Confidential and Proprietary Information.
This document and all the information contained herein is the sole property of Barfield Inc.
No intellectual property rights are granted by the delivery of this document or the disclosure of its content.
This entire document is proprietary information and shall not be reproduced or disclosed to a third party without
the express written consent of Barfield Inc.
This document and its content shall not be used for any purpose other than that for which it is supplied.
Copyright © 2015 Barfield Inc. All Rights Reserved.
www.avionteq.com
DPS1000
RVSM Pitot-Static Test Set
USER INSTRUCTION MANUAL
M/N DPS1000, P/N: 101-01175
Doc. P/N: 56-101-01175
____________________________________
BARFIELD, INC.
Revision C
March 18, 2015
Advertisement
Table of Contents

Related Manuals for barfield DPS1000


Summary of Contents for barfield DPS1000
- Page 1 Barfield Inc. Confidential and Proprietary Information. This document and all the information contained herein is the sole property of Barfield Inc. No intellectual property rights are granted by the delivery of this document or the disclosure of its content.
- Page 2 SAFETY Before us sing this inst trument the operator sho ould read an nd understan nd all of the related data This inclu udes the app plicable loca al safety proc cedures, this s publication n, and the ins structions fo or the accessor ries/options/...
- Page 3 CAUTIONS Inspect the aircraft Static Vents for dirt or debris before making any connections. CAUTION: Inspect the aircraft Pitot Probes for dirt or debris before making any connections. CAUTION: Do not connect this equipment to a contaminated aircraft pitot-static system. CAUTION: To prevent damage to this equipment, do not allow water or other contaminants to CAUTION:...
- Page 4 Please be sure to complete and return the enclosed OWNER WARRANTY REGISTRATION CARD to Barfield in order to validate the warranty and to ensure that you will receive updated information when published. You MUST have your name and address on file at Barfield as a registered user of this equipment, to be able to obtain the service covered by the warranty.
- Page 5 DESCRIPTION OF CHANGE May 28, 2014 Initial Release 260-0141 October 15, 2014 Update Barfield logo and warranty 260-01092 March 18, 2015 Completely Revised MAINTENANCE AND REPAIR INFORMATION The manufacturer of this equipment does not recommend the user to attempt any maintenance or repair.
-
Page 6: Table Of Contents
TABLE OF CONTENTS Safety Cautions Attn / Cont Rev / Maint Table of Contents List of Figures and Tables PAGE INTRODUCTION ......................... 1 1. PUBLICATION BREAKDOWN ..................1 2. INFORMATION PROVIDED WITH THE TEST SET ............1 3. RECERTIFICATION ......................2 CHAPTER 1: GENERAL ...................... - Page 7 4. CALIBRATION ........................ 55 Appendix A: Abbreviations & Glossary ................56 Appendix B: Operating Limits ....................58 Appendix C: DPS1000 Internal Pneumatic Diagram ............61 Appendix D: Menu Navigation ....................62 Appendix E: Tablet App Wi-Fi Connect Procedure .............. 63 ...
- Page 8 FIGURE 7 POWER SUPPLY CABLE ..................11 FIGURE 8 DO NOT OBSTRUCT VENTS .................. 11 FIGURE 9 HUMID AIR EXHAUST ..................... 12 FIGURE 10 DPS1000 PRESSURE CONNECTIONS ..............12 FIGURE 11 DPS1000 FRONT PANEL ..................13 FIGURE 12 INSTRUCTION MANUAL, P/N 56-101-01175 ............14 ...
- Page 9 LIST OF FIGURES (cont'd) FIGURE 50 LEAK TEST TIMER SCREEN ................39 FIGURE 51 LEAK RATE TIMER, UNIT SAFE AT GROUND ............ 40 FIGURE 52 ATP LEAK TEST ....................40 FIGURE 53 ATP LEAK TEST RESULTS .................. 41 FIGURE 54 UNIT SAFE AT GROUND ..................43 FIGURE 55 LEAK TEST RESULTS ..................
- Page 10 This page intentionally left blank. 56-101-01175 BLANK March 18, 2015 Page x...
-
Page 11: Introduction
BLICATION BREAKDO This user instruct tion manual establishes the standar rds of operat tion for the D DPS1000 Pit tot- Static c Test Set. Its pu urpose is to p provide suffi icient inform mation for the e personnel u... -
Page 12: Recertification
Contact Barfield for Maintenance and Calibration requirements. B. At the conclusion of the power up initialization the DPS1000 will display the date when it was “Last Calibrated” in the format of Day–Month-Year and will provide the user with the number of days remaining before its calibration due date with a statement of “Cal... -
Page 13: Figure 3 Limited 2 Year Warranty
BARFIELD product, and all costs of shipping the DPS1000/1811NG product to BARFIELD for inspection shall be borne solely by the Purchaser. In order to recover under this limited warranty, Purchaser must make claim to BARFIELD within 60 days of occurrence, and must present acceptable proof of original ownership (such as a purchase order, invoice, warranty card registration, or other documentation ... -
Page 14: Chapter 1: General
B. The DPS1000 Digital Pitot Static Test Set meets the demanding RVSM accuracy requirement of ± 0.003 inHg and compliance requirements of 91.171. 2. SPECIFICATIONS A. -
Page 15: Table 3 Aeronautical Specifications
55,000 Note (*4): This tolerance represents the stability over a 12 month period. If tighter tolerances are required, the calibration interval should be reduced or establish proof of stability. Pressure Units (DPS1000) RtQc Channel Rate of Change... -
Page 16: Table 5 Display Units
Note (*5): Regarding Qc Channel: Specification based on typical accuracy (0.05% FS). Maximum error is 0.10% FS Note (*6): This tolerance represents the stability over a 12 month period. If tighter tolerances are required, the calibration interval should be reduced or establish proof of accuracy/stability. -
Page 17: Instructions For Use
3. INSTRUCTIONS FOR USE A. With the Barfield DPS1000 Pitot and Static ports connected via the hoses (included) and mating aircraft adapters (not included) to their respective ports on the aircraft, the user is able to enter pressures or equivalent aeronautical values using the test set’s touch screen input display to drive the aircraft system to the required points of test. -
Page 18: Chapter 2: Ratings
1. SUPPLY VOLTAGES A. The Barfield DPS1000 Pitot Static Test Set may be powered from either 100 to 120 VAC @ 50 or 60 Hz, 400 VA, or from 200 to 240 VAC @ 50 or 60 Hz, 400 VA. -
Page 19: Chapter 3: Installation
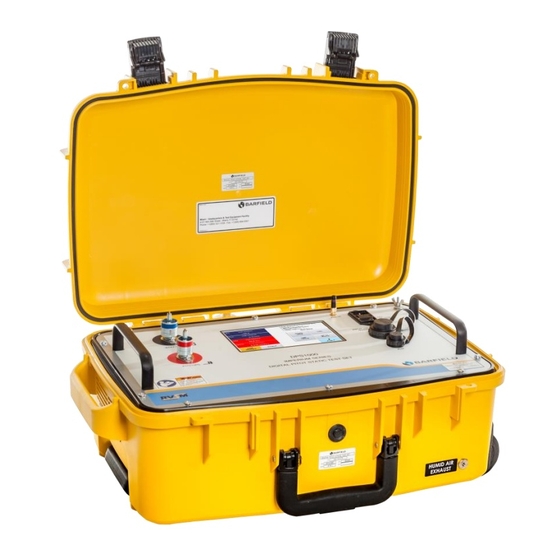
The user should take inventory of the package contents to insure the following items are there: (1) DPS1000 Pitot Static Test Set P/N 101-01175 (2) Hose kit P/N 115-00632 composed of: (a) 1 each Blue 25 ft Hose with quick disconnect and 1 tethered plug for STATIC (Ps) port connection, P/N 115-00630. -
Page 20: Grounding (Earthing)
B. The DPS1000 chassis may be Grounded to the aircraft or instrument under test using the Ground stud located in the upper right corner of the panel as depicted item 5 in Figure 11. -
Page 21: Electrical Connections
4. VENTILATION / DRAINAGE A. Ventilation The DPS1000 has exhaust vents on the right side of the unit which must not be blocked. Also there are intake vents on the left side for drawing air though the case which also must be kept free from obstructions. -
Page 22: Pneumatic Pressure Connections
Pitot and Stat tic Quick Dis sconnect Po orts - Pt (pitot) P P/N: B-QC4 -D-2PMK5F - Ps (static ) P/N: B-QC C4-D-2PMK2 0 DPS1000 PRESSURE E CONNECT TIONS Figure 10 56-101-0 01175 March 18 8, 2015 Pag ge 12... -
Page 23: Chapter 4: Operation
CHAPTER 4: OPERATION 1. OPERATING CONTROLS A. Front Panel Switches and Controls (Components shown in Figure 10). Figure 11 DPS1000 Front Panel (1) PITOT (Pt) PORT Connect to Aircraft Pitot system. This is also referred to as the Pt port and Total Pressure port. -
Page 24: Positioning
For 120 VAC operation use 1(ea) fuse: 4A For 220 VAC operation use 1(ea) fuse: 2A (8) Power ON/OFF switch Used to power On/Off Test Set operation (9) USB port Standard USB Port used for multiple purposes To Upgrade Test Set HUIM or PCM Firmware from flash drive. -
Page 25: Figure 13 Electrical Cable, P/N Ae9887-Nd
ure 13 Elec ctrical Cable, , P/N AE988 87-ND Figu gure 14 Ho ose Kit, P/N 115-00632 Antenna, P/ /N 126-0000 Figure 15 56-101-0 01175 March 18 8, 2015 Pag ge 15... -
Page 26: Figure 16 Carrying Bag, P/N 195-00021
Figure 16 Carrying Bag, P/N 195-00021 B. Items not included (5) Ruggedized shipping case Barfield P/N 194-00073 see drawing in Figure 6. (6) Nav-Aids Pitot Static Adapters – Contact Barfield with your aircraft requirements (7) Wi-Fi enabled tablet - either Android or IOS device. -
Page 27: Preparation
Pitot and Static hoses. Each test set is completely calibrated and tested before shipment. However to ensure the integrity of the tests, the DPS1000 should be leak checked before each use. To help automate this process, use the predefined ATP Test Set–only. -
Page 28: Operating Modes
6. OPERATING MODES A. The DPS1000 has two pneumatic control modes of operation, (1) the default mode: 2- channel (Ps & Pt) mode and (2) 1-channel: Pt-Only mode which the user can select under the Setup 1 menu. -
Page 29: Test Set Configuration Status Display
D. B Below are ex amples of th he 2-modes: 1) Default: A Aeronautical 2-Channel ( (Ps&Pt) ( Figure 18) 2) Aeronauti ical 1-Chann nel (Pt Only) Figure e 19) e 18 Default t 2-Channel (Dual Ps, Pt t) mode Figure re 19 Option nal 1-Chann... -
Page 30: User Interface Menu And Display
Note: The Co onfiguration S Status area is an active touch zone that will pos sition the me page to the 2 age and is eq quivalent to selecting M enu >, Setu p 1 from the main menu. Test Set C Configuration n Information n Displayed... -
Page 31: Figure 21 Display Setup Aeronautical Menu
21 Display y Setup Aero onautical Me Figure Note: Re garding the UI Menu str ructure, the m menu screen n above is c considered th p level “Root Menu”. Note: Thr roughout this s section wh hile explainin ng all the UI related func ctions the so oft-... -
Page 32: Figure 23 Display Setup: 4-Parameter
gure 23 Dis splay Setup: : 4-Paramete e 24 Display y Setup: 2-P Parameter fo ormats Figure C. U Units - displa ayed units Once the Dis play Setup h has been se elected, (Aero ronautical, P ressure unit ts or EPR, 4 arameter or 2-paramete er display for... -
Page 33: Figure 25 Display Units - For Aeronautical Mode
e 25 Display y Units – for r Aeronautica al Mode Figure 26 Display Units – for P Pressure Un its Mode Figure 2 D. L g – There ar re two types of leak tests s supported on the DPS S1000, the Leak Testing raditional lea... -
Page 34: Figure 28 Leak Rate Timer Results
user selec cts Leak Me easure mode e followed by y Leak Testi ng followed by Leak Ra Timer bei ng selected Main Men nu: Leak Tes sting → Leak k Rate Time Wait Time e is the dura ation of time that will allo ow the Ps &... -
Page 35: Figure 29 Select Atp Leak Test Profile
Select ATP Leak Test P Profile Figure 29 The ATP Leak Test p provides the following pro ofile options (a) ALR “ “Auto Leak R Recover” can n be “(X)” se elected/dese elected (b) Ambi ent Comp c can be “(X)” select/desel lected Ambie... -
Page 36: Figure 30 Atp Leak Test - Parameter Profile Screen
0 ATP Leak k Test - Para ameter Profil le Screen Figure 30 ure 31 ATP P Leak Test R Results Scre Figu E. G nd: This func ction will tak ke the Test S Set back to G Ground (amb bient barome etric Go To Groun... -
Page 37: Figure 32 Go To Ground Confirm Screen
Go to Grou und Confirm Screen Figure 32 The user can select “Go T To Ground” from the Ma ain menu, w hile in either r Leak Meas sure or Control mode e. At the con nclusion of G Go To Groun d, the Test S Set will perfo orm an Auto... -
Page 38: Figure 34 Conclusion Of Go To Ground
Conclusion n of Go To G Ground Figure 34 After a Go To o Ground fun nction is perf formed, Tes st Set will rem main vented to ambient. F. S Setup 1 – Th he following i is available u under this se et of menu(s Setup 1... -
Page 39: Figure 36 Altitude Correction Screen
Note: If th he DPS1000 0 test set wa as physically y higher than n the instrum ment or aircra en the altitud e correction n would be e entered as a (“-“) negativ ve value. Figure 36 A Altitude Corr... -
Page 40: Figure 38 Altitude Correction Keypad
Pt port to th he Target pr ressure spec cified by the u user. Note: The e DPS1000 a always powe ers up into th he default: 2 2-Channel (P Ps & Pt) mod 56-101-0 01175... -
Page 41: Figure 40 Setup 1 Control Mode(S)
In ca ase of requir red technica al support, Barfield p personnel ma ay request th hat this file b be forwarded d to them for r troublesho oting purposes G. -
Page 42: Figure 42 Setup 2 - Edit Custom Limits
(b) Edit C Custom Limit Allows s user to edi it custom lim mit profile(s). Note: The user ca annot edit th he two pre-d efined (1) de efault and (2 2) max limit profiles. Setup 2 – E Edit Custom Limits Figure 42 (c) Delete... -
Page 43: Figure 44 Backlight Adjustment
H. S Setup 3 – Th his is for OEM M only, OEM M or Service PIN require Custom PIN required for r each Test S Set) Change Use r PIN Allows us ser to change e the curren t user PIN Note: Use er must know w the curren... -
Page 44: Test Set Operation
9. TEST SET OPERATION A. Preliminary Setup (1) Ensure that the DPS1000 Powered ON//OFF switch (8) is in the OFF position prior to connecting the AC power cable. (2) As a standard practice and under normal circumstances it is recommended that the DPS1000 does not have hoses connected prior to initialization. -
Page 45: Figure 46 Initialization Display
Leak k Measure a and Control . The defaul mode of oper ration for the e DPS1000 i s Leak Mea sure mode. At the conc lusion of pow ON initializati on the Test Set will be p... - Page 46 When the Display Setup is configured for Aeronautical mode, the DPS1000 has some additional features and safe guards such as ALR and Leak Test ATP. While in Leak Measure mode, the ALR “Auto Leak Recover” (if enabled) monitors the leak rate of ROC and RtCAS. If the rates exceed the values defined under the Limits...
-
Page 47: Test Set Leak Test
Menu(s Figure 4 4) There are e two metho ds available for performi ing Leak Tes sting using t the DPS1000 (a) Metho od-(1) Leak R the tradition nal method u uses the Lea k Rate Time Rate Timer:... -
Page 48: Figure 48 Selecting Atp Leak Test Profile
ure 48 Sele ecting ATP L Leak Test Pr rofile Figu 49 Leak Te est Profile - P Parameters Screen Figure 5) Select fro m the UI Me nu: (1) Leak k Testing, (2) ATP Leak T Test Profiles, (3) Test Set t-only 6) The ATP Leak Test P... - Page 49 D. S STATIC and PITOT Test Set Leak Te est – (Test S Set and hose es only) Confirm hose es connected d to both Ps and Pt ports s on DPS10 000. Confirm the o other end of each hose i s sealed wit th an AN4 pl lug.
- Page 50 24) Select Menu, M Menu, Men 25) You are now position ned back at the root me 26) Select G Go To Ground d, followed b by “Yes” to c confirm Go T To Ground. 27) Wait for Test Set to r reach Groun nd (ambient...
- Page 51 31) From the e main menu u, select Lea ak Testing, L Leak Test Pr rofiles. 32) Now you u can either s select an ex xisting profile e by selectin g “Select Le eak Test Pro ofile(s)” or “Create L Leak Test Pr rofiles”(see A ATP Leak Te...
-
Page 52: Aircraft Testing
(3) Set the aircraft altimeter baro setting to 29.92 inHg (1013.25 mbar). (4) View and select the appropriate Limits on the DPS1000 for the Aircraft / Instruments to be tested. (5) If necessary, (from the Main menu) select Display Setup to configure display for the Aeronautical display parameters required. - Page 53 Note: Th he DPS1000 is capable o of conductin ng a combine ed Pitot and Static test ( escribed abo ove) or indivi idual system m leak tests.
- Page 54 (2) Verify the DPS1000 including hoses and the Aircraft Pitot System Leak Test and Static System Leak Tests have been completed. Note: It is always recommended that prior to performing any testing the DPS1000 test set and hoses should be known to be leak tight. The reality is every Test...
- Page 55 AMM or CM MM dictates s the specific c test process, seq uences and values. 1) Verify the e DPS1000 is s powered O ON and that Initialization n has comple eted and tha at the system is safe at Gro...
- Page 56 If required, select Go To Ground and wait for the Test Set to indicate “Unit Safe at Ground”. (2) Connect the hoses, both Static (Ps) and Pitot (Pt) to the DPS1000 ports. Note: The Pitot (Pt) hose is not required to perform a Static system test however it is highly recommended as a safety precautions to protect the ASI from possible does.
- Page 57 (a) If required, select Go To Ground and wait for the Test Set to indicate “Unit Safe at Ground” (2) Connect the Pitot (Pt) port of the DPS1000 to the aircraft or ASI instrument being tested. Note: The Static (Ps) hose is not required to perform a Pitot system test if the test set is configured for “1-Channel Pt Only”...
- Page 58 (5) Connect the hoses to the aircraft Pitot ports. Note: While testing the Pitot (Pt) system with test set configured as 1-Channel (Pt only) mode, the Static (Ps) channel of the test set will remain vented to ambient, this is the same point of reference the aircraft’s Static port is referencing while drive the Pitot system with the test set.
- Page 59 AMM or CMM dictates the specific test process, sequences and values. (1) Verify the DPS1000 is powered ON and that Initialization has completed and that the system is safe at Ground and that the display indicates “Vented”.
- Page 60 CAS becomes the controlling parameter for the PITOT (Pt) channel. Similarly, if the user enters a MACH Target value then MACH is the controlling parameter. With a Target value entered for MACH “i.e. Constant MACH”, once the DPS1000 reaches the Target MACH value, the PITOT (Pt) channel controller will continue to maintain the MACH value requested while the STATIC (Ps) Target value is changed by the user entering a different ALT Target.
-
Page 61: Engine Pressure Ratio (Epr) Test
B. Test (1) The EPR function of the DPS1000 allows the display of the EPR Ratio PT7/PT2 and also pressures of PT2 and PT7 individually. The units of measure available for the PT2 and PT7 pressure display are: inHg, mb, or Altitude (ft or m) and Airspeed (kts or km/h). -
Page 62: Shutdown Procedure
Engine Pressure R Ratio AIRSPE EED (knots) ALTITU UDE (feet) Pt7 ( (Hi) Port Pt2 (L Lo) Port (Engine P Pressure Ra atio) 5,870 5,000 ,650 5,000 4,690 5,870 5,000 ,210 0,000 5,000 ,000 0,000 5,000 e 6 Engine P Pressure Ra atio Test Tab Table... - Page 63 7 Unit Safe at Ground Figure 57 N: Do not re emove STAT TIC (Ps) or P PITOT (Pt) ho ose or Nav-A Aids adapters CAUTION before T est Set displ ays “Unit Sa afe at Ground d”. 3) Switch Po ower OFF.
-
Page 64: Chapter 4: Receiving, Shipping, And Storage
CHAPTER 4: RECEIVING, SHIPPING, AND STORAGE 1. RECEIVING No special unpacking procedures are necessary. It is recommended that the factory- shipping container and packing materials be retained should it become necessary, for any reason, to re-ship the Test Set, such as for the O.E.M. recertification. It is also recommended that the Test Set undergo a leak check upon receipt and its carrying case should be carefully inspected for damage. -
Page 65: Chapter 5: Maintenance
B. Inspect the ports, hoses and aircraft adapters for the presence of moisture or any type of foreign matter. With the DPS1000 disconnected from the hose and adapter assemblies power the unit on and observe the initialization routines to insure no issues are reported. -
Page 66: Appendix A: Abbreviations & Glossary
Appendix A: Abbreviations & Glossary Absolute Aircraft Maintenance Manual Altitude (ft or m). Airspeed Indicator Calibrated airspeed (kts or km/h) Component Maintenance Manual Engine pressure ratio Degrees Fahrenheit Degrees Celsius Fig. Figure Foot Gauge Hour Hecto meter inHg inches of Mercury HUIM Host User Interface module Hertz... - Page 67 Static Pressure Pounds per square inch Pitot Pressure PsRt Ps Rate, rate of Ps pressure change PtRt Pt rate, rate of Pt pressure change Differential pressure (Qc = Pt - Ps) Local atmospheric pressure Barometric pressure at sea level Rate of climb in units of (ft/min or m/min) Rate RtCAS Rate of change of CAS in units of (kts/min) or (km/h/min)
-
Page 68: Appendix B: Operating Limits
Appendix B: Operating Limits The DPS1000 is supplied with 2 pre-defined sets of operating limits, these we refer to as the default limits profile and max limits profile. The unit has limits files for each of the 3-modes of operation, Aeronautical, Pressure units and EPR. There will be a default limits profile for each of the 3-modes, these values are stored in a R/O “read only”... -
Page 69: Table 9 Aeronautical Limits Profile - (Default)
Operating Limits (con’t) Pressure Limits Profile – (default) Parameters Limits Comments Ps Min 2.693 inHg Ps Minimum Pressure Ps Max 32.000 inHg Ps Maximum Pressure Qc Min 0.000 inHg Qc Minimum Pressure Qc Max 30.000 inHg Qc Maximum Pressure Pt Min 2.693 inHg Pt Minimum Pressure Pt Max... -
Page 70: Table 11 Epr Limits Profile - (Default)
Operating Limits (con’t) Note: EPR = Pt / Ps (where Ps = Inlet pressure and Pt = Outlet pressure) EPR Limits Profile – (default) Parameters Limits Comments Ps Min 2.693 inHg Ps Minimum Pressure Ps Max 32.000 inHg Ps Maximum Pressure Pt Min 2.693 inHg Pt Minimum Pressure... -
Page 71: Appendix C: Dps1000 Internal Pneumatic Diagram
Appendix C: DPS1000 Internal Pneumatic Diagram 56-101-01175 March 18, 2015 Page 61... -
Page 72: Appendix D: Menu Navigation
Appendix D: Menu Navigation 56-101-01175 March 18, 2015 Page 62... -
Page 73: Appendix E: Tablet App Wi-Fi Connect Procedure
A. Select Settings B. Set Wi-Fi to “1” ON C. View Wi-Fi Networks to identify the Test Set you are trying to connect to. The DPS1000 will be identified as “DPS1000_00xxx” where “xxx” is the S/N of the Test Set. - Page 74 A. N Now you can launch the Barfield tabl et Applicatio on, once it lo oads it will in ndicate “D DPS1000 Re emote Term inal” (Versio on: x.x) B. O On the tablet App, select “Connect” C. It will indicate e “Connectin...
-
Page 75: Appendix F: Field Firmware Update Procedure
Appendix F: Field Firmware Update Procedure The following Field Firmware Update Procedure (Document 42-101-01175_01178) details the process. 56-101-01175 March 18, 2015 Page 65... - Page 76 Email: gsesales@barfieldinc.com Barfield Inc. Confidential and Proprietary Information. This document and all the information contained herein is the sole property of Barfield Inc. No intellectual property rights are granted by the delivery of this document or the disclosure of its content.
- Page 77 00 & 1811NG) ): dpsx file fo rmat PCM ( Pneumatic co ontroller, sup ports both DP PS1000 & 181 11NG): contro oller.hex file format t You will b be able to dow wnload the so oftware from the Barfield w website to a c computer, un nzip and then n copy the unzip ped downloa ded files to y our media sto orage device. . If you are unable to do o this, Barfield d can send yo ou a USB with h the updated d files, please contact the s sales ...
- Page 78 42‐101‐01 1175_01178 Page 3 of 8 ...
- Page 79 SECTION 3 3 ‐ UPDATING G THE HUIM USING THE U USB PORT 1. Tu urn on the po ower of the u nit that need s the softwar re update. 2. A llow the initia alization to co omplete. Onc ce finished, th he unit will di splay the ma in menu (disp play menu 1). 3. P ress Menu ke ey to go to dis splay menu 2 . 4. In n menu 2, sele ect Setup2. 5. Th he unit will p rompt for the e User’s Pin ...
- Page 80 7. U nit will displa ay the Setup 2 2 Menu selec tion. 8. P ress Menu ‐> > key. 9. U nit will displa ay the softwa re download selection. 10. P ress Flash – H HUIM from U SB. 11. A “pop up” me essage will pr ompt you to insert the US SB. 42‐101‐01 1175_01178 ...
- Page 81 dpsx UIM User Inte erface, suppo orts both DPS 1000 & 1811 NG) contro oller.hex (PC CM – pneuma atic controller r, supports bo oth DPS1000 & 1811NG) 13. P lug the USB f lash drive in t the front face e USB of the D DPS1000 or 1 811NG and w wait 10 secon ds efore pressin g “OK” butto on. 14. Th he unit will d isplay a progr ression bar du uring the inst tallation (this ...
- Page 82 16. A llow the initia alization to co omplete. otes: During g the Test set initialization, , after the HU UIM update, i it is not unusu ual to get ERR ROR messa ges in “Check king Vacuum pump” and “ “Checking Pre essure pump” ”, this is expec cted and th hey will disapp pear once the e PCM firmwa are is update d. Cance l the Go‐to‐G round seque nce. 17. A fter the HUIM M firmware In nstallation an d the initializ ation have be een complete...
- Page 83 19. A “pop up” me essage will pr ompt you to insert the US SB. Plug the U USB flash drive e in the front face SB of the DPS S1000 or 181 1NG and wait t 10 seconds before press ing “OK” butt ton. 20. Th he unit will d isplay a progr ression bar du uring the inst tallation. 21. O Once installati on is complet te, the unit w will prompt yo ou, “Complete ed, Select Ok – System wil l eboot….” Aft er selecting “...
Need help?
Do you have a question about the DPS1000 and is the answer not in the manual?
Questions and answers