Table of Contents
Advertisement
Advertisement
Table of Contents

Summary of Contents for Cuddeback IR
- Page 2 Th is device complies with Part 15 of the FCC Rules. Operation is subject to the following two conditions: (1) this device may not cause harmful interference, and (2) this device must accept any interference received, including interference that may cause undesired operation. Please note that changes or modifi cations not expressly approved by the party responsible for compliance could void the user’s authority to operate the equipment.
- Page 3 Got a great picture? A big deer or a special scene? A funny situation or beautiful colors? We want to see them and give you a chance to win a free Cuddeback. Visit http://cuddeback.com/contest to enter your best pictures into our photo contest.
- Page 4 ✓ Dispose of batteries properly as recommended by the manufacturer. SD Card Notice Th is Cuddeback camera is compatible with secure digital (SD) cards sizes 2GB to 32GB. Do not use SDXC cards. Micro SD cards will function with the proper adapter (usually included with the micro SD card).
- Page 5 Internal Memory You can use this camera without an SD card. Up to 120MB of internal memory is available for image storage. Note: Videos and time-lapse images cannot be stored to internal memory. Images stored in internal memory must be copied to an SD card for retrieval. Th is feature is handy if you check a camera without a spare SD card.
-
Page 6: What You Need
® 3. When Cuddeback IR is running it displays an electronic “worm” on the LCD. This worm scrolls around the LCD to indicate that you must not remove the SD card, must not turn the rotary knob, and must not press any button. - Page 7 Zone Control Cuddeback’s patent-pending Zone Control allows you to select wide-angle view or centered-subject view. Position the shutter as appropriate for your needs. Be aware that wide-view mode can generate more blank images when deer move to the edges of the view.
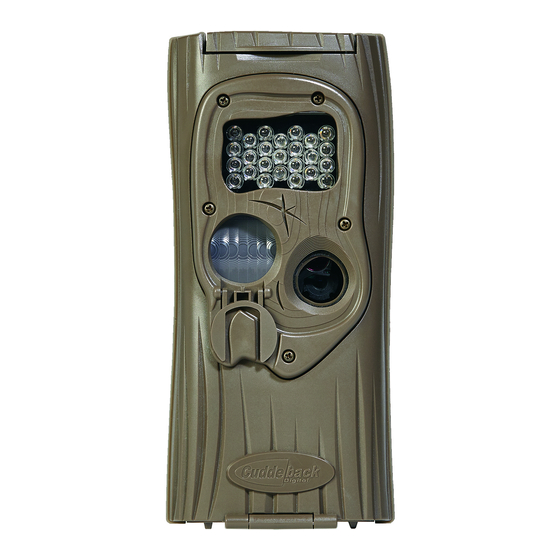
- Page 8 Step 1: Getting Familiar With the ® Cuddeback IR Camera ® Take a moment to familiarize yourself with Cuddeback camera parts. Front Back Infrared LEDs User Interface Test Door Motion- Heat Sensor Camera Lens Battery Door Back SD Card Socket...
- Page 9 Install 8 AA alkaline or 8 AA lithium batteries. Lithium batteries will provide longer battery life and better night IR images. Make sure to observe correct polarity. Close the door and secure latch. 3. A series of numbers display. These are the ®...
- Page 10 ® Cuddeback Step 4: Attaching to a Tree ® 1. We recommend you fi rst try your Cuddeback camera at home. 2. For optimum detection of deer and similar-size ® animals, we recommend mounting Cuddeback about 30 to 36 inches off the ground, roughly waist high.
- Page 11 IR to make sure it’s pointed where you expect the animals to be. Aim ® Cuddeback IR level with the ground to maximize detection range and performance. You can use the ® Cuddeback IR test feature (Step 5) to help you determine the detection area.
- Page 12 Video Off setting or the Video On setting as desired. ® The settings represent the amount of time Cuddeback IR will wait before it is armed and ready to take another image. This delay time prevents multiple images of the same animal. Here is our recommendation for the various Armed settings: a.
- Page 13 6. Year ® 7. Test indicates Cuddeback IR is in Test mode and will illuminate the red Test LED when activity is sensed. 8. Pressing A or B again will arm the camera and the current delay setting will be displayed.
- Page 14 3. Pic – Lets you take a test picture. Press B to take a picture. Press A to advance to the next menu item. ® 4. LEd – This menu allows you to test Cuddeback LEDs and measure the battery strength. Press B to ®...
- Page 15 6. LOAd – Lets you to install new fi rmware. We may ® update the Cuddeback IR fi rmware to improve its performance. If a fi rmware update is required you will need to download a fi rmware fi le from our website.
- Page 16 ® No Card Mode – Using Cuddeback IR Without an SD Card ® When Cuddeback IR is used without an SD card, images ® are stored in Cuddeback IR internal image memory. ® Cuddeback IR features an internal memory of about 120 MB.
- Page 17 The battery life you get may be more or less than these numbers, depending on the circumstances. ® Cuddeback IR – 5,000 images or 6 months, depending on usage. Note that using video mode greatly reduces battery life. ®...
- Page 18 1. You can view the images with an optional viewer or a point-and-shoot camera that is able to read ® Cuddeback IR’s images (Note: Not all SD-based ® cameras can view Cuddeback IR’s images. Please test any camera before purchasing).
- Page 19 Additional Topics Mounting Genius mount is more versatile than the traditional strapping of the camera to a tree. Using a strap or screws, the Genius mount easily and quickly attaches to and removes from a tree without altering the camera aim and alignment.
- Page 20 Strap Use and Assembly For secure strapping, follow the steps below: Step 1 – Route strap through bracket. Step 2 – Insert strap through buckle as shown. Note the hook is facing out. Step 3 – Loop strap and insert through buckle as shown.
- Page 21 Long Range IR 50 feet Recommended Black Flash® 25 feet Camera mounted on tree IR camera mounted on tree Black Flash® camera mounted on tree Position your camera about 3 feet off the ground Incorrect Incorrect Correct In a...
- Page 22 Detection Range Th e motion sensor detects the temperature diff erence between the air and the animal. Th e range at which an animal will be detected varies with animal size, movement speed, air temperature and the heat of the animal. 1.
- Page 23 Using the Camera in Cold Conditions Be aware of these issues if you use your camera in extreme cold (below 0˚C or 32˚F). 1. Battery life may be reduced by 50% or more. 2. Night illumination range may be reduced because cold batteries typically cannot deliver the same amount of power to the LEDs as warm batteries.
- Page 24 ® Setting Cuddeback IR Parameters ® Some Cuddeback IR model’s features can be changed ® by the user. Cuddeback IR can also be programmed to become a time-lapse camera. (Note: In the text that follows, the underlined items are default settings. For most users these settings are not required, and they can leave PO set to 0.)
- Page 25 P4:2 = operate only during the day P4:3 = operate during day & night Step 6: Press the A key to display P5 (quality) On certain Cuddeback cameras, P5 selects image size. If P5 is not displayed, your camera does not require this feature.
- Page 26 Step 8: Press the A key to display P7 (Zone Control) ® P7 controls the Cuddeback IR Zone Control setting. Select available settings by pressing the B key: P7:0 = when Zone Control shutter is up (centered) P7:1 = when Zone Control shutter is down (wide angle)
- Page 27 Settings are 1 to 5 images per minute (60, 30, 20, 15 and 12 seconds). • Guard Duty takes images only during daylight. ® • At night, Cuddeback will revert to motion sensing mode and take pictures of animals as they are detected. The camera delay will default to 15 seconds.
- Page 28 We strongly recommend you visit our website prior to camera deployment to check for fi rmware updates. Updating your Cuddeback camera fi rmware is a 2-step process: 1) retrieving fi rmware from the Cuddeback website, and 2) loading the fi rmware onto your camera.
- Page 29 2. Loading fi rmware onto your Cuddeback camera: a. Copy the fi rmware fi le to your SD card. b. Insert the SD card into your Cuddeback camera. c. Press A until LoAD is displayed. d. Press B to load the fi rmware.
- Page 30 It is now ok to remove the SD card. h. You can use the same SD card to update all your Cuddeback® cameras. Th e same fi rmware fi le will update all recent Cuddeback® models (Attack, Ambush and C & E models).
- Page 31 4. Th e more images taken, the fewer days the camera will operate. 5. Video consumes more power than still images. 6. Night images require considerably more power than day images. 7. Night video requires considerably more power than day video. 8.
- Page 32 Appendix D: Trophy Room Trophy Room Cuddeback off ers a free Windows PC tool to manage your trail camera images. Trophy Room is valued at over $100 but is free to all trail camera users.
- Page 33 Download a free copy of Trophy Room at http://cuddeback.com/TrophyRoom For additional Product support, visit http://support. cuddeback.com. You can also email us your questions by visiting http://cuddeback.com/email. Approvals: FCC, CE, ROHS. Th is device complies with Part 15 of the FCC Rules.
- Page 34 3. Warranty Period. Th e Warranty Period shall commence on the date of the product’s registration and shall expire on either: (a) the 1st annual anniversary of the Product’s Activation Date; or (b) the 181st Run Day of the Product, whichever comes fi rst. Note: Registration must be within 2 weeks of the fi rst installation of batteries.
- Page 35 accident, misuse, abuse, use with incompatible accessories or attachments, your failure to follow proper operating instructions provided by Non Typical, claims made aft er the duration of the Warranty Period, or your failure to follow the instructions set forth below with respect to return of the Product to Non Typical.
- Page 36 Internet auction web site. OBTAINING SERVICE FOR YOUR PRODUCT Visit www.cuddeback.com and click Product Support or go to cuddeback.com/support for up-to-date service options and get phone numbers. Here you will also fi nd product manuals, answers to common questions, and...
- Page 37 Put a Genius Mount bracket in all your favorite hunting spots! Patents Pending For use with all Cuddeback ® scouting cameras Lock Mount & Tilt Secure your Cuddeback with the included lock clip Post Mount Put your Cuddeback virtually anywhere! No tree needed!
- Page 40 Non Typical, Inc., P.O. Box 10447, Green Bay, WI 54307-0447 920-347-3810 20160512...
Need help?
Do you have a question about the IR and is the answer not in the manual?
Questions and answers