
Summary of Contents for Sheffield PLA1397
- Page 1 AIR FRYER PLA1397 Instruction Manual Due to ongoing product improvements, specifications and accessories may change without notice. Actual product may differ slightly to that depicted.
-
Page 2: Table Of Contents
CONTENTS 02 Welcome 03 Package Contents 03 Technical Specifications 04 Important Safety instructions 06 Assembly and parts 08 Instructions 09 Other Useful Information 10 Cleaning and Maintenance 11 Recipes AFTER SALES SUPPORT PROLINK ASIA LTD Phone: 0508 776 546 - Mon-Fri 8:30am – 4.30pm Page 1... -
Page 3: Welcome
WELCOME Congratulations on choosing to buy a Sheffield product. All products brought to you by Sheffield are manufactured to the highest standards of performance and safety, and, as part of our philosophy of customer service and satisfaction, are backed by our comprehensive 12 Month warranty. -
Page 4: Package Contents
1 x Warranty Card Confirm all parts before disposing of carton. Safely dispose of all plastic bags and other packaging components. They may be potentially dangerous to children. TECHNICAL SPECIFICATION Model: PLA1397 Rated voltage: 220-240V~50-60Hz Power consumption: 1200-1400W Protection class:... -
Page 5: Important Safety Instructions
IMPORTANT SAFETY INSTRUCTIONS READ CAREFULLY AND KEEP FOR FUTURE REFERENCE Carefully read this manual before using this appliance. Ensure that you know how the appliance functions and how to operate it. Maintain the appliance in accordance with the instructions to ensure that it functions properly. - Page 6 Use and Environment Do not leave unattended while in use. Do not use outdoors. Do not use directly below a socket outlet. This appliance is not intended to be operated by means of an external timer or separate remote-control system. This appliance is designed exclusively for private, domestic use and is not suitable for commercial or industrial use.
-
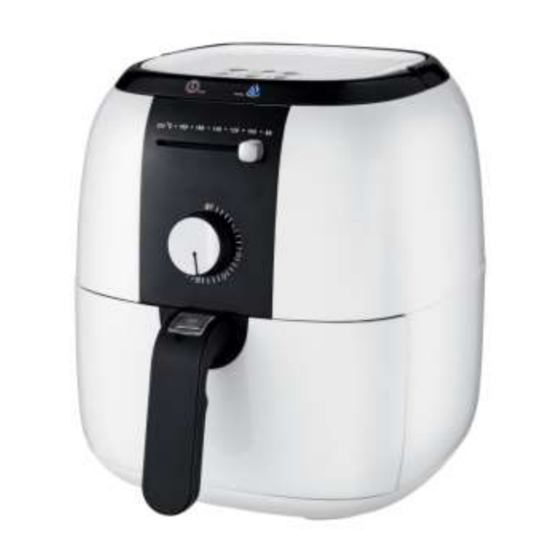
Page 7: Assembly And Parts
ASSEMBLY AND PARTS 1. Lift-up Carry Handle 6. Tank 2. Air Inlet 7. Fry Basket Handle 3. Temperature Control Knob (80- 8. Basket Release Button 4. Timer Control Knob (0-30 min) 9. Power indicator 5. Fry Basket 10. Working indicator Before First Use Remove all packaging materials. -
Page 8: Instructions
INSTRUCTIONS Using Your Air Fryer Connect the mains plug to an earthed wall socket. Carefully pull the tank out of the Air Fryer. Put the ingredients into the basket. Note: Never fill the basket exceeding the amount indicated in the table, as this could affect the quality of the end result. -
Page 9: Other Useful Information
OTHER USEFUL INFORMATION Cooking Guide This table below helps you to select the basic settings for the ingredients you want to prepare, please refer to the recipe book for more ingredients Note: Keep in mind that these settings are indications. As ingredients differ in origin, size, shape as well as brand, we cannot guarantee the best setting for your ingredients. - Page 10 Cooking Tips Smaller ingredients usually require a slightly shorter cooking time than larger ingredients. A larger amount of ingredients only requires a slightly longer cooking time, a smaller amount of ingredients only requires a slightly shorter cooking time. Shaking smaller ingredients halfway through the cooking time optimises the end result and can help prevent unevenly fried ingredients.
-
Page 11: Cleaning And Maintenance
CLEANING and MAINTENANCE This appliance requires little maintenance. It contains no user-serviceable parts. Any servicing requiring disassembly other than cleaning must be performed by a qualified appliance repair technician. Clean the appliance after each use. The tank, baking tray, basket and the inside of the appliance have a non-stick coating. -
Page 12: Recipes
RECIPES We have included a handful of recipes to help you get started with the Air Fryer. Once you have mastered these you can experiment with your own recipes for new and exciting meal or snack options! Please NOTE: The recipes found in this Guide are provided as suggestions only, we cannot guarantee that favourable results will be obtained from their use and, therefore, recommend that you conduct appropriate tests under your own operating conditions prior to adoption. - Page 13 Sweet Potato Chips Required 800g Sweet Potatoes 1 tablespoon of olive oil Salt or garlic salt to taste Method Peel sweet potatoes and slice length ways into 15mm thick pieces. Soak potato slices in water for approximately 20 minutes. Drain and pat dry on a paper towel.
- Page 14 Potato Wedges Required 800g Potatoes 1 tablespoon of olive oil Salt to taste 1 tablespoon ground cumin 1 tablespoon ground coriander 1 tablespoon ground paprika Method Slice potato into wedges. Soak potato slices in water for approximately 20 minutes then drain and pat dry on a paper towel.
- Page 15 Fried Dumplings Required Frozen Dumplings, thawed Olive oil Method Preheat the Air Fryer to 180°C. Wipe a thin layer of olive oil onto the dumplings. Place the dumplings in the frying basket, ensuring they are evenly spaced. Cook for 12-15 minutes or until golden brown. Serve with some soy sauce, red vinegar and chilli if desired.
- Page 16 Spicy Prawns Required 1 teaspoon olive oil 1 clove garlic, minced Red chillies Spicy black pepper Paprika (optional) 10 medium size prawns, whole Method Preheat the Air Fryer to 200°C. Lightly coat the prawns with some olive oil, then place into the frying basket and set the timer for 5-8 minutes at 200°C or until they are crispy.
- Page 17 Fried Bananas Required 2 bananas 1 tablespoon butter 1 teaspoon brown sugar ½ cup bread crumbs Topping (optional) Vanilla ice cream Method Slice bananas into 2-3cm chunks. Melt butter in the Air Fryer for 1 minute. In a bowl, mix the brown sugar and bread crumbs, then place the bananas in the crumb mixture, ensuring you get a good cover of crumbs over the banana pieces.
- Page 18 Remove the cake pan from the frying basket and let it cool, then slice into small squares and serve. Apple Crumble This recipe and many other baking recipes will require using an oven safe baking dish or tray to be placed in the frying basket. Required Apple Crumble Mixture ¾...
Need help?
Do you have a question about the PLA1397 and is the answer not in the manual?
Questions and answers