Table of Contents
Advertisement
Quick Links
Advertisement
Table of Contents

Related Manuals for Crosscall SPIDER-X1


Summary of Contents for Crosscall SPIDER-X1
- Page 2 Thank you for purchasing this mobile phone Please read all safety precautions and this manual carefully before using your device to ensure safe and proper use. Content, images and screenshots used in this manual may differ in appearance from the actual product.
- Page 3 Read Before Proceeding Safety Precautions Please read the safety precautions carefully to ensure the correct use of your mobile phone. Do not crash, throw, or puncture your mobile phone. Avoid the falling, squeezing, and bending of your mobile phone. Do not use your mobile phone in a moist environment, such as the bathroom. Prevent your mobile phone from being soaked or washed in liquid.
- Page 4 During testing, the maximum Specific Absorption Rate (SAR) recorded for this model was 1,071W/kg. Compliance This device complies with essential recommandation and other relevant requirements contained in the 1999/5/CE. The full text of the déclaration of conformity of your phone is available on the website: www.crosscall.com 0700...
-
Page 5: Table Of Contents
TABLE OF CONTENTS TABLE OF CONTENTS 1. UNDERSTANDING YOUR DEVICE 1.1. GENERAL INFO 1.2. DEVICE OVERVIEW 2. GETTING STARTED 2.1. INSTALLING CARDS & BATTERY 2.2. POWERING ON/OFF THE DEVICE 3. BASIC OPERATIONS 3.1. CALLING 3.2. MESSAGING 3.3. PHONEBOOK 4. CALL CENTER 5. -
Page 6: Understanding Your Device
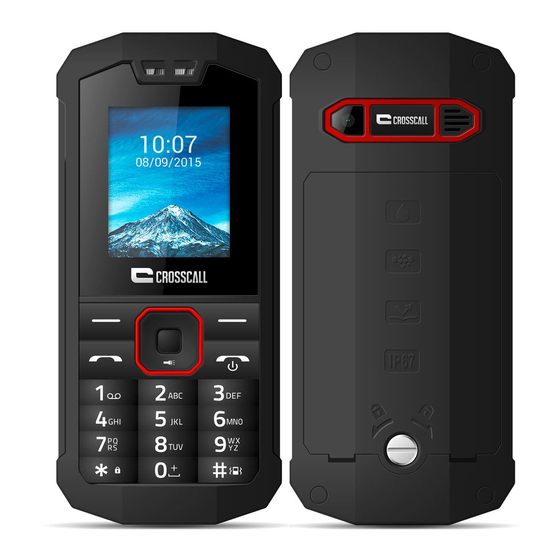
1. UNDERSTANDING YOUR DEVICE 1.1 GENERAL INFO Crosscall SPIDER-X1 has a 1.77” QVGA screen with 128*160 resolution. It has a fixed focus back camera, with 1000 mAh battery and expandable memory. It supports MMS, SMS and Bluetooth. 1.2 DEVICE OVERVIEW... -
Page 7: Getting Started
2. GETTING STARTED 2.1 INSTALLING SIM CARDS & BATTERY Please switch off your device before removing the battery, inserting a SIM or memory card. Installing Battery To install the battery please follow the steps below:- Remove the back cover of the device. •... -
Page 8: Powering On/Off The Device
Installing Memory Card Your device supports micro SD card, which is a multimedia memory card used to increase the memory of the device. The micro SD card is small and should be installed carefully to avoid any kind of damage. Please follow the steps below to install the memory card in the device: Remove the battery cover of the device. -
Page 9: Basic Operations
Press and hold the Power Key to turn on the device. • Turning Off the Device Press and hold the Power Key for 3 seconds • 3. BASIC OPERATIONS 3.1 CALLING Making Calls If the icon network strength icon is visible in the information bar at the top of the screen, then you can make or receive calls. -
Page 10: Messaging
Swap –Switch between active calls Conference – Multi-call options. The availability of this option depends on your service provider. End single call - End the current call. End all calls- End all active calls New call – Launches the dialler and a new call can be initiated Phonebook –... -
Page 11: Phonebook
Delete: Delete the highlighted message. Delete all: Delete all messages in inbox. Save to phonebook: Save the information in the sender number to the phonebook. 3.3 PHONEBOOK Contact details (name and number) are stored in the phonebook. You can save information such as name and phone number. - Page 12 If accessed through the menu item, the submenus are as follows:- Dialled calls • Missed calls • Received calls • Delete call logs • Missed/dialled/Received In the missed, dialled and received calls lists the following actions are applicable:- Call key – Make a call to the highlighted number/contact •...
- Page 13 soft key and the end key. Auto answer when headset - When set, incoming calls will automatically be answered if a headset is inserted.
-
Page 14: Settings
5. SETTINGS 5.1 PHONE SETTINGS Time and date • Set home city: You can choose a home city from the list to set as the phone home time zone. Set time/date: Under this you can set the phone to the current date and time. The phone allows you to set the date range of calendar 2000 to 2030. -
Page 15: Security Settings
camped onto. 5.3 SECURITY SETTINGS SIM security • You can set and enable the PIN code and PIN” codes Note that if the input PIN code wrong three times, the SIM card will automatically lock and unlock and a PUK code will be required to unlock. Please contact your SIM card provider for more details regarding PUK codes. -
Page 16: Restore Settings
range of the signal. After the Bluetooth device is found, you can select the device you wish to connect with. My name: Modify the Bluetooth device name that other users can identify your device with. Data account • Preloaded MMS accounts are displayed. These accounts can be manually edited, deleted and added. -
Page 17: Image Viewer
7.2 IMAGE VIEWER This feature is convenient for users to view the photos stored in on the phone or memory card. Press the OK key to open the picture or press the left soft key to open the option menu: View: Open the current image to view. -
Page 18: Extras
Channel list – Radio stations names and frequencies can be saved. When in FM Radio pressing the corresponding key will tune into the specified frequency. Manual input – Radio frequency can be manually entered. Auto search – Automatically searches and saves the found frequencies. 8. -
Page 19: Torch Light
8.4 TORCH LIGHT Torch can be switched on through the from an idle screen shortcut. On idle screen, press and hold the middle key to switch the torch on and off. • 8.5 SHORTCUTS You can pick up some useful function as shortcuts in the function list. 8.6 SERVICES Press the Left soft key to access the browser function menu interface.
Need help?
Do you have a question about the SPIDER-X1 and is the answer not in the manual?
Questions and answers