Table of Contents
Advertisement
Available languages
Available languages
Advertisement
Chapters
Table of Contents

Related Manuals for Husqvarna LC221Ai


Summary of Contents for Husqvarna LC221Ai
- Page 1 Operator′s manual Manual de instrucciones LC221Ai Please read the operator’s manual carefully and make sure you understand the instructions before using the machine. US ES ea detenidamente el manual de instrucciones y asegúrese de entender su contenido antes de utilizar la máquina.
-
Page 2: Key To Symbols
KEY TO SYMBOLS Key to symbols Explanation of warning levels WARNING! The machine can be a The warnings are graded in three levels. dangerous tool if used incorrectly or WARNING! carelessly, which can cause serious or fatal injury to the operator or others. WARNING! Used if there is a risk of serious injury or death for the operator Please read the operator’s manual... -
Page 3: Table Of Contents
CONTENTS Contents MAINTENANCE General ..............16 KEY TO SYMBOLS Maintenance schedule .......... 16 Key to symbols ............. 2 General recommendations ........17 Explanation of warning levels ....... 2 General inspection ..........17 CONTENTS General lubrication ..........17 Contents ............... 3 Cleaning .............. -
Page 4: Presentation
Congratulations on your choice to buy a Husqvarna • Read and observe the safety rules. product! Husqvarna is based on a tradition that dates • Follow the maintenance schedule in this manual. Any back to 1689, when the Swedish King Karl XI ordered the... -
Page 5: Steps Before Using A New Lawn Mower
Husqvarna AB has a policy of continuous product with plug. development and therefore reserves the right to modify the design and appearance of products without prior notice. -
Page 6: What Is What
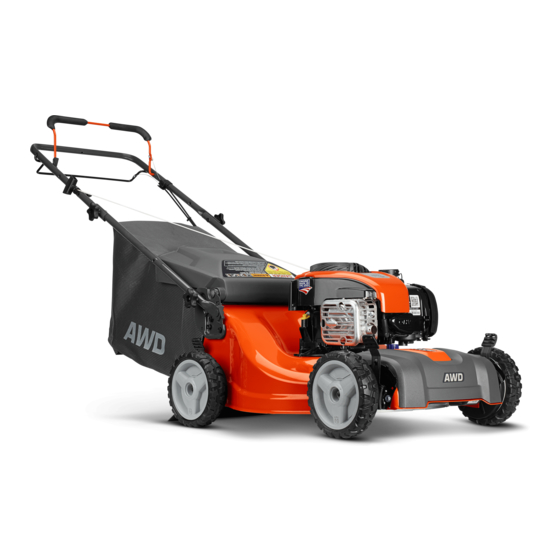
WHAT IS WHAT? What is what on the lawn mower? Engine brake handle Muffler Drive 10 Wash-out port connector Starter handle 11 Rear deflector Grass catcher 12 Engine oil cap with dipstick Fuel cap 13 Mulcher door Air filter 14 Cutting height control Spark plug 15 Mulch plug Drive cover... -
Page 7: Machine´s Safety Equipment
MACHINE´S SAFETY EQUIPMENT General Rear deflector The rear deflector, attached between the rear wheels of This section describes the machine′s safety equipment, your mower, is provided to minimize the possibility that its purpose, and how checks and maintenance should be objects will be thrown out of the rear of the mower into the carried out to ensure that it operates correctly. -
Page 8: Assembling And Adjustments
ASSEMBLING AND ADJUSTMENTS General Vertical handle storage The handle can be set in a vertical storage position. WARNING! Prevent unintentional starting Loosen the lower handle knobs. by removing the ignition cable from the spark plug. Rotate the handle to vertical storage indentation on the handle bracket. -
Page 9: Grass Catcher
ASSEMBLING AND ADJUSTMENTS Grass catcher Grip the starter handle, slowly pull the engine starter handle until the starter rope can slip into the loop of the rope guide. Assembly of the catcher Tighten the T-knob. Put the grass catcher frame into the grass bag with the rigid part of the bag on the bottom. -
Page 10: Cutting Height
ASSEMBLING AND ADJUSTMENTS Mulching Close the back shield to allow the machine to discharge material to the left of the machine while Lift the back shield and remove the grass bag (if cutting. equipped). Insert the mulch plug into the collector channel. Cutting height Allow the back shield to close and ensure the back shield is firmly shut against the mulch plug. -
Page 11: Fuel Handling
FUEL HANDLING General Engine oil WARNING! Running an engine in a CAUTION! Check the oil level before starting the lawn confined or badly ventilated area can mower. A too low oil level can cause serious damage to result in death due to asphyxiation or the engine. -
Page 12: Operating
OPERATING Personal protective equipment Children You must use approved personal protective equipment WARNING! Children can be seriously whenever you use the machine. Personal protective injured or killed by this equipment. equipment cannot eliminate the risk of injury but it will Carefully read and follow all of the safety reduce the degree of injury if an accident does happen. - Page 13 OPERATING • Beware of roots, stones, twigs, pits, ditches etc. Tall WARNING! The machine can be a grass can hide obstacles. dangerous tool if used incorrectly or • Mowing slopes can be dangerous. Do not use the carelessly, which can cause serious or fatal injury to the operator or others.
-
Page 14: Basic Working Techniques
OPERATING • Shut down the engine before changing the cutting Slope operation height. Never make adjustments with the engine Mowing slopes can be dangerous. Do not use the lawn running. mower on slopes steeper than 15°. All slopes demand • Never leave the machine unsupervised with the motor extra care. -
Page 15: Starting And Stopping
OPERATING Starting and stopping When the drive starts feeling slow you need to adjust the drive control cable. Finely adjust the wire using the Before starting adjuster screw. WARNING! Please read the operator’s manual carefully and make sure you understand the instructions before using the machine. -
Page 16: Maintenance
If you need further information please contact your nearest servicing dealer. • Let your Husqvarna dealer regularly check the machine and make essential adjustments and repairs. • Replace any damaged, worn or broken parts. -
Page 17: General Recommendations
MAINTENANCE General recommendations Cleaning The warranty on this lawn mower does not cover items WARNING! Always disconnect the spark that have been subjected to operator abuse or plug before performing maintenance or negligence. To receive full value from the warranty, service. -
Page 18: Engine
MAINTENANCE Water washout feature Engine Your lawn mower is equipped with a fitting that allows Lubrication quick and easy cleaning of the underside of the housing. Use only high quality detergent oil rated with API service Note that water, grass and other debris will drain from classification SG-SL. -
Page 19: Oil Change
MAINTENANCE Oil change Oil level CAUTION! The oil level must always be checked before Before starting for the first time starting the engine. Your lawnmower is shipped without oil in the engine. You Change the oil after every 25 hours of operation or at receive a container of oil with the unit. -
Page 20: Muffler
MAINTENANCE Muffler • Do not use a nail for balancing blade. The lobes of the center hole may appear to be centered, but are not. If the muffler is corroded or is damaged in any other way, • Slide blade on to an unthreaded portion of the steel it must be replaced because it may become a fire hazard bolt or pin and hold the bolt or pin parallel with the and/or cause injury. - Page 21 MAINTENANCE Use a wood block between blade and mower housing Install the blade bolt with the lock washer and to prevent blade from turning when removing blade hardened washer into blade adapter and crankshaft. bolt. Remove the blade bolt by turning the bolt counter- clockwise.
-
Page 22: Drive Belt
MAINTENANCE Drive belt Mulch plug Remove the drive belt Rear insert • Empty the fuel tank by running the machine until the tank is empty. Transmission drive pulley • Always disconnect the spark plug before performing Idler bracket maintenance or accessing mocable parts. Drive cover •... - Page 23 MAINTENANCE • Remove the blade bolt by turning the bolt counter- • Remove all 3 idler pulleys from idler assembly. clockwise. Remove blade and attaching hardware: bolt, lock washer and hardened washer. • Remove belt from blade adapter / engine pulley and idler assembly.
-
Page 24: Troubleshooting
TROUBLESHOOTING Troubleshooting schedule WARNING! If service operations or troubleshooting does not require the machine to be on, the engine should be switched off, and the spark plug wire disconnected from the spark plug. Problem Probable cause Potential Solution Incorrect starting procedure. See instructions under the heading Starting and stopping. -
Page 25: Aclaracion De Los Simbolos Aclaración De Los Símbolos
ACLARACION DE LOS SIMBOLOS Aclaración de los símbolos Explicación de los niveles de advertencia ¡ATENCION! La máquina, si se utiliza de forma errónea o descuidada, puede Las advertencias se clasifican en tres niveles. ser una herramienta peligrosa que puede causar daños graves e incluso ¡ATENCION! la muerte al usuario y a otras personas. -
Page 26: Indice Índice
INDICE Índice MANTENIMIENTO Generalidades ............39 ACLARACION DE LOS SIMBOLOS Programa de mantenimiento ........ 39 Aclaración de los símbolos ........25 Recomendaciones generales ....... 40 Explicación de los niveles de advertencia .... 25 Inspección general ..........40 INDICE Lubricación general ..........40 Índice .............. -
Page 27: Presentación
¡Felicidades por haber adquirido un producto Husqvarna! • Lea y cumpla las normas de seguridad. La historia de Husqvarna data del año 1689, cuando el • Siga el programa de mantenimiento de este manual. Rey Karl XI encargó la construcción de una fábrica en la Todas las medidas de mantenimiento que no estén... -
Page 28: Preparativos Para El Empleo De Un Cortacésped Nuevo
Puede adquirir un apagachispas para el silenciador a través de su centro de servicio técnico más cercano. Husqvarna AB trabaja constantemente para perfeccionar ¡ATENCION! Siempre desconecte el sus productos y se reserva, por lo tanto, el derecho a alambre de la bujía y póngalo donde no... -
Page 29: Que Es Que
¿QUE ES QUE? Componentes del cortacésped? Horquilla del freno de motor Silenciador Transmisión 10 Lave el conector del puerto de salida Empuñadura de arranque 11 Deflector trasero Recogedor de césped 12 Tapón del depósito de aceite del motor con varilla Tapa del depósito 13 Puerta de la acolchadora Filtro de aire... -
Page 30: Equipo De Seguridad De La Máquina
EQUIPO DE SEGURIDAD DE LA MÁQUINA Generalidades Deflector trasero El deflector trasero, fijado entre las ruedas traseras del En este capítulo se describen los componentes de cortacésped, se incluye para minimizar la posibilidad de seguridad de la máquina, su función y el modo de que algún objeto salga proyectado por la parte trasera del efectuar el control y el mantenimiento para garantizar un cortacésped hacia el puesto del operario. -
Page 31: Montaje Y Ajustes
MONTAJE Y AJUSTES Generalidades Almacenamiento vertical del manillar El manillar puede colocarse en posición de ¡ATENCION! Evite el arranque accidental almacenamiento vertical. retirando el cable de encendido de la Afloje los pomos inferiores del manillar. bujía. Gire el manillar hasta la muesca de almacenamiento vertical del soporte del manillar. -
Page 32: Recogedor De Césped
MONTAJE Y AJUSTES Recogedor de césped Agarre la empuñadura de arranque del motor y, cuidadosamente, tire de ella hasta que la cuerda de Montaje del recogedor arranque pueda deslizarse en el lazo de la guía de cuerda. Coloque el bastidor del recogedor de césped en la bolsa de hierba con la parte rígida de la bolsa para Apriete el pasador en forma de T. -
Page 33: Altura De Corte
MONTAJE Y AJUSTES Mulching Cierre la protección posterior para permitir que la máquina descargue el material por el lado izquierdo Levante la protección posterior y retire la bolsa de mientras siega. hierba (si está instalada). introduzca el enchufe de trituradora en el canal del colector. -
Page 34: Manipulacion Del Combustible
MANIPULACION DEL COMBUSTIBLE Generalidades • Si se salpicó el cuerpo o las ropas, cambie de ropas. Lave las partes del cuerpo que han entrado en contacto con el combustible. Use agua y jabón. ¡ATENCION! Si se hace funcionar el motor en un local cerrado o mal •... -
Page 35: Funcionamiento
FUNCIONAMIENTO Equipo de protección personal Niños Para trabajar con la máquina debe utilizarse un equipo de ¡ATENCION! Este equipo puede protección personal homologado. El equipo de protección provocar lesiones graves o mortales a personal no elimina el riesgo de lesiones, pero reduce su niños. - Page 36 FUNCIONAMIENTO relámpagos, etc. Trabajar con mal tiempo es ¡ATENCION! La máquina, si se utiliza de cansador y puede crear condiciones peligrosas, por forma errónea o descuidada, puede ser ejemplo suelo resbaladizo. una herramienta peligrosa que puede • No corte hierba mojada. La hierba mojada es causar daños graves e incluso la muerte resbaladiza, con lo que los neumáticos pueden al usuario y a otras personas.
-
Page 37: Técnica Básica De Trabajo
FUNCIONAMIENTO • No corra nunca con la máquina con el motor en SÍ: marcha. Hay que caminar siempre con el • Corte transversalmente las laderas de una pendiente, cortacésped. nunca corte hacia arriba y abajo. • Pare el motor antes de cambiar la altura de corte. No haga nunca ajustes con el motor en marcha. -
Page 38: Arranque Y Parada
FUNCIONAMIENTO Arranque y parada Cuando la unidad funciona de forma lenta, debe ajustar el cable de control de mando. Use el tornillo de ajuste Antes del arranque para llevar a cabo el reglaje preciso del cable. ¡ATENCION! Lea detenidamente el manual de instrucciones y asegúrese de entender su contenido antes de utilizar la máquina. -
Page 39: Mantenimiento
Para más información, consulte con el taller de servicio oficial más cercano. • Encargue al distribuidor de Husqvarna la revisión regular de la cortadora y los ajustes y reparaciones necesarios. • Cambie todas las piezas dañadas, desgastadas o rotas. -
Page 40: Recomendaciones Generales
MANTENIMIENTO Recomendaciones generales Limpieza La garantía de este cortacésped no cubre piezas que ¡ATENCION! Desconecte siempre la hayan sufrido desperfectos por el mal uso del operario o bujía antes de realizar tareas de por su negligencia. Para obtener el valor total de la mantenimiento o servicio. -
Page 41: Motor
MANTENIMIENTO Cajas de engranajes Motor • Para mantener el sistema de transmisión en buen Lubricación funcionamiento, las cajas de engranajes y la zona de alrededor debe mantenerse limpia y sin Utilice sólo aceite detergente de alta calidad con acumulaciones de basura. Limpie debajo de la clasificación de servicio API SG–SL. -
Page 42: Cambio De Aceite
MANTENIMIENTO Nivel del aceite Asegúrese siempre de volver a apretar la varilla de nivel de aceite antes de arrancar el motor. Antes del primer arranque Vuelva a colocar el cable en la bujía. El cortacésped se suministra sin aceite en el motor. Se Cambio de aceite proporciona un recipiente de aceite con la unidad. -
Page 43: Silenciador
MANTENIMIENTO Silenciador • No utilice un clavo para equilibrar la cuchilla. Es posible que parezca que los lóbulos del orificio de centrado están centrados, pero no lo estén. Si el silenciador está oxidado o presenta cualquier otro daño, deberá reemplazarlo, ya que puede provocar un •... - Page 44 MANTENIMIENTO Utilice un bloque de madera entre la cuchilla y la Monte el tornillo de la cuchilla con la arandela de carcasa del cortacésped para evitar que la cuchilla presión y la arandela endurecida en el adaptador de gire al retirar el tornillo de la cuchilla. la cuchilla y el cigüeñal.
-
Page 45: Correa De Transmisión
MANTENIMIENTO Correa de transmisión Enchufe para trituradora Quite la correa de transmisión Pieza trasera • Haga funcionar la máquina hasta que se vacíe el depósito de combustible. Polea del disco de transmisión • Siempre desconecte la bujía antes de realizar el Soporte de la rueda guía mantenimiento o acceso a las piezas móviles. - Page 46 MANTENIMIENTO • Retire el tornillo de la cuchilla girándolo en sentido • Retire las 3 poleas tensoras del conjunto tensor. contrario a las agujas del reloj. Desmonte la cuchilla y las piezas acopladas: tornillo, arandela de presión y arandela endurecida. •...
-
Page 47: Localización Y Corrección De Averías
LOCALIZACIÓN Y CORRECCIÓN DE AVERÍAS Tabla de localización de fallos ¡ATENCION! Si las operaciones de servicio o la solución de problemas no requieren que la máquina esté encendida, el motor debe estar apagado y el cable de la bujía desconectado de la bujía. - Page 48 US - Original instructions, ES - Instrucciones originales 1157570-46 ´®z+YY$¶6r¨ ´®z+YY$¶6r¨ 2015-10-26...