Advertisement
SEL-735 Power Quality and Revenue Meter
I. Introduction
This Quick-Start Guide explains how to
install, configure, test, and operate the
SEL-735 Power Quality and Revenue
Meter. For detailed information on these
topics, please refer to the SEL-735 Power
Quality and Revenue Meter Instruction
Manual located at www.selinc.com.
II. SEL-735 Overview
This section outlines essential installation information, including front-panel layout, rear-panel layout, labels, and
dimensions.
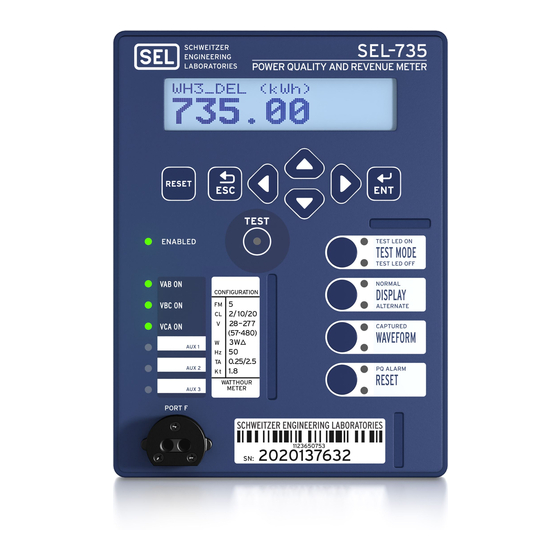
A. Front-Panel Layout
The front-panel interface consists of programmable pushbuttons and LEDs, an LCD, a keypad, a test mode LED,
and an optical communications port.
Optical port,
communications
and test mode LED
Enable LED
Programmable
local-control button
Potential LEDs
Programmable LEDs
Date Code 20131015
Quick-Start Guide
Figure 1 Front-Panel Layout
TEST LED
Programmable LCD
Programmable
control
pushbuttons
Menu pushbuttons
for settings
SEL-735 Quick-Start Guide
Advertisement
Table of Contents

Summary of Contents for Sel sel-735
- Page 1 This Quick-Start Guide explains how to install, configure, test, and operate the SEL-735 Power Quality and Revenue Meter. For detailed information on these topics, please refer to the SEL-735 Power Quality and Revenue Meter Instruction Manual located at www.selinc.com. II. SEL-735 Overview This section outlines essential installation information, including front-panel layout, rear-panel layout, labels, and dimensions.
-
Page 2: Rear Panel Layout
ANSI Configuration Label FM: Form designation Compliance CL: Current class marks V: Rated voltage W: Wires Hz: Frequency (hertz) TA: Test amperes Kt: Watt-hour meter test constant Figure 3 Labels and Dimensions SEL-735 Quick-Start Guide Date Code 20131015... -
Page 3: Required Installation Tools
➤ Mounting screws: 12 in-lb C. Mounting Options SEL supplies each SEL-735 with four #8 screws for mounting the meter in a rectangular panel cutout shown Figure 3. For detailed information on mounting options, communications cables, and other accessories, please refer to the SEL-735 Metering Accessories flyer, found at www.selinc.com. - Page 4 SEL-735 Installation and Wiring E. Voltage and Current Connections The SEL-735 supports Form 9 (4-wire wye), Form 5 (3-wire delta), and Form 36 (4-wire wye) connections. Form 5, 3-wire delta connection Form 9, 4-wire wye connection Form 36, 4-wire wye connection...
- Page 5 Display waveforms from event reports. B. Install QuickSet ERATOR Install QuickSet with the enclosed CD, or download from www.selinc.com. On the SEL ERATOR website, click on Products > Software Solutions > Settings Software > QuickSet ERATOR Software, click on Download, save, and then run Install.exe. A wizard will guide an installation or an upgrade of QuickSet.
-
Page 6: Settings Editor
> Parameters. Figure 4 shows the default serial port parameters for the SEL-735. Figure 5 SEL-735 Serial Port 2 Figure 4 Default Communications Parameters Figure 6 Cables for the SEL-735 D. Settings Editor This section discusses how to read, modify, save, and send configuration settings within ERATOR QuickSet. - Page 7 ERATOR 2. Read Configuration Settings From the Meter Into QuickSet ERATOR Before editing configuration settings, QuickSet must read them from the SEL-735. ERATOR Click File > Read as shown in Figure 8 to read meter configuration settings. 3. Modify Configuration Settings...
-
Page 8: Demand Metering
QuickSet settings editor tree. Note that the CTR and PTR values are net ratios. For example, a 1200:5 CT ratio equates to a CTR setting of 240. 2. Demand Metering The SEL-735 supports Thermal, Rolling, and Block demand types with intervals of 1, 5, 10, 15, 30, and 60 minutes. - Page 9 Example 1 or a form C KYZ output contact as shown in Example 2. The SEL-735 supports four Form A outputs or two Form C outputs. Please verify that the meter contains solid-state output contacts prior to Figure 13 KYZ Pulse Settings configuring KYZ outputs.
- Page 10 5. Date and Time Configuration Settings a. Set the Date and Time The SEL-735 internal time clock is accurate to 5 seconds per month at room temperature and accurate to 30 seconds per month at temperature ranges from –40°C to +85°C. Use one of the methods listed below to improve time-clock drift.
- Page 11 6. Load Profile (LDP) and MV-90 The SEL-735 supports as many as 12 recorders, each having 16 channels, with an acquisition rate of 3–59 second or 1–120 minute intervals. The load profile settings LDLIST tool presents a list of all available LDP values.
-
Page 12: Human-Machine Interface (Hmi)
ERATOR V. Human-Machine Interface (HMI) QuickSet HMI displays ERATOR instantaneous meter information, captures reports, and allows test and control of the SEL-735. To access the Meter and Control interface, choose Tools > HMI > HMI in the main QuickSet ERATOR window. - Page 13 Many times CT polarity convention varies from site to site, which can lead to reversed CT connections. The top label of the SEL-735 indicates CT polarity convention with a dot that denotes current flow out of the instrumentation transformer and into the SEL-735 CT terminal.
-
Page 14: Test Mode
Figure 25 Control Window VI. Security and Passwords A. Security The SEL-735 supports four access levels to prevent unauthorized entry. Table 3 describes the default passwords and the capabilities of each access level. The user must enter the ACC Access Level before entering the EAC or 2AC Access Levels. -
Page 15: Changing Passwords
A message will appear confirming that the meter accepted the new password. VII. Factory Support We appreciate your interest in SEL metering products and services. If you have questions or comments, please contact us at: Direct meter support line: +1.509.334.8793 Meter support email: metersupport@selinc.com... - Page 16 2350 NE Hopkins Court • Pullman, WA 99163-5603 USA trademark of their respective holders. No SEL trademarks may be used without written Phone: +1.509.332.1890 • Fax: +1.509.332.7990 permission. SEL products appearing in this document may be covered by U.S. and Foreign Internet: www.selinc.com • E-mail: info@selinc.com patents.
Need help?
Do you have a question about the sel-735 and is the answer not in the manual?
Questions and answers