Table of Contents
Advertisement
Advertisement
Table of Contents

Related Manuals for Cuddeback Ambush IR series


Summary of Contents for Cuddeback Ambush IR series
- Page 2 Make viewing and managing your Cuddeback images easy with Trophy Room – Cuddeback’s free PC program...
- Page 3 Trophy Room manages your images, and now your Cuddeback camera, too! – includes camera troubleshooting and support tools - hunting and scouting tips; articles from our pro staff Plus: 1-click image copy from SD card to your PC. Fast Guard Duty image viewing.
- Page 4 Attack model shown CuddeSafe Protects your ™ Cuddeback Ambush IR ® ® from bears, thieves and the elements! • Fits Cuddeback Ambush IR series scouting cameras • Heavy-duty, bear-proof metal design • Easy to install (lag-bolts to tree); accepts a padlock • Makes for easier card checking/battery replacement...
- Page 5 Don’t contact your dealer. Use one of these support options: • Download Trophy Room and use its support tools • Visit www.cuddeback.com for support, help and troubleshooting options • Email us at support@cuddeback.com • Call us at (920) 347-3810 The store you purchased this product from does not carry parts nor are they able to service your camera.
- Page 6 Extended Warranty with online registration! Extend the warranty on your Ambush IR to 18 months by registering your purchase at www.cuddeback.com. Click “Support” then “Product Registration” . You must register your Ambush IR within 10 days of purchase to be eligible.
- Page 7 Care and treatment A. Don’t abuse your camera. Treat it like the sophisticated piece of electronics that it is. I. Treat it gently – do not abuse or drop II. Keep SD card dry and never insert wet SD cards into the camera III.
- Page 8 Ambush IR ® Operating Instructions What You Need 1) One or more Secure Digital (SD) cards. (See Appendix A for recommendations). 2) Eight-AA batteries (we recommend Rayovac or Duracell brand batteries). ® ® 3) When Ambush IR is working it displays an electronic “worm”...
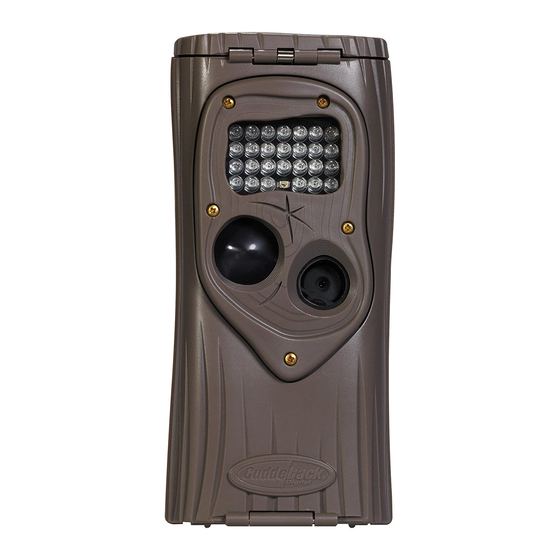
- Page 9 Step 1 – Familiarize yourself with Ambush IR ® Take a moment to familiarize yourself with Ambush IR’s parts. Front Back Infrared LEDs Test Camera Lens Motion- Heat User Interface Sensor Door Battery Door Back SD Card Socket Back Screen Mount Bracket Buttons...
- Page 10 Step 2 – Installing Batteries and SD Card 1) Turn the rotary knob to the OFF position. 2) Loosen the battery thumb screw and open the battery compartment door. Install 8-AA alkaline or 8-AA lithium batteries. Lithium batteries will provide longer battery life and better night IR images. Make sure to observe correct polarity.
- Page 11 Step 3 – Setting up the Ambush IR ® 1) Turn the rotary knob to Time position, press A and B to set. Time is AM/PM format. 2) Turn the rotary knob to Date position, press A and B to set. 3) Turn the rotary knob to Year position, press A and B to set.
- Page 12 You can use Ambush IR’s test feature (explained next) to help you determine the detection area. 8) Cuddeback has optional mounting methods available, such as tilt-brackets, bear-resistant boxes, and mounting posts. See your retailer or www.cuddeback.com for details.
- Page 13 Step 5 – Checking Ambush IR ’s Detection Zone ® 1) Turn the rotary knob to the Test position. Close the cover and tighten the thumb screw. Put Ambush IR back onto the tree bracket. (Note: there is a more convenient method to enable test mode, see Step 7 - Checking your Ambush IR for details).
- Page 14 After the image is saved to the SD card the LCD will display the delay setting and begin counting down. Once the counter reaches 0, Ambush IR is ready to record the next image. Step 7 – Checking Ambush IR ®...
- Page 15 You can leave Ambush IR in any of the states 1 thru 7 and Ambush IR will automatically re-arm in about 5 minutes. This allows you to close the cover and leave the area without triggering an image. Step 8 – More Features Menu Position Turn the rotary knob to the MENU position to perform various activities.
- Page 16 If a firmware update is required you will need to download a firmware file from our website. Instructions will be provided with the firmware. Please see www.cuddeback.com for details. We recommend you check our website for updates at the beginning of your scouting season.
- Page 17 Transfer to SD card: If you use Ambush IR without an SD card, follow these steps to transfer the images from the internal memory to an SD card. 1) If Ambush IR is not armed, turn the rotary knob to any of the Armed positions.
- Page 18 Battery Life and Battery Low Warning Battery life in Ambush IR will vary depending upon bat- tery quality, ambient temperature, the number of images taken, how long Ambush IR has been operating, and other factors. Battery life you get may be more or less than these numbers depending on the circumstances.
-
Page 19: Viewing Images
SD card with you to view on your PC or other device. 3) Cuddeback’s CuddeView viewer will allow you to view the images, copy the images to a second SD card and erase the images from the SD card. You can then put the original SD card back into Ambush IR. - Page 20 Trophy Room 1) Automatically copies images from your SD card to your PC and organizes them by year and date. 2) Allows you to rename each folder making it easy to find your images. 3) Displays sun and moon data for each image, including moon phase, moon rise and set, sunrise and set, and moon and sun position in the sky at the time the image was taken.
- Page 21 CuddeCharts to predict future activity. Think of this as the traditional moon tables, only tailored to you. 8) Allows you to rapidly view Cuddeback images taken in Guard Duty mode. 9) Is FREE and works with all Cuddeback cameras.
- Page 22 This table shows approximately how many images and videos fit on a SD card: Card & Video Ambush IR Mode Card Size Video Images Videos 2 GB 2000 2 GB 4 GB 4000 4 GB 8 GB 8000 8 GB 1600 1600 16 GB...
- Page 23 Put your Cuddeback virtually anywhere! No tree needed! Set-up is simple as I, 2, 3... Insert Post Mount into firm ground. Insert 2 Adjust thumb screws camera angle into bracket and tighten...
- Page 24 & tilt Aim your camera in virtually any direction – up, down or all around! Insert 2 thumb screws into bracket...
- Page 25 Kit includes: Tilt Mount Brackets Lock Clip Theft Deterrant (not applicable with Ambush IR) Mounting Tool Mounting Screws Slide on/off Tilt Put a Genius Tilt adjust Mount bracket in all your favorite hunting spots!
- Page 26 Non Typical, Inc., P.O. Box 10447, Green Bay, WI 54307-0447 920-347-3810...
Need help?
Do you have a question about the Ambush IR series and is the answer not in the manual?
Questions and answers