Advertisement
Quick Links
Read all instructions BEFORE assembly and USE of product.
KEEP INSTRUCTIONS FOR FUTURE USE.
Lea todas las instrucciones ANTES de armar y USAR el producto.
GUARDE LAS INSTRUCCIONES PARA USAR EN EL FUTURO.
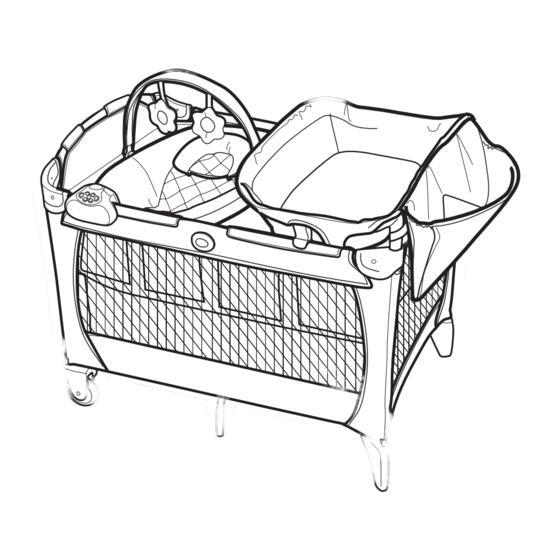
Pack 'n Play® Playard
Newborn Napper® LX
Owner's Manual • Manual del Usario
PD307344C 9/15
Advertisement

Related Manuals for Graco Pack 'n Play Playard Newborn Napper LX


Summary of Contents for Graco Pack 'n Play Playard Newborn Napper LX
- Page 1 Read all instructions BEFORE assembly and USE of product. KEEP INSTRUCTIONS FOR FUTURE USE. Lea todas las instrucciones ANTES de armar y USAR el producto. GUARDE LAS INSTRUCCIONES PARA USAR EN EL FUTURO. Pack 'n Play® Playard Newborn Napper® LX Owner’s Manual •...
- Page 2 • Never use this product if there are any loose or missing fasteners, loose joints, broken parts or torn mesh. Check before assembly and periodically during use. Contact Graco at 1-800-345-4109 (Canada 1-800-667-8184) for replacement parts and instructions if needed. Never substitute parts.
- Page 3 • On soft bedding. NEVER add a mattress, pillow, comforter or padding. Use ONLY mattress pad provided by Graco. • To reduce the risk of SIDS, pediatricians recommend healthy infants be placed on their backs to sleep, unless otherwise advised by your physician.
- Page 4 Verifique antes del armado y periódicamente durante el uso. De ser necesario, comuníquese con Graco al 1-800-345-4109 (Canadá 1-800-667-8184) para obtener piezas de repuesto e instrucciones. Nunca sustituya las piezas. Al usar el corralito •...
- Page 5 • En ropa de cama blanda. NUNCA agregue un colchón, almohada, edredón o almohadillas. Use SOLAMENTE el colchón proporcionado por Graco. • Para reducir el riesgo del SIDS, los pediatras recomiendan que los bebés con buena salud sean puestos a dormir sobre la espalda, a menos que su médico le indique lo contrario.
- Page 6 Parts list • Lista de las piezas This model may not Este modelo podría include some no incluir algunas features shown de las características below. Check that que se indican a you have all the continuación. parts for this model Verifique que tiene BEFORE assembling todas las piezas de este...
- Page 7 Setup • Installar...
- Page 8 DO NOT push center down yet. NO empuje todavía el centro hacia abajo todavía. SNAP! ¡RUIDO! SNAP! ¡RUIDO! • When setting up, lock rails before lowering center. Be sure top rails have become rigid. If not, pull up again until they are rigid.
- Page 9 Hold one end of the unit up and push the center of the floor down. Mantenga la unidad levantada de un extremo y empuje el centro del piso hacia abajo. Always use mattress/pad soft side up. Use siempre el lado más suave del colchón hacia arriba.
- Page 10 Put two tabs under mattress/pad through button holes and fasten securely on bottom of unit. Pase las dos lengüetas debajo del col- chón por los ojales y sujételas en la parte inferior de la unidad. Pull strap through bottom of playard and wrap around tube and refasten SNAP!
- Page 11 To Fold • Para plegar Release the straps. Suelte las correas. DO NOT unlock top rails yet. Center of floor must be halfway up before top rails will unlock. NO destrabe todavía los rieles superiores. El centro del piso debe estar arriba, al menos hasta la mitad, cuando pliegue los laterales.
- Page 12 Center of floor must be up. 1. Lift up slightly on the top rail. 2. Push in on the button located on the side of the top rail to release the two tubes. 3. Push down. • If top rails do not unlatch, DO NOT FORCE.
- Page 13 Do not force. If unit will not fold, look for a partially latched top rail. Squeeze the latch button to release the rail. No la fuerce. Si el corralito no se pliega totalmente, fíjese si los laterales están parcialmente doblados. Apriete el botón y pliegue el lateral.
- Page 14 To Cover • Para cubrir Cover unit with handle out. Zip together. Cubra la unidad con la manija hacia fuera. Cerrar con el cierre.
- Page 15 • If a sheet is used with the pad use only the one provided by Graco or one specifically designed to fit the dimensions of the bassinet.
- Page 16 • Si usa una sábana con la almohadilla, use solamente la provista por Graco o una específicamente diseñada según la dimensión de la cuna. • Nunca ponga al niño en la cuna si el moisés está instalado.
- Page 17 You will need to remove the mattress/pad from the bottom of the playard to use inside your bassinet. Necesitará sacar el colchón / almohadilla del fondo del corralito para usarlo adentro del moisés. Insert tapered end of bar into end of other bar with hole in it.
- Page 18 For Safe Battery Use • Para el uso seguro de las pilas Keep the batteries out of children’s reach. Any battery may leak battery acid if mixed with a different battery type, if inserted incorrectly (put in backwards) or if all batteries are not replaced or recharged at the same time.
- Page 19 Mantenga las pilas fuera del alcance de los niños. Cualquier pila puede sufrir una fuga de electrolito si se combina con otro tipo de pila, si se coloca incorrectamente (al revés) o si todas las pilas no se remplazan o recargan al mismo tiempo. No mezcle pilas viejas con nuevas.
- Page 20 Using Electronics Module • Cómo usar el módulo electrónico WARNING ADVERTENCIA Debe quitar el You must remove the module módulo electrónico cuando su niño from the unit when your child pueda ponerse de pie. can pull up to a standing position.
- Page 21 Remove battery door and insert 3 AA (LR06) batteries (not included). Replace door and screws. Saque la puerta para las pilas e inserte 3 pilas tamaño AA (LR06) (no se incluyen). Vuelva a poner la puerta y los tornillos. TO TURN OFF ANY FUNCTION— Press and hold the button for 2 seconds.
- Page 22 LIGHTS— Press once to turn top light (A) on, press twice to turn both lights on, press three times to turn bottom light (B) on, and four times to turn lights off. LUCES— Oprima una vez para encender la luz de arriba (A), dos veces para encender ambas luces, tres veces para encender la luz de abajo (B), y cuatro veces para apagarlas.
- Page 23 VOLUME— Press the plus (+) to raise the volume and the minus (-) to lower the volume. VOLUMEN— Oprima el signo más (+) para aumentar el volumen y el signo menos (-) para bajarlo. NATURE SOUNDS— Each press will change to the next nature sound.
- Page 24 Jamas deje a su hijo solo. • El mudador ha sido diseñado para usarlo con solamente esta el corralito Graco. No usarlo en el piso, la cama, el tablero o otro superficie. Antes de cada uso, asegúrese que el mudador esté bien firme sobre el corralito, empujando hacia abajo desde el centro del mudador.
- Page 25 Slide tube through fabric as shown. Repeat with other tube. Deslice el tubo por la tela como se indica. Repita el procedimiento con el otro tubo. Tubes should appear exactly as shown. Los tubos deberán aparecer exactamente como se indica.
- Page 26 Snap leg tubes together as shown. Trabe los tubos de las patas como se indica. SNAP! ¡RUIDO! Attach short tubes into changing table mounts. Conecte los tubos cortos en los montajes de la mesa para cambiar al bebé. SNAP! ¡RUIDO!
- Page 27 WARNING • Always keep objects out of child's reach. • Do not place more than 5 lbs (2.27 kg) in organizer. • Always attach organizer straps to playard when using product. ADVERTENCIA • Siempre mantenga los objetos fuera del alcance del niño. •...
- Page 28 To remove, push in button while Electronic module must be pulling up on corner of changing on opposite end from table. Repeat for other side. changing table. El módulo electrónico debe Para sacarla, empuje el botón estar en el lado opuesto de mientras tira hacia arriba de una la mesa para cambiar al esquina de la mesa para cambiar...
- Page 29 Newborn Napper® • Moisés WARNING Prevent serious injury or death: follow these warnings and the instructions. • You are responsible to provide adult supervision when using your napper. • Napper must be properly attached to bassinet before use. • Never use this napper on any other product. FALL HAZARD: To prevent falls, stop using the product when infant: •...
- Page 30 ADVERTENCIA Prevenga las lesiones serias o la muerte: use estas advertencias y las instrucciones. • Usted es responsable por proporcionar la supervisión de un adulto cuando usa su moisés. • El moisés debe estar instalado correctamente en la cuna antes de su uso.
- Page 31 WARNING ADVERTENCIA To prevent Para prevenir serias serious injury or lesiones o la muerte, death, DO NOT NO SAQUE LA REMOVE FOAM. ESPUMA. NOTE: Napper should always be attached opposite the changing table. NOTA: El moisés debe estar instalado siempre en el lado opuesto a la mesa para cambiar al bebé.
- Page 32 Insert the head support strap through the slot in the napper. MAKE sure strap is not twisted. Inserte la correa del apoyacabezas a través de la ranura del moisés. ASEGÚRESE que la correa no esté doblada. Secure hook and loop tape as shown.
- Page 33 Insert tube with plastic end into channel opening . Snap buttons should be down as shown Pase el tubo con el extremo de plástico por la abertura del canal . Trabe los botones como se indica en NOTE: DO NOT connect tubes until step 40.
- Page 34 Insert mattress pad into bassinet. Ponga la almohadilla del colchón en la cuna. Place napper inside of bassinet with head support at either end as shown. Ponga el moisés en el interior de la cuna con el apoyacabezas en cualquier extremo como se indica. Insert tube into channel on inside of bassinet as shown.
- Page 35 Insert tube into channel of bassinet on opposite side as shown. Ponga el tubo en el canal de la cuna en el otro lado como se indica. Instert metal tube into plastic tube. Ponga el tubo de metal en el tubo de plástico.
- Page 36 Insert opposite metal tube into plastic tube. Ponga el tubo de metal del otro lado en el tubo de plástico. SNAP! ¡RUIDO! Make sure the button clicks into place as shown. Asegúrese de que el botón se trabe en su lugar como se indica.
- Page 37 Toybar • Barra de juguetes WARNING • Possible entanglement or strangulation injury. Remove toy bar when baby begins to push up on hands and knees. Recommended use from birth to 5 months. • Never use toybar on playard or changing table. Only use toybar on napper.
- Page 38 Toy style may vary Los estilos de los juguetes pueden variar Firmly attach toybar to napper by clipping the toybar mounts to the sides of the napper as shown. Coloque firmemente la barra de juguetes en el moisés trabando los montantes de la barra de juguetes a los costados del moisés como se indica.
- Page 40 To Remove Napper • Cómo sacar el moisés Press buttons on both sides of napper to release metal tubes from plastic tubes. Oprima los botones en ambos costados del moisés para liberar los tubos de metal de los tubos de plástico.
-
Page 41: Care And Maintenance
DE VEZ EN CUANDO REVISE SU EL CORRALITO por si existieran partes gastadas, material roto o descosido. Reemplace o repare las par- tes que lo necesiten. Use sólo repuestos Graco ® . SI SU EL CORRALITO ES USADA EN LA PLAYA, debe limpiarla y sacarle muy bien la arena, incluyendo las patas, antes de meterla en el bolso cobertor. - Page 42 WARNING Changes or modifications to this unit not expressly approved by the party responsible for compliance could void the user authority to operate the equipemnt. This device complies with part 15 of the FCC Rules. Operation is subject to the following two conditions: (1) This device may not cause harmful interference, and (2) this device must accept any interference received, including interference that may cause undesired operation.
- Page 43 ADVERTENCIA: Los cambios o modificaciones a esta unidad que no hayan sido expresamente aprobados por la parte responsable por el cumplimiento de las normas podría cancelar el derecho del usuario a usar el equipo. Este dispositivo cumple con la parte 15 de las Normas de la Comisión Federal de Comunicaciones (FCC por sus siglas en inglés).
- Page 44 1-800-345-4109 Product Registration (USA) Registro del producto (EE.UU.) To register your Graco product from within the U.S.A. visit us online at www.gracobaby.com/productregistration or return registration card provided with your product. We currently do not accept product registrations from those living outside the United States of America.
Need help?
Do you have a question about the Pack 'n Play Playard Newborn Napper LX and is the answer not in the manual?
Questions and answers