Table of Contents
Advertisement
Available languages
Available languages
Quick Links
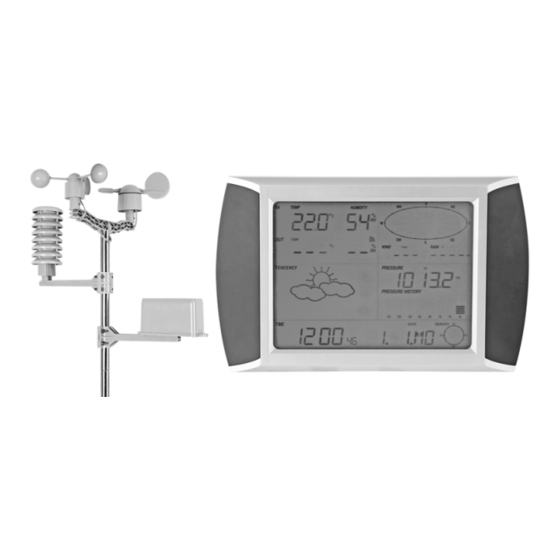
WS1080
WEATHER CENTRE WITH TOUCHSCREEN AND PC INTERFACE
WEERSTATION MET TOUCHSCREEN EN PC-AANSLUITING
STATION MÉTÉO À ÉCRAN TACTILE ET CONNEXION PC
ESTACIÓN METEOROLÓGICA CON PANTALLA TÁCTIL Y CONEXIÓN PC
WETTERSTATION MIT BERÜHRUNGSBILDSCHIRM UND PC-ANSCHLUSS
ESTAÇÃO METEOROLÓGICA COM ECRÃ DIGITAL E LIGAÇÃO AO PC
STACJA POGODOWA Z EKRANEM DOTYKOWYM I INTERFEJSEM PC
STAZIONE METEO CON TOUCHSCREEN E INTERFACCIA PC
2
13
24
36
48
60
72
84
Advertisement
Table of Contents

Related Manuals for Velleman WS1080


Summary of Contents for Velleman WS1080
-
Page 1: Table Of Contents
WS1080 WEATHER CENTRE WITH TOUCHSCREEN AND PC INTERFACE WEERSTATION MET TOUCHSCREEN EN PC-AANSLUITING STATION MÉTÉO À ÉCRAN TACTILE ET CONNEXION PC ESTACIÓN METEOROLÓGICA CON PANTALLA TÁCTIL Y CONEXIÓN PC WETTERSTATION MIT BERÜHRUNGSBILDSCHIRM UND PC-ANSCHLUSS ESTAÇÃO METEOROLÓGICA COM ECRÃ DIGITAL E LIGAÇÃO AO PC... -
Page 2: User Manual
If in doubt, contact your local waste disposal authorities. Thank you for choosing Velleman! Please read the manual thoroughly before bringing this device into service. If the device was damaged in transit, don't install or use it and contact your dealer. Damage caused by disregard of certain guidelines in this manual is not covered by the warranty and the dealer will not accept responsibility for any ensuing defects or problems. - Page 3 WS1080 V. 11 – 29/03/2013 ©Velleman nv...
- Page 4 WS1080 Install your outdoor weather station on a suitable location minding the wind direction markings. Connect the anemometer to the wind vane phone jacket. Connect the wind vane to the thermo- hygrometer WIND phone jacket. Connect the rain sensor to the thermo-hygrometer RAIN phone jacket.
- Page 5 WS1080 Outdoor Temperature Touch the outdoor temperature section once and press + or – to switch between outdoor temperature, wind chill, and dew point display. Touch the outdoor temperature section a second time and press + or – to switch between the temperature display in °C or °F.
- Page 6 WS1080 Weather Forecast Touch the weather forecast section once and press + or – to switch between sunny, partly cloudy, cloudy, and rainy display. Touch the weather forecast section a second time and press + or – to set the pressure threshold from 2-4 hPa.
- Page 7 WS1080 PC Connection and EasyWeather Software The WS1080 weather station is a high-quality and easy-to-use weather station that reads, displays and records weather data from internal as well as external sensors. The receiver itself has a non-volatile ring buffer memory (EEPROM) for up to 4,800 weather data sets with time and date.
- Page 8 WS1080 Function Button Press to display the function window. This window enables you to modify all the functions of the receiver as well as enable or disable the corresponding alarm functions. Edit as desired and click [Save] or [Cancel]. V. 11 – 29/03/2013...
- Page 9 WS1080 Alarm Button Press to display the alarm window. This window enables you to set the alarm time, and the high and low alarm of the receiver. Edit as desired and click [Save] or [Cancel]. Scope Button Press to display the scope window.
- Page 10 WS1080 History Data Button Press to display the history data window. This window gives you a complete recorded data overview in a spread sheet format. Enter the start time in the [StartTime] window and the end time in the [EndTime] window, and press [Search] for a quick search.
-
Page 11: Technical Specifications
Special Notes To successfully use your WS1080, both the receiver and your PC should display the exact same time. The WS1080 will only consider the set time on the receiver or through the software, not the time set on your PC. - Page 12 Microsoft Corporation in the United States and other countries. © COPYRIGHT NOTICE The copyright to this manual is owned by Velleman nv. All worldwide rights reserved. No part of this manual may be copied, reproduced, translated or reduced to any electronic medium or otherwise without the prior written consent of the copyright holder.
-
Page 13: Gebruikershandleiding
WS1080 GEBRUIKERSHANDLEIDING Inleiding Aan alle ingezetenen van de Europese Unie Belangrijke milieu-informatie betreffende dit product Dit symbool op het toestel of de verpakking geeft aan dat, als het na zijn levenscyclus wordt weggeworpen, dit toestel schade kan toebrengen aan het milieu. Gooi dit toestel (en eventuele batterijen) niet bij het gewone huishoudelijke afval;... - Page 14 WS1080 V. 11 – 29/03/2013 ©Velleman nv...
- Page 15 WS1080 Kies een geschikte plaats en stel het weerstation op volgens de aanwijzingen hierboven. Houd rekening met de windstreken. Koppel de anemometer aan de windwijzer, koppel de windwijzer aan WIND-aansluiting van de thermo-hygrometer en koppel de pluviometer aan de RAIN-aansluiting van de thermo-hygrometer.
- Page 16 WS1080 Buitentemperatuur Raak het lcd-scherm ter hoogte van de buitentemperatuur aan en druk op + of – om te schakelen tussen de buitentemperatuur, de gevoelstemperatuur en het dauwpunt. Raak het lcd-scherm een tweede maal aan en druk op + of –...
- Page 17 WS1080 regenval op te vragen. Houd de waarde ingedrukt om de waarde te resetten. Raak het lcd-scherm een vijfde maal aan en druk op CLEAR om alle waarden te resetten. Weersvoorspelling Raak het lcd-scherm ter hoogte van de weersvoorspellingen aan en druk op + of –...
- Page 18 Aansluiting op pc en de EasyWeather-software Het WS1080 weerstation is een hoogwaardig en gemakkelijk te gebruiken weerstation waarmee u de opgemeten waarden door de interne en externe sensoren kunt lezen en weergeven. Het ontvangststation heeft een ingebouwd niet-vluchtig geheugen (EEPROM) voor 4.800 weersgegevensets met tijd en datum.
- Page 19 WS1080 Alle instellingen van het ontvangststation verschijnen identiek in EasyWeather. Eens het ontvangststation ingesteld, hoeft dit in EasyWeather niet meer te doen. In EasyWeather kunt u echter, indien nodig, heel gemakkelijk de instellingen aanpassen. Deze aanpassingen worden dan automatisch in het ontvangststation opgeslagen.
- Page 20 WS1080 Alarmknop Druk op om het alarmvenster weer te geven. Hierin kunt u de alarmtijd instellen, alsook het alarm voor de hoge en de lage waarden. Wijzig naar wens en klik op [Save] om te bewaren of op [Cancel] om te annuleren.
- Page 21 WS1080 Historiekknop Druk op om een historiek weer te geven. Hierin vindt u een overzicht van alle opgemeten gegevensets in een spreadsheet. Geef de starttijd [StartTime] en de eindtijd [EndTime] in, en druk op [Search] voor een snelle zoekactie. Selecteer een gegevenset en druk op [Export] om de set naar een tekstformaat te exporteren.
- Page 22 Speciale opmerkingen Om de WS1080 zo goed mogelijk te benutten, stelt u het uur van het ontvangststation af op dat van uw pc. De WS1080 houdt enkel rekening met het uur ingesteld op het ontvangststation of via de pc, niet met het uur ingesteld op uw pc.
- Page 23 WS1080 Gebruik dit toestel enkel met originele accessoires. Velleman nv is niet aansprakelijk voor schade of kwetsuren bij (verkeerd) gebruik van dit toestel. Voor meer informatie over dit product en de laatste versie van deze handleiding, zie www.velleman.eu. De informatie in deze handleiding kan te allen tijde worden gewijzigd zonder voorafgaande kennisgeving.
-
Page 24: Mode D'emploi
WS1080 MODE D'EMPLOI Introduction Aux résidents de l'Union européenne Des informations environnementales importantes concernant ce produit Ce symbole sur l'appareil ou l'emballage indique que l’élimination d’un appareil en fin de vie peut polluer l'environnement. Ne pas jeter un appareil électrique ou électronique (et des piles éventuelles) parmi les déchets municipaux non sujets au tri sélectif ;... - Page 25 WS1080 V. 11 – 29/03/2013 ©Velleman nv...
- Page 26 WS1080 Installer la station météo à un endroit approprié en tenant compte des points cardinaux. Raccorder l’anémomètre à la prise de la girouette, raccorder la girouette à la prise WIND du thermo- hygromètre et raccorder le pluviomètre à la prise RAIN du thermo-hygromètre. Enfin, insérer 3 piles type AA dans la station météo en respectant la polarité.
- Page 27 WS1080 Température extérieure Enfoncer légèrement l’écran à hauteur de la température extérieure et enfoncer + ou – pour afficher la température extérieure, le refroidissement éolien et le point de rosée. Enfoncer l’écran une deuxième fois à hauteur de la température extérieure et enfoncer + ou –...
- Page 28 WS1080 Pluviosité Enfoncer légèrement l’écran à hauteur de la pluviosité et enfoncer + ou – pour afficher la pluviosité de la dernière heure, des dernières 24h, de la dernière semaine, du dernier mois ou la pluviosité totale. Enfoncer l’écran une deuxième fois à hauteur de la pluviosité et enfoncer + ou –...
- Page 29 Connexion avec l’ordinateur et le logiciel de gestion EasyWeather La WS1080 est une station météo haute qualité convivial prévue pour l’affichage et l’enregistrement de données météorologiques. La station de réception intègre une mémoire tampon non volatile (EEPROM) et mémorise jusqu’à...
- Page 30 WS1080 Paramétrages de base Après avoir lancé EasyWeather, la fenêtre suivante apparaît : Les paramétrages de la station de réception sont repris par le logiciel. Une fois la station de réception réglée, il n’est plus nécessaire de paramétrer depuis l’ordinateur. Cependant, EasyWeather permet de facilement apporter des modifications si nécessaire.
- Page 31 WS1080 La fenêtre d’alarme Enfoncer pour afficher la fenêtre d’alarme. Cette fenêtre permet de régler l’heure de l’alarme, et les alarmes HI et LO de la station de réception. Modifier comme souhaité et cliquer sur [Save] pour sauvegarder ou sur [Cancel] pour annuler.
- Page 32 WS1080 L’aperçu Enfoncer pour afficher un aperçu. Cet aperçu affiche toutes les valeurs minimale et maximale avec heure et date de relevé. Les valeurs ne peuvent être remises à zéro que depuis la station de réception. Cliquer sur [OK] pour quitter.
- Page 33 WS1080 Le graphique Enfoncer pour afficher le graphique. Le graphique est une représentation des valeurs relevées. Agrandir une partie de la courbe en la sélectionnant à l’aide de la souris. Cocher la case [3D] pour afficher la courbe au format 3D.
- Page 34 WS1080 Remarque Afin d’utiliser votre WS1080 de manière efficace, il est conseillé de synchroniser l’heure de la station de réception à celle de votre ordinateur. La WS1080 ne tient compte qu’avec l’heure enregistrée dans la station et non avec celle de votre ordinateur.
- Page 35 Microsoft Corporation aux Etats-Unis et dans d'autres pays. © DROITS D’AUTEUR SA Velleman est l’ayant droit des droits d’auteur pour cette notice. Tous droits mondiaux réservés. Toute reproduction, traduction, copie ou diffusion, intégrale ou partielle, du contenu de cette notice par quelque procédé...
-
Page 36: Manual Del Usuario
Si tiene dudas, contacte con las autoridades locales para residuos. ¡Gracias por elegir Velleman! Lea atentamente las instrucciones del manual antes de usar el aparato. Si el aparato ha sufrido algún daño en el transporte no lo instale y póngase en contacto con su distribuidor. - Page 37 WS1080 V. 11 – 29/03/2013 ©Velleman nv...
- Page 38 WS1080 Instale la estación meteorológica en un lugar adecuado y tenga en cuenta los puntos cardinales. Conecte el anemómetro a la conexión de la veleta. Conecte la veleta a la conexión WIND del termo- higrómetro y conecte el pluviómetro a la conexión RAIN del termo-higrómetro. Finalmente, introduzca 3 pilas AA en la estación meteorológica.
- Page 39 WS1080 Temperatura exterior Pulse ligeramente la pantalla a la altura de la temperatura exterior y pulse + o – para visualizar la temperatura exterior, el factor de enfriamiento del viento y el punto de rocío. Pulse la pantalla una segunda vez a la altura de la temperatura exterior y pulse + o –...
- Page 40 WS1080 Pluviosidad Pulse ligeramente la pantalla a la altura de la pluviosidad y pulse + o – para visualizar la pluviosidad de la última hora, las últimas 24h, la última semana, del último mes o la pluviosidad total. Pulse la pantalla una segunda vez a la altura de la pluviosidad y pulse + o –...
- Page 41 Conexión al ordenador y el software EasyWeather La WS1080 es una estación meteorológica de alta calidad y fácil de utilizar para la visualización y la grabación de datos meteorológicos. La estación de recepción incorpora una memoria tampón no volátil (EEPROM) y memoriza hasta 4.800 grupos de datos con hora y fecha.
- Page 42 WS1080 Ajustes básicos Después de haber ejecutado EasyWeather, aparece la siguiente pantalla: Los ajustes de la estación de recepción aparecen también en el software. Después de que la estación de recepción esté ajustada, ya no es necesario ajustar desde el ordenador. Sin embargo, EasyWeather permite realizar fácilmente modificaciones si fuera necesario.
- Page 43 WS1080 La pantalla de funciones Pulse para entrar en la pantalla de las funciones. Esta pantalla permite modificar las funciones en la estación de recepción y activar o desactivar la alarma correspondiente. Modifique como quiera y haga click en [Save] para guardar o en [Cancel] para anular.
- Page 44 WS1080 La pantalla de alarma Pulse para visualizar la pantalla de alarma. Esta pantalla permite ajustar la hora de la alarma, y las alarmas HI y LO de la estación de recepción. Modifique como quiera y haga click en [Save] para guardar o en [Cancel] para anular.
- Page 45 WS1080 La historia Pulse para visualizar la historia. La historia visualiza un resumen completo de los valores medidos en una hoja de cálculo. Introduzca la hora y la fecha inicial [StartTime], y la hora y la fecha finales [EndTime], y haga click en [Search] para efectuar una búsqueda rápida.
- Page 46 Para utilizar la WS1080 de manera eficaz, sincronice la hora de la estación de recepción con la del ordenador. La WS1080 sólo cuenta con la hora de la estación o la hora ajustada por el software y no cuenta con la hora del ordenador.
- Page 47 Microsoft Corporation en los Estados Unidos y otros países. © DERECHOS DE AUTOR Velleman NV dispone de los derechos de autor para este manual del usuario. Todos los derechos mundiales reservados. Está estrictamente prohibido reproducir, traducir, copiar, editar y guardar este manual del usuario o partes de ello sin previo permiso escrito del derecho habiente.
-
Page 48: Bedienungsanleitung
Respektieren Sie die örtlichen Umweltvorschriften. Falls Zweifel bestehen, wenden Sie sich für Entsorgungsrichtlinien an Ihre örtliche Behörde. Vielen Dank, dass Sie sich für Velleman entschieden haben! Lesen Sie diese Bedienungsanleitung vor Inbetriebnahme sorgfältig durch. Überprüfen Sie, ob Transportschäden vorliegen. Sollte dies der Fall sein, verwenden Sie das Gerät nicht und wenden Sie sich an Ihren Händler. - Page 49 WS1080 V. 11 – 29/03/2013 ©Velleman nv...
- Page 50 WS1080 Wählen Sie einen geeigneten Ort und installieren Sie die Wetterstation (siehe Anweisungen oben). Berücksichtigen Sie die Himmelsrichtungen. Verbinden Sie das Anemometer mit der Wetterfahne. Verbinden Sie die Wetterfahne mit dem WIND-Anschluss des Thermo-Hygrometers und verbinden Sie das Pluviometer mit dem RAIN-Anschluss des Thermo-Hygrometers. Legen Sie schließlich 3 x AA-Batterien in das Batteriefach der Wetterstation ein.
- Page 51 WS1080 Außentemperatur Berühren Sie die Außentemperatur im LCD-Display und drücken Sie + oder – um zwischen der Außentemperatur, der gefühlten Temperatur und dem Taupunkt zu schalten. Berühren Sie das LCD-Display ein zweites Mal und drücken Sie + oder – um zwischen der Temperaturanzeige in °C oder °F zu schalten.
- Page 52 WS1080 Regenfall Berühren Sie die Regenfall im LCD-Display und drücken Sie + oder – um zwischen der Regenfalldaten der letzten Stunde, der letzten 24 Stunden, der letzten Woche, des letzten Monates und der totalen Regenfall zu schalten. Berühren Sie das LCD-Display ein zweites Mal und drücken Sie + oder –...
- Page 53 Berühren Sie das LCD-Display ein zweites Mal. Halten Sie gedrückt um alle Daten zu löschen. Anschluss an PC und die EasyWeather-Software Die WS1080 ist eine hochwertige und einfach zu verwenden Wetterstation mit der Sie die gemessenen Werte dank der internen und externen Sensoren lesen und anzeigen können. Das Empfangsgerät hat einen nichtflüchtigen Speicher (EEPROM) für 4.800 Wetterdatengruppen mit Zeit und Datum.
- Page 54 WS1080 Basiseinstellungen Nach dem Starten von EasyWeather erscheint nachfolgendes Fenster: Alle Einstellungen des Empfangsgeräts erscheinen identisch in EasyWeather. Nachdem Sie das Empfangsgerät eingestellt haben, brauchen Sie dies nicht mehr in EasyWeather zu tun. In EasyWeather können Sie aber, wenn nötig, sehr einfach die Einstellungen anpassen. Diese Anpassungen werden dann automatisch in das Empfangsgerät gespeichert.
- Page 55 WS1080 Alarmtaste Drücken Sie um den Alarmfenster anzuzeigen. Hier können Sie die Alarmzeit und den Alarm für die hohen und niedrigen Werte einstellen. Ändern Sie nach Wunsch und klicken Sie [Save] zum Speichern oder [Cancel] zum Abbrechen. V. 11 – 29/03/2013...
- Page 56 WS1080 Überblicktaste Drücken Sie um den Überblick anzuzeigen. Hier bekommen Sie einen völligen Überblick der gemessenen Mindest- und Höchstwerte mit Zeit und Datum. Setzen Sie den Wert über das Empfangsgerät zurück. Klicken Sie [OK] um das Fenster zu verlassen. Datenüberblicktaste Drücken Sie...
- Page 57 WS1080 Grafiktaste Drücken Sie um das Grafikfenster anzuzeigen. Hierin bekommen Sie eine grafische Darstellung. Holen Sie die Kurve näher heran, indem Sie den gewünschten Teil mit der Maus auswählen. Wählen Sie die Option [3D] um die Kurve in 3D-Format anzuzeigen.
-
Page 58: Technische Daten
WS1080 Spezielle Bemerkungen Um die WS1080 möglichst gut zu verwenden, beachten Sie, dass die Uhr des Empfangsgeräts und des PC genau übereinstimmen. Die WS1080 berücksichtigt nur die Uhr des Empfangsgeräts oder eingestellt über die Software, nicht die Uhr des PC. - Page 59 Warenzeichen von Microsoft Corporation in den VS und anderen Ländern. © URHEBERRECHT Velleman NV besitzt das Urheberrecht für diese Bedienungsanleitung. Alle weltweiten Rechte vorbehalten. Ohne vorherige schriftliche Genehmigung des Urhebers ist es nicht gestattet, diese Bedienungsanleitung ganz oder in Teilen zu reproduzieren, zu kopieren, zu übersetzen, zu bearbeiten oder zu speichern.
-
Page 60: Manual Do Utilizador
Em caso de dúvidas, contacte com as autoridades locais para os resíduos. Obrigada por escolher a Velleman! Leia atentamente as instruções do manual antes de usar o aparelho. Caso o aparelho tenha sofrido algum dano durante o transporte não o instale e entre em contacto com o seu distribuidor. - Page 61 WS1080 V. 11 – 29/03/2013 ©Velleman nv...
- Page 62 WS1080 Instale a estação meteorológica num local adequado e tenha em conta os pontos cardeais. Ligue o anemómetro a la conexión de la veleta. Ligue a veleta à entrada WIND do termo-higrómetro e ligue o pluviómetro à entrada RAIN do termo-higrómetro. Finalmente, introduza 3 pilhas AA na estação meteorológica.
- Page 63 WS1080 Temperatura exterior Pressione ligeiramente o ecrã na altura da temperatura exterior e prima + ou – para visualizar a temperatura exterior, o factor de arrefecimento do vento e o ponto de orvalho. Pressione o ecrã uma segunda vez na altura da temperatura exterior e prima + ou –...
- Page 64 WS1080 Pluviosidade Pressione ligeiramente o ecrã ao aparecer a pluviosidade e prima + ou – para visualizar a pluviosidade da última hora, das últimas 24h, da última semana, do último mês ou a pluviosidade total. Pressione o ecrã uma segunda vez ao aparecer a pluviosidade e prima + ou –...
- Page 65 Ligação ao computador e o software EasyWeather A WS1080 é uma estação meteorológica de elevada qualidade e fácil de utilizar para visualização e gravação de dados meteorológicos. A estação de recepção incorpora uma memória não volátil (EEPROM) e memoriza até...
- Page 66 WS1080 Ajustes básicos Após ter executado o EasyWeather, aparece o ecrã seguinte: Os ajuste da estação de recepção aparecem também no software. Logo que a estação de recepção esteja ajustada, já não é necessário fazer ajustes a partir do computador. No entanto, o EasyWeather permite fazer alterações fácilmente caso seja necessário.
- Page 67 WS1080 O ecrã de alarme Prima para visualizar o ecrã de alarme. Este ecrã permite ajustar a hora do alarme, e os alarmes HI e LO da estação de recepção. Modifique como desejar e faça click em [Save] para guardar ou em [Cancel] para anular.
- Page 68 WS1080 Resumo Prima para visualizar o resumo. Este resumo indica todos os valores mín. e máx. com hora e data. Só é possível reinicializar os valores a partir da estação da recepção. Faça click em [OK] para sair. O histórico Prima para visualizar o histórico.
- Page 69 WS1080 O gráfico Prima para visualizar o gráfico. O gráfico é uma representação dos valores medidos. Amplie uma parte da curva seleccionando-a com o rato. Seleccione a opção [3D] para visualizar a curva em formato 3D. O que fazer quando o gráfico não aparece Abra a pasta que contem o ficheiro [EasyWeather.exe].
- Page 70 WS1080 Notas Para utilizar a WS1080 de forma eficaz, sincronize a hora da estação de recepção com a hora do computador. A WS1080 regula-se apenas pela hora da estação ou pela hora ajustada pelo software e não tem em conta a hora do computador.
- Page 71 © DIREITOS DE AUTOR A Velleman NV detem os direitos de autor deste manual do utilizador. Todos os direitos mundiais reservados. É estrictamente proíbido reproduzir, traduzir, copiar, editar e gravar este manual do utilizador ou partes deste sem prévia autorização escrita por parte da detentora dos direitos.
-
Page 72: Instrukcja Obsługi
środowiska. Jeśli masz wątpliwości skontaktuj się z firmą zajmującą się utylizacją odpadów. Dziękujemy za wybór produktu firmy Velleman! Prosimy o dokładne zapoznanie się z instrukcją obsługi przed użyciem. Jeśli urządzenie zostało uszkodzone podczas transportu prosimy o nie korzystanie z niego i skontaktowanie się... - Page 73 WS1080 V. 11 – 29/03/2013 ©Velleman nv...
- Page 74 WS1080 Czujniki zewnętrzne stacji pogodowej instaluj w odpowiedniej lokalizacji zwracając uwagę na najczęstsze kierunki wiatru. Podłącz wiatromierz do obudowy róży wiatrów. Podłącz różę wiatrów do obudowy czujnika temperaturowo-wilgotnościowego WIATRU. Ten z kolei połącz z czujnikiem temperaturowo-wilgotnościowym DESZCZU. Następnie, włóż 3 sztuki baterii alkalicznych AA do stacji pogodowej.
- Page 75 WS1080 Temperatura Zewnętrzna (OUT TEMP) Dotknij ekranu w sekcji temperatury zewnętrznej raz a następnie wciśnij + lub – aby przełączyć wyświetlanie pomiędzy temperaturą, temperaturą odczuwalną a punktem rosy. Dotknij ekranu w sekcji temperatury zewnętrznej drugi raz a następnie wciśnij + lub – aby zmienić wyświetlaną jednostkę...
- Page 76 WS1080 Wciśnij ON/OFF aby odpowiednio włączyć/wyłączyć ten alarm. Dotknij ekranu w sekcji prędkości wiatru po raz piąty aby wyświetlić najwyższą zanotowaną prędkość wiatru. Naciśnij i przytrzymaj w miejscu wyświetlonej wartości, aby ją wyzerować. Deszcz (RAIN) Dotknij ekranu w sekcji deszczu raz a następnie wciśnij + lub –...
- Page 77 Połączenie z komputerem oraz oprogramowanie EasyWeather WS1080 to wysokiej jakości, prosta w użytkowaniu stacja pogodowa, która mierzy, pokazuje i zapisuje dane pogodowe dzięki wewnętrznym i zewnętrznym czujnikom. Odbiornik posiada wbudowaną stabilną pamięć podręczną (EEPROM), dzięki czemu może zapisywać do 4.800 danych pogodowych z równoczesnym zapisem czasu.
- Page 78 WS1080 Uwaga: Oprogramowanie EasyWeather instaluj przy użyciu konta administratora. Użycie innego konta może skutkować nieefektywnym działaniem funkcji graficznych. Ustawienia podstawowe Po uruchomieniu aplikacji EasyWeather, wyświetli się poniższe menu główne: Wszystkie ustawienia zapisane w stacji pogodowej mają swoje odwzorowanie w programie. Jeśli ustawiłeś...
- Page 79 WS1080 Przycisk alarmu Wciśnij aby wyświetlić okno alarmów. Okno to pozwala Ci ustawianie czasu alarmu a także wartości maksymalnych i minimalnych dla funkcji alarmu w stacji pogodowej. Po zakończeniu modyfikowania kliknij [Save] aby zapisać zmiany lub [Cancel] aby wyjść bez zapisywania.
- Page 80 WS1080 Przycisk przeglądu Wciśnij aby wyświetlić okno przeglądu. Okno to daje Ci kompletny przegląd zapisanych przez stację wartości minimum i maksimum wraz z datą i godziną ich zanotowania. Zerowanie tych danych może zostać wykonane tylko bezpośrednio w stacji pogodowej. Kliknij [OK] aby zamknąć to okno.
- Page 81 WS1080 Przycisk wykresu Wciśnij aby wyświetlić okno wykresu. Okno to daje Ci możliwość tworzenia wykresów na podstawie zebranych danych. Aby przybliżyć fragment wykresu, zaznacz wybrany fragment za pomocą myszki. Aby wyświetlić wykres w formacie 3D, kliknij na przycisk [3D]. Co zrobić, jeśli okno wykresu nie działa poprawnie? Otwórz folder, w którym znajduje się...
- Page 82 WS1080 Uwagi dodatkowe Dla najlepszego działania stacji WS1080, Twój komputer i stacja pogodowa powinny mieć ustawiony dokładnie taki sam czas. Stacja WS1080 posługuje się czasem ustawionym ręcznie przez sekcję czasu, lub za pomocą oprogramowania EasyWeather. Nie ma możliwości automatycznego zsynchronizowania czasu z komputerem.
- Page 83 Microsoft Corporation w Stanach Zjednoczonych i innych krajach. © INFORMACJA O PRAWACH WŁASNOŚCI Instrukcja ta jest własnością firmy Velleman NV i jest chroniona prawami autorskimi. Wszystkie prawa są zastrzeżone na całym świecie. Żadna część tej instrukcji nie może być...
-
Page 84: Manuale Utente
è stato effettuato l’acquisto. La ringraziamo per aver scelto Velleman! Si prega di leggere attentamente le informazioni contenute nel presente manuale prima di utilizzare il dispositivo. Assicurarsi che l’apparecchio non sia stato danneggiato durante il trasporto;... - Page 85 WS1080 V. 11 – 29/03/2013 ©Velleman nv...
- Page 86 WS1080 Installare l’unità esterna della stazione meteo in uno spazio aperto, lontano da alberi o altri ostacoli. Collegare il cavo dell’anemometro al connettore telefonico presente sotto la banderuola ed inserire il connettore di quest’ultima nella presa “WIND” presente nel pannello posteriore del termoigrometro.
- Page 87 WS1080 Temperatura esterna Premere una volta sulla sezione temperatura esterna quindi su + o – per visualizzare, in sequenza, la temperatura esterna, il wind chill e il punto di rugiada. Premere una seconda volta sulla stessa sezione e successivamente su + o – per visualizzare la temperatura in °C o °F.
- Page 88 WS1080 premere ON/OFF per attivare o disattivare l’allarme. Premere una quarta volta sulla stessa sezione e successivamente su + o – per visualizzare il volume totale delle precipitazioni. Premere a lungo sul valore per azzerarlo. Premere una quinta volta sulla stessa sezione e successivamente su CLEAR per azzerare tutti i valori relativi alle precipitazioni.
- Page 89 Collegamento al PC e software EasyWeather La stazione meteo WS1080 è un apparecchio di elevata qualità, semplice da utilizzare, in grado di visualizzare e registrare i dati meteorologici rilevati dall’unità interna nonché quelli trasmessi dai sensori esterni.
- Page 90 WS1080 Impostazioni di base Dopo l’avvio del programma EasyWeather appare la seguente schermata: Tutte le impostazioni presenti nell’unità ricevente vengono riportate nel software, per cui non è necessario effettuare alcuna operazione dal PC. Tuttavia, mediante il software EasyWeather, è possibile effettuare con molta semplicità...
- Page 91 WS1080 Tasto allarmi Premere per visualizzare la finestra degli allarmi. Tramite questa finestra è possibile impostare l’allarme orario e i livelli alto e basso degli allarmi disponibili nella centralina. Effettuare le modifiche desiderate quindi cliccare su [Save] per salvare o [Cancel] per annullare.
- Page 92 WS1080 Tasto valori max/min registrati Premere per visualizzare la finestra contenente i valori minimi e massimi registrati. Questa finestra vi permette di avere una visione completa dei valori minimi e massimi registrati dalla centralina con relativa ora e data. L’azzeramento dei valori può essere eseguito solamente dalla centralina.
- Page 93 WS1080 Tasto grafico Premere per visualizzare la finestra grafico. In questa finestra viene visualizzato il grafico della grandezza selezionata. Per ingrandire una specifica area del grafico, premere il pulsante sinistro del mouse e trascinare il cursore. Spuntare la casella [3D] per visualizzare il grafico in formato 3D.
- Page 94 WS1080 Note particolari Per utilizzare correttamente la vostra WS1080, è necessario che l’orologio del PC e quello della stazione siano sincronizzati. La WS1080 prende in considerazione l’ora impostata nell’unità ricevente e non quella del proprio PC. Si tenga presente che i dati cancellati manualmente dall’unità ricevente verranno persi definitivamente.
- Page 95 Microsoft Corporation negli Stati Uniti e in altri paesi. © DIRITTI D’AUTORE Questo manuale è protetto da copyright. Velleman nv è il beneficiario del diritto d'autore di questo manuale. Tutti i diritti riservati in tutto il mondo. È severamente vietato riprodurre, tradurre, copiare, modificare e salvare il manuale utente o porzioni di esso su qualsiasi supporto, informatico, cartaceo o di altra natura, senza previa autorizzazione scritta del proprietario.
- Page 96 Déclaration de conformité R&TTE R&TTE Konformitätserklärung Declaración de conformidad R&TTE We / wij / nous / Wir / nostros Velleman Components NV Legen Heirweg, 33 9890 Gavere (België) Declare on our own responsibility that the finished product(s): Verklaren op eigen verantwoordelijkheid dat het afgewerkte product: Déclarons sous notre propre responsabilité...
- Page 97 Technische gegevens zijn beschikbaar en kunnen worden aangevraagd bij : Die technische Dokumentation zu den oben gennanten Produkten wird geführt bei: Los datos técnicos están disponibles y pueden ser solicitados a: Velleman Components NV Legen Heirweg, 33 9890 Gavere (België) Place and date of issue / Plaats en datum van uitgifte / Place et date d’émission / Ort und Datum der Ausstellung / Lugar y...
- Page 98 • Velleman® can decide to replace an article with an equivalent article, or to • Tip: alvorens het toestel voor reparatie aan te bieden, kijk nog eens na of er...
- Page 99 Velleman®; wewnętrznego działu jakości jak również wyspecjalizowanych firm - se calcula gastos de transporte de y a Velleman® si el aparato ya no está zewnętrznych. Pomimo dołożenia wszelkich starań czasem mogą pojawić się...
- Page 100 • no caso da reclamação ser justificada e que a reparação ou substituição de um artigo é impossível, ou quando os custo são desproporcionados, Velleman® autoriza-se a substituir o dito artigo por um artigo equivalente ou a devolver a totalidade ou parte do preço de compra. Em outro caso, será...
Need help?
Do you have a question about the WS1080 and is the answer not in the manual?
Questions and answers