Cub Cadet 18M Operator's Manual
19-inch rotary lawnmower
Hide thumbs
Also See for 18M:
- Operator's manual (60 pages) ,
- Operator's manual (28 pages) ,
- Operator's manual (32 pages)
Table of Contents
Advertisement
Quick Links
Download this manual
See also:
Operator's Manual
Safety • Set-Up • Adjustments • Operation • Maintenance • Troubleshooting • Warranty • Parts Lists
OPERATOR'S MANUAL
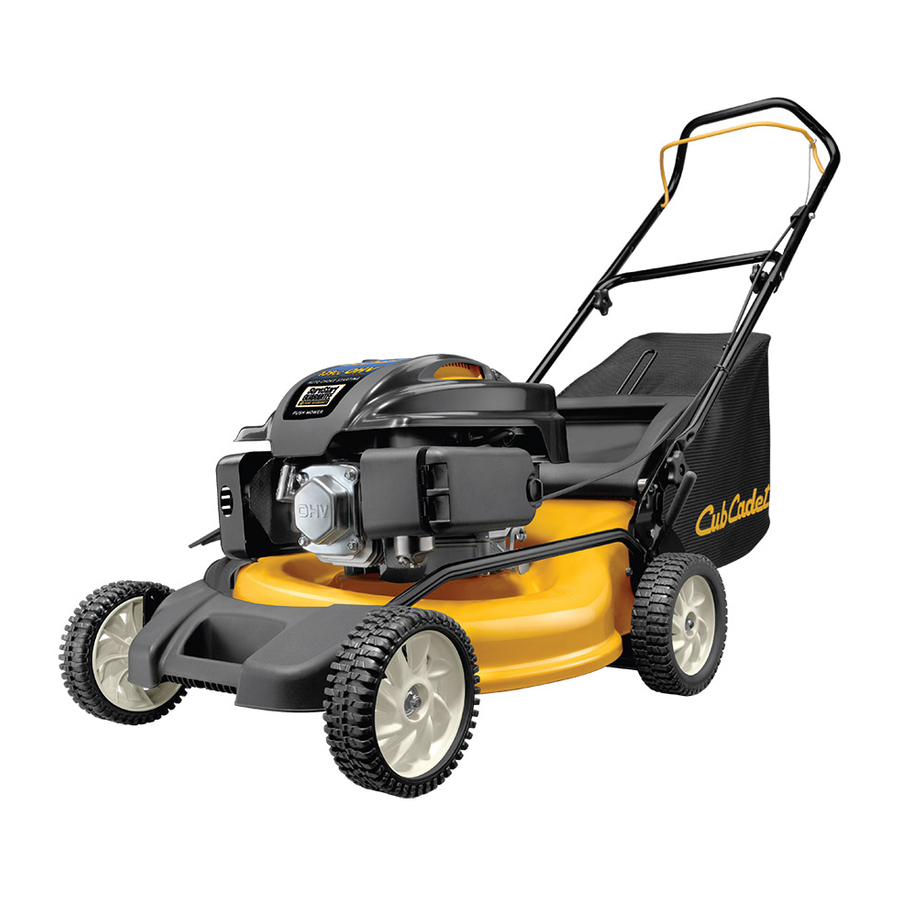
19-inch Rotary Lawn Mower — Model 18M
IMPORTANT:
READ SAFETY RULES AND INSTRUCTIONS
CAREFULLY BEFORE OPERATING EQUIPMENT.
PRINTED IN U.S.A.
P. O. Box 1386, 97 Kent Avenue, KITCHENER, ONTARIO N2G 4J1
769-03084B
02/17/09
Advertisement
Table of Contents

Related Manuals for Cub Cadet 18M


Summary of Contents for Cub Cadet 18M
- Page 1 Safety • Set-Up • Adjustments • Operation • Maintenance • Troubleshooting • Warranty • Parts Lists OPERATOR’S MANUAL 19-inch Rotary Lawn Mower — Model 18M IMPORTANT: READ SAFETY RULES AND INSTRUCTIONS CAREFULLY BEFORE OPERATING EQUIPMENT. 769-03084B P. O. Box 1386, 97 Kent Avenue, KITCHENER, ONTARIO N2G 4J1 02/17/09 PRINTED IN U.S.A.
-
Page 2: Table Of Contents
This Operator’s Manual is an important part of your new equipment. It will help you assemble, prepare and maintain the unit for best performance. Please read and understand what it says. Table of Contents Slope Gauge............3 Trouble Shooting ..........14 Safe Operation Practices ........ -
Page 3: Slope Gauge
Use this page as a guide to determine slopes where you may not operate safely. Do not operate your lawn mower on such slopes. Slope Gauge WARNING Do not mow on inclines with a slope in excess of 15 degrees (a rise of approximately 2-1/2 feet every 10 feet). -
Page 4: Safe Operation Practices
WARNING: Engine Exhaust, some of its constituents, and certain vehicle components contain or emit chemicals known to the State of California to cause cancer and birth defects or other reproductive harm. DANGER: This machine was built to be operated according to the rules for safe operation in this manual. As with any type of power equipment, carelessness or error on the part of the operator can result in serious injury. -
Page 5: Slope Operation
Children 22. Shut the engine off and wait until the blade comes to a complete stop before removing the grass catcher or ragic accidents can occur if the operator is not alert to unclogging the chute. The cutting blade continues to the presence of children. - Page 6 9. Never over fill fuel tank. Fill tank to no more than ½ 8. Never attempt to make a wheel or cutting height inch below bottom of filler neck to provide for fuel adjustment while the engine is running. expansion. 9.
-
Page 7: Save These Instructions
Safety This page depicts and describes safety symbols that may appear on this product. Read, understand, and follow all instructions on the machine before attempting to assemble and operate. Symbols Symbol Description READ THE OPERATOR’S MANUAL(S) Read, understand, and follow all instructions in the manual(s) before attempting to assemble and operate DANGER —... -
Page 8: Set-Up & Adjustments
NOTE: The units illustrated may vary slightly from your unit. 1. Remove any packing material which may be between upper and lower handles. Pull up and back on the upper handle to raise the handle from position A into the operating position. Setup and See Figure 3-1. -
Page 9: Cutting Height
To remove grass catcher lift rear discharge door on the mower . Lift grass catcher up and out, off of the pivot rod. Release rear discharge door to allow it to close rear opening of mower. WARNING: Never operate mower un- less the hooks on the grass catcher Setup and are firmly seated on the pivot rod, and... -
Page 10: Operation
Know Your Lawn Mower Blade Control Operating Choke Knob (optional) Your Lawn Recoil Starter Mower Cutting Height Adjustment Lever WARNING Read, understand, Mulching Plug and follow all instruc- tions and warnings on the machine and in this manual before Figure 4-1 operating. -
Page 11: Starting Engine
Starting Engine Refer to the separate engine manual packed with your unit. NOTE: Some models are equipped with an automatic choke. 1. If equipped, pull out the choke knob located on the left side of the upper handle, Figure 4-2. Operating For models without a manual choke, proceed to step Your Lawn... -
Page 12: Maintenance & Off-Season Storage
4. Clean the engine regularly with a cloth or brush. Keep the cooling system (blower housing area) clean to permit proper air circulation which is essential to engine performance and life. Be certain to remove all grass, dirt and combustible debris from muffler area. Deck Maintenance The underside of the mower deck should be cleaned after... - Page 13 Blade Adapter Maintenance WARNING Figure 5-2 Figure 5-3 9. Install the blade adapter on the crankshaft with the Off-Season Storage When removing “star” away from the engine. See Figure 5-2. Place the cutting blade The following steps should be taken to prepare your lawn the blade with the side marked “bottom”...
-
Page 14: Trouble Shooting
Problem Cause Remedy 1. Engage blade control handle. Engine fails to start 1. Blade control handle disengaged. 2. Connect wire to spark plug. 2. Spark plug wire disconnected. 3. Fuel tank empty or stale fuel. 3. Fill tank with clean, fresh gasoline. Trouble 4. -
Page 15: Warranty
THREE YEAR LIMITED WARRANTY The limited warranty set forth below is given by MTD Products Limited with respect to new merchandise purchased and used in Canada and/or its territories and possessions (either entity respectively, “MTD”). MTD warrants this product (excluding its normal wear parts as described below) against defects in material and workmanship for a period of three (3) years commencing on the date of original purchase and will, at its option, repair or replace, free of charge, any part found to be defective in materials or workmanship. -
Page 16: Illustrated Parts Lists
Model 18M OHV engines with auto choke Moteurs à soupapes en tête avec volet de départ automatique... - Page 17 * 62 731-06749 Ca ble Bracket Support 738-04278 Shoul der Screw 1/4-20 x .50 Vis a épaulement 1/4-20 x 0,50 11A-18M * OHV en gines with auto choke only/ 4.8.09 Moteurs à soupapes en tête avecvolet de départ automatique seulement...
-
Page 18: The Surestart Guarantee
If the engine on your mower fails to fuels, lubricants, or additives conform to this limited warranty, Cub Cadet will cover the cost of • Special conditions or circumstances that normally require more parts and labor associated with any adjustments and/or repairs than two pulls to start, specifically: 1) First start-up following your necessary to return your engine to its warranted condition. - Page 19 NOTES: For parts and/or accessories refer to customer support on page 2. Adressez-vous au «Service après-vente» à la page 2 pour ce qui concerne les pièces et/ou accessoires.