Table of Contents
Advertisement
Quick Links
Advertisement
Table of Contents

Related Manuals for Focus ST-IIIB


Summary of Contents for Focus ST-IIIB
- Page 1 ST-IIIB user manual P/N 20130320-1...
- Page 3 User manual Brief Dear customer: Congratulations on purchasing you new security systeman thank you for the confidence you have shown in us.You have chosena high -quality. Product that has been produced,tested and packed wthegreatest care.Please familiarize yourself with these instructions before atte mpting operation will only been sure if it is fitted properly.We hope your new security system will bring you lasting pleasure.
-
Page 4: Table Of Contents
User manual Content Chapter I Introduction Chapter 2 Installation and Connection Installation Connection(N.O. N.C) Install wired detector 2.4 Intall wereless detector Chapter 3 Keybad and Operation 3.1 About panel Basic operation 3.3 Flashes when phone line cut 3.4 Host arm and disarm 3.5 Alarm procedure Chapter IV Voice alarm receiving and GSM control... - Page 5 User manual 6.4.2 Set entry delay 6.4.3 Set exit delay 6.4.4 Set siren time 6.4.5 Set ring times 6.4.6 Set detector loss inspection 6.4.7 Set arm/disarm tone 6.4.8 Set arm/disarm report 6.4.9 Set others 6.4.9.1Set emergency alarm siren type 6.4.9.2 Ac off inspection time setting 6.4.9.3 Magnetic contact inspection 6.4.9.4 Check wireless detector tamper 6.4.9.5 Set force arm...
- Page 6 User manual 6.6.1 Set zone attribution 6.6.2 Set zone siren type 6.6.3 Set wired zone loop type 6.6.4 Set wired zone response speed 6.6.5 Set related zone 6.7 System maintance 6.7.1 Set timing operation 6.7.2 Recording 6.7.3 Play recording 6.7.4 Set programmable output port 6.7.5 Delete system events 6.7.6 Restore to factory default 6.8 Set GSM module...
-
Page 7: Chapter I Introduction
User manual Chapter I Introduction 1.1 Function Introduction I Alarm mode: w ith PSTN and GSM network al arm, GSM networ k with GPRS function(GPRS function is for China market only), remote arm and disarm panel through CMS or SMS CID protocol, SMS notification, the priority of PSTN and GSM network is Optional. -
Page 8: Set Zone Alrm Times
User manual 13 Wireless zones, each wireless zone can automatically learn the codes or be coded manually via the keyboard. 14 8 wired zones, User can set the circuit type and speed of response, support N.O, N.C. 15 Enable enroll total 8 wireless remote,8 electronic switch,1 pc of wirele- ss doorbell and Unlimited for quantity of one way wireless siren. - Page 9 User manual The tampering alarm: cut the cable between wired detectors and the panel will trigger larm, the telephone line cut will autom atically trigger siren alarm. When someone deliberately dismantled the panel, it will alarm when triggering tamper switch at the back of the panel. 27 Timing arm/disarm:Enable set 4 group time arm/disarm time.
-
Page 10: Chapter 2 Installation And Connection
User manual Chapter 2 Installation and Connection Installation the bracket to the wall and hang the pane to the bracket The large metal objects can not be placed around the panel, so as not to affect the wireless signal. Make sure to place the panel within the wireless range of all wireless accessoris and pay attention to the hidden Connection(N.O. -
Page 11: Intall Wereless Detector
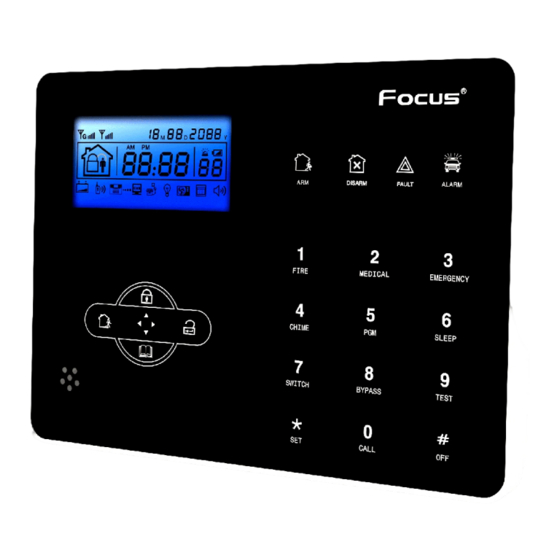
User manual To arm the panel. The zone number will be also display on the LCD screen. At this time arm system is not allowed unless you force arm. 2.3.2 The control pane can power 15V, 100mA to detectors. The max curent is 100mA. - Page 12 User manual Arm led: Light on under armed status, Light flashes under stay status. Disarm led: Light on under disarmed status Trouble led: Light on when with zone trouble. Light flashes when AC cut. Alarm led: Light flashes when alarm. Press 3 seconds to tirgger fire alarm Press 3 seconds for medical help Press 3 seconds for SOS...
-
Page 13: Basic Operation
User manual Basic operation Factory default Adminitrator password: 012345 16 User passwords, NO. 01 factory default is 1234. No. 02-16 of the user password is blank and can not enter the user setting untill user set the password. Disarm: User password[1234]+DISARM Home arm: Home arm key Arm: Arm key Event log: inquiry key... -
Page 14: Host Arm And Disarm
User manual Flashes when phone line cut. Light on when phone line is normal. Flashes when GSM not ready, Light on when GSM is normal. Flashes when GPRS disconnected with CMS. Light on when GPRS is connected well with CMS. Flashes under sleep mode. - Page 15 User manual Home Arm Panic ~DI~ ~DI~ Press the key for home arm on the Press the panic button on remoter,or remote or "HOME"key on the keypad, press" key on panel for 3 then you will hear ystem stay seconds. And it display home arm icon on the LCD screen.
-
Page 16: Alarm Procedure
User manual 3.5 Alarm procedure Telephone telephone Cell phone Tele 3.The panel will dial 1-4 telephone numbers as preset.If more than 4 numbers,the panel will start with second telephone number, then 3,4... Alarm software 1.The detector activated Alarm situation found, send alarm infor start to send message mation to alarming... -
Page 17: Chapter Iv Voice Alarm Receiving
User manual Chapter IV Voice alarm receiving and GSM control 4.1 Remote phone control User can remote control the system by phone call, after the preset ringing times then panel will off hook the phone then enter the 4 digit user codes according to voice prompting and operate as per the voice prompting. -
Page 18: Gsm Remote Operation
User manual 4.3 GSM remote operation ( talk-back function added) When alarm occurs, GSM will call the preset voice number, when pick up the call,enter 4 digit user code, then voice prompt: Press 1 to arm system, Press 2 to disarm system, Press 3 to Stay arm, Press 4 to check system status, Press 5 to appliance switch control, Press 9 to talk-back, Press 0 to Disconnect. -
Page 19: Chapter Iv Voice Alarm Receiving And Gsm Control
User manual Chapter IV Voice alarm receiving and GSM control Press[*] for 3 seconds Set system clock Set user password Set voice phone 5.1 Set system clock For example: set system clock as : 22:59:36 22/12/2012 Press[*] for 3 seconds Enter passord Please enter system clock, pressconfirm... -
Page 20: Chapter Vi System Setting
User manual Chapter VI System Setting Set password Set CMS number Set voice phone Press[*] for 3 seconds Set system options Set wireless devices Set zone System maintenance Set GSM Set advanced options 6.1 Set password Press[*] for 3 seconds Then operate according to the voice prompt as below. -
Page 21: Set Cms Number
User manual 2.Administrator password is 6 digit, user password is 4 digit, can set 16 user passwords, corresponding password No. from 01 to 16, but No.2-16 password can t enter user setting. 3.If forgot the password, when the alarm is powered on, for the first minute,the administrator password is 000000. -
Page 22: Set Voice Phone
User manual Note: 1.The user code is the identification code in CMS setting, CMS 1 and CMS 2 use the same user code; dialing times can be set 1-15 , communication inspection interval time can be set 0-999 hours, the common setting is 24 hours. -
Page 23: Set System Options
User manual Note:1.dialing times can set 1-15 2.When panel call user s phone, if you enable password check, it will prompt enter user password when pick up the call. For example: Set voice phone No.3 is 12345678 Press[*] for 3 seconds Enter password Please enter phone number, press * key to delete, Long... -
Page 24: Set Entry Delay
User manual 6.4.2 Set entry delay When trigger alarm, the panel will give delay alarm time(default setting is 10s) For example: Set entry delay to 20seconds Press[*] for 3 seconds Enter password Please enter entry delay time, press confirm key to save, press back key to exit Enter 3 digit number from 0-255, add 0 if less than 3 digit. -
Page 25: Set Detector Loss Inspection
User manual Press[*] for 3 seconds Enter password Enter password..Please enter ring times, if set as 0, the phone will not off hook, press confirm key to save, press back key to exit Enter 2 digit number from 0-15, add 0 if lower than 10. Note: The max. -
Page 26: Set Arm/Disarm Report
User manual 6.4.8 Set arm/disarm report Set if arm/disarm report to CMS or not( the default setting is disabled) For example: Set arm/disarm report to CMS Press[*] for 3 seconds Enter password Please choose arm/disarm report: 1. enable, 2. disable, press confirm key to save, press back key to exit 6.4.9 Set others... -
Page 27: Ac Off Inspection Time Setting
User manual 6.4.9.2 Ac off inspection time setting. When the AC power is off, delay to report to CMS(factory default delay time is 30 min) Example set AC off inspection time as 15 min Press[*] for 3 seconds Enter password Plsease enter 0 to 255 minutes AC off duration time.press confirm key to save, press... -
Page 28: Set Telehpone Line Disconnect Remind
User manual Press[*] for 3 seconds Enter password Please choose: 1. Auto force arm 2. Forbid force arm via remote control. Press confirm key to save, pressback key to exit. 6.4.9.6 Set telehpone line disconnect remind(factory default delayed siren sound remind) Example : disable telephone line disconnet remind Press[*] for 3 seconds Enter password... -
Page 29: Set Ac Off Remind
User manual 6.4.9.9 Set AC off remind factory default remind by SMS Example disable AC off remind Press[*] for 3 seconds Enter password Please choose AC off remind: 1. SMS remind 2. Voice phone remind 3. Disable Press confirm key to save, Pressback key to exit. -
Page 30: Delte Remote Control 2
User manual 6.5.1.2enter remote control code Example: manaul enter the address code of remote 112113114 to the #8 remote in alarm pa Press[*] for 3 seconds Enter password Please enter the serial number of remote control. Press confirm key to save, Pressback key to exit. -
Page 31: Delete Detector
User manual 6.5.2.2 enter detector code Example: manual enter the address code of detector 011022033 to the # 7 detector in alarm panel Press[*] for 3 seconds Enter password P l e a s e e n t e r detector Number. -
Page 32: Delete Appliance Switch
User manual 6.5.3.2 Delete appliance switch Example: delete the # 4 appliance switch Press[*] for 3 seconds Enter password Please enter the serial number of appliance switch to delete, enter 0 to delete all Press confirm key to save, Pressback key to exit. 6.5.4 Enroll wireless siren Enroll wireless siren Delete wireless siren... -
Page 33: Set Door Bell
User manual 6.6.5 Set door bell Enroll doorbell Delete doorbell 6.5.5.1Enroll doorbell Press[*] for 3 seconds Enter password Please trigger doorbell Please trigger Enroll doorbell successful Pressback key to exit. Note: can only learn a wireless doorbell, the trigger will be issued after the chink 6.5.5.2 Delete doorbell Press[*] for 3 seconds Enter password... -
Page 34: Set Zone Attribution
User manual 2.interior zone only trigger alarm when the zone is triggered under system at armed status. 3.delay and perimeter zone trigger alarm when the zone is triggered under system at armed or home arm status. 4.emergency zone, 24 hours zone, fire zone will trigger alarm when system at any status 5.wirelss zone can not set key zone type. -
Page 35: Set Wired Zone Response Speed
User manual EOL loop EOL loop N/O wiring diagram N/C wiring diagram Example: set zone 35 as N/O loop type Press[*] for 3 seconds Enter password Please choose loop type: Please enter the zone 1.EOL 2.N/C, 3.N/O number to modify Press confirm key to save, Press confirm key to save, Pressback key to exit. -
Page 36: System Maintance
User manual 2>EXIT-ENTRANCE single trigger model: trigger zone 1, zone 1 make alarm. Trigger zone 2 first, then during the period of related time trigger zone 1, do not make alarm. Trigger zone 2, then do not trigger zone 1 during related time, then zone 2 make alarm. -
Page 37: Set Timing Operation
User manual 6.7.1 Set timing operation Example: Set group No.3 as timing disarm at 8:30, and timing arm at 17:30 Press for 3 seconds Enter password Please enter timing Please enter timing arm arm time, 00 is invalid /disarm group number time.Press confirmkey to save, pressback key to exit. -
Page 38: Delete System Events
User manual For example: Set as password control output Press[*] for 3 seconds Enter password Please select programmable output port follow event 1.Follow alarm output 2.Follow arm output 3.Follow AC power fault output 4.Follow Communication fault output 5.Password control output Hint: when setting as password control output, press key 5 for 3 seconds, then enter the user password, the programme output port will be open or closed. - Page 39 User manual Set GSM module GSM signal Set GSM bill [2]Set GSM [1]Set GSM in priority display disabled/enabled reminder time The maximum Please choose Please choose Please enter SIM signal intensity 1> enable GSM 1> GSM in priority card expiry time, can be displayed 2>...
-
Page 40: Advanced Setting Options
User manual 6.9 Advanced setting options Without voice prompt, programme address and the corresponding options as below table. GPRS enable and disable 59 Sensor recovery 60 Sensor loss Set sever IP address 61 System low battery Set sever port 62 System AC loss Set user ID 63 System AC recovery Set user password... -
Page 41: Gprs Enable And Disable
User manual LCD display direction Programming Data Data bit address Press key up and down to check and modify the different data of the data bit. 6.9.1 GPRS enable and disable 1. Enable 2. Disable default is 2 For example: set enable GPRS Press[*] for 3 seconds Enter password Programming... -
Page 42: Set Sever Port
User manual 6.9.3 Set sever port For example: Sever port as 80808 Press[*] for 3 seconds Enter password 6.9.4 Set user ID For example: User ID as 50505050 Press[*] for 3 seconds Enter password User ID must be 8 bits 6.9.5 Set user password For example: User password as 12345678 Press[*] for 3 seconds... -
Page 43: Delay Zone Tone Source Options
User manual 6.9.7 Delay zone tone source options 1. Dingdong 2. Welcome 3. Recording 4. Didi For example : Delay zone tone source as recording Press[*] for 3 seconds Enter password Hint: In disarm mode, once delay zone triggered and above 4 voices will be generated. -
Page 44: Alarm Event Retain Time
User manual 6.9.11 Alarm event retain time When telephone line and GSM all fault, the alarm event will be retained in the preset time. Otherwise it will loss. After telephone line and GSM recovery, it will upload to the CMS. (default time is 10 mintus). For example: set the alarm information retention time is 255 minutes Press[*] for 3 seconds Enter password... -
Page 45: Chapter Vii Technical Specification
User manual Chapter VII technical specification 7.1 General data 1.Power supply: 15V/2000mA 2.Built in rechargeable battery:11.1V/1000mah 3.System static current: <50mA(exclude wireless detector) 4.System alarming current: <300mA(exclude wireless high siren current) 5.System maximum output current: 100mA(supply wireless detector) 6.Frequency:433MHz/868MHz 7.Signal transmit distance: 100 to 150 meters (open area) 8.The method of alarming dial: DTMF GSM or GPRS 9.Communication protocol with CMS: Ademco Contact ID 10.DTMF dial frequency variation:,1.5%... -
Page 46: Chapter Viii Maintenance
User manual Chapter VIII maintenance 8.1 Regular test Design of components of the system is to reduce maintenance cost, but still it is suggested that periodical check may be carried out. 8.2 The cleanliness of control main machine Main control panel may be stained by fingers or covered by dust after using for a while.
Need help?
Do you have a question about the ST-IIIB and is the answer not in the manual?
Questions and answers