
Related Manuals for Olympus VN-180


Summary of Contents for Olympus VN-180
- Page 1 DIGITAL VOICE RECORDER VN-180 VN-90 Instruction Always do a test recording to avoid recording problems.
-
Page 2: Table Of Contents
CONTENTS BEFORE YOUR FIRST RECORDING ... 3 Parts Identification ... 3 Liquid Crystal Display (LCD) ... 4 Installing the Batteries ... 5 Clock Adjustment ... 5 Changing the Batteries ... 6 BASIC OPERATIONS ... 7 Recording (REC) ... 7 Recording-Pause (REC PAUSE) ... 8 Playback (PLAY) ... -
Page 3: Before Your First Recording
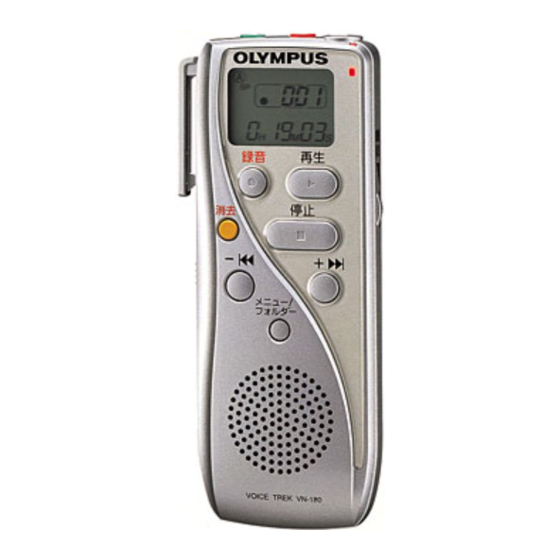
BEFORE YOUR FIRST RECORDING Parts Identification 1 Liquid crystal display panel (LCD) 2 REC button 3 ERASE button 4 Fast Reverse ( 5 MENU/FOLDER button 6 Speaker 7 Strap holes 8 Fast Forward ( 9 VOLUME control 0 STOP button A PLAY button B Recording indicator (LED) C Battery cover... -
Page 4: Liquid Crystal Display (Lcd)
Liquid Crystal Display (LCD) 1 Current folder (A, B or S) 2 Voice-actuated recording indicator 3 Remaining battery power 4 Current message number, recording/playback/fast forward/fast reverse indicators 5 · Current date/time · Remaining memory (REMAIN) · Recording date/time (REC DATE) ·... -
Page 5: Installing The Batteries
Installing the Batteries 1 Slide open the battery cover in the direction of arrow. 2 Insert two AAA (LR03 or R03) batteries according to the polarity ) indications and close the battery cover. 3 Time is displayed on the LCD and the voice recorder enters the clock adjustment mode. -
Page 6: Changing The Batteries
Changing the Batteries Be sure to stop all operations before changing the batteries, and set the HOLD switch to ON, turning the recorder power off. When in the Stop mode, you can check the battery indicator by holding down the STOP button. 1 When the [ ] mark is shown on the LCD, you should replace... -
Page 7: Basic Operations
[A] 2 Select the recording mode. To change the recording mode, see page 19. The recorder’s default setting is the SP mode (about 67 minutes of recording with the VN-180 or 33 minutes of recording with the VN-90). [A]. -
Page 8: Recording-Pause (Rec Pause)
Recording-Pause (REC PAUSE) All recording will stop if the recorder is left in the Recording-Pause mode for 10 minutes or if the STOP button is pressed during the Recording-Pause mode. 2 Press the REC button again to resume recording. Using the Recording-Pause mode allows you to continue recording in the same message. -
Page 9: Playback-Pause (Pause)
Playback-Pause (PAUSE) Playback will stop if the recorder is left in the Playback-Pause mode for 10 minutes or the STOP button is pressed during the Playback-Pause mode. 2 Press the PLAY button again to resume Playback. Fast Playback 3 When the STOP button is pressed or the end of a message is reached by Fast Playback, Fast Playback mode is stopped and all playback stops. -
Page 10: Fast Forward/Fast Reverse
Fast Forward/Fast Reverse 1 Press and hold the Fast Forward ( button for more than 1 second in the Playback, Fast Playback or Playback-Pause mode. The message will be fast forwarded or reversed for as long as the button is pressed. When the end of message (with Fast Forward) or beginning of message (with Fast Reverse) is reached, the recorder pauses (for about 1/2 second), then starts Fast Forward or Fast Reverse... -
Page 11: Erasing (Erase)
Erasing (ERASE) Erasing a single message (ERASE) 1 Press the ( ) or ( message No. to be erased. Erasing all messages in a folder (ALL ERASE) 1 Press the MENU/FOLDER button to select the folder to be erased (see page 13). ) button in the Stop mode to select the 2 Press the ERASE button and release. -
Page 12: Resetting The Recorder (Clear)
When folder [S] is selected: • Erasing all messages in folder [S] - When the ERASE button is pressed and held for more than 4 seconds, the LCD shows [ALL] together with alternately blinking [ERASE] and [YES]. Press the ERASE button within 4 seconds again to erase all messages in folder [S]. -
Page 13: Message Folder Management
MESSAGE FOLDER MANAGEMENT Types of Folders 1 The voice recorder has three folders, [A], [B] and [S]. Folders [A], [B] These folders are convenient for recording ordinary messages. Each folder can store up to 100 messages. Folder [S] This folder is convenient for schedule management. The folder can store up to 15 messages on a given date and 100 messages in the whole folder. -
Page 14: Additional Features
ADDITIONAL FEATURES Schedule Recording Schedule Playback 2 Press the PLAY button. All messages recorded for the selected date will be played in succession. 3 Press the STOP button to stop Playback. The voice recorder enters the Stop mode. Messages in folder [S] cannot be forward skipped or reverse skipped in the Stop mode. -
Page 15: Message Alarm Playback
Message Alarm Playback Setting the message alarm Up to 20 alarm messages can be set. Alarm messages cannot be set if 20 messages have already been set or the message No. being selected is No. 0. To cancel a set alarm message, select the set alarm message No., perform operations in steps 2 and 3, then press the MENU/ FOLDER button. -
Page 16: Schedule Alarm Playback
2 Press any button while the beep tones are being emitted to play back the message set for that time. Press the STOP button to stop message alarm playback. The electronic beep tones stop automatically if no button is pressed for 5 minutes after the beeping starts. The message is not played back in this case. -
Page 17: Recording With Vcva (Variable Control Voice Actuator) (Vcva Rec)
Recording with VCVA (Variable Control Voice Actuator) (VCVA REC) 1 First press and hold the MENU/ FOLDER button for more than 1 second. Then after pressing the ) button twice to select the [VCVA] setting in the Options mode, press the MENU/FOLDER button again to enter the VCVA screen. -
Page 18: Hold (Hold)
Hold (HOLD) To conserve battery power, the LCD display disappears when the recorder is set to the Hold status in the Stop mode. Checking Remaining Recording Time (Remaining Memory Capacity) Power Save When 60 minutes have elapsed in Stop mode, all LCD display segments go out and the unit enters the Power Save mode. -
Page 19: Entering Options Mode
FOLDER button to start the recording mode setting. 2 Pressing the ( button switches the recording modes: SP with the VN-180 or 33 minutes with the VN-90) (recording time approx. 180 minutes with the VN-180 or 90 minutes with the VN-90) -
Page 20: Vcva Recording (Vcva Rec) Setting
2 Pressing the ( sensitivity: HI · HI: ... High sensitivity mode. Recommended for normal use. · LO: ... Low sensitivity mode. Use this setting when there is a lot of background noise. 3 Press the MENU/FOLDER button while the desired mode is displayed to complete its setting. -
Page 21: Beep Tone (Beep) Setting
Beep Tone (BEEP) Setting When [BEEP] is set to [OFF], no beep tone will be produced when a button is pressed (the alarm tone will still be generated). 3 Press the MENU/FOLDER button while the desired mode is displayed to complete its setting. Current Time (TIME) Setting 1 In the Options mode, display [BEEP] and press the MENU/... -
Page 22: Care In Handling
CARE IN HANDLING 1 Avoid subjecting the unit to direct sunlight, high humidity, strong magnetic fields. 2 If the unit is exposed to water (especially rain or condensation), wipe it off with a clean, dry cloth. Always avoid contact with salt components 3 Do not use alcohol, lacquer thinner or other organic compounds for cleaning. -
Page 23: Battery Precautions
BATTERY PRECAUTIONS 1 Always use the batteries correctly. Fluid leakage, heat generation or explosion may occur if the batteries are used incorrectly. When the batteries are replaced, be sure the + and - polarity positions are correct. 2 Some batteries are of the same sizes but have different voltages. 3 Note the difference between dry type and rechargeable batteries. -
Page 24: Troubleshooting
TROUBLESHOOTING Q1 Nothing happens when an operation button is pressed. A 1 · The unit may be set to the [HOLD] status. · The batteries may be depleted. · The batteries may be inserted incorrectly. · The battery cover may not be closed tightly. Q2 No sound is output. -
Page 25: Specifications
Connecting cord (Miniplug Accessories marked * should be used in combination with the PA3 plug adapter. Built-in flash memory SP mode: ... Approx. 67 min. (VN-180)/33 min. (VN-90) LP mode: ... Approx. 180 min. (VN-180)/90 min. (VN-90) ø 28 mm diameter dynamic internal speaker 120 mW ø... - Page 26 Please contact an Olympus service for further information. Olympus home page: http://www.olympus.com Customer support: USA: 1-800-622-6372 Europe: +800 67108300 USA RFI This equipment has been tested and found to comply with the limits for a Class B digital device, pursuant to part 15 of the FCC Rules.
Need help?
Do you have a question about the VN-180 and is the answer not in the manual?
Questions and answers