Table of Contents
Advertisement
Advertisement
Table of Contents

Related Manuals for Canon 7


Summary of Contents for Canon 7
-
Page 4: Table Of Contents
Model 7 Specifications ......4 How to Hold the Canon 7 ....22 Film Winding........5 Unloading Film ......... 23 Shutter Button ........ 7 Flash Synchronization ..... 25 Self-timer ......... 27 Exposure Counter Dial ....7 Film Winding ........8 Double Exposures ...... -
Page 5: Model 7 Specifications
Model 7 Specifications Model 7 accepts Canon's unique bayonet-mount Canon lens 50mm F 0.95, as well as all Lens : thread-mount Canon lenses from 25mm to 1000mm. All metal focal plane shutter. Single-pivot, rigid shutter speed dial equally calibrated from Shutter: 1/1000th to 1 sec., B &... -
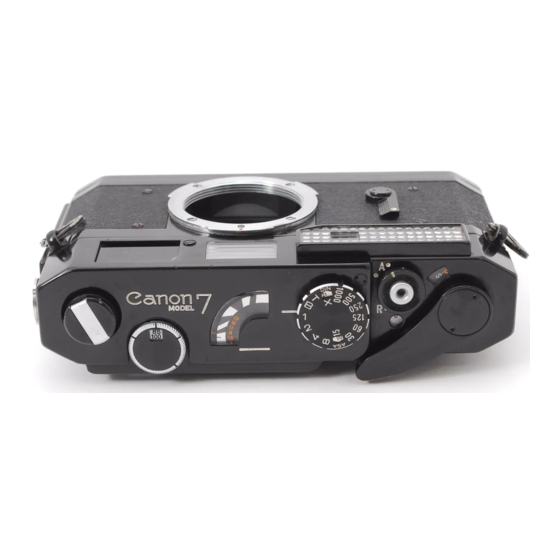
Page 6: Film Winding
Winding Film and Cocking Shutter Film Winding... Pull the winding lever the full length of its run until it stops The film will then be advanced to the next exposure and the shutter cocked At the same time, the exposure counter dial is advanced to the next number NOTE: •... - Page 7 • The lever will return automatically when released. It will not return to the original position, i. e. close to the body. It will be about 1/4"—1/2" from the body. But you can advance the film from this position. When the camera is not in use return the lever to its original position against the body.
-
Page 8: Shutter Button
Shutter Button ... When the shutter button is pressed, the film can be wound again with the lever after the shutter is actuated Cable release can be attached to the shutter button. Exposure Counter Dial ... The film advanced whenever the film winding lever is completely wound and the exposure counter dial is advanced by one number indicating the number of exposed films. -
Page 9: Film Winding
Film Winding Pull the winding lever the full length of its run until it stops. The film will then be advanced to the next exposure and the shutter cocked At the same time, the exposure counter dial is advanced to the next number. Before winding the winding lever, be sure to return the film rewind ring index to the "... - Page 10 The lever will return automatically when released. It will not return to the original position, i. e. close to the body. It will be about 1/4"-1/2" from the body. But you can advance the film from this position. When the camera is not in use return the lever to its original position against the body.
- Page 11 When the Shutter button is pressed, the film can be wound again with the |ever after the shutter is actuated. Cable release can be attached to the shutter button. The film advanced whenever the film winding lever is completely wound and the exposure counter dial is advanced by one number indicating the number of exposed films.
-
Page 12: Shutter Button Safety Device
Shutter Button Safety Device The shutter button's safety device locks the shutter if the film is not completely wound. Unintentional double exposures cannot occur. Shutter Button Safety Lock After the shutter is cocked, if you put the index of the rewind ring on the red dot, the shutter button is locked, and you cannot release the shutter even if the button is pressed. -
Page 13: Exposure Setting
Exposure Setting Exposure adjustment is done by adjusting the shutter speed and the lens aperture. Correct exposure is easily determined by the coupled, built-in light meter. Setting the Shutter Speed Turn the shutter speed dial and set it to the index mark. The shutter can be adjusted to speeds of 1 second, 1/2, 1/4th, 1/8th, 1/16th, 1/30th, 1/60th, 1/r25th, 1/250th, 1/500th, and 1/1000th of a second as well as "... -
Page 14: Setting The Lens Aperture
Setting the Lens Aperture The lens aperture adjusts the light volume that reaches the film and also the depth-of-field (see page 31). The required "F" stop can be obtained by turning the lens aperture ring until the figures align with the index mark. The following table shows the relation between aperture value and exposure time. -
Page 15: Using The Light Meter
Using The Light Meter When the light meter is faced in the direction of the subject, the needle in the light meter indicator window moves according to the light condition of the subject. The correct exposure can be obtained by following these steps: When the shutter dial is preset to the desired speed: Read off the figure of aperture scale on the light meter indicator window where... -
Page 16: Changing The Sensitivity Of The Light
When the lens aperture ring is preset to the desired "F" stop: Turn the shutter dial and match the aperture reading on the meter indicator window to the guide line where the needle rests. The shutter dial should be set where it click-stops. -
Page 17: Setting The Film Speed
Setting the Film Speed When using the light meter, the speed of the film used should be set on the film speed indicator window on the shutter speed dial. In order to set the film speed, turn the shutter speed dial while pressing the film speed indicator button. -
Page 18: Focusing
The lens will move back and forth by rotating the lens barrel, which is coupled to the rangefinder, enabling you to focus. Canon telephoto lenses do not have a stopper. Range Viewfinder... -
Page 19: Range Viefinder Selector
Range Viefinder Selector when you look through the range — viewfinder, you will see a white frame and a figure The figure indicates the focal length of the lens, and the view seen within the white frame in the viewfinder is that which will be recorded on the film The field of view indicated by a white frame varies according to the focal length of the lens used when the range. -
Page 20: Film Loading
Film Loading To open the back cover, turn the magazine opening key counter-clockwise. Pull down the hinged back lock while holding the back cover with your fingers. The camera back will then swing open. Rotate the take-up spool until you can slide the end of the film leader into the groove. Then engage the second perforated hole of the leader with the small hook inside the groove. - Page 21 Canon 7 accepts any standard 35mm film cartridge as well as the Canon Film Magazine V, which is available as an accessory. Lift up the rewind crank. Put the film cartridge into the recess directly beneath the rewind crank. Press the film rewind crank again to lock the film cartridge in place.
- Page 22 Then turn the magazine opening key clockwise to "close," and return the knob to its former position. Do not turn the magazine opening key before closing the back cover. Wind the lever and press the shutter button with the lens cap on.
-
Page 23: How To Hold The Canon 7
How to Hold the Canon 7 It is important to hold the camera properly in order to obtain clear-and-sharp pictures. Holds the camera in a vertical or horizontal position . . . look through the view-finder and focus. Press the shutter button gently after composing your picture. -
Page 24: Unloading Film
Unloading Film Turn the film rewind ring to "R" from the "A" position. Raise the rewind crank to its operating position and turn clockwise, as shown by the arrow. Watch the rotation of the film transport indicator while rewinding the film. When the rotation suddenly stops . . . then stop rewinding immediately. - Page 25 When you have finished a roll of film and you try to advance the film. You will feel tension on your finger. You should then stop winding and remove the film from the camera in this manner: Pull out the rewind crank as far as it will go and take out the film cassette or magazine. Be sure to put the lens cap on before rewinding the film.
-
Page 26: Flash Synchronization
Flash Synchronization When the Canon Flash Unit V-2 is fitted directly into the flash unit connector socket, and when the shutter button is pressed, it is automatically adjusted for the various shutter speeds of synchro-flash operation. A lens hood is also necessary when taking flash pictures. - Page 27 To extend the flash unit from the camera, or to connect a speedlight unit of non-Canon make, use a Canon Extension Cord Va (15- ft.) or Vb (3-ft.) When using a clip-on-type Speedlight on the...
-
Page 28: Self-Timer
. . . and the shutter will be actuated approximately 1o seconds later Once you have cocked the self-timer, it cannot be released unless the shutter button is pressed. When using the self-timer, it is advisable to use Canon Cable Release, Canon Camera Holder L, and tripod. -
Page 29: Double Exposures
Double Exposures Canon Model 7 is not designed to take double exposures; however, it can be done by following these steps: First turn the film rewind ring to "R" from “A” position While watching the film transport indicator, turn the film rewind crank to the right and stop when the film transport indicator has made about one-and-a-half turns. -
Page 30: Special Care Of Lenses
Special Care of Lenses Changing Lens The lens mounting flange of the Canon 7 is equipped with both the Canon standard screw-in-mount and Canon special bayonet-mount M. To detach a screw-in-type lens (other than the F 0.95 50mm lens) from the camera, hold the lens barrel at its base and turn counter-clockwise illustrated by small arrow). -
Page 31: Distance Scale
Do not change your lens in a strong light. When changing your lens have the replacement lens at hand. Then quickly change the lens in the shade ... or use your shadow as a shield from the direct light. Distance Scale The distance scale indicates the distance between the focused subject and the film. -
Page 32: Depth-Of-Field Scale
Depth-Of-Field Scale The depth-of-field scale shows you the range of subjects which will be in sharp focus on the film. This range will vary with the "F" stop selected. For example: The depth-of-field will be deeper . . . the smaller the lens aperture the shorter the lens focal length the farther the distance of the subject The depth-of-field will be shallow . -
Page 33: Infra Red Fotografy
Infra Red Fotografy The letter "R" is on the depth-of-field scale of all Canon lenses. This is for infrared film. When using this film, focus in the normal way. Read off the distance of the subject you are focusing on as shown opposite the distance indicator mark on the lens distance scale. -
Page 34: Loading Film Into The Magazine
Loading Film into the Magazine The Canon Film Magazine V is designed to hold 5-1/4 feet (1.53m) of 35mm film. It consists of three parts: center spool, inner shell, and outer shell. To disassemble the magazine, place your finger on the button and turn the inner shell clockwise until both the inner shell and outer shell slots are superimposed and the safety disengaged. - Page 35 Wind 5-1/4 feet of film around the center spool moderately tight for 36 exposures ... 3-1/4 feet for 20 exposures ... 3 feet for 18 exposures. Do not touch the emulsion (dull) side with your fingers. To assemble the magazine, first insert the center spool into the inner shell, with the beginning of the film sticking out of the slot.
-
Page 36: Canon Lenses
Canon lenses Canon lenses are held in the highest esteem by professional and discerning amateur photographers the world over for their unsurpassed, unique optical design and precision engineering. Before leaving the factory, each lens must meet exacting quality tests to insure the highest resolution, contrast, brilliance, and color fidelity. -
Page 37: Specifications For Screw-In Mount Lenses
* Special bayonet-mount M-type lens used for the Canon 7 only. ** Bayonet-mount-type lens used in combination with the Canon Mirror Box 2. NOTE: Canon lenses from 200mm to 1000mm are available in combination with the mirror box and a complete set of attachments. -
Page 38: Proper Care Of Your Camera
Proper Care of your Camera Moisture and dust are harmful to your camera. It should be taken out into the light and fresh air from time to time. If your camera is to be stored for a long time, it should be removed from its case. Silica gel or another drying agent should be placed alongside it. -
Page 39: To Summarize
To Summarize Now That You Are Completely Familiar With Your Camera, Follow These Simple Steps.