
Summary of Contents for Brew-Boss 2.06
- Page 1 Brew-Boss® V2.06 Operation Manual Automated Electric Brewing System Operation Manual V2.06 (For Brew-Boss® App Versions 1.27 and later) www.Brew-Boss.com Page 1...
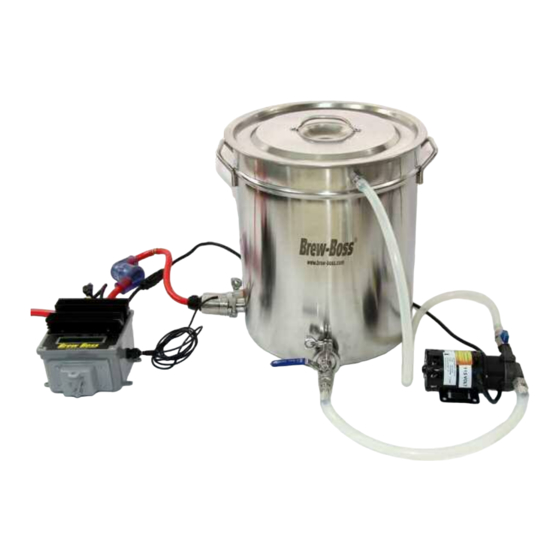
- Page 2 Brew-Boss® V2.06 Operation Manual 1 - System Overview The Brew-Boss® home brew system is an all electric home brewing system that allows home brewers to brew extract and all-grain recipes with complete and accurate automatic control of temperature and timing. Complete systems are available in 10, 15, and 20 gallon versions in both 120VAC and 240VAC options.
-
Page 3: Very Important
3500 or 5500 Watt Electric Heating Element for 240 Volt Systems or Dual 1500 Watt Elements for 120VAC 10 Gallon Version Microprocessor Controlled Brew-Boss® Brew Controller with LCD Display and Integrated WiFi Router High Temperature Recirculation Pump ... - Page 4 “Brew-Boss” is the SSID of the wi-fi controller. The Brew-Boss controller must be powered on for at least 1 minute for the Wi-Fi radio to start up. Please note, that the Brew-Boss® controller acts as it's own server, and that you will not be able to communicate with the internet or your home/work network on the tablet while connected to the controller.
- Page 5 Brew-Boss® V2.06 Operation Manual run the Brew-Boss® application that you “forget” the network you connect to the internet with. This is because the tablet will try and connect to the strongest powered network with internet access automatically, and should the signal strength of the Brew-Boss network drop, the tablet will automatically try and connect to other stronger wifi networks.
- Page 6 Ideally, some type of overhead support such as a floor truss, ceiling truss, etc. for mounting a lifting device above the kettle is helpful as well. For the COFI version, this is required. Brew-Boss offers a very nice block and tackle type hoist on the brew-boss.com web site.
- Page 7 The Brew-Boss® system is designed to be as electrically safe as possible considering the fact that it is being used to heat water and pump water and several amps are involved. To facilitate the use of GFI breakers and outlets, the various circuit elements must be separately powered.
- Page 8 Brew-Boss® V2.06 Operation Manual Warning - Shock Hazard! This is an all electric system. It eliminates the many dangers associated with gas fired systems, but working with electricity is dangerous. You can be seriously injured or worse die by electricity. This system requires that you provide a 240VAC 30 AMP or two 120VAC 15 Amp circuits and the appropriate power plug.
- Page 9 Install the Heater Element Assembly The Brew-Boss® heater element assembly is a Tri-Clamp device and needs to be clamped to the Tri- Clamp ferrule(s) on the lower left side of the kettle using a Tri-Clamp clamp. Install the Red silicone gasket between the heater and the ferrule on the kettle.
- Page 10 Brew-Boss® V2.06 Operation Manual Insert the Digital Temperature Probe The temperature probe plugs into the controller using a headphone type stereo plug on the right side of the controller. The system includes a weldless temperature probe coupler that allows direct contact between the sensor and the water.
- Page 11 Brew-Boss® V2.06 Operation Manual Tighten the nut by hand (never use a wrench) until it is just tight enough to prevent it from coming off on it's own. If it leaks, tighten a little more. Over tightening will damage the O-rings, so be careful and lean towards too loose rather than too tight.
- Page 12 Brew-Boss® V2.06 Operation Manual Install Accessory Port Install the accessory port to the hole on the front top of the kettle. There are two types of accessory ports, VALUE and DELUXE. The VALUE accessory port has a Camlock nipple on the inside of the kettle and a barbed nipple on the outside of the kettle.
- Page 13 Brew-Boss® V2.06 Operation Manual For both accessory port styles, the Camlock fitting shown on the left of both images above is installed inside the kettle. To install the accessory port, first wrap the threads of the male threaded Camlock nipple with Teflon tape as described above. Then, install the thin stainless steel washer over the wrapped threads.
- Page 14 Brew-Boss® V2.06 Operation Manual Install the valve assembly to the Tri-Clamp ferrule on the bottom front of the kettle (below the Brew- Boss Logo) using the clear silicone gasket between the valve and the ferrule on the kettle. Make certain the gasket is centered in the grooves and does not get pinched while installing the clamp and tightening.
- Page 15 Brew-Boss® V2.06 Operation Manual these on our web site as well. Self Locking Lifting Device (Available on Brew-Boss Web Site) We recommend mounting an eye hook above the kettle to the ceiling, truss, joist, etc. so this can be utilized.
- Page 16 Brew-Boss® V2.06 Operation Manual Connect Heating Element to the Controller The heating element simply plugs into the controller using the L6-30 twist lock connectors. Make sure that the controller is NOT plugged into the 120 or 240VAC source and the switch on the front of the controller is in the “OFF”...
- Page 17 Brew-Boss® V2.06 Operation Manual Start the Brew-Boss® Application After the controller is powered up as described above, make sure you are connected to the Brew-Boss network as described in Section 2. After connecting to the Brew-Boss network, you can start the Brew-Boss® app on the Tablet.
- Page 18 Brew-Boss® V2.06 Operation Manual Look at the heater element, you should see small bubbles coming off the heater element and most of the time, hear it heating as well. If it appears the heater is not functioning, confirm that the heater is plugged into the controller.
- Page 19 The Brew-Boss® system includes 6 feet of silicon brewery grade tubing. You need to cut this tubing into two pieces based on your desired setup. We recommend 2 feet between kettle and pump and 4 feet between pump and kettle, but let you cut it as you desire.
- Page 20 Brew-Boss® V2.06 Operation Manual DELUXE Recirculation Plumbing Hardware Installed The pump should be located on the same level as the kettle or below the kettle so that at least 12” of water are above the pump. Connect all the tube ends to the appropriate points as shown in the images above.
-
Page 21: Very Important
Brew-Boss® V2.06 Operation Manual other electric device that requires less than 10 amps into the pump pigtail receptacle. To test the pump, simply press the “Pump Toggle” button on the App so the prompt changes from “Pump Off” to “Pump On” and the little green light on the button lights up. - Page 22 The Brew-Boss® Controller does nothing on it's own. It receives it's operating instructions from an Brew-Boss® App that is connected to the controller wirelessly via a Wi-Fi interface. For this reason, the Brew-Boss® App must be running during brewing! We recommend you set your tablet's display “Sleep”...
- Page 23 Brew-Boss® V2.06 Operation Manual Target Temperature This window shows the current target temperature (setpoint) that the controller is trying to heat to and maintain. This value is automatically obtained from the current brew step (see section 4). It is also a drop-down list. Clicking on this window will present a list of temperatures that the user can use to override the controller and manually set the setpoint.
- Page 24 Brew-Boss® V2.06 Operation Manual value for Brew Mode is set in the system parameters screen. The default value is the value that the controller uses when the application starts up. You can go between manual and auto modes during your brew session if desired.
- Page 25 A yellow menu icon button is provided in the upper right comer of the screen. The standard Android menu button has been disabled in the Brew-Boss app as many newer devices no longer have menu buttons. Clicking on the menu icon may vary on various tablets) opens the application menu. When clicked, the following menu will appear in some fashion based on the make and model of Android tablet.
- Page 26 BeerXML file to the BrewBoss/BeerXML folder on the Android Tablet before running the Brew-Boss app and using this function. Please be aware that the BeerXML converter handles most brewing situations but it does not handle hops additions that occur after flameout, these hops additions will be added to the final hops addition whenever that was.
- Page 27 Allows you to sample the volume and make sure the alarm works properly. email Brew Log via Brew-Boss – Sends log of your brew session to Brew Boss tech support using Brew-Boss internal email client. Use as requested by support. Your tablet must be connected to the internet before invoking this function.
- Page 28 Brew-Boss® V2.06 Operation Manual Note: The temperature can be defined as Fahrenheit or Celsius in the system parameters. It is important that the temperatures entered in the steps below use the same temperature units as is defined in the system parameters.
- Page 29 This step type is used to pause the program to request the user perform some action. After the user completes the action, he/she presses the Green “Start” button on the Brew-Boss® application screen. When the user presses the Start button, the next step is processed in the sequence shown on the step definition spreadsheet.
- Page 30 Brew-Boss® V2.06 Operation Manual Type 2 – Prompt User Without Confirmation This step type is used to prompt the user for informational purposes without requiring that they confirm. This step does not pause brewing and basically immediately proceeds to the next step.
- Page 31 Brew-Boss® V2.06 Operation Manual The above image shows the first 12 steps of a typical BIAB brew session. The columns correlate to the Step Parameters defined above. Study the table above to understand how to set up your own brew session.
- Page 32 Brew-Boss® V2.06 Operation Manual want the user to “Place the cover on the kettle and open the valve”. This forces the user to perform the steps in the proper sequence. We could have added this prompt to the first step, but opening the valve before adding the water is a bad idea, as it might start dumping water all over the floor.
- Page 33 Brew-Boss® V2.06 Operation Manual process our first mash step and maintain 152F for 1 hour (60 minutes) with the pump recirculating worth through the grain bed. We set the prompt to tell the user what we are doing, set the Setpoint to 152F, set the Step Timer to 60 minutes,.
- Page 34 Brew-Boss® V2.06 Operation Manual The following image shows the remaining steps of the BIAB step definition screen example Step 13 – Heating wort to boil: We now want to raise the temperature of the kettle to Boil, which we already got a head start on in the previous steps. We use Step Type 3 again. We set the appropriate prompt, set the setpoint to 220F, turn the pump off, and of course tell the user verbally what we are doing with the Speak Flag set to 1 as well.
- Page 35 Brew-Boss® V2.06 Operation Manual it did that via an audible prompt as well. The Alarm Flag is also set as we want to make certain that the ® user gets to see the awesome Hops Boss automatic hops feeder in action! Since this is step type 2, the controller proceeds to the next step automatically if Auto Brew Mode is active.
- Page 36 Once the 15 minutes expires, the final step is processed, provided the controller is in Auto Brew Mode. With V1.20 and above of the Brew-Boss App, we recommend using step type 5 for this step.
- Page 37 Definitions of paramers are as follows: Wi-Fi Enabled Use this to enable Wi-Fi if you have the Wi-Fi interface in your Brew-Boss® Controller. All Brew- Boss® Controllers are wi-fi at this time, so make certain this box is checked. If you have a USB cabled version, make certain to un-check this box.
- Page 38 Brew-Boss SSID network, use the default value of 8080 for the port. If you connect the Brew-Boss® controller to your home or business network, then use the port that you assigned to the Brew-Boss® controller. In most cases 8080 should be the port selected.
- Page 39 This is the email address that the Brew-Boss® App will send alerts to (whenever you set the Alarm Flag to 1 in the step definitions). This is handy as you can have the Brew-Boss® App send you an e- mail or text message to your phone when your attention is required (we don’t advise or recommend you be far from your brewing setup during brewing for safety reasons).
- Page 40 “K” values for traditional PID control. Google K values PID and see what we mean! The preceding chart helps describe how the parameters used within the Brew-Boss® controller are used. Our target temp is 156 on this chart.
- Page 41 The Brew-Boss® App will automatically tweak this value for you and save that value in your parameters. If there is ever temperature overshoot (over setpoint), the value of PwrM is automatically reduced by 2%.
- Page 42 The Brew-Boss® App stores the parameters you enter whenever you make a change to any parameter to a file named “lastused.prm”. This file is loaded each time the Brew-Boss® App is started. If you want to save the parameters for later recall, you can save the parameters to a file you name using the “Save Parameters”...
- Page 43 Brew-Boss® V2.06 Operation Manual 7 – About Mashing The Brew-Boss® system allows unlimited mash steps (multi-step mashing). The system allows you to define how many mash steps you desire by simply adding each mash step to your brew step definitions as described above.
- Page 44 Pilsner/Dry Lager Mash Time (min) As you can see, the The Brew-Boss® system is flexible enough to handle almost any mash schedule you may want to try. The Brew-Boss® system provides three different methods of mashing, BIAB, BIAB with Mesh Basket, and COFI.
- Page 45 Brew-Boss® V2.06 Operation Manual keeps the bag from touching the heater element. Install the false bottom before starting brewing making certain the support legs are parallel with the heating element of positioned to not touch either element for 120 volt systems.
- Page 46 Brew-Boss® V2.06 Operation Manual BIAB Basket Mash Systems The Brew-Boss BIAB Basket mash method is similar to the BIAB method described above, except the mesh bag and false bottom are replaced by a stainless steel mesh basket. This mesh basket holds the grain and is easier to use than the mesh bags and lasts a long time! These BIAB baskets do not have covers like the COFI systems described below.
- Page 47 Brew-Boss® V2.06 Operation Manual COFI Infusion Filter Assembly A central infusion tube, that is perforated with a series of flow-matched holes, extends all the way to the bottom of the filter. During the mash cycle, water/wort is continuously pumped from the bottom of the kettle to the top of the filter, into the central infusion tube, where it is forced through the grain bed.
- Page 48 Brew-Boss® V2.06 Operation Manual Spray Pattern of Central Infusion Tube The central infusion tube is also connected to a false bottom. After mashing is completed, the elbow fitting at the top of the COFI filter is exchanged with a lifting ring. When removing the filter, the filter is lifted by the lift ring.
- Page 49 Brew-Boss® V2.06 Operation Manual COFI Infusion Filter Installed in Kettle and Attached to Accessory Port During Mashing, the 90 degree barbed elbow is attached to the infusion tube and the other end is connected to the accessory port as shown in the image above. It is important when installing the COFI filter to make certain the filter is rotated such that the support legs are oriented to not hit the heating element.
- Page 50 Brew-Boss® V2.06 Operation Manual Proper Placement of COFI Filter 45 Degrees to heater Element CAUTION: During mashing, it is important to ensure that the flow of water into the pump equals the flow out of the pump. This is true for both BIAB and COFI mash methods. The wort/water level should always be above the temperature probe level.
- Page 51 Brew-Boss® V2.06 Operation Manual After mashing, if you desire to utilize the grain squeeze feature, follow these instructions. 1. Remove the 90 degree barbed elbow accessory and install the lifting ring accessory. 2. Lift the COFI filter out of the kettle about 4”.
- Page 52 3. Make sure the temperature sensor is inserted properly and that the valve is closed. 4. Power up the controller and wait for the Wi-Fi network to appear on the Android tablet. 5. Connect to the Brew-Boss® Wi-Fi network on the Android tablet. 6. Start the Brew-Boss® App on the Android Tablet.
- Page 53 Brew-Boss® V2.06 Operation Manual pump off so you can lift the cover. Make sure to turn the pump back on after stirring. 25. When the final mash step completes (mash out), the controller will beep and instruct you to close the valve and remove the cover.
- Page 54 Brew-Boss® V2.06 Operation Manual Note regarding Rye: We have found that brewing with high concentrations of Rye does not work well with electric brewing. For some reason rye burns and scorches to the heating element and is very difficult to clean off. It can also impart a burnt and smokey flavor to the wort. We recommend avoiding recipes containing rye if possible.
- Page 55 Brew-Boss® V2.06 Operation Manual Example Recipes (5 gallon batch) Note: Hops in the recipes below are pellets. Recipe 1: "Miller Like" This is a basic drinkable beer that resembles a typical American "blonde" beer. It is a lighter beer that everyone enjoys.
- Page 56 Brew-Boss® V2.06 Operation Manual Recipe 3: "Mick A. Lobes Amber Bock" This is a nice Amber Bock and our favorite recipe. Mick Andrew Lobes drank this and said it was his favorite as well. Here's to you Mick! Cheers! 11 lbs Pale Ale Malt (2 Row)
- Page 57 Brew-Boss® controllers operating in the same area. If you can use the Brew-Boss® Controller in its default state, you do not need to reconfigure the wifi radio. Only perform the steps below if you need to operate on your own wireless wifi network! These instructions will walk you through reconfiguring your controller to operate on your home or business wireless network.
- Page 58 To re-configure the Hops-Boss® controller to connect to your home or business network, follow these steps: 1. Power up the Brew-Boss® Controller and let it boot up for at least 45 seconds so that the Brew-Boss network is visible from your tablet.
- Page 59 Brew-Boss® V2.06 Operation Manual 11. You will be presented with a page like the following image. 12. Click on the SCAN button to the right of the SSID cell with Brew-Boss in it as shown above. 13. You will be presented with a list of wireless networks within range of the Hops-Boss controller.
- Page 60 Brew-Boss® V2.06 Operation Manual 14. Next, click on the “Apply” button on the lower right of the screen to save this network selection. 15. Select the “Encrypt Type” that matches your network encryption using the dropdown list. Select “Open” if your network is not encrypted.
- Page 61 25. Test that the Hops-Boss was properly configured. Connect your tablet to your home or business network in the wifi settings area. 26. Launch the Brew-Boss® application. 27. Load the “Edit Parameters” screen using the menu. 28. Change the “IP Address for Hops-Boss Controller” cell to the static IP address you set for the controller above.
- Page 62 Brew-Boss® V2.06 Operation Manual 31. Close the Brew-Boss® application and restart it. After a few seconds, the Hops-Boss Controller Connection Status should turn GREEN and display “Connected” (the Brew-Boss Controller Connection Status” will be RED at this time as we have not re-configured it yet!).
- Page 63 To change the Brew-Boss® controller to become a wifi client instead of a wifi server, perform the following steps: 1. Power up the Brew-Boss® Controller and let it boot up for at least 45 seconds so that the Brew-Boss network is visible from your tablet.
- Page 64 Brew-Boss® V2.06 Operation Manual then touch “Sign in”. 8. You will be presented with a page like the following image. 9. Change the “NetMode” to “WFI(CLIENT)-SERIAL” by using the dropdown list that appears when you touch the cell that should originally contain “WIFI(AP)-SERIAL”. The screen...
- Page 65 Brew-Boss® V2.06 Operation Manual 10. Click on the SCAN button to the right of the SSID cell with Brew-Boss in it as shown above. 11. You will be presented with a list of wireless networks within range of the Hops-Boss controller.
- Page 66 Brew-Boss® V2.06 Operation Manual 17. The “Subnet Mask” should be “255.255.255.0”, if it is not, change it. 18. The “Default Gateway” needs to be set to the IP address of your router. In the example shown, it is “192.168.1.1” 19. The Primary and Secondary DNS Servers should both be blank as shown in the example image.
- Page 67 24. Launch the Brew-Boss® application. 25. Load the “Edit Parameters” screen using the menu. 26. Change the “IP Address for Brew-Boss® Controller” cell to the static IP address you set for the controller above. 27. Make certain the “TCP/IP Port for Brew-Boss® Controller” is set to 8080.
- Page 68 Brew-Boss® V2.06 Operation Manual Note: If the Brew-Boss® controller does not connect, try turning the power off on the Brew- Boss® controller and restarting it. If that does not work, it is most probable that you set something incorrectly or your network router is blocking the port. It may be necessary to send the controller back to Brew-Boss for reset.
- Page 69 Brew-Boss® V2.06 Operation Manual Swirl-Boss Whirlpool Wand Instructions The Swirl-Boss wand is designed to connect to a 1/2” ID silicone brewery hose. Simply slip the hose coming from your pump over the end of the wand. A hose clamp should not be needed, but you may add one if you feel it is necessary.
- Page 70 Never miss a hops addition again! The Hops-Boss is available in two versions, as an accessory device (slave) to the Brew-Boss electric brew controller or as a stand-alone device that requires programming via an Android or iOS application. This document will guide you through setup and use of your new Hops-Boss.
- Page 71 Brew-Boss® V2.06 Operation Manual Assembly The Hops-Boss is assembled easily with 8 nuts. Items are assembled as shown in the picture below. If you have the optional heat shield, Make certain to mount the Chute to the Baseplate first, as the heat shield (not shown) will obstruct the fasteners on the bottom of the Baseplate, making them difficult to install.
- Page 72 Brew-Boss controller to have an SSID of “Brew-Boss”. To change the SSID, perform the following steps: 1. Turn on your Brew-Boss controller and wait for at least a minute for the wi-fi radio inside to boot up. 2. Connect to the Brew-Boss XXXXXX wireless network on your Android tablet as you normally do before launching the Brew-Boss App.
- Page 73 11. Launch your Brew-Boss app (make certain you have Version 1.10 or later! If you don't, connect to the internet and make sure to update to the latest version in the Google Play Store or Amazon's App Store).
- Page 74 Green Hops-Boss Checkbox indicates that the Hops-Boss is connected. It is important that the controllers be powered up in the order above. First the Brew-Boss controller, wait at least 1 minute, then the Hops-Boss, wait at least 30 seconds, then connect the Tablet to the Brew-Boss network, and finally, run the Brew-Boss app.
- Page 75 Brew-Boss® V2.06 Operation Manual 16. Test the Hops-Boss by clicking on the Box with “Home” shown on the screenshot above. A graphic representation of the Hops-Boss unit will be displayed as shown in the screenshot below. Notice that the current position of the Hops-Boss feeder is highlighted in RED. To test the feeder, simply press on one of the hops feeder position numbers on the graphic.
- Page 76 Brew-Boss® V2.06 Operation Manual 17. Now you can add automated hops feeding to your step definitions by simply placing the desired position number in the “Hops Pos” column of the “Edit/Define Brew Steps” screen. Valid poitions are from 0 (Home) to 7. Remember to make certain that the hops feeder positions are in sequential order as previously described.
- Page 77 Brew-Boss® V2.06 Operation Manual Line A above shows the step definition for the first hops addition after the kettle reached boil. We use a step type 2 (prompt without user confirm) to move the feeder to position 2. This dispenses the contents of feeder positions 1 and 2. Line B, step type 4, maintains the boil for 45 minutes.
Need help?
Do you have a question about the 2.06 and is the answer not in the manual?
Questions and answers