
Related Manuals for Vista Viper series


Summary of Contents for Vista Viper series
- Page 1 Real Time Full HD, PoE Network Video Recorders (4/8/16CH) INSTRUCTION MANUAL Please read this manual thoroughly before use, and keep it handy for future reference.
-
Page 2: Explanation Of Graphical Symbols
WARNING TO REDUCE THE RISK OF FIRE OR ELECTRIC SHOCK, DO NOT EXPOSE THIS PROCUCT TO RAIN OR MOISTURE. DO NOT INSERT ANY METALLIC OBJECT THROUGH THE VENTILATION GRILLS OR OTHER OPENNINGS ON THE EQUIPMENT. CAUTION EXPLANATION OF GRAPHICAL SYMBOLS The lightning flash with arrowhead symbol, within an equilateral triangle, is intended to alert the user to the presence of uninsulated "dangerous voltage"... - Page 3 CE COMPLIANCE STATEMENT WARNING: This is a Class A product. In a domestic environment this product may cause radio interference in which case the user may be required to take adequate measures. VIPER user manual V1.0...
-
Page 4: Important Safety Instructions
IMPORTANT SAFETY INSTRUCTIONS Read these instructions. Keep these instructions. Heed all warnings. Follow all instructions. Do not use this apparatus near water. Clean only with dry cloth. Do not block any ventilation openings. Install in accordance with the manufacturer’s instructions. Do not install near any heat sources such as radiators, heat registers, stoves, or other apparatus (including amplifiers) that produce heat. -
Page 5: Table Of Contents
3.1.2.3. Manual Adding of ONVIF cameras ................... 28 3.1.2.4. Manual adding of cameras RTSP streams ................30 3.1.3. IP Camera Setup ......................... 32 3.1.4. Image Setup ( Vista VK2 cameras only) ..................33 3.1.5. Monitor ............................34 3.1.6. Sequence / Event Display ......................34 3.1.7. - Page 6 3.5. Network Setup ..........................50 3.5.1. Connection ..........................50 3.5.2. Port / Connection Test ......................... 52 3.5.3. DVRNS/Dashboard ........................53 3.5.3.1. DVRNS Registration ......................... 53 3.5.3.2. Dashboard Setup........................54 3.5.3.3. using Dashboard ........................54 3.5.4.3. Dashboard Login ........................55 3.5.4.4. DVR/NVR Search ........................56 3.5.4.5.
- Page 7 7.4. Backup Captured Image ......................... 93 Chapter 8. Web Viewer – Connection via Internet Explorer ..............94 8.1. System Requirement ........................94 8.1.1. Network Environment ........................94 8.2. Web Viewer – Getting Started ......................94 8.2.1. Connect NVR via Web Browser using Direct IP................94 8.2.2.
- Page 8 TERMS / ICONS GLOSSARY ......................125 NVR Icon Reference ..........................126 VIPER user manual V1.0...
-
Page 9: Chapter 1. Introduction
Chapter 1. Introduction 1.1. Description This manual applies to the 4/8/16 channel PoE VIPER network video recorder. The network video recorder supports up to 4/8/16 network cameras. The NVR can record high quality Full HD images onto hard disk drives. The network recorder is extremely straightforward to install and setup, as it detects network cameras and defines the parameters of each through a dedicated configuration wizard. -
Page 10: Basic Security System Configuration
► Protect Video/Audio files from HDD Overwrite ► System & Event Log files management ► Configuration data copy to other channels for easy setup ► Configuration file Export / Import for easy installation of multiple NVRs ► Control of minimum recording dates by channel ►... -
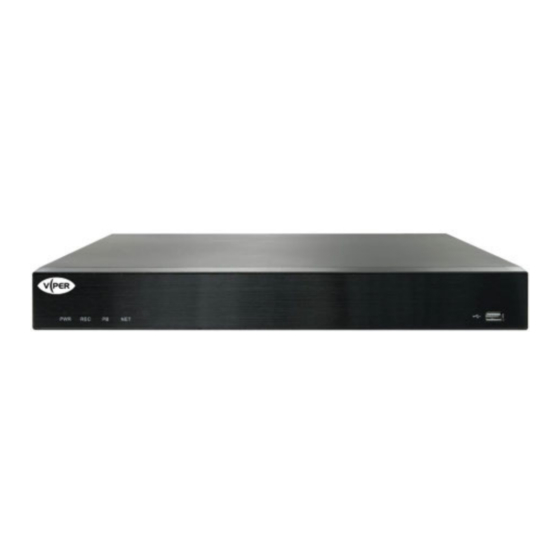
Page 11: Front Panel View
1.5. Front Panel View 1 2 3 4 5 1) Power LED: NVR power indicator 2) REC LED: Recording indicator 3) Playback LED: Playback indicator 4) Network LED: Network connection indicator 5) IR REMOTE CONTROL SENSOR: Receives all incoming signals from the remote control 6) USB 2.0 Port: Connect USB mouse or USB memory device for firmware upgrade. -
Page 12: Ir Remote Control
1.7. IR Remote Control Installing batteries 1. Remove the battery cover by sliding in the direction of the arrow. 2. Insert two AAA batteries according to directions provided. 3. Replace the battery cover by sliding in the direction of the arrow. VIPER user manual V1.0... -
Page 13: Chapter 2. Installation
Chapter 2. Installation 2.1. HDD Installation Before Installation We recommend setting the current time on your NVR before HDD Installation. Please make sure that the power of NVR is switched off before starting installation. Step 1. Make sure the NVR power is switched OFF Step 2. -
Page 14: Using A Dynamic Ip Address
2.2.2. Using a Dynamic IP Address You can use a router with your Dynamic IP broadband modem. In this case, you should set the configuration of a router properly for network connection between NVR and Net/Web Viewer. Please follow the instructions in next section to configure your router correctly. Home/Office Network Internet If your Broadband Modem does not support internal loop back (port forwarding) function and you... -
Page 15: Starting The System
2.3. STARTING THE SYSTEM When power is turned on, you will see the initializing screen and it may take up to one minute to complete. After initializing is complete, an Easy Setup screen will appear. 2.3.1. EASY SETUP An Easy Setup screen of 10 steps will appear. If you don’t want to use the Easy set up, simply click the Exit button. - Page 16 [3/10] Port /Connection Test [4/10] DVRNS / Dashboard [5/10] IP Camera Registration The user can check the IP camera listing and register the desired IP cameras automatically or manually by click the Auto/Manual button. See Section 3.1.2 for more details on camera registration VIPER user manual V1.0...
- Page 17 [6/10] IP Camera Setup [7/10] Date/Time Setup In this step, the user can set the date and time of the system, and Time zone as well. [8/10] Camera VIPER user manual V1.0...
- Page 18 [9/10] Record Quality [10/10] Monitor After Easy Setup is completed or exited from Easy Setup menu, a live screen will appear. When the user is not logged-in, and they try to access it, it will prompt you to login. Enter ID and Password by using the virtual keyboard and click OK. By default, the ID is set at “admin”...
-
Page 19: Live Menu Description
2.3.2. Live Menu Description Mouse Menu To navigate by using your mouse, right click your mouse anywhere on the screen and you will be given options to choose from. Screen Mode Select how you would like to view screen Audio Off Select the audio on or off Freeze Freeze Playback or Live scene... -
Page 20: Live Menu Navigating
characters are used in the password, it will show as 12**, six characters will show as 123*** and eight character, 1234**** 2.3.4. Live Menu navigating You can navigate the screen using the mouse and remote control. By selecting arrow button using mouse or pressing the direction button ▶and enter button on the remote control you can move to the next channels. -
Page 21: Chapter 3. Main Menu Setup
Chapter 3. Main Menu Setup Go to Main Menu Window using: Remote control – Press MENU, Mouse – Right click and click Main MENU. To go to desired sub menu: • Use direction keys and press ENTER (remote control) or click on sub menu with the mouse. To go to the higher level menu: •... -
Page 22: Video/Audio Setup
3.1. Video/Audio Setup There are 5 sub menus under Video/Audio. To exit to main menu, press MENU key again (or right click on the mouse). 3.1.1. Camera In the Camera menu, you will be able to set up your camera to a desired setting. Click the Camera menu and it will route you to a Camera setup page 1) VIDEO: You may select the video ON, OFF, COVERT 1 or COVERT 2. -
Page 23: Ip Camera Registration
NVRs in built PoE switch. The 4 methods are as follows: 1. Auto Detection This is the simplest and quickest method, it can be used for all cameras within the Vista VK2 range, or for other third party manufacturers camera that support “Zero Config”. -
Page 24: Auto Detection
3.1.2.1 Auto Detection This is the simplest method of registering cameras; it can be used with any of the Vista VK2 range of cameras or third party manufacturer’s cameras that support “Zero Config” The cameras must be connected directly to the PoE ports of the NVRs built in switch, and the cameras ID and Password must both be set to “admin”, and the network settings, set to DHCP( This is... -
Page 25: Nvr Search And Manual Registration
3.1.2.2 NVR search and manual registration Used to register cameras connected via the WAN port, or cameras on the PoE ports which do not support “Zero Config” To register cameras using this method the “Auto Detection” function must be turned “off” for the relevant channels. - Page 26 menu page. If cameras have previously been connected they will be displayed in the list with their channel numbers in the Registration column. To search for more cameras on the system either a “Quick” or “Detailed” search can be used. If the “Detail”...
- Page 27 Select the channel number required, channels that have already been allocated will be greyed out. If a “Quick” search has been run then the camera ID and Password will be blank and will need to be added manually, click on the box to display the on screen keyboard and enter the ID and Password. If a “Detailed”...
-
Page 28: Manual Adding Of Onvif Cameras
3.1.2.3. Manual Adding of ONVIF cameras This method should be used if the Auto Detection or NVRs search method does not operate. For this method to work the cameras must be ONVIF version S or above. To use this method, the Auto Detection for that channel must be switched to “off” as described in the previous section. - Page 29 Select the address box, the following on screen keyboard will appear: Use the keyboard to change the IP address section (192.168.0.1) to the IP address of required camera. Next add the camera ID and Password. Click on “TEST”, if the details are correct and the camera is compatible then the message “Success” will be displayed, Next click “OK”...
-
Page 30: Manual Adding Of Cameras Rtsp Streams
3.1.2.4. Manual adding of cameras RTSP streams This method should be used if any of the 3 previous methods fails to connect to the cameras. The process for RSTP connection is very similar to that described in the previous ONVIF connection. Note: The RTSP URL for each of the cameras streams will bee required for this method. - Page 31 3. Enter the correct information on the “RTSP URL”, “HTTP port”, “ID”, and “Password”. If Secondary stream is registered both Primary and Secondary stream are supported. If not only Primary stream is supported. Click “OK” to save the configurations and then “Cancel” to exit the menu.
-
Page 32: Ip Camera Setup
3.1.3. IP Camera Setup In this menu, you will be able to setup your IP camera to desired setting. By clicking the Setup tab, you will have five (5) different settings to work with. -PROFILE -RESOLTUION -FPS -QUALITY -GOP (Group of Pictures) Click on the Setup tap of desired channel, then IP camera setup page will appear. -
Page 33: Image Setup ( Vista Vk2 Cameras Only)
5) GOP: Maximum GOP is 30 and a half of FPS is recommended as a GOP size. 3.1.4. Image Setup ( Vista VK2 cameras only) In this menu, the user can set the camera image setup in the NVR; brightness, contrast, hue, saturation, DWDR, etc. -
Page 34: Monitor
3.1.5. Monitor To select HDMI/VGA resolution setting, click on the Monitor menu. In this menu, you’ll be able to set the desired HDMI/VGA resolution by simply clicking on the Resolution tap to scroll down bar and select the setting. To adjust the brightness/contrast/hue/color for monitor, click the “Monitor”... -
Page 35: Osd / Display Position
Event Display When viewing live and an event occurs, an event window will pop up showing all channels that are set in event setting. 1) Duration: You may select OFF or time interval setting. 3.1.7. OSD / Display Position You can configure each parameter for on-screen-display using direction keys and ENTER button. To save and exit from this menu, press MENU. -
Page 36: Record Setup
1) Live Screen: Select split modes for the Live screen. 4-split screens by default. 2) Play Screen: single screen and 4 split mode are default. 3) When the screen mode setup is done, click OK. Live Screen: Use Secondary Stream. If the Use Secondary Stream box is selected, the second stream will be used on multi view mode. -
Page 37: Record Quality
2) Schedule (S) [ON / OFF] ON: Schedule record enabled OFF: Schedule record disabled on selected camera and NVR will not record by your schedule setup. This will override schedule setup menu. 3) AUDIO [ON/OFF]: Allows user to turn audio record ON or OFF. 3.2.2. -
Page 38: Record Option
3.2.4. Record Option You can enable/disable HDD overwriting feature and set warning method when HDD is full and overwriting is disabled. 1) HDD Overwrite Mode [ON / OFF] If you select “ON”, NVR will delete the old recorded files (from the oldest file) and will record the new video file when the HDD is full. -
Page 39: Schedule Setup
3.2.5. Schedule Setup This menu allows you to create your own recording schedule and trigger type. To enable this feature, schedule recording feature at RECORD->POLICY->SCHEDULE menu must be turned “ON”. Using direction keys and ENTER button, choose preferred record types (such as Continuous, Event, Both (Cont&Evnt) on the selected time and date. -
Page 40: Motion Setup ( Vk2 Cameras Only)
3.2.7. Motion Setup ( VK2 Cameras only) In this menu, the user can set the motion area setting on the screen. Select the Mode to On position to click Setup button. Once the user clicks the desired setup channel, a motion setup window will appear. Check the motion Enable box and adjust the sensitivity and Interval value. -
Page 41: Device Setup
3.3. Device Setup In this Device menu, you can configure the peripherals in your NVR such as storage, PTZ control, printers, alarm sensors and Video analysis. 3.3.1. Storage 1) HDD / Flash Installed Hard disk drive or Flash drive’s capacity and percentage used is shown. For 4CH model 1 internal HDD can be installed, and for 8CH and 16CH NVR up to 2 internal HDDs can be installed. -
Page 42: Sensor / Video Loss Detection Setup
3.3.2. Sensor / Video Loss Detection Setup Select the right type of your external sensors connected to NVR. 1) Sensor # (4CH:1~4 / 8,16CH:1~8): means sensor input number (terminal block of rear panel) 2) Type [Off / N.O. / N.C.] N.O.: “Normal mode- Open”. -
Page 43: Ptz
1) Alarm Select the alarm out port of rear panel. 2) Beep When Beep (Event Sync) is selected, and alarm schedule mode is set as Event sync. When the alarm is triggered, Beep sound is activated during the dwell time (continuous, 5sec, 20sec ~ 3 hours). 3) Alarm Out Schedule - ON: Marked in Blue, it will generate alarm out when the event occurs on scheduled time. -
Page 44: Pos/Atm Device
3.3.6. POS/ATM Device POS/ATM Device Setting: 1) In the POS/ATM Device menu, by clicking the box of <POS/ATM USE>, the NVR and POS/ATM will be connected. If you change settings for the device and press <OK> while the <POS/ATM USE> is not checked, the changes for POS/ATM will not be saved. 2) For point to point connection, click the check box of <POS/ATM USE>... -
Page 45: Video Analysis ( Vk2 Cameras Only)
A POS/ATM popup message will appear to ask if you wish to continue. Click OK to finish the POS/ATM setting. When POS/ATM sends the data, you can find data overlay on the live screen. The POS/ATM text icon is also shown on the screen indicating the text recording. *For further information of POS/ATM device setting. -
Page 46: System Setup
3.4. System Setup This menu helps you to configure NVR for basic operation. You can set the current time for your area, network parameters, and password for security purposes. 3.4.1. Date/Time Setup You can set the current date and time manually. 1) Auto Time Set: Time Sync. -
Page 47: Config
3.4.3. Config You can Upgrade the firmware, Import/Export the settings and do the Factory Reset of the NVR. 1) Upgrade: Upgrade NVR firmware with USB memory stick at local USB. How to upgrade firmware with USB memory stick: - Check the current firmware version before starting upgrade. - Have a higher/newer version of firmware software in a USB memory stick. -
Page 48: Authorization Management
You can retrieve log information by calendar by clicking the calendar icon. For those dates that have data, there will be a small checkmark next to the date. You can export System log via USB thumb drive. File format will be .csv. 3.4.5. -
Page 49: User
3.4.5.3. User Once you create the Group, you can add the User on that Group. NOTE: Users can be added only if a Group has already been established. 1) When selecting “Add” from the window, a window for “Add User” will appear. You can configure the Network Viewer setting including Name, ID, Select Group and Password (include Confirm PW). -
Page 50: Network Setup
3.5. Network Setup You can setup the network for the NVR. Before starting this setup, the NVR must be connected to the router by LAN cable. Also, please make sure that the internet is working properly. Important: If you are not familiar with network configuration and find any difficulties during this setup, please consult with your IT specialist. - Page 51 For use Dynamic IP, the NVR should be directly connected to a cable modem, DHCP ADSL Modem or FTTH network. IP, Gateway, Subnet Mask and DNS will be set automatically. * Network Port: When A Router Is Used: 1) Setting the NVR with a Static IP: Internet Connection: You can connect the NVR to a router which is connected to a cable modem or a router in a LAN environment.
-
Page 52: Port / Connection Test
3.5.2. Port / Connection Test 1) Port (TCP): Initially, 9350-9351 is set. But can be changed: It has better stability and lower speed when compared to UDP and recommended for internet environments. 2) WebViewer Port: Enter the port number for the Web Viewer. Initially, it is set to 80. It can be changed. -
Page 53: Dvrns/Dashboard
3.5.3. DVRNS/Dashboard You can use default ID and Password or enter your Network ID and Password to gain network access. By using the virtual keyboard, you may enter your ID and Password. The Exclamation icon indicates that the NVR has not been registered to our DVRNS server. The Network ID and Password is for access to the NVR via web browser. -
Page 54: Dashboard Setup
3.5.3.2. Dashboard Setup Dashboard allows you to access, manage and monitor the multiple NVR with single ID from anywhere in the world where you can access the internet. Once you login with your ID, the Dashboard shows the registered NVR list on the web and enables you to access the NVR for real-time monitoring and playback. -
Page 55: Dashboard Login
3.5.4.3. Dashboard Login Once you have logged on, the Dashboard will appear and from here, you’ll be able to view your NVR information. Click the REMOTE WATCH tab and you’ll be able to access your NVR and monitor. ① ② ③... -
Page 56: Dvr/Nvr Search
3.5.4.4. DVR/NVR Search In your Dashboard, type in the Network ID of your desired NVR to connect to your NVR’s webpage. Network ID: Once you have entered the Network ID for desired NVR, click the GO button. After clicking the GO button, it will route you to the web page login. Once you have entered the Login page, you will then need to enter your ID and Password. -
Page 57: Ddns
To access your Web Viewer for Live monitoring and Playback, you will need to enter your ID and Password 3.5.5. DDNS You can set the DDNS site for a remote user’s network connection DDNS Setting: DDNS is a short form of Dynamic Domain Naming Systems. DNS (Domain Name System) is a service that routes a Domain name consisting of user friendly characters to an IP consisting of numbers (64.233.189.104). -
Page 58: Ftp File Transfer
3.5.6. FTP File Transfer This menu allows the user to transfer the FTP file to a specific server when event is triggered. For the detail information, please refer to the description by click the Help button. The Help description is as follows; FTP Server IP Address/URL –... -
Page 59: Email
3.5.7. Email You can send Email to registered NVR users. There are four sub-menus under Email: SMTP, Event, Schedule & Recipient. 3.5.7.1. Email: SMTP SMTP mail server: 1) Server Type: Displays the connected server type. 2) Server: Enters a server to connect to. 3) Port: Sets the communication port. -
Page 60: Email: Schedule
3.5.7.3. Email: Schedule Schedule menu will allow one to set schedule to receive notification. You may select specific channel for notification or simply click Apply to All CH tab. 3.5.7.4 Email: Recipient You can add recipients to the email service. You can add up 100 recipients maximum. Click on the ADD button and an Add Recipient window will appear. -
Page 61: Iscsi
3.5.8. iSCSI 3.5.8.1. NVR iSCSI Setting 1) Use iSCSI: If you want to use iSCSI, check Use iSCSI box. If you check the iSCSI box, iSCSI setting menu will be activated. 2) Target Node Table: You can see the device number, registered IQN(iSCSI Qualified Name) and connection status. -
Page 62: Iscsi Device Block Size
3.5.8.2. iSCSI device block size. Note: In iSCSI device setting block size, you must set to 512byte. Note: In iSCSI device IP address, it should be set to static IP address, not in DHCP. VIPER user manual V1.0... -
Page 63: Backup Procedure
3.6. Backup Procedure You can check the backup device and set the backup schedule by channel or by time. You can only backup your data with either a USB Drive or external CD/DVD Writer. 1. Before selecting the “Backup” menu, insert a USB Pen drive (Max 2TB) 2. - Page 64 6. Select Video Type: HV4 – Downloads secure format of multiple cameras with player included AVI – Single camera can be played back in Media player Click on CHECK CAPACITY, the NVR will calculate the size of file and available space and display graphically in the bar on screen.
- Page 65 7. If there is sufficient available space, then click on OK to start the download. 8. Wait until the “Backup complete” message is displayed Click “Remove USB” then click “OK VIPER user manual V1.0...
-
Page 66: Chapter 4: Search Menu
CHAPTER 4: Search Menu To use the search menu, the user right-clicks on the live screen and selects the Search Menu option, or click the Search icon on the launcher. 4.1. Time Search There are 6 options to choose from to retrieve recorded data. You can choose to search one at a time, multiple at a time or by all. - Page 67 You can search for recorded data of a desired time. 1) Select a date to search. 2) Recorded data on that date and time will be listed. The display bar is different according to the data type so check the data type for the color in the left pane. 3) Using mouse, drag the time bar to the desired search criteria and select the desired channels.
-
Page 68: Event Search
4.2. Event Search You can search for events by the channel and playback them. 1) Use the mouse or direction buttons to set the search criteria and Play button. 2) Click the desired channel(s). The selected channels will be colored as yellows. 3) All recorded events on a specific date for the selected channels will be displayed (Normal / Schedule recording included) -
Page 69: Pos/Atm
4.5. POS/ATM You can search for data of the POS device that is connected to the NVR. Right click on the live screen to select Search > POS/ATM and enter POS/ATM Search. Select the desired date and time and click Search button. You can enter specific text to refine your search. -
Page 70: Video Analysis
4.6. Video Analysis You can search for data as a preferred function in a specified preset position. Motion: An object in motion will be detected. 1) Tracking: The camera will track a moving object. 2) Line Detector: You can detect a moving object crossing a specified virtual line in a preset position. -
Page 71: Chapter 5. General Operation
CHAPTER 5. General Operation 5.1. General Menu To navigate by using your mouse, right click your mouse anywhere on the screen and you will be given options to choose from. 1) Screen Mode 2) Audio On/Off 3) Freeze 4) Stop Alarm 5) Record Start/Stop 6) Play 7) Search... -
Page 72: General Menu: Screen Mode
5.1.1 .General Menu: Screen Mode Clicking Screen Mode will enable you to select the multi view options. Auto Sequence activate Auto Display Mode (Sequence Display Mode), live channels (cameras) will be displayed on the monitor screen in accordance with your sequence setup. -
Page 73: General Menu: Audio Off
5.1.2. General Menu: Audio OFF You can turn the sound on/off corresponding to the channel in Live Mode. 5.1.3. General Menu: Freeze This is only available in Live Mode and will temporarily pause Live feeds. VIPER user manual V1.0... -
Page 74: General Menu: Stop Alarm
5.1.4. General Menu: Stop Alarm Stops the alarm output and the event monitoring. 5.1.5. General Menu: Record Start/Stop Will start and stop Manual recording. However, if the schedule or event recording is set, even the user clicks the Record Stop menu, it will not be applied to the Schedule recording or Event recording. VIPER user manual V1.0... -
Page 75: General Menu: Play
5.1.6. General Menu: Play You can playback data stored in the HDD. Also you can playback with quick play for 30sec ~ 10min, which is very critical time search. 5.1.7. General Menu: Search You can perform search for recorded data by Time, Event, Protect, Capture, POS/ATM and Video Analysis. -
Page 76: General Menu: Backup ( Plus Back Up Procedure)
5.1.8. General Menu: Backup ( plus back up procedure) You can back up the desired data to a connected device. By clicking the Backup tab from the General Menu, it will direct you to the Main Backup Menu. 1. Before selecting the “Backup” menu, insert a USB Pen drive (Max 2TB) 2. - Page 77 5. Choose the device type (generally USB) 6. Select Video Type: HV4 – Downloads secure format of multiple cameras with player included AVI – Single camera can be played back in Media player 6. Click on CHECK CAPACITY, the NVR will calculate the size of file and available space and display graphically in the bar on screen.
- Page 78 7. If there is sufficient available space, then click on OK to start the download. 8. Wait until the “Backup complete” message is displayed 9. Click “Remove USB” then click “OK” VIPER user manual V1.0...
-
Page 79: General Menu: Main Menu
5.1.9 General Menu: Main Menu By clicking the Main Menu on the General Menu, it will direct you to the Main Menu. VIPER user manual V1.0... -
Page 80: General Menu: Information
5.1.10. General Menu: Information This menu will display overall system information. 5.1.11. General Menu: IP Cam INFO This menu will display your IP camera information. NOTE: For full IP camera information, please refer to your IP Camera Setup in the Main Menu under Video Audio. -
Page 81: General Menu: Easy Setup
5.1.12. General Menu: Easy Setup This menu will allow you to set your NVR with 10 easy steps. 5.1.13. General Menu: IP Camera Registration This menu will direct you to the IP camera registration window. VIPER user manual V1.0... -
Page 82: General Menu: Shut Down
5.1.14. General Menu: Shut Down This menu will allow you to completely shut down your NVR unit. When the user clicks this menu, a warning message window will appear to confirm the user to proceed. 5.1.15. General Menu: Hide Launcher Shows or hides the Launcher VIPER user manual V1.0... -
Page 83: General Menu: Logout
5.1.16. General Menu: Logout This menu allows you to logout by clicking the Logout button. A logout window will appear to confirm you to logout. VIPER user manual V1.0... -
Page 84: Live Launcher
5.2. Live Launcher The Live Launcher menu appears at the bottom of the live screen. Some of the menu buttons will appear in the Live Launcher, General Menu and Playback Launcher for the convenience of not having to go back and forth to navigate to the desired action. 5.2.1. -
Page 85: Playback Launcher
5.3. Playback Launcher 1) Click <Play> Menu in Mouse Menu or on Live launcher. You can select 30sec. 1 min, 5 min, 10 min and critical time playback. Once you select the time, the selected data is played and the play launcher appears on the screen. -
Page 86: Playback (P) And Trap Mode (Pause / Ff/ Rew / Frame Advance)
○ Printer: Allows you to Print image either in Live or Playback Mode 5.3.2. Playback (P) and Trap Mode (Pause / FF/ REW / Frame Advance) Playback Icon: To playback any recorded files, click ▶ in the Playback control button. ‘▶’. Icon will be displayed on the right-top of the screen during the playback. - Page 87 USING THE PTZ CAMERA1 You can use one camera to perform all functions of PAN, TILT & ZOOM (PTZ) for monitoring multiple places and set the preset to your preference in a desired mode. 1) PTZ Direction Button/Wheel: Click to any given direction you wish to view.
- Page 88 PRESET SETTING A preset is a set of specific target points of a PTZ camera and up to 128 presets per camera can be stored. 1) In PTZ Control mode, use the direction buttons to adjust the camera to desired direction. Firstly set the preset number and then adjust the camera to the desired direction.
- Page 89 TOUR SETTING Firstly select the Tour menu and click Setup-Preset button , the Tour setting window will appear. Tour Number: you can set 1 ~ 8. Dwell Time: Dwell time of one Preset. (0 ~ 99 sec). Tour program setting: max. 50 tour set per tour number can be set.
-
Page 90: Chapter 6. Protect Video/Audio File
Chapter 6. Protect Video/Audio File 6.1. Protect Registration You can protect important recorded files from HDD overwriting. During playback, click the protect icon in the launcher , this will protect a 30 minute segment around the current time being played. A poop up message will appear, click on yes to save this segment to the Protect list IMPORTANT:... -
Page 91: Protected File Backup
6.3. Protected File Backup Protected files are very important and are valuable evidences for any incidents. You can make a copy of protected files on to USB memory same as the ordinary backup function of your NVR. How to backup protected files? Go to PROTECT LIST menu. -
Page 92: Chapter 7. Capture Video Still Image
Chapter 7. Capture Video Still Image 7.1. Still Image Capture You can capture and save up to 100 still images and retrieve, delete, or back them up easily. You can capture these images instantly using a mouse or remote control. How to capture images? During playback mode (including FF, REW and Pause) or live display, you can capture current image using a mouse or remote control. -
Page 93: Remove Captured Image
7.3. Remove Captured Image You can save up to 100 captured images into our HDD. You should erase some saved images to save new captured images. How to remove captured image files? IMPORTANT: If there are 100 captured images in your HDD and you try to capture new video images, the oldest image will be erased automatically to save new images. -
Page 94: Chapter 8. Web Viewer - Connection Via Internet Explorer
Chapter 8. Web Viewer – Connection via Internet Explorer 8.1. System Requirement - Pentium 4 or above recommended - O/S: Microsoft Windows XP, Vista, Windows 7 - 2GB RAM or above recommended - Super VGA 512M or above (1GB recommended) - 10/100 Base T network card for LAN operation 8.1.1. -
Page 95: General Web Viewer Operation
8.2.2. General Web Viewer Operation When you connect to your NVR, you will see a screen as below. Connect/Disconnect Button: Connect to NVR which is designated in Login pop-up window. To disconnect or connect to other NVRs please click this button again. Search Button: You will be able to search for data by calendar search. -
Page 96: Calendar And Time Search Button
8.2.3. Calendar and Time Search Button: You can search data from Calendar Search or by Time Search. Click on the Search button at the menu bar. Once you have clicked the Search button, a Calendar Search will appear. The dates that are marked in red color indicates that there are data on that date. -
Page 97: Ptz Control
8.2.4. PTZ Control You will be able to control your PTZ camera that’s connected to your NVR. Keep in mind that PTZ control function can only be performed in LIVE mode. First select a specific channel to control the PTZ camera, then simply click on the PTZ icon/button on the menu bar. -
Page 98: Connect To Nvr Via Web Browser Using Url
8.2.5. Connect to NVR via Web Browser using URL 1) Make sure your NVR network setup is completed. Registering your Network ID and Password is not required to connect to NVR via web browser. 2) However Network & Password is required to http://www.securityddns.com. -
Page 99: Chapter 9. Web Viewer - Setup/Web Configuration
Chapter 9. Web Viewer – Setup/Web Configuration 9.1. Web Configuration You can remotely control and manage the NVR from your Internet. We strongly recommend this function is only used for professional administrators who manages it from remote sites. To control the NVR remotely, simply type in the NVR IP address in the Internet browser. -
Page 100: Ip Camera Setup
9.1.1.3. IP Camera Setup You will be able to setup your IP camera and select from six different setup menus. 1. Profile 2. Resolution 3. FPS 4. Quality 5. GOP 6. Web Page (Link) ** For detailed information, please refer to the Main Menu under Video/Audio To setup your IP camera, click the “LINK”... -
Page 101: Osd/Display Position
9.1.1.6. OSD/Display Position You can configure each parameter for on-screen-display. ** For detailed information, please refer to the Main Menu under Video/Audio 9.1.2. RECORD You can set all parameters related to recording for each camera independently. 9.1.2.1. Policy NVR can record a live video by manual, schedule, event (motion detection and/or external sensor) and by network user’s command. -
Page 102: Schedule
9.1.2.3. Schedule 1) CAMERA Select channel for schedule recording. 2) SELECT DAY [SUN – SAT/Holiday] Select the desired day for schedule recording. 3) TIME Move the cursor to desired time and click to set it highlighted. Press click again to change schedule recording option by color. -
Page 103: Record Option
9.1.2.6. Record Option You can enable/disable HDD overwriting feature. ** For detailed information, please refer to the Main Menu under Record 9.1.3. Device You can configure the peripherals in your NVR such as PTZ control and printer 9.1.3.1. Sensor Detection Select the right type of your external sensors connected to the NVR. -
Page 104: Alarm Out Schedule
9.1.3.3. Alarm Out Schedule You can set the conditions and operating hours for scheduled alarms. ** For detailed information, please refer to the Main Menu under Device 9.1.3.4. PTZ NVR supports PAN, TILT, ZOOM and FOCUS control for PTZ cameras or servers. ** For detailed information, please refer to the Main Menu under Device 9.1.3.5. -
Page 105: Storage
9.1.3.6. Storage This feature will display your storage (HDD) status. ** For detailed information, please refer to the Main Menu under Device VIPER user manual V1.0... -
Page 106: System
9.1.4. System The menu will help you to configure DVR for basic operation. 9.1.4.1. Date/Time You can set up the current date and time manually. ** For detailed information, please refer to the Main Menu under System 9.1.4.2. Time Synchronization Setup Auto Time Set (Time Sync.): By clicking the Time Sync. -
Page 107: Config
9.1.4.4. Config This menu allows the user to reboot the NVR system remotely. For NVR rebooting, it will take about 2 minutes. 9.1.4.5. System Information This menu will display overall system information 9.1.4.6. Authorization Management You can set permissions of each user over the NVR’s specific function and settings. -
Page 108: Authorization Management: Admin
9.1.4.6.1. Authorization Management: Admin 1) Under Permission Management Admin, you can change Admin ID and Password. By clicking on the ID, a virtual keyboard will appear to type in ID. This also applies to Password and Confirm PW. Once you have entered your ID and PW, click OK. -
Page 109: Authorization Management: Setup
9.1.4.6.4. Authorization Management: Setup You can set restricted access for all general users. Items with restrictions will require logging in for use ** For detailed information, please refer to the Main Menu under System 9.1.5. Network With this menu, you can setup the network for NVR. Before starting this setup, the NVR must be connected to the router by LAN cable. -
Page 110: Dvrns/Dashboard
9.1.5.3. DVRNS/Dashboard You can set the network ID and Password for DVRNS access, and for Dashboard connection. ** For detailed information, please refer to the Main Menu under Network 9.1.5.4. DDNS You can set the DDNS site for a remote user’s network connection. -
Page 111: Email
9.1.5.6. Email Receive event notifications by Email. ** For detailed information, please refer to the Main Menu under Network 9.1.5.6.1 Email: SMTP You can send e-mail to a registered NVR user at a specific time interval or if an event occurs. ** For detailed information, please refer to the Main Menu under Network 9.1.5.6.2. -
Page 112: Email: Recipient
9.1.5.6.4. Email: Recipient You can add a user to the mailing service. Click the User Add button and Add recipient window will appear in the middle of the screen. Enter recipient’s name and email address and click OK. ** For detailed information, please refer to the Main Menu under Network VIPER user manual V1.0... -
Page 113: Product Specifications
PRODUCT SPECIFICATIONS Model 16CH Input 4 x RJ45 Port 8 x RJ45 Port 16 x RJ45 Port Embedded Ethernet Switch Gigabit Ethernet IP Camera Embedded PoE Switch IEEE 802.3af for IP camera input Input Resolution 5MP/3MP/1080p/960p/960H/D1/VGA Protocol Onvif v2.4 base HD Video Output VGA, HDMI Main Video Resolution... - Page 114 Model 16CH Auto Deletion Setup Recording Duration Per Channel Languages 48 Languages Support Power Supply DC48V 1.2A DC48V 2.0A AC 110~220V NVR Power Consumption 20Watts 37Watts 32Watts 30Watts 44Watts 144Watts Max usable power for camera Operating Temperature 0°C ~ +45°C (+32°F ~ +113°F) Operating Humidity 0%RH ~ 90%RH Weight (Main unit, w/o HDD)
-
Page 115: Installing Viperkbd Keyboard
INSTALLING VIPERKBD KEYBOARD This keyboard controller is capable of controlling the certain functions of VIPER NVR, including Live viewing, Reviewing of recorded data and PTZ control of dome cameras 3 Axis control joystick with zoom controlling handle. Program and recall programmed preset positions, auto scan, tour, pattern, from the selected ... - Page 116 Keyboard Setup- For USB As default the VIPERKBD keyboard will be set to USB operation. – “U” will appear in the LCD display If the keyboard is not set to USB use the following method to set this mode. To enter the Keyboard menu, press and hold CTRL and press MENU. 1.
-
Page 117: Using The Keyboard
Using the keyboard KBD Controller Keys in USB (NVR-LIVE) Function Key Label Descriptions Macro Enter the NVR MENU screen. You will need to enter the administrator password to access the Menu DVR/NVR MENU. Pressing the button also closes the current. Using the Joystick, you can navigate menu and select by turning the Joystick clockwise. - Page 118 Auto Sequence Mode When in the Live Mode, clicking the SEQ button will display another full live channel sequentially. Alarm Will turn off the alarm Record Toggle will start and stop the recording operation Pressing the SCAN button on the keyboard and it will take you to Search Menu. This function Search will only work when it’s not in PTZ mode.
- Page 119 Cancels current inputs. Exits from currently running functions or Cancel menu, error status, etc. Enter Completes entering data for the password or title The camera UP, Down, Left, Right motion (Direction of the Joystick camera control). Turn the Joystick clockwise or counter clockwise for Zoom IN/OUT control.
-
Page 120: Pos Configuration
POS Configuration When the POS device transmits ASCII data, the NVR can record without any interface devices. (ex., AVE device – VSSI Pro) However if the POS device is sending data other than ASCII protocol, it is recommended to use the AVE interface device. For example, the AVE’s VSSI –PRO device is point to point, (ASCII standard protocol) but if the user would like to use multiple POS with the NVR, it is needed to use AVE’s VSI –PRO Max (VSI-ADD) interface. - Page 121 Typical Configuration using AVE interface device for multi-POS Black: Video from the camera goes to NVR. Red: Data from each VSI-PRO-MAX is daisy chained to a master VSI-PRO-MAX or Hydra, this data is then consolidated and transmitted to a compatible NVR in an addressable format. Optional: The optional EX function gives you 2 hard alarm outputs to trigger alarming VCR’s, Quads, or other alarming devices for Exception reporting allowing easy review of exceptional sales, or Instant reviewing on NVR’s.
-
Page 122: Atm Configuration
You can connect the NVR with POS or Keyboard through the RS232. With POS systems, the NVR can communicate through RS232 and network. For the POS system, the NVR can integrate the text content and even search the record through the info. -
Page 123: Network Troubleshooting
NETWORK TROUBLESHOOTING You must set your network environment properly to use remote control software (Net Viewer or Web Viewer). 1.Ping Test through your Router Ping is a command-line tool used to check whether another computer is reachable from your own. You can use the command either from the Windows Command Prompt or from a Linux terminal. - Page 124 Set IP address, Subnet mask, and Gateway address of your PC - Open Network Connections - Select Properties of Local Area Connection - Select Internet Protocol (TCP/IP) - Select Properties - Click on Use the following IP address - Type in Subnet mask and Gateway address of NVR into these fields.
- Page 125 TERMS / ICONS GLOSSARY Composite Video - A format of an analog television (picture only) signal before it is combined with a sound signal. DHCP - Dynamic Host Configuration Protocol. A network application protocol used by devices to obtain configuration into for operation in an internet protocol network. Also a source of IP addresses. DSL - Internet connection that can be used at the same time and on the same telephone line with a regular telephone.
-
Page 126: Nvr Icon Reference
NVR Icon Reference REGULAR RECORDING Icon PTZ SET - Icon indicates PTZ function indicates manual recording is set is available SCHEDULE RECORDING Icon PTZ- Icon indicates that PTZ function indicates recording is set to record has been activated according to schedule EVENT RECORDING Icon indicates SENSOR EVENT (ALARM IN)-Icon that... - Page 127 Real Time Full HD, PoE Network Video Recorders (4/8/16CH) VIPER user manual V1.0...
Need help?
Do you have a question about the Viper series and is the answer not in the manual?
Questions and answers