Table of Contents
Advertisement
Model No. NTL10842
Serial No.
Find the serial number in the location
shown below. Write the serial number
in the space above for reference.
Serial Number Decal
QUESTIONS?
If you have questions, or if there
are missing parts, we will guar-
antee complete satisfaction
through direct assistance from
our factory.
TO AVOID DELAYS, PLEASE
CALL DIRECT TO OUR TOLL-
FREE CUSTOMER HOT LINE.
The trained technicians on our
Customer Hot Line will provide
immediate assistance, free of
charge to you.
CUSTOMER HOT LINE:
1-888-825-2588
Mon.–Fri., 6 a.m.–6 p.m. MST
CAUTION
Read all precautions and instruc-
tions in this manual before using
this equipment. Save this manual
for future reference.
USER'S MANUAL
Patent Pending
Visit our website at
www.nordictrack.com
new products, prizes,
fitness tips, and much more!
Advertisement
Table of Contents

Related Manuals for NordicTrack C2000 NTL10842


Summary of Contents for NordicTrack C2000 NTL10842
- Page 1 Mon.–Fri., 6 a.m.–6 p.m. MST CAUTION Read all precautions and instruc- tions in this manual before using this equipment. Save this manual for future reference. USER'S MANUAL Patent Pending Visit our website at www.nordictrack.com new products, prizes, fitness tips, and much more!
-
Page 2: Table Of Contents
HOW TO FOLD AND MOVE THE TREADMILL ........ -
Page 3: Important Precautions
11. Use only a single-outlet surge suppressor that meets all of the specifications described on page 9. To purchase a surge suppressor, see your local NordicTrack dealer or call 1-888- 825-2588 and order part number 146148. 12. Failure to use a properly functioning surge suppressor could result in damage to the con- trol system of the treadmill. - Page 4 SAVE THESE INSTRUCTIONS The decals shown have been placed on your treadmill and on the aromatherapy bot- tle. If a decal is missing or illegible, please call our Customer Service Department, toll-free, to order a free replacement decal (see ORDERING REPLACEMENT PARTS on page 31).
-
Page 5: Components View
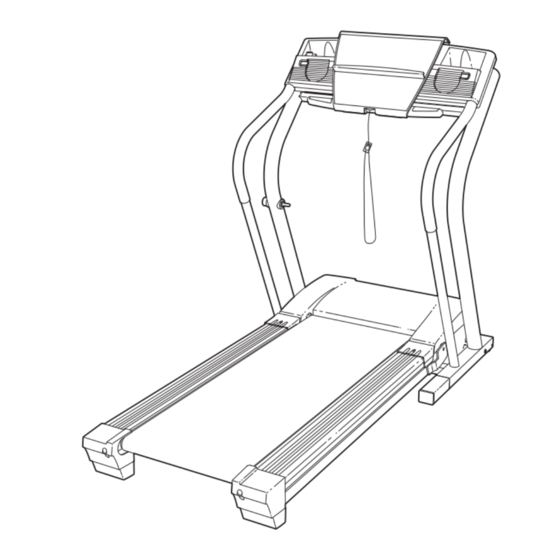
BEFORE YOU BEGIN Thank you for selecting the revolutionary NordicTrack C2000 treadmill. The C2000 treadmill combines ad- vanced technology with innovative design to help you get the most from your exercise program in the conve- nience of your home. And when you’re not exercising, the unique C2000 treadmill can be folded up, requiring less than half the floor space of other treadmills. -
Page 6: Assembly
This is a normal condition and does not affect treadmill performance. If there is lubricant on top of the walking belt, simply wipe off the lubricant with a soft cloth and a mild, non-abrasive cleaner. - Page 7 Base Pad to replace any Base Pad that becomes worn. 6. Make sure that all parts are properly tightened before you use the treadmill. Keep the included allen wrench in a secure place. The allen wrench is used to adjust the walking belt (see page 26). To protect the floor or carpet from damage, place a mat under the treadmill.
- Page 8 If you purchase the optional chest pulse sensor (see page 22), follow the steps below to install the re- ceiver and the short jumper wire included with the chest pulse sensor. 1. Make sure that the power cord is unplugged. Remove the indicated screws from the Console Back (88).
-
Page 9: To Turn On Power
(see drawing 1 at the right). To purchase a surge suppressor, see your local NordicTrack dealer or call 1-888-825- 2588 and order part number 146148. Use only a single-outlet surge suppressor that is UL 1449 listed as a transient voltage surge sup- pressor (TVSS). -
Page 10: Features Of Console
When the manual mode of the console is selected, the speed and incline of the treadmill can be changed with the touch of a button. As you exercise, the console will provide continuous exercise feedback. -
Page 11: How To Use The Manual Mode
Attach the clip to the waistband of your clothes. Stand on the foot rails of the treadmill. Find the clip attached to the key (see the drawing on page 10), and slide the clip onto the waistband of your clothes. - Page 12 0.5%. Note: After the buttons are pressed, it may take a mo- ment for the treadmill to reach the selected incline setting. Follow your progress with the displays. The program display—When...
- Page 13 Step onto the foot rails, press the Stop button, and adjust the incline of the treadmill to the lowest level. The incline must be at the lowest level when the treadmill is raised to the storage position or the treadmill will be damaged.
- Page 14 Step onto the foot rails and make sure that the in- cline of the treadmill is at the lowest level. The in- cline must be at the lowest level when the treadmill is raised to the storage position. Next, remove the key from the console and put it in a se- cure place.
-
Page 15: How To Create Custom Programs
HOW TO CREATE CUSTOM PROGRAMS Insert the key fully into the console. See HOW TO TURN ON THE POWER on page Select one of the custom programs. When the key is inserted, the manual mode will be selected. To select a custom program, press the Select Program button repeatedly until the Learn 1 or... -
Page 16: How To Use Custom Programs
The speed setting for the second segment will then be shown in the flashing Current Segment column and the treadmill will automatically adjust to the second speed and incline settings that you pro- grammed previously. - Page 17 B. A. Plug one end of the audio cable into the jack on the front of the treadmill near the power cord. Plug the other end of the cable into the LINE OUT jack on your CD player.
- Page 18 B. A. Plug one end of the audio cable into the jack on the front of the treadmill near the power cord. Plug the other end of the cable into the included adapter. Plug the adapter into the LINE OUT jack on your stereo.
- Page 19 CONNECT YOUR HOME STEREO on page 18. A. Plug one end of the audio cable into the jack on the front of the treadmill near the power cord. Plug the other end of the cable into the included adapter. Plug the adapter into the AUDIO OUT jack on your VCR.
- Page 20 Stop button or remove the key and go to step 1 on page 19. Note: If the speed or incline of the treadmill does not change when a “chirp” is heard: • Make sure that the iFIT.com indicator is lit and that the Time/Pace display is not flashing.
- Page 21 Additional options are soon to be available. See www.iFIT.com for details. To use programs from our Web site, the treadmill must be connected to your home computer. See HOW TO CONNECT YOUR COMPUTER on page 18. In addition, you must have an internet connection and an internet service provider.
- Page 22 If a “d” appears in the display, the console is in the “demo” mode. This mode is intended to be used only when a treadmill is displayed in a store. When the console is in the demo mode, the power cord can be...
-
Page 23: How To Fold And Move The Treadmill
2. Move your right hand to the position shown and hold the treadmill firmly. Using your left hand, pull the latch knob to the left and hold it. Raise the treadmill until the latch pin is aligned with the indicated hole in the side of the treadmill. - Page 24 HOW TO LOWER THE TREADMILL FOR USE 1. Hold the upper end of the treadmill with your right hand as shown. Using your left hand, pull the latch knob to the left and hold it. Pivot the treadmill down until the frame is past the pin on the latch knob.
-
Page 25: Troubleshooting
TROUBLESHOOTING Most treadmill problems can be solved by following the steps below. Find the symptom that applies, and follow the steps listed. If further assistance is needed, please call our Customer Service Department toll- free at 1-888-825-2588, Monday through Friday, 6 a.m. until 6 p.m. Mountain Time (excluding holidays). - Page 26 SOLUTION: a. With the key in the console, press one of the Incline buttons. While the incline is changing, re- move the key. After a few seconds, re-insert the key. The treadmill will automatically rise to the maximum incline level and then return to the minimum level. This will recalibrate the incline.
-
Page 27: Conditioning Guidelines
For maximum fat burning, adjust the speed and incline of the treadmill until your heart rate is near the middle number in your training zone. Aerobic Exercise If your goal is to strengthen your cardiovascular sys- tem, your exercise must be “aerobic.”... -
Page 28: Suggested Stretches
SUGGESTED STRETCHES The correct form for several basic stretches is shown at the right. Move slowly as you stretch—never bounce. 1. Toe Touch Stretch Stand with your knees bent slightly and slowly bend forward from your hips. Allow your back and shoulders to relax as you reach down toward your toes as far as possible. - Page 29 NOTES...
-
Page 30: Part List
PART LIST—Model No. NTL10842 To locate the parts listed below, see the EXPLODED DRAWING attached in the center of this manual. Key No. Qty. Description Foot Rail Insert Foot Rail Front Belly Pan Screw/ Rear Foot Screw Left Foot Rail Cap Frame Pivot Bolt Frame Pivot Spacer Magnet... -
Page 31: Ordering Replacement Parts
• the MODEL NUMBER OF THE PRODUCT (NTL10842) • the NAME OF THE PRODUCT (NordicTrack • the SERIAL NUMBER OF THE PRODUCT (see the front cover of this manual) • the KEY NUMBER AND DESCRIPTION OF THE PART(S) (see the PART LIST on pages 30 and 31 and the EXPLODED DRAWING attached in the center of this manual) Key No. - Page 32 EXPLODED DRAWING—Model No. NTL10842 R0304A...
- Page 33 EXPLODED DRAWING—Model No. NTL10842 R0304A...
-
Page 34: Limited Warranty
WHAT IS COVERED—The entire NordicTrack ® C2000 treadmill (“Product”) is warranted to be free of all defects in ma- terial and workmanship. WHO IS COVERED—The original purchaser or any person receiving the Product as a gift from the original purchaser.
Need help?
Do you have a question about the C2000 NTL10842 and is the answer not in the manual?
Questions and answers
Does it need any lubrication?