Table of Contents
Advertisement
Advertisement
Table of Contents

Related Manuals for Beltone myPAL Pro


Summary of Contents for Beltone myPAL Pro
- Page 1 Beltone myPAL Pro Instructions for use...
-
Page 2: Statement
Congratulations on your purchase of a Beltone myPAL Pro. The This device complies with Part 15 of the FCC Rules and ICES-003 myPAL Pro is a high quality portable speech and audio streamer of the IC Rules. Operation is subject to the following two condi-... -
Page 3: Intended Use
Annex I of Council Directive 93/42/EEC for medical devices (MDD) and Essential Requirements and other relevant provisions of Directive 1999/5/EC (R&TTE). The declaration of conformity may be consulted at www.beltone-hearing.com In US: FCC CFR 47 Part 15, subpart C In Canada: IC 6941C-SM2P... -
Page 4: Table Of Contents
Built-in battery care ....... .36 Turning your myPAL Pro ON and OFF....12 Battery warning. -
Page 5: Description
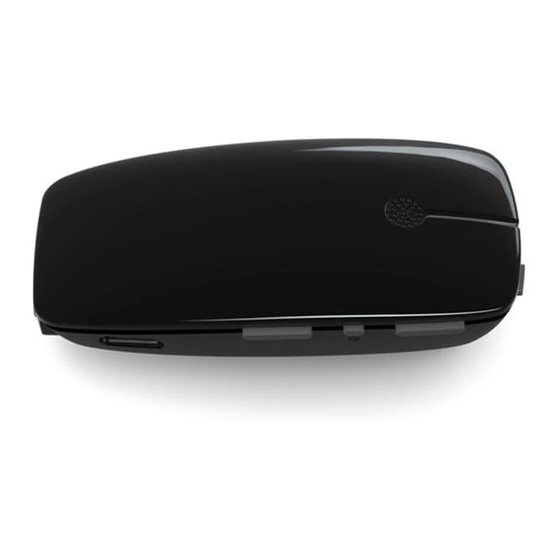
Description Volume down Power button Mute button Microphone inlet Volume up Microphone inlet Status light indicator (LED) 10 Micro USB for charging Line-in 11 Mute light indicator (LED) FM connector 12 Mode and battery status light indicators (LEDs) 13 Mode button 14 Paring button 15 Mounting clip... -
Page 6: Getting Started
Getting Started • When charging your myPAL Pro for the first time, let it charge for at least 3 hours, even if the battery indicator indicates that Before using your myPAL Pro, you need to charge the recharge- the battery is fully charged. -
Page 7: Turning Your Mypal Pro On And Off
Turning your myPAL Pro ON and OFF Pairing the myPAL Pro in channel 1 To turn the myPAL Pro ON, press and hold the Power button (see 1. Make sure the myPAL Pro is turned ON. Your hearing instru- page 8) for approximately 1.5 seconds, until the status LED turns ments must be OFF –... -
Page 8: Start Streaming
Pairing the myPAL Pro in channel 2 or 3 (For people using more Start streaming than one streaming device) Turn ON the myPAL Pro and make sure your hearing instruments To pair the myPAL Pro in channel 2, press the pairing button are turned ON. -
Page 9: Stop Streaming
1. Press and hold the hearing instrument program button for about 3 seconds two or three times in a row to access the 2nd Note! You may get out of range from your myPAL Pro. If your or 3rd Beltone streaming device. -
Page 10: Microphone Directionality
Microphone directionality The myPAL Pro can both be used for picking up the voice from one speaker wearing the myPAL Pro as well as a table micro- phone solution picking up the voices of multiple speakers. Wearing the Multi Mic... -
Page 11: Status Light Indicator (Led)
Status light indicator (LED) The LED on your myPAL Pro serves as a multipurpose user inter- face, providing information on the status of your device. Power/Charging No charging Charging Fully charged Powered Off Powered On (Normal) Powered On (Volume control disabled and MIC or... -
Page 12: Modes Of Operation
When wearing it vertically on the body (using the clip ed. Other modes can be selected by clicking on the mode or the lanyard) the myPAL Pro will be in a mode, minimizing button until the desired mode is reached. In this mode the background noise. -
Page 13: Using The Mode Button
The corresponding mode LED on the backside of the - 25 – 50 % remaining battery capacity: Two Mode LEDs blink myPAL Pro will light up for 3 seconds. (FM + Line-in) - <25 % remaining battery capacity: One Mode LED blinks... -
Page 14: Volume Control And Mute
Volume control and mute Volume control Note: The myPAL Pro will revert to its default level for all modes when restarted. myPAL Pro is designed to provide a comfortable listening level from the moment it is activated. However, for some devices or lis- tening environments you may want to adjust the volume. -
Page 15: Mute Light Indicator
Drop detection that the volume control is locked. In the event that the myPAL Pro falls from a height of more than 75 cm (30 inches), a built-in sensor will mute the output streamed How to unlock the volume control to the hearing instruments for up to 2 seconds. -
Page 16: Test Mode
• When in Test mode the Status LED (see page 8) will be solid orange. • When entering Test mode the default volume is applied. If needed, volume can be adjusted on the myPAL Pro until trans- parency has been verified. -
Page 17: Important Information
Note: Adjustments to reach transparency can be made on the myPAL Pro and/or in the hearing instrument using the fitting • When the myPAL Pro is not in use, turn it OFF and store it software. safely. -
Page 18: General Warnings
• When using myPAL Pro and the device is affected by electro- • If the hearing instruments do not respond to the device be- magnetic interference, move away from the source. -
Page 19: Built-In Battery Care
Battery performance is par- ticularly limited in temperatures well below freezing. • Do not use myPAL Pro in areas where RF transmission is pro- hi-bited, e.g. air planes etc. • Do only connect myPAL Pro to connections, which it is explic- Battery warning itly intended for. -
Page 20: Charger Care
• For availability of approved enhancements, please check with your hearing care professional. Do not charge the myPAL Pro while it is on your body. • Charge the product according to the instructions supplied with the product. Charger warning Use the device only with the power supply unit that has been supplied together with the product. -
Page 21: Technical Specifications
Your Hearing Care Professional may have The myPAL Pro is covered by a limited warranty issued by the issued a warranty that goes beyond the clauses of this limited manufacturer for a period of 12 months from the day of the origi- warranty. -
Page 22: Troubleshooting Guide
Unlock the volume control (see Volume control lock chapter) ume control specific level The myPAL Pro and the hearing Assure that myPAL Pro and the hearing instruments are within wire- instrument are out of wireless range less range There is no sound in the... - Page 23 The myPAL Pro and the hearing Assure that the myPAL Pro and hearing instruments are within wire- instrument are not within wireless less range and repeat pairing process range...
- Page 24 When using the line-in Adjust the volume using the “+” and “-“ buttons on the myPAL Pro, or The audio level of the device con- the sound is too high or adjust the volume on the external audio device, until the best sound...
- Page 25 Pro CAUTION indicates a situation that could lead to minor and moderate injuries. Advice and tips on how to handle your Beltone acces- sory better. Any issues relating to the EU Medical Device Directive 93/42/...
- Page 27 Beltone A/S Lautrupbjerg 7 DK-2750 Ballerup Denmark Tel.: +45 45 75 11 11 Fax: +45 45 75 11 19 400546000-GB-15.10-Rev.A www.beltone-hearing.com © Beltone 2015...
Need help?
Do you have a question about the myPAL Pro and is the answer not in the manual?
Questions and answers