
Related Manuals for Maktec mt900


Summary of Contents for Maktec mt900
- Page 1 GB Angle Grinder Instruction manual Gerinda Sudut Petunjuk penggunaan Maù y maø i goù c Taø i lieä u höôù n g daã n MT900 MT901...
-
Page 5: Specifications
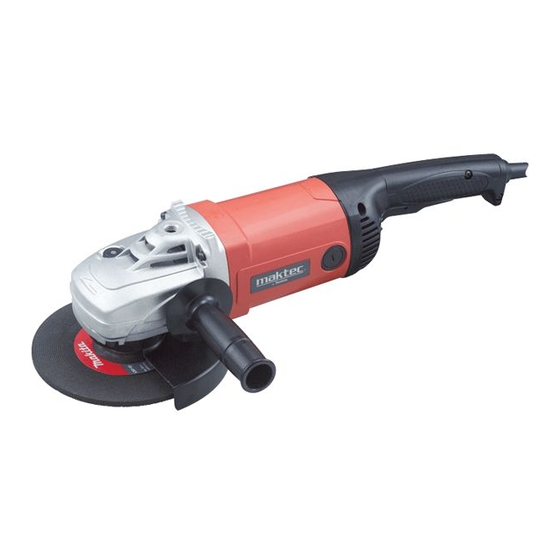
19. Wheel guard for abrasive cut-off 29. Screwdriver 10. Depressed center wheel wheel/diamond wheel 11. Super flange 20. Outer flange 78 SPECIFICATIONS Model MT900 MT901 Depressed center wheel diameter 180 mm 230 mm Rated speed (n)/No load speed (n 8,500 min 6,600 min... -
Page 6: Grinder Safety Warnings
moving parts. Damaged or entangled cords increase power tool or these instructions to operate the the risk of electric shock. power tool. Power tools are dangerous in the hands 8. When operating a power tool outdoors, use an of untrained users. extension cord suitable for outdoor use. - Page 7 7. Do not use a damaged accessory. Before each use For example, if an abrasive wheel is snagged or pinched inspect the accessory such as abrasive wheels for by the workpiece, the edge of the wheel that is entering chips and cracks, backing pad for cracks, tear or into the pinch point can dig into the surface of the material excess wear, wire brush for loose or cracked causing the wheel to climb out or kick out.
-
Page 8: Functional Description
increases the loading and susceptibility to twisting or 21. Before using the tool on an actual workpiece, let it binding of the wheel in the cut and the possibility of run for a while. Watch for vibration or wobbling kickback or wheel breakage. that could indicate poor installation or a poorly b) Do not position your body in line with and balanced wheel. -
Page 9: Optional Accessory
Shaft lock (Fig. 1) Installing or removing wheel guard (For depressed center wheel, multi disc, wire CAUTION: wheel brush/abrasive cut-off wheel, • Never actuate the shaft lock when the spindle is moving. The tool may be damaged. diamond wheel) Press the shaft lock to prevent spindle rotation when WARNING: installing or removing accessories. - Page 10 spindle cannot revolve, then use the lock nut wrench and • Do not use wire wheel brush that is damaged, or which securely tighten clockwise. is out of balance. Use of damaged wire wheel brush To remove the disc, follow the installation procedure in could increase potential for injury from contact with reverse.
- Page 11 The tool and its air vents have to be kept clean. Regularly clean the tool's air vents or whenever the vents start to become obstructed. Replacing carbon brushes (Fig. 18) When the resin insulating tip inside the carbon brush is exposed to contact the commutator, it will automatically shut off the motor.
- Page 12 19. Pelindung roda untuk roda gerinda 28. Tutup borstel arang 10. Roda nap cekung pemotong/roda intan 29. Obeng SPESIFIKASI Model MT900 MT901 Diameter roda nap cekung 180 mm 230 mm Kecepatan nominal (n)/Kecepatan tanpa beban (n 8.500 men 6.600 men...
- Page 13 6. Jangan membiarkan mesin listrik kehujanan atau Penggunaan dan pemeliharaan mesin listrik kebasahan. Air yang masuk ke dalam mesin listrik 18. Jangan memaksa mesin listrik. Gunakan mesin akan meningkatkan risiko sengatan listrik. listrik yang tepat untuk keperluan Anda. Mesin 7. Jangan menyalahgunakan kabel. Jangan sekali- listrik yang tepat akan menuntaskan pekerjaan kali menggunakan kabel untuk membawa, dengan lebih baik dan aman pada kecepatan sesuai...
- Page 14 2. Pekerjaan seperti pemolesan tidak dianjurkan 11. Posisikan kabel agar jauh dari aksesori yang menggunakan mesin listrik ini. Pekerjaan yang berputar. Jika hilang kendali, kabel dapat putus atau tidak cocok dengan desain mesin listrik ini dapat tersangkut dan tangan atau lengan Anda dapat menimbulkan bahaya dan menyebabkan cedera.
- Page 15 aksesori terpantul atau tersangkut. Sudut, penuh dan dengan hati-hati masukkan lagi ke pinggiran tajam, atau pantulan cenderung dalam irisan pemotongan. Roda dapat macet, menyebabkan aksesori yang berputar tersangkut dan berjalan naik, atau menendang balik jika mesin listrik mengakibatkan hilangnya kendali atau tendang-balik. dinyalakan di dalam benda kerja.
- Page 16 Kunci as (Gb. 1) menjauhi Anda dan orang lain atau bahan yang mudah menyala. PERHATIAN: 24. Jangan tinggalkan mesin dalam keadaan hidup. • Jangan mengaktifkan kunci as saat spindel sedang Jalankan mesin hanya ketika digenggam tangan. bergerak. Hal ini dapat menyebabkan kerusakan pada 25.
- Page 17 Memasang atau melepaskan pelindung Memasang atau melepaskan cakram roda (Untuk roda nap cekung, multi- gerinda (aksesori tambahan) cakram, sikat kawat roda/roda gerinda CATATAN: pemotong, roda intan) • Gunakan aksesori pengampelas yang diuraikan dalam buku petunjuk ini. Aksesori ini harus dibeli secara PERINGATAN: terpisah.
- Page 18 Cabut steker alat dan letakkan secara terbalik sehingga Pasang flensa-dalam pada spindel. Pasangkan roda/ spindel mudah diakses. Lepaskan aksesori pada spindel. cakram pada flensa-dalam dan pasang mur pengunci Pasang sikat kawat mangkok pada spindel dan pada spindel. (Gb. 14) kencangkan dengan kunci yang disertakan. Bila Saat memasang roda intan atau roda gerinda pemotong menggunakan sikat, hindari memberikan tekanan terlalu dengan badan roda setebal 7 mm atau lebih, pasanglah...
- Page 19 10. Ñóa maø i loõ m taâ m cöông 29. Tua vít THOÂ N G SOÁ KYÕ THUAÄ T Kieå u maù y MT900 MT901 Ñöôø n g kính ñóa maø i loõ m taâ m 180 mm 230 mm Toá...
- Page 20 7. Khoâ n g söû duï n g daâ y sai caù c h. Khoâ n g bao giôø söû 19. Khoâ n g söû duï n g duï n g cuï maù y neá u coâ n g taé c duï...
- Page 21 4. Toá c ñoä ñònh möù c cuû a phuï tuø n g phaû i baè n g hoaë c voû maù y vaø vieä c tích tuï quaù nhieà u kim loaï i daï n g boä t lôù n hôn toá c ñoä toá i ña ñöôï c ghi treâ n duï n g cuï coù...
- Page 22 Caû n h baù o an toaø n boå sung: ngoaø i cuø n g, caù c löï c beâ n caï n h taù c duï n g vaø o nhöõ n g 17. Khi söû duï n g ñóa maø i loõ m taâ m , ñaû m baû o chæ söû ñóa naø...
- Page 23 QUAÙ TRÌNH LAÉ P RAÙ P CAÛ N H BAÙ O : KHOÂ N G ñöôï c ñeå söï thoaû i maù i hay quen thuoä c vôù i THAÄ N TROÏ N G: saû n phaå m (coù ñöôï c do söû duï n g nhieà u laà n ) thay theá •...
- Page 24 ñai oá c haõ m ñeå sieá t chaë t theo chieà u kim ñoà n g hoà . quay. Laé p choå i maø i hình coá c vaø o truï c quay vaø sieá t chaë t (Hình 9) baè...
- Page 25 Daø n h cho Australia vaø New Zealand Laé p hoaë c thaù o ñóa caé t /ñóa kim cöông (phuï tuø n g tuyø choï n ) (Hình 15) BAÛ O DÖÔÕ N G THAÄ N TROÏ N G: •...
- Page 26 MT900 MT901 (n)/ 8,500 6,600 • • • EPTA 01/2003 END202-6 GEA005-3 ......ENE048-1 " " ENF002-2...
- Page 27 (RCD) 30 mA...
- Page 28 GEB033-4 " " " "...
- Page 29 " " " "...
- Page 30 • " " • " " " " (30 mA) • • • • •...
- Page 31 • • • • • 5 & • • • • • •...
- Page 32 • • Makita Makita • • • " " • • • • • 16 & 17)
- Page 36 Makita Corporation Anjo, Aichi, Japan www.makita.com 884636-378...
Need help?
Do you have a question about the mt900 and is the answer not in the manual?
Questions and answers