Table of Contents
Advertisement
Advertisement
Table of Contents

Related Manuals for minrray UV950A


Summary of Contents for minrray UV950A
- Page 1 HD Color Video Camera User Manual...
- Page 2 Preface: Thanks for using our HD color video conference camera. The manual introduces the function, installation and operation of the HD camera. Prior to installation and usage, please read the manual thoroughly Warning This product can be only used in specified range in order to avoid any damage or danger. Don’t expose the camera to rain or moisture place.
-
Page 3: Table Of Contents
【Contents】 NOTES ......................................3 SUPPLIED ACCESSORIES ............................... 3 FAST INSTALLATION ................................4 CAMERA HIGHLIGHTS ................................6 CAMERA SPECIFICATIONS : ..............................6 CAMERA INTERFACE EXPLANATION ..........................7 DIMENSION ....................................8 REMOTE CONTROLLER: ............................... 9 RS-232C INTERFACE: ................................13 MENU SETTING ..................................21... -
Page 4: Notes
Notes Electric Safety Installation and operation must accord with electric safety standard Caution to transport Avoid stress, vibration and soakage in transport, storage and installation. Polarity of power supply The power supply of the product is ±12V, the max electrical current is 2A .Polarity of the power supply drawing. -
Page 5: Fast Installation
Fast Installation 1. Please check the connection before turn on. 2. Bottom Dial Switch Setting Bottom Dial Switch to be set as both ON, means camera is working under normal mode. SW2-2 SW2-1 Explanation Undefined Updating mode Debugging mode Working mode... - Page 6 3. The Rotary Switch Setting The choice for16 rotary switch video formats: Dial-up 1080P60 1080P50 1080I60 1080I50 720P60 720P50 1080P30 1080P25 -------- -------- -------- -------- -------- -------- -------- Display the video format set on the menu Note: need to restart the camera after switching video format. 4.When the power supply switch is “【on】”, the indicator light is open (Green Color)
-
Page 7: Camera Highlights
5, Camera initializes after powering on: horizontally turn left to the limit position, vertically turn to the bottom; finally both horizontally and vertically turn to the middle position. The motor stops running, (the indicator light turns into red) and initialization is completed. (Note: If the power-on mode is opened and saved preset position 0 or 1, then the pan/tilt will be set to 0 or 1 preset position) 6.Factory Default : entry OSD menu by pressing the menu key of remote controller, 【HOME】->【RESET】->... -
Page 8: Camera Interface Explanation
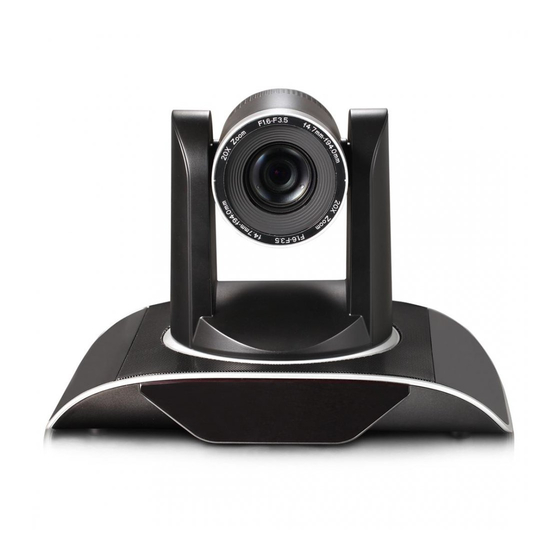
13. Working temperature: -5℃ to +45℃ 14. Storage temperature:-20℃ to +60℃ 15. Weight: 2.0kg Camera Interface Explanation 1、Camera lens 2、Camera base 3、Remote Controller Receiver light 4、 Bottom dial Switch 5、 Tripod screw hole 6、 Installation Orientation Hole 7、 Rotary Switch : Video format optional 8、... -
Page 9: Dimension
Dimension:... -
Page 10: Remote Controller
Remote Controller Explanation 0、Standby key After pressing the standby key, the camera will step into standby mode. Press again, the camera will self-check again and back to HOME position. (Note: If power-on mode is turned on, it will automatically point to the specified preset position. 1、Number key Setting or locating presets 2、* key... -
Page 11: Usage Of Ir Remote Controller
10、Zoom Control key zoom+:Lens near zoom-:Lens far 11. Camera IR remote control address selection 【*】+【#】+【F1】:Camera Address No.1 【*】+【#】+【F2】:Camera Address No. 2 【*】+【#】+【F3】:Camera Address No. 3 【*】+【#】+【F4】:Camera Address No. 4 Usage of IR Remote Controller Finishing initialization, it can receive and execute the IR commands. Users can control the pan/tilt/zoom, setting and running preset positions via the IR remote controller. - Page 12 ZOOM OUT: press “ZOOM “ key ZOOM IN: press “ZOOM ” key Press and hold the key, the camera will keep zooming in or zooming out and stops as soon as the key is released. 3、Focus Control Focus (far): Press ”【focus+】” key Focus (near):...
- Page 13 press the number key 0-9 to set a relative preset, 10 preset positions in total are available. 2、Preset clearing : to clear a preset position, the user can press the “【CLEAR PRESET】” key first and then press the number key 0-9 to clear the relative preset; Note : press the“【#】”...
-
Page 14: Rs-232C Interface
RS-232C Interface (Pin Specs) - Page 15 VISCA OUT Function COM control In the normal working condition, the camera can be controlled via the RS-232C/RS485 command (VISCA IN) . The parameter of the RS232C COM is as follows : Baud Rate :2400/4800/9600/115200 Bit/S Start bit:1bit ; Data bit: 8bit ; Stop bit : 1bit;...
- Page 16 VISCA Protocol Part1 . Camera Return Command Ack/Completion Message Command Packet Note z0 41 FF Returned when the command is accepted. Completion z0 51 FF Returned when the command has been executed. z=camera address +8 Error Messages Command Packet Note Returned when the command format is different or when a Syntax Error z0 60 02 FF...
- Page 17 Command Function Command Packet Note Direct 8x 01 04 44 00 00 0p 0q FF pq: B Gain Full Auto 8x 01 04 39 00 FF Automatic Exposure mode Manual 8x 01 04 39 03 FF Manual Control mode CAM_AE Shutter priority 8x 01 04 39 0A FF Shutter Priority Automatic Exposure mode...
- Page 18 Command Function Command Packet Note via the VISCA communication ON/OFF 8x 01 7D 01 13 00 00 FF 8x 01 06 01 VV WW 03 01 FF Down 8x 01 06 01 VV WW 03 02 FF Left 8x 01 06 01 VV WW 01 03 FF Right 8x 01 06 01 VV WW 02 03 FF Upleft...
- Page 19 Part3 Checking Command Command Command Packet Return Packet Note y0 50 02 FF CAM_PowerInq 8x 09 04 00 FF y0 50 03 FF Off(Standby) CAM_ZoomPosInq 8x 09 04 47 FF y0 50 0p 0q 0r 0s FF pqrs: Zoom Position y0 50 02 FF Auto Focus CAM_FocusModeInq...
- Page 20 Pelco-D Protocol Function Byte1 Byte2 Byte3 Byte4 Byte5 Byte6 Byte7 0xFF Address 0x00 0x08 Pan Speed Tilt Speed Down 0xFF Address 0x00 0x10 Pan Speed Tilt Speed Left 0xFF Address 0x00 0x04 Pan Speed Tilt Speed Right 0xFF Address 0x00 0x02 Pan Speed Tilt Speed...
- Page 21 Pelco-P Protocol Function Byte1 Byte2 Byte3 Byte4 Byte5 Byte6 Byte7 Byte8 0xA0 Address 0x00 0x08 Pan Speed Tilt Speed 0xAF Down 0xA0 Address 0x00 0x10 Pan Speed Tilt Speed 0xAF Left 0xA0 Address 0x00 0x04 Pan Speed Tilt Speed 0xAF Right 0xA0 Address...
-
Page 22: Menu Setting
Menu Setting 1. Main Menu In normal working mode, press 【MENU】key to display the menu, using scroll arrow to point at or highlight the selected items. MENU ===================== Language Chinese (Setup) (Camera) (P/T/Z) (Version) (Restore Default) [↑↓]Select [← →]Change value [Menu]Back [Home]OK LANGUAGE: Language setting, Chinese / English SYSTEM OPTION:system setting... - Page 23 3.CAMERA OPTION Move the pointer to the (CAMERA SET) in the Main Menu, click the【HOME】and enter the (CAMERA SET) as follow, CAMERA ====================== (Exposure) (Color) (Image) (Focus) (Noise Reduction) [← →] Change value [↑↓] Select [Menu] Back [Home]OK EXPOSURE:exposure setting COLOR: color setting Image: enter into image setting Focus:...
- Page 24 3.2 COLOR SETTING Move the pointer to the (COLOR SET) in the Main Menu, click the【HOME】and enter the (COLOR SET) as follow, COLOR ==================== WB Mode Auto Saturation 100% AWB Sensitivity High Color Matrix Color style Default [← →]Change value [↑↓]Select [Menu]Back WB MODE:White balance mode setting:Auto,Indoor,Outdoor,Manual...
- Page 25 3.4 FOCUS Move the pointer to the (FOCUS) in the CAMERA Menu, click the【HOME】and enter the (FOCUS) as follow, FOCUS ==================== Focus Auto AF-Zone Center AF-Sensitivity [← →]Change value [↑↓]Select [Menu]Back Focus mode: options: auto,manual AF-Zone: options:up、middle、down AF-Sensitivity: options: high、middle、low 3.5 NOISE REDUCTION Move the pointer to the (NOISE REDUCTION) in the CAMERA Menu, click the【HOME】and enter the (NOISE REDUCTION) as follow,...
- Page 26 Zoom speed:set the zoom speed for controller to camera,1~8 Image Freezing: options:On/Off Accelerating curve :options:fast/slow 5. VERSION Move the pointer to the (VERSION) in the Main Menu, click the【HOME】and enter the (VERSION) as follow, VERSION ==================== MCU Version 2.0.0.1 2015-8-16 Camera Version 2.0.0.1 2015-8-16...
- Page 27 Web Client 192.168.5.163 Input the IP address of the device in the address filed of browser and click Enter button to enter into Web Client login page as below picture. Note: Web visit are supported by Browsers: IE、Chrome、Firefox、Safari. But Web plug in only supported by the IE browser.
- Page 28 LOGO After login in the management interface it will show the default video preview interface as above picture. User can control the pan tilt, zoom, focus, record, snapshot, audio, enlarge, full screen and preset set, run and delete operations etc. 3.
- Page 29 LOGO Major options: Local configure, Audio configure, Video configure, Network configure, Pan Tilt configure, Platform access configure and System configure. The detailed description refer to below sheet. Menu Explanation Local Including video preview mode, record video packing time, record video storage route settings etc. configure Audio Including audio compressing format, sampling frequency, sampling precision,compressing code rate...
- Page 30 Video size:set resolution,then device will restart automatically(Main stream default 1920*1080,1280*720 optional, Secondary stream default 640 * 320, 320 * 180,1280 * 720 optional)。 Stream Rate control:Set rate control mode,then device will restart automatically(Primary / secondary stream default variable bit rate,fixed rate is for option)。 Image quality:Set image quality(default for Primary stream is better image,secondary stream default is bad image.
- Page 31 Sharpness: Sets the sharpness value (default 1,0-15 optional)。 Black and white mode: Set black and white mode (default off)。 Gamma: Gamma value setting (default, 0.45,0.5,0.56,0.63 optional)。 Flip Horizontal: Set Flip Horizontal。 Flip Vertical: Set vertical flip。 Noise Reduction: 2D Noise Reduction: 2D noise reduction level is set (the default Auto, 0-5 optional, automatic, 0 to disable)。...
- Page 32 pan/tilt will be set to 0 or 1 (1 or 2) number Preset (off by default, preset 1, preset 2)。 Installation: Set the device installation (default is up, down for optional)。 Depth of field: Set depth of field, (default on, off optional). When it is on, camera zooming in, speed slowing down.
- Page 33 4.6.5 Restore factory setting Click on "Restore Factory Defaults" button,the device will restart automatically and restore factory setting 。 4.6.6 Reboot Click on the "Reboot" button,then the device will restart automatically 5.Logout Click the logout dialog , then the current user will be log off, showed as bellow: LOGO...
Need help?
Do you have a question about the UV950A and is the answer not in the manual?
Questions and answers