
Related Manuals for Geonav 6 Sunshine


Summary of Contents for Geonav 6 Sunshine
- Page 1 SUNSHINE User and Installation Guide Manuale d’uso e d’installazione Manuel d’emploi et d’installation Bedienungsanleitung und Installationshinweise...
- Page 2 SUNSHINE User and Installation Guide...
- Page 3 The use of the GEONAV implies knowledge and accep- tance of this warning by the user. NOTE: This manual applies to the GEONAV 6 Sunshine, GEONAV 6 Sun and GEONAV 5C models. The functions peculiar to each model are highlighted in the text. Unless otherwise specified, functions are intended as common to all the models.
-
Page 4: Autopilot
Characteristics Introduction CHARACTERISTICS INTRODUCTION The GEONAV is a chart plotter that displays your boat’s cur- General characteristics rent position with respect to an electronic chart. • Compact chart plotter with optional built-in GPS receiver GPS inside model and antenna The unit can be optionally equipped with a built-in GPS re- •... -
Page 5: Characteristics
Characteristics • Operating temperature: 0° to +60° C, humidity 93% • Storage temperature: -20°C to +70°C, humidity 93% • Color LCD, TFT 5.6”, sunlight visible Sunshine • Monochrome LCD, 5.7”, sunlight visible • Color LCD, TFT 4.8”, daylight visible • Adjustable backlight and contrast •... -
Page 6: Installation And Precautions
0.35 meters away from magnetic compasses • Depth sounder: To connect the GEONAV to a depth sounder, use or flux-gate sensors, such as those used on autopilots and the data cable provided with the unit (see the Connections Sec- remote electronic compasses. -
Page 7: Connections
If sent by the autopilot, the following NMEA messages are transmitted to external devices: GGA - RMC - ZDA The GEONAV will add the following messages: APA - APB - XTE - RMB - BWC - GLL - VTG The data cable is supplied together with the GEONAV plotter. -
Page 8: Cartridge Installation
Windows • Cursor mode: Cursor mode. Explorer not to erase the content of the \NAVIONIC and \GEONAV folders. Damaging • Allows selecting from Allows switching from the files stored in such directories may result in loss of data or improper operation of... -
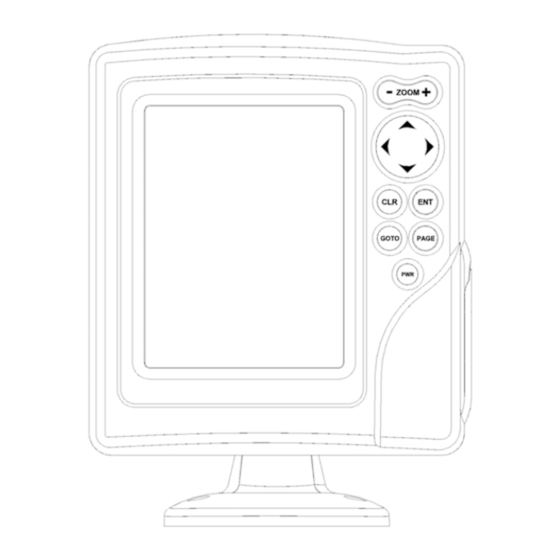
Page 9: Keyboard
WARNING: The internal memory can be cleared by pressing simultaneously the Converting depth values into the units PWR and CLR keys. This operation will delete all the settings stored in the GEONAV and restore factory settings. Press PAGE to display the menu,... -
Page 10: Navionics Electronic Charts
NAVIONICS Electronic Charts Changing chart symbols Displaying abbreviated navaid charac- The symbols used to represent the objects on the chart (buoys, teristics lights, landmarks, etc.), as well as chart colors (G6 Sunshine Position the manual cursor on and G 5C only), can be selected between paper-chart Interna- the navaid symbol. -
Page 11: Graphic Items
GRAPHIC ITEMS Health and first aid Customer services and port services authorities Besides chart data, the GEONAV displays some graphic items use- ful during navigation. Tourist services and Water Tide station The figure below shows some of these items. shops... -
Page 12: Functional Characteristics
FUNCTIONAL CHARACTERISTICS tion mode. This chapter describes some of the most important functions 5 - Route leg of the GEONAV, as well as the terms most commonly used in Part of route between two waypoints. this document. 6 - Waypoint Switching on/Switching off the unit Waypoints are identified by a circle and a number. - Page 13 To deactivate the Autozoom function, press the ZOOM key once. correspond to reality. For example, when traveling southwards, the chart When the GEONAV is turned on, and if at least one waypoint shows, on the right side of the boat, has been previously entered, the Autozoom function is auto- what is actually located on the left side, matically activated.
- Page 14 Functional Characteristics To cancel local time, press PAGE until the menu bar is dis- replacing RANGE with OVZ (blinking) within the navigation played, select SETUP, SET TIME and then GMT. window. To activate/deactivate the Overzoom function, press PAGE un- Chart presentation til the menu bar is displayed, then select SETUP, OVERZOOM This function allows the user to select the symbols and colors and ON/OFF.
-
Page 15: Getting Started
10m: areas with depths up to 5 meters in dark blue (dark We recommend that you use the GEONAV intuitively, since gray), up to 10 meters in blue (light gray) no damage will be caused by pressing an incorrect button. - Page 16 Getting Started If an autopilot is connected to the GEONAV, the plotted route The GEONAV is in Navigation is automatically followed as soon as the Navigation mode is mode; by pressing the CURSOR enabled. key, it is possible to switch to Cursor mode (editing mode).
-
Page 17: Operating Modes
Info window. CURSOR MODE At start-up the satellite window When the GEONAV is in Cursor mode, the crosshair cursor is displays how many and which displayed. The CURSOR key allow browsing through the elec- satellites are tracked by the GPS tronic chart, as well as editing or creating the route. -
Page 18: Satellite Window
3D fix is obtained. screen. As soon as a valid fix is available, the GEONAV will automati- By using the ZOOM key, the chart cally switch to Navigation mode and display the boat’s posi- detail level can be increased, tion at the best chart range available;... -
Page 19: Menu
Depth Sounder Window DEPTH SOUNDER WINDOW MENU A depth sensor can be interfaced with the GEONAV via NMEA. The menu bar, displayed at the top of the screen, allows selecting from the following options: In this case, the GEONAV auto-... -
Page 20: Info Window
Trip Window Info Window INFO WINDOW TRIP WINDOW When a NAVIONICS cartridge featuring Tides and Currents The trip window shows the data data is present, this window displays further information, relating to the route followed and, besides the forecast data supplied by selecting the Tides and in particular: Currents station. -
Page 21: Runway Window
Runway Window Lat/Lon Window RUNWAY WINDOW LAT/LON WINDOW This window displays the following information on the target This window displays the following information on the boat’s waypoint: current position: • Name of the target waypoint • Geographical coordinates • Distance from the target (latitude/longitude) waypoint •... -
Page 22: Route
Route ROUTE it more easily from the other route legs. A window will also show the leg captured. Move the manual cursor to the position desired, insert the EDITING A ROUTE (CURSOR MODE) new waypoint and confirm by pressing ENTER. Creating a waypoint Using the CURSOR key, move the cursor on the position de- EDITING A ROUTE (NAVIGATION MODE) - Page 23 Route The time to arrive to the waypoint Storing a route in the CompactFlash™ and fuel consumption are dis- Press the PAGE key to display the played provided that estimated menu, select ROUTE, STORE speed and fuel consumption val- and press ENTER. To change the ues have been entered (see the default name and to confirm the Entering speed and fuel consump-...
-
Page 24: Track
Track Route TRACK Reversing a route Press the PAGE key to display the menu, select ROUTE and then REVERSE (if no route is currently displayed, the “NO The Track function allows recording the track actually fol- ROUTE PRESENT” message is displayed). lowed by the boat. -
Page 25: Marker
Marker Track MARKER Deleting a track Press the PAGE key to display the menu, select TRACK, DE- LETE and press ENTER to confirm. Markers are used to identify points of interest to which names and symbols can be assigned. The catalog that lists the tracks stored in the CompactFlash™ will show the CURRENT item indicating the track currently NOTE: Marker names are displayed starting from the 32 NM chart range. -
Page 26: Setup
Marker Setup assigned to the marker; to change the marker symbol and name SETUP according to the type of marker to store (e.g., fishing spots, submerged wrecks, rocks, etc.), use the CURSOR key. Press The SETUP menu allows setting the available options. ENTER to confirm the insertion. -
Page 27: Goto
PAGE to exit. • Set Time (LOCAL/GMT) Enters local time. As the GEONAV will plot a new route, the waypoint selected • Calibration (ON/OFF) will become the first waypoint in the route, whereas previous Sets the boat’s position received by the GPS. - Page 28 ENTER to confirm. confirm the selection. Once the desired marker has The GEONAV will insert a waypoint in the port selected, de- been selected, the GEONAV will lete automatically the existing route (if in Navigation mode), or insert a waypoint at the marker...
- Page 29 TER. Press GOTO, select NEAR by the CURSOR key, choose the Tides or Currents service, then press ENTER to confirm. The GEONAV NOTE: The same information can be ac- will allow selecting one of the three nearest Tides and Cur- cessed by positioning the manual cursor on rents stations.
-
Page 30: Table Of Contents
Autopilot Table of Contents AUTOPILOT TABLE OF CONTENTS The GEONAV allows a boat equipped with an autopilot to fol- INTRODUCTION ................4 low automatically the entered route, compensating for any CHARACTERISTICS ............... 5 diversion caused by external conditions (wind, currents, etc.). - Page 31 SUNSHINE Manuale d’uso e d’installazione...
- Page 32 NOTA: il presente manuale è applicabile ai modelli GEONAV 6 Sunshine, GEONAV 6 Sun e GEONAV 5C. Le funzioni esclusive di ciascun modello sono evidenziate a lato del testo. Dove non specificato, le funzioni sono da intendersi comuni a tutti i modelli.
- Page 33 Introduzione Caratteristiche tecniche INTRODUZIONE CARATTERISTICHE TECNICHE Il GEONAV è un plotter cartografico in grado di visualizzare la Caratteristiche generali vostra posizione geografica in sovrapposizione a una carta elettro- • Plotter cartografico compatto con ricevitore GPS opzionale Modello nica. Lo strumento dispone di un ricevitore GPS opzionale...
- Page 34 Caratteristiche tecniche • Assorbimento: 8 W Accessori a corredo Temperatura di funzionamento: 0°C ÷ +60°C, umidità 93% • • Staffa per installazione fissa Temperatura di immagazzinamento: -20°C ÷ +70°C, umidi- • • Guarnizione e dima di foratura per montaggio a pannello tà...
- Page 35 Installazione e precauzioni INSTALLAZIONE E PRECAUZIONI • GPS esterno: in caso di utilizzo di GPS esterno, il GEONAV deve essere collegato all’antenna GPS esterna tramite il cavo fornito in dotazione con lo strumento. I collegamenti Per evitare interferenze elettromagnetiche si raccomanda di sono riportati nel capitolo “Collegamenti elettrici”.
- Page 36 Attraverso l’uscita Autopilota, i seguenti messaggi provenienti dal GPS sono inviati ad altri dispositivi: GGA - RMC - ZDA Il GEONAV aggiungerà i seguenti messaggi: APA - APB - XTE - RMB - BWC - GLL - VTG Il cavo dati è incluso nella confezione.
- Page 37 PC. Microsoft Windows permette di cancellare e spostare i file facilmen- te, quindi occorre prestare particolare attenzione per evitare di cancellare file dalle directory \NAVIONIC e \GEONAV presenti in cartuccia. L’eventuale danneggiamento di tali file può provocare malfunzionamenti dello strumento.
- Page 38 ATTENZIONE: è possibile effettuare un reset della memoria interna del GEONAV premendo simultaneamente il tasto PWR e il tasto CLR. Questa operazione cancel- lerà tutte le impostazioni fino a quel momento memorizzate e ripristinerà le impostazioni di fabbrica.
- Page 39 In questo caso l’operazione può essere eseguita Il GEONAV possiede memorizzata al suo interno una carta del senza la necessità di scollegare fisicamente l’alimentazione, semplicemente pre- mondo che consente di selezionare scale comprese tra 4096 e mendo il tasto PWR per più...
- Page 40 ENTER per visualizzarne gli attributi. Gli oggetti che possono essere interrogati includono Da quel momento il GEONAV batimetriche, aree di profondità, oggetti puntuali (luci, aiuti convertirà tutti i valori di profon- alla navigazione, punti cospicui, ecc.), aree di terraferma, fon- dità...
- Page 41 La cartografia NAVIONICS I servizi portuali sono rappresentati dalle seguenti icone: Capitaneria di porto Informazioni Pronto soccorso Stazione rilevamento Servizi turistici Acqua potabile marea Stazione rilevamento Meccanico Carburante corrente Il numero e il tipo di servizio visualizzato dipenderà dalla car- tuccia installata.
- Page 42 È possibile eliminare il segmento elastico pre- mendo il tasto PAGE e passando in modo Navigazione. In aggiunta alle informazioni cartografiche, il GEONAV mo- 5 - Segmento di rotta stra sullo schermo alcuni elementi grafici utili per la naviga- È...
- Page 43 Per consentire una maggiore flessibilità in fase di installazio- co, che tuttavia non corrisponde a ciò ne, il GEONAV può utilizzare il GPS interno (se disponibile) o essere collegato ad un GPS esterno; questo permette di instal- che si osserva durante la navigazione.
- Page 44 Per disattivare la funzione Autozoom premere il tasto ZOOM. dovuto al principio su cui si basa il sistema di posizionamento All’accensione del GEONAV, e se almeno un waypoint è stato satellitare. Grazie alla funzione di calibrazione della posizione, il precedentemente inserito nel plotter, la funzione Autozoom vie- GEONAV permette di correggere manualmente l’errore di posizio-...
- Page 45 Caratteristiche funzionali Per annullare la calibrazione premere PAGE fino a visualizzare Batimetriche Questa funzione permette di abilitare selettivamente la barra menu principale. Selezionare SETUP, visualizzazione delle curve di profondità: CALIBRAZIONE e, infine, OFF. OFF: nessuna curva visualizzata visualizzate solo curve con profondità fino a 5 metri Inserimento dell’ora locale 10m: visualizzate solo curve con profondità...
- Page 46 Il GEONAV esce di fabbrica configurato per la lingua inglese. Per selezionare la lingua italiana, premere PAGE fino a far ap- parire il menu principale. Tramite il tasto CURSOR selezionare SETUP, LANGUAGE e quindi IT.
- Page 47 Se nell’imbarcazione è presente un autopilota collegato al Il GEONAV si trova ora in modo GEONAV, una volta tracciata la rotta questa viene automatica- Navigazione. Premendo il tasto mente seguita dall’imbarcazione non appena è attivato il modo CURSOR è...
- Page 48 Finestra satelliti MODALITÀ DI FUNZIONAMENTO FINESTRA SATELLITI Le modalità di funzionamento del GEONAV sono due: la mo- NOTA: nel caso in cui sia presente una cartuccia NAVIONICS con Maree e Correnti, dalità Cursore e la modalità Navigazione, ognuna delle quali la finestra Satelliti compare solo fino a quando non viene acquisito un fix valido, permette l’accesso a differenti funzioni.
- Page 49 GPS ha calcolato la posizione (FIX OK). Un fix a due dimensioni (senza altitudine) è disponibile non appena il GEONAV aggancia tre satelliti; a questo punto sono In assenza di rotta, la velocità, visualizzate automaticamente anche la latitudine e la longitu- la rotta e la scala della carta nau- dine relative al vostro punto nave.
- Page 50 FINESTRA MENU FINESTRA ECOSCANDAGLIO La barra delle opzioni menu, presentata sulla parte superiore del- È possibile interfacciare il GEONAV con un sensore di pro- lo schermo, permette di accedere alle seguenti funzioni: fondità via NMEA. In questo caso, il GEONAV attiverà automaticamente la funzio- ne ecoscandaglio e mostrerà...
- Page 51 FINESTRA VIAGGIO Quando è presente una cartuccia NAVIONICS contenente i È la finestra che riporta le infor- dati Maree e Correnti, il GEONAV mostra in questa finestra mazioni generali relative al per- alcuni dati aggiuntivi rispetto alle normali previsioni corso seguito, e in particolare: visualizzate tramite la selezione di una stazione di rilevamen- to.
- Page 52 Finestra Runway Finestra Lat/Lon FINESTRA RUNWAY FINESTRA LAT/LON Questa finestra riporta le informazioni generali riguardanti il Questa finestra riporta le informazioni generali riguardanti la waypoint di destinazione e, in particolare: posizione corrente dell’imbarcazione e, in particolare: • nome del waypoint di desti- •...
- Page 53 Rotta ROTTA Comparirà inoltre una finestra che indica qual è il segmento catturato. A questo punto spostare il cursore manuale nel punto dove si MODIFICA DI UNA ROTTA (MODO CURSORE) desidera inserire il nuovo waypoint e premere ENTER per con- Creazione di un waypoint fermare.
- Page 54 Inserimento della velo- il menu, selezionare ROTTA, cità e del consumo di carburante). MEMORIZZA e premere ENTER. Il GEONAV proporrà un nome, che Utilizzare il tasto CURSOR per pas- tuttavia è possibile cambiare con sare alla pagina successiva che il tasto CURSOR.
- Page 55 Salvataggio di una traccia nella CompactFlash™ Premere PAGE fino a far apparire il menu, selezionare TRAC- CIA, quindi MEMORIZZA e premere ENTER. Il GEONAV pro- porrà un nome per il file, che tuttavia è possibile cambiare con il tasto CURSOR. Premere ENTER per confermare.
- Page 56 CIA, quindi CANCELLA e confermare con ENTER. I marker identificano un punto d’interesse tramite un nome e un simbolo e sono salvati nella memoria del GEONAV. Comparirà il catalogo delle tracce memorizzate nella CompactFlash™, nel quale la voce CURRENT indica la traccia NOTA: i nomi dei marker sono visualizzati a partire dalla scala carta di 32 NM.
- Page 57 Premere PAGE fino a far apparire il menu, selezionare MARKER, quindi MEMORIZZA e premere ENTER per confermare. Il GEONAV proporrà un nome che tuttavia è possibile cambiare con il tasto CURSOR. Premere ENTER per confermare. Apparirà il messaggio “MARK SALVATI” per confermare che l’operazione è...
- Page 58 Setup • Contorni Mappe (ON/OFF) SETUP Abilita disabilita visualizzazione dei contorni Il menu SETUP consente di impostare le opzioni dello stru- delle mappe. mento. Per accedere al menu SETUP, premere PAGE • Easy View (ON/OFF) ripetutamente fino a quando non appare il menu principale, Abilita / disabilita la funzio- quindi utilizzare il tasto CURSOR per selezionare la voce SETUP, ne di ingrandimento carta.
- Page 59 Goto GOTO Una volta selezionato il porto desiderato, il GEONAV inserirà un waypoint in corrispondenza della sua posizione, aggiunge- rà il nuovo segmento in coda alla rotta esistente (se non c’era La funzione GOTO consente di creare una rotta o di cambiare alcuna rotta il nuovo waypoint verrà...
- Page 60 Tide o Current e confermare pre- stanza e al tempo di arrivo (sti- mendo ENTER. Il GEONAV consentirà di scegliere una delle tre mato sulla velocità corrente). Per stazioni di rilevamento più vicine. Selezionare la stazione de- confermare la selezione premere siderata tramite CURSOR, quindi confermare premendo ENTER.
- Page 61 AUTOPILOTA Stazione di rilevamento della corrente di marea • Nome della stazione Il GEONAV consente a un’imbarcazione dotata di autopilota di • Data di riferimento della pre- seguire automaticamente la rotta impostata sul plotter, compen- visione sando le varie deviazioni che possono verificarsi a causa di fattori •...
- Page 62 Indice INDICE INTRODUZIONE ................4 CARATTERISTICHE TECNICHE ............. 5 INSTALLAZIONE E PRECAUZIONI ..........8 COLLEGAMENTI ELETTRICI ............11 INSTALLAZIONE DELLE CARTUCCE ........... 12 LA TASTIERA ................. 14 DIAGNOSTICO ................15 LA CARTOGRAFIA NAVIONICS............. 17 ELEMENTI GRAFICI ..............22 CARATTERISTICHE FUNZIONALI ..........24 PER INIZIARE ................
- Page 63 SUNSHINE Manuel d’emploi et d’installation...
- Page 64 L’utilisation de GEONAV comporte de la part de l’utili- sateur l’acceptation et la connaissance de cette notice. NOTE : Ce manuel concerne les modèles GEONAV 6 Sunshine, GEONAV 6 Sun et GEONAV 5C. Les fonctions caractéristiques de chaque modèle sont mises en évi- dence à...
- Page 65 NAVIONICS du monde entier. Quand de nouvelles fonctions seront disponibles, le logiciel Caractéristiques électriques interne de GEONAV pourra être mis à jour par un distributeur • Alimentation : de 9,8 V CC à 18 V CC protégé contre l’in- autorisé...
- Page 66 Caractéristiques techniques • Consommation : 8 W • Cordon de liaison pour GPS externe, échosondeur et pi- • Température d’utilisation : de 0 °C à +60 °C, humidité 93% lote automatique • Température de stockage : de -20 °C à +70 °C, humidité 93% •...
- Page 67 Installation et précautions INSTALLATION ET PRECAUTIONS • Pilote automatique : Il est possible de raccorder GEONAV à un pilote automatique au moyen du câble fourni avec l’appa- reil. Les raccords électriques sont reportés au chapitre “Rac- Afin d’éviter tout risque d’interférences électromagnétiques, cordements”.
- Page 68 GEONAV ajoutera les messages suivants : APA - APB - XTE - RMB - BWC - GLL - VTG Le câble de connexion est fourni avec GEONAV. ATTENTION : Quand l’installation est terminée, vérifier que toutes les connexions soient correctes. Un câblage mal fait peut endommager l’appareil.
- Page 69 • Mode Navigation • Passage du mode Na- accidentelle du répertoire \NAVIONIC et \GEONAV présents dans la cartouche, ma- Permet de faire vigation au mode Cur- nipuler avec prudence. Un endommagement de ces fichiers peut provoquer un défiler les pages seur.
- Page 70 PWR et CLR. Cette opération permet de supprimer toutes les de sécurité, secteurs des phares, données mémorisées dans GEONAV et de revenir à la configuration de base. points de prof. ou noms) en uti- lisant la touche CURSOR.
- Page 71 Sélectionner un objet montré dans la fenê- tre et appuyer sur ENTER pour en afficher les attributs. GEONAV convertira toutes les valeurs de profondeur dans Les objets qui peuvent être interrogés sont les lignes fond, l’unité...
- Page 72 Cartographie numérique NAVIONICS Les icônes des services varient d’une cartouche à l’autre. Capitainerie Informations Premiers secours Station de relèvement Services Eau potable des marées touristiques Réparations Station de relèvement Carburant mécaniques des courants La quantité et le type de service affiché dépendra de la cartou- che utilisée.
- Page 73 ELEMENTS GRAPHIQUES 5 - Segment de route Partie de route entre deux waypoint. En plus des informations cartographiques, GEONAV affiche quel- 6 - Waypoint ques éléments graphiques utiles pendant la navigation (voir la fi- Indique le point où la route change de direction; il est représenté...
- Page 74 Toutefois, cette représentation ne cor- Echosondeur respond pas à la réalité. Ainsi, en na- En mode échosondeur, l’écran de GEONAV est divisé en deux par- viguant vers le sud, tout ce qui se trouve ties : à droite du bateau sur la carte est à gau- •...
- Page 75 à choisir l’échelle à partir que cette fonction est activée, l’échelle est remplacée par OVZ de laquelle GEONAV doit activer la rotation de la carte. La dans la fenêtre Navigation. direction nord sera indiquée par le symbole Appuyer sur la touche PAGE jusqu’à...
- Page 76 Modalité Easy View zones de profondeur jusqu’à 2m en bleu (gris foncé), jus- GEONAV permet de doubler la visibilité de la carte numéri- qu’à 5m en bleu plus clair (gris clair) que. Lorsque cette modalité est activée, la carte sera agrandie, mais elle ne ajoutera pas de détails.
- Page 77 à la meilleure échelle dis- répéter les opérations précéden- ponible. tes. GEONAV est configuré en anglais. Pour sélectionner la lan- La numération augmentera pro- gue française, appuyer sur la touche PAGE jusqu’à l’affichage gressivement en ajoutant de nou- du menu, choisir SETUP, LANGUAGE et puis FR.
- Page 78 GOTO. Voir la section GOTO pour de plus amples informations. MODE CURSEUR Quand GEONAV est en mode Curseur, le curseur à croix est disponible. A l’aide de la touche CURSOR, il sera possible de faire défiler la carte numérique, modifier ou créer la route.
- Page 79 GPS. Lorsque le point est correct, GEONAV passe automatiquement en mode Navigation en affichant la position du bateau. La Le cercle extérieur représente fenêtre Navigation en bas de l’écran indique la direction et la l’horizon, le cercle intérieur une...
- Page 80 Fenêtre navigation Fenêtre menu FENETRE NAVIGATION FENETRE MENU Cette fenêtre est activée aussitôt que le point est correct (FIX OK). Lorsque le menu est affiché en haut de l’écran, il est possible de sélectionner les fonctions suivantes : S’il n’y a pas de route, la vitesse, la route et l’échelle de la carte s’affichent en bas de l’écran.
- Page 81 Fenêtre échosondeur Fenêtre informations FENETRE ECHOSONDEUR FENETRE INFORMATIONS Il est possible d’interfacer un échosondeur avec GEONAV via Quand une cartouche NAVIONICS avec les données des Ma- NMEA. rées et des Courants est présente, GEONAV affiche quelques informations additionnelles par rapport aux normales prédic- Dans ce cas, GEONAV active tions affichées à...
- Page 82 Fenêtre runway Fenêtre parcours FENETRE PARCOURS FENETRE RUNWAY Cette fenêtre affiche les informations relatives au parcours Cette fenêtre affiche les informations générales relatives au effectué : waypoint de destination : • Vitesse moyenne • Nom du waypoint de destina- • Temps passé...
- Page 83 Fenêtre lat/lon Route FENETRE LAT/LON ROUTE Cette fenêtre affiche les informations générales relatives à la MODIFIER UNE ROUTE (MODE CURSEUR) position courante du bateau : Créer un waypoint En utilisant la touche CURSOR, déplacer le curseur sur le point • Latitude et longitude relatives voulu et appuyer sur ENTER pour insérer un waypoint;...
- Page 84 Route Déplacer le curseur sur le point choisi pour insérer le nou- Les données relatives au temps veau waypoint, puis appuyer sur la touche ENTER pour valider. d’arrivée au waypoint et à la con- sommation de carburant sont af- MODIFIER UNE ROUTE (MODE NAVIGATION) fichées uniquement après l’in- Si le curseur manuel est visible, appuyer sur la touche PAGE sertion des valeurs estimées de...
- Page 85 ENTER. Appuyer sur la touche PAGE jusqu’à l’affichage du menu, sélec- GEONAV propose automatique- tionner ROUTE, INVERSER (si aucune route n’est mémorisée, ment un nom qu’il est possible le message “AUCUNE ROUTE” apparaît). de changer à l’aide de la touche CURSOR.
- Page 86 Appuyer sur la touche PAGE jusqu’à l’affichage du menu, puis sélectionner TRACE, MEMORISER et valider avec ENTER. GEONAV propose automatiquement un nom pour le fichier qu’il est possible de changer à l’aide de la touche CURSOR. Appuyer sur ENTER pour valider l’opération.
- Page 87 Une fenêtre montrera le sym- un symbole et sont sauvegardées dans la mémoire de GEONAV. bole et le nom que GEONAV donne automatiquement à la mar- que. Avec la touche CURSOR, il est possible de changer le sym- NOTE : Les noms des marques sont visualisés à...
- Page 88 Marque Menu setup Le catalogue des groupes de marques sauvegardés dans la Com- MENU SETUP pact Flash™ apparaîtra. Le mot ACTUEL définira le groupe de marques actuellement utilisé et visualisé sur l'écran. Le menu SETUP permet de définir les options de l’instru- ment.
- Page 89 Sunshine et G 5C) de la pré- • Noms (ON/OFF) sentation de la carte. GEONAV tracera une nouvelle route, le waypoint sélectionné • Active/désactive l’affichage des noms des localités. Unité Distance (NAUT/METR/STAT) deviendra le premier waypoint de la route et les waypoint •...
- Page 90 à la route existante (s'il n'existe pas de route, le sur CLR pour annuler l’opération. segment partira de la position du bateau). En appuyant sur PAGE, GEONAV retournera en mode Naviga- GEONAV visualisera les trois des- tion et activera automatiquement l'Autozoom.
- Page 91 ENTER. • Phase lunaire GEONAV permettra de choisir une des 3 stations les plus • Graphique de la courant sur proches. Sélectionner une station et valider avec la touche les 24 heures ENTER.
- Page 92 Pilote automatique Table des matières PILOTE AUTOMATIQUE TABLE DES MATIERES GEONAV permet à un bateau équipé d’un pilote automatique de INTRODUCTION ................4 suivre automatiquement la route définie sur le traceur en com- CARACTERISTIQUES TECHNIQUES ..........5 pensant les différentes variations dues à des facteurs externes INSTALLATION ET PRECAUTIONS ..........
- Page 93 SUNSHINE Bedienungsanleitung und Installationshinweise...
- Page 94 ANMERKUNG: Diese Anleitung bezieht sich auf die Modelle GEONAV 6 Sunshine, GEONAV 6 Sun und GEONAV 5C. Die Funktionen zu den Modellen werden im Text hervorgehoben. Technische Eigenschaften und Funktionen in diesem Handbuch können jederzeit geändert werden, sofern dies der Verbesserung des Gerätes dient.
- Page 95 Hafeninformationen. Denken Sie daran: Elektroni- sche Seekarten und der GPS-Seekartenplotter sind kein Er- satz für die offiziellen Seekarten. Der GEONAV ist ein Kartenplotter, der die aktuelle Boots- position auf der elektronischen Seekarte anzeigt. Als Zusatz zur herkömmlichen Seekarte ist der GEONAV ein Hilfsmittel und erleichtert die Navigation ungemein.
- Page 96 Auflösung 240 x 320 Bildpunkte • Anzeige der Tiefe und Wassertemperatur (sofern der • Auflösung 234 x 320 Bildpunkte GEONAV an einen Echolotgeber oder an ein entsprechen- des Instrument angeschlossen ist) • 32 Bit RISC Prozessor • Anschluß des Autopiloten über NMEA 0183 Schnittstelle Speicher •...
- Page 97 Dadurch kann das Gehäuse oder die Frontscheibe be- schädigt werden. Installation Der GEONAV kann im Schiff (mit einer externen Antenne) oder im Cockpit bzw. auf der Flybridge (mit der internen Antenne) ein- gebaut werden. ANMERKUNG: Beim Einschalten wird automatisch der interne GPS eingestellt.
- Page 98 Sie deshalb vorher auf den richtigen Blickwinkel. Einbaumontage Wählen Sie den Ort aus, an dem Sie den GEONAV montieren wollen. Verwenden Sie nun die Bohrschablone, die dem Plot- ter beiliegt. Schneiden Sie sorgfaltig die entsprechenden Aus- schnitte aus und bohren Sie die Löcher.
- Page 99 RMB, BWC, GLL, VTG. Das Datenkabel befindet sich im Lieferumfang des GEONAV. WARNUNG: Wenn die Installation beendet ist, kontrollieren Sie noch einmal die Anschlüs- se. Falsche Anschlüsse oder sich lösende Verbindungen können den GEONAV oder die angeschlossenen Geräte zerstören. Entfernen des Seekartenmoduls CompactFlash™...
- Page 100 CURSORMODUS um- löscht oder verschoben werden. Löschen bzw. verschieben Sie deshalb auf keinen Sie zwischen den einzel- schalten. Fall die Dateien im Verzeichnis \NAVIONIC und \GEONAV. Das Löschen oder verän- nen Anzeigen wechseln. • Im MENÜ zwischen dern der Daten in diesen Verzeichnissen kann zu Fehlfunktionen des Gerätes führen.
- Page 101 DIAGNOSEPROGRAMM ANMERKUNG: Im Falle eines defekten Kartenmoduls oder Spannungsspitzen kann der GEONAV blockiert werden, was bedeutet, daß die Spannung weggenommen werden müßte um dann neu zu starten. Dazu drücken Sie einfach mindestens 9 Die Eigenschaften des Diagnoseprogramms des GEONAV die- Sekunden auf die Taste PWR.
- Page 102 Elektronische Seekarten von NAVIONICS stätigen Sie die Auswahl durch ELEKTRONISCHE SEEKARTEN VON NAVIONICS drücken CURSOR -Taste (ENTER-Taste). Der GEONAV beinhaltet bereits eine Weltkarte mit einer Auf- lösung von 512 bis 4096 Seemeilen. GEONAV wandelt alle Tiefenangaben in die von Ihnen Weitere Kartendetails, zusätzlich zu den im Gerät gespeicher-...
- Page 103 Elektronische Seekarten von NAVIONICS Anzeige der Objekteigenschaften In diesem Fenster sehen Sie nun mehrere Zeichen. Diese Bewegen Sie den Cursor an die Oberkante des Objekts, drük- Zeichen zeigen an, welche Informationen für diesen Hafen ken Sie GOTO und wählen Sie INFO. Ein Fenster mit der Be- hinterlegt sind.
- Page 104 Grafische Symbole Elektronische Seekarten von NAVIONICS GRAFISCHE SYMBOLE Neben den Karteninformationen werden zusätzliche grafische In- formationen auf der Seekarte eingeblendet. Die untere Abbildung zeigt einige dieser Symbole. 1 - Markierungen Anzeige von Ereignismarkierungen (Punkten von Interesse) mit einem Symbol und einem Namen. 2 - Tracklinie Aufzeichnen des aktuellen Kurses.
- Page 105 8 - Kursvektor Anzeige des aktuell gefahrenen Kurses. Echolot Wenn Sie sich im Echolot-Modus befinden, dann hat der GEONAV 9 - Nordanzeige eine geteilte Anzeige. Im oberen Teil der Anzeige sehen Sie das Anzeige der Nordrichtung wenn die Funktion Course Up aktiviert Navigationsfenster mit der Seekarte, im unteren Teil der Anzeige ist.
- Page 106 Karte drehen auszuschalten, drücken Sie die ZOOM -Taste einmal. Karten werden normalerweise nord- Wenn der GEONAV eingeschaltet wird, eine Route bereits orientiert dargestellt. Dies entspricht aktiviert ist und der GPS arbeitet, wird die Funktion Auto- nicht immer der Realität bzw. der Fahrt- zoom automatisch aktiviert.
- Page 107 Funktionen wechseln Sie in das SETUP. Wählen Sie POSITIONS- KORREKTUR. Auf der Anzeige erscheint eine Meldung. Sie werden darauf hingewiesen, dass Sie nun den CURSOR an die tatsächliche Position verschieben müssen. Drücken Sie die ENTER -Taste um die richtige Position zu bestätigen. Die Positionskorrektur wird nun gespeichert.
- Page 108 Sie durch drücken der ENTER-Taste. Jedes mal wenn AUS: Alle Tiefenlinien sind ausgeblendet der GEONAV eingeschaltet ist wird die zuletzt verwendete Tiefenlinien bis 5 m werden angezeigt Karte geladen. 10m: Tiefenlinien bis 10 m werden angezeigt 20m: Tiefenlinien bis 20 m werden angezeigt Um eine andere Karte, die auf der CompactFlash™...
- Page 109 Po- sition aus angezeigt. Wenn Sie Wir empfehlen eine intuitive Bedienung des GEONAV Plot- sich nicht in Fahrt befinden, ters. Der GEONAV kann durch eine falsche Bedienung auf dann kann dieser Kursvektor keinen Fall beschädigt werden. vernachlässigt werden.
- Page 110 Wegpunkten laufend erhöht. Wenn Sie einen Wegpunkt falsch eingegeben haben, dann drücken Sie einfach die CLR- Der GEONAV hat zwei Betriebsarten, den Cursor- und den Taste (im Cursor-Modus). Der zuletzt eingegebene Wegpunkt Navigationsmodus. In jeder Betriebsart haben Sie unterschied- wird gelöscht.
- Page 111 Position berechnet; die Höhe wird ebenfalls angezeigt. Horizont dar, der innere Ring bedeutet 45° zum Horizont und Sobald eine Position berechnet wurde, wechselt der GEONAV der Mittelpunkt zeigt zum Zenit. automatisch in den Navigations-Modus. Die Position wird nun Die kleinen Rechtecke mit den auf der Seekarte eingetragen, die Seekarte wechselt in den Zahlen stellen die verfügbaren...
- Page 112 Menü Navigationsanzeige NAVIGATIONSANZEIGE MENU Diese Anzeige wird automatisch nach dem Berechnen des Fix auf- Wenn Sie das MENU aufrufen, können Sie aus folgenden Unter- gerufen (FIX OK). Die Bootsposition wird eingeblendet. menüs wählen: Wenn keine Route aktiviert ist, dann sehen Sie die Boots- geschwindigkeit (SOG), Kurs (COG) und den eingestell-...
- Page 113 Informationsfenster Echolotanzeige ECHOLOTANZEIGE INFORMATIONSFENSTER Beim GEONAV können Sie einen Echolotgeber oder ein ande- Wenn ein Seekartenmodul von NAVIONICS die Gezeiten- und res Echolot über die NMEA-Schnittstelle anschließen. In die- Strömungsinformationen beinhaltet, erscheint dieses Fenster sem Fall hat der GEONAV automatisch die Funktion eines mit weiteren Informationen.
- Page 114 Reisefenster Trip-Anzeige TRIP-ANZEIGE REISEFENSTER Die Daten im unteren Teil der Anzeige beziehen sich allesamt Dieses Fenster zeigt generelle Reiseinformationen und im Ein- auf Ihre zurückgelegte Strecke: zelnen: • Durchschnittliche • Name des Zielwegpunktes schwindigkeit-über-Grund • Entfernung bis zum Zielweg- • Vergangene Zeit vom Beginn punkt der Reise an...
- Page 115 Route Positions Fenster POSITIONS FENSTER ROUTE BEARBEITEN EINER ROUTE (CURSOR-MODUS) Dieses Fenster informiert generell über die gegenwärtige Po- Erstellen eines Wegpunkts sition des Bootes und weitere Einzelheiten wie: Gehen Sie mit der CURSOR -Taste auf die Position, an der Sie einen Wegpunkt eingeben wollen.
- Page 116 Route Wählen Sie mit der CURSOR -Ta- Einfügen eines neuen Wegpunkts in eine bestehende Route Positionieren Sie den Cursor mit der CURSOR -Taste genau auf ste ROUTE, dann INFO. Drük- der Verbindungslinie zwischen zwei Wegpunkten. Drücken ken Sie nun die ENTER-Taste. Im Fenster erscheinen nun fol- Sie nun die ENTER-Taste.
- Page 117 Route Eingabe von Durchschnittsgeschwindigkeit und Spritverbrauch Die aufgerufene Route wird nun auf der Anzeige eingeblen- Mit diesen Informationen werden die Werte in der Routen- det. Die Funktion Autozoom wird automatisch gestartet und info-Anzeige berechnet. Drücken Sie die PAGE-Taste um in das in einem Fenster werden Sie aufgefordert, den ersten Weg- MENU zu gelangen.
- Page 118 Tracklinie Wählen Sie KURS, ABRUFEN und drücken Sie dann die ENTER- TRACKLINIE Taste. Mit der Tracklinie zeichnen Sie die aktuell zurückgelegte Eine Liste mit den verfügbaren Tracklinien wird angezeigt. Wegstrecke auf. Die Tracklinie kann ein- und ausgeschaltet Wählen Sie die gewünschte Tracklinie mit der CURSOR -Taste werden.
- Page 119 Markierungen NAVIGATIONS-MODUS MARKIERUNGEN Einfügen einer Markierung Drücken Sie die MARK-Taste. Die aktuelle Bootsposition wird Markierungen werden verwendet, um bestimmte Positionen nun als Markierung gespeichert. In einem Fenster sehen Sie zu mit Symbolen und Namen kennzeichnen. nun das Symbol und den Namen für die Markierung. Beides wird automatisch vorgeschlagen.
- Page 120 Setup Markierungen Taste aus. Bestätigen Sie die Auswahl durch drücken der ENTER- SETUP Taste. Wenn Sie den Vorgang abbrechen wollen, dann drük- ken Sie die PAGE-Taste. Im SETUP können Sie einige Grundeinstellungen vornehmen. Um in das SETUP zu gelangen drücken Sie mehrmals die Löschen von Markierungen PAGE -Taste.
- Page 121 Einstellung der Einheiten für die Tiefenangaben. Der ausgewählte Wegpunkt wird der erste Wegpunkt in der • Uhrzeit (ORT/GMT) Route, da der GEONAV nun mit einer „neuen“ Route anfängt. Eingabe der Ortszeit. Vorherige Wegpunkte werden gelöscht. Diese Funktion ist nur •...
- Page 122 Wenn Sie den gewünschten Hafen ausgewählt haben, dann Sie diese in der GOTO MARK Liste aus und drücken die CLR-Taste. setzt der GEONAV in den Hafen einen Wegpunkt. Dieser Weg- punkt wird zu einer bestehenden Route hinzugefügt. Wenn Route zum nächsten Service keine Route aktiviert ist, dann wird eine Linie zwischen der aktuellen Position und dem Wegpunkt hergestellt.
- Page 123 Wenn Sie den gewünschten Hafen ausgewählt haben, dann nen mit Gezeiteninformationen auswählen. Wählen Sie die setzt der GEONAV in den Hafen einen Wegpunkt. Dieser Weg- gewünschte Station mit der CURSOR -Taste und bestätigen Sie punkt wird zu einer bestehenden Route hinzugefügt (im Cur- mit der ENTER-Taste.
- Page 124 Wegpunkt der Route erreicht wird. Dadurch wis- sen Sie genau, dass der Autopilot keine weiteren Daten empfängt. WICHTIGE ANMERKUNG: Um einen plötzlichen Kurswechsel zu vermeiden, schal- ten Sie den Autopiloten, während Sie mit dem GEONAV eine Route bearbeiten, ab. Deutsch Deutsch...
- Page 125 Inhaltsverzeichnis INHALTSVERZEICHNIS EINLEITUNG ..................4 TECHNISCHE DATEN ..............6 INSTALLATION UND SICHERHEITSHINWEISE ......9 ANSCHLÜSSE ................. 12 DAS SEEKARTENMODUL ............... 13 DIE TASTATUR ................15 DIAGNOSEPROGRAMM ..............16 ELEKTRONISCHE SEEKARTEN VON NAVIONICS ......18 GRAFISCHE SYMBOLE ..............23 FUNKTIONEN .................. 25 SCHNELLEINFÜHRUNG ..............
- Page 126 HEADQUARTERS • ITALY Navionics S.p.A. - Geonav Division Via Vespucci 289 • 55049 Viareggio • Italy Tel: +39 0584 961696 Fax: +39 0584 961309 Numero Verde: 800-861215 http://www.geonav.it http://www.navionics.it OFFICE • USA Navionics Inc. 6 Thacher Lane • Wareham, MA. • USA 02571...
Need help?
Do you have a question about the 6 Sunshine and is the answer not in the manual?
Questions and answers