Sony RCP-750 Operation Manual
Hide thumbs
Also See for RCP-750:
- Operation manual (60 pages) ,
- Operating instructions manual (149 pages)
Table of Contents
Advertisement
Advertisement
Chapters
Table of Contents

Related Manuals for Sony RCP-750


Summary of Contents for Sony RCP-750
- Page 1 * 3 - 2 0 6 - 9 1 4 - 0 5 * REMOTE CONTROL PANEL RCP-750/751 電気製品は、安全のための注意事項を守らないと、火災 や人身事故になることがあります。 このオペレーションマニュアルには、 事故を防ぐための重要な注意事項と製 品の取り扱いかたを示してあります。 このオペレーションマニュアルをよく お読みのうえ、 製品を安全にお使いください。 お読みになったあとは、 いつ でも見られるところに必ず保管してください。 OPERATION MANUAL [Japanese/English] 1st Edition (Revised 4)
- Page 2 安全のために ソニー製品は安全に十分に配慮して設計されています。 しかし、 電気製品は 警告表示の意味 まちがった使い方をすると、 火災や感電などにより死亡や大けがなど人身事 このオペレーションマニュアル 故につながることがあり、危険です。 および製品では、次のような表 事故を防ぐために次のことを必ずお守りください。 示をしています。表示の内容を よく理解してから本文をお読み 安全のための注意事項を守る ください。 2(J)∼3(J)ページの注意事項をよくお読みください。 この表示の注意事項を守らない 定期点検を実施する と、火災や感電などにより死亡 長期間安全に使用していただくために、 定期点検を実施することをおすすめ や大けがなど人身事故につなが します。 点検の内容や費用については、 ソニーのサービス担当者または営業 ることがあります。 担当者にご相談ください。 故障したら使用を中止する この表示の注意事項を守らない ソニーのサービス担当者または営業担当者にご連絡ください。 と、感電やその他の事故により けがをしたり周辺の物品に損害 を与えたりすることがあります。 万一、異常が起きたら 1 電源を切る。 異常な音、に 注意を促す記号 2 ソニーのサービス担当者または営業担当者に修 おい、煙が出...
-
Page 3: Table Of Contents
コンソールへの取り付け ..................メニューの構成と基本操作 ..................13(J) 基本操作手順 ........................ 13(J) メニュー画面の基本構成 .................... 14(J) メニュー項目 ........................ 18(J) 25(J) 初期設定 ........................ RCP-750/751の動作環境の設定 ................. 25(J) 時計を合わせる ......................25(J) ブザーを設定する ......................26(J) LEDの明るさを設定する .................... 27(J) ロータリーエンコーダーの設定を変更する ............27(J) 液晶ディスプレイの明るさを設定する ..............27(J) 28(J) メモリースティック ....................メモリースティックの取り付け ................28(J) メモリースティックについて... - Page 4 下記の注意を守らないと、 火災 感電 死亡 大けが や により や につながることがあります。 外装を外さない、改造しない 外装を外したり、改造したりすると、感電の原因となります。 内部の調整や設定および点検を行う必要がある場合は、 必ずサービストレー ニングを受けた技術者にご依頼ください。 内部に水や異物を入れない 水や異物が入ると火災や感電の原因となります。 万一、 水や異物が入ったときは、 接続コードを抜いて、 ソニーのサービス担 当者または営業担当者にご相談ください。 油煙、湯気、湿気、ほこりの多い場所では設置 • 使用しない 上記のような場所で設置・使用すると、火災や感電の原因となります。 2 (J)
- Page 5 下記の注意を守らないと、 けが 損害 をしたり周辺の物品に を与えることがあります。 AUX REMOTE CCU/CNU REMOTE 端子や 端子には指 定以外の機器を接続しない このオペレーションマニュアルに記載している以外の機器を接続すると、 火災や感電の原因となることがあります。 (CCA リモートケーブル ケーブル を傷つけない リモートケーブルを傷つけると、火災の原因となることがあります。 3 (J)
-
Page 6: 概要
カメ ラコン ト ロールユニッ ト と本機との間は、 デジタル回線により信 RCP-750とRCP-751 では、 アイ リ ス/マスターブラ ック調整部の構 号の受け渡しを行います。 1本の接続ケーブル (CCA-5) ですべて 成・形状が異なるだけで、他の機能は共通です。 の信号の授受を確実に行う こ とができます。本機には接続ケーブ アイ リ ス/マス ターブラ ック調整部は、 RCP-750 ではジ ョ イ スティ ック ルを介して電源が供給されます。 (レバー) タイ プ、 RCP-751 ではつまみになっています。 メモリースティックスロット 主な特長... -
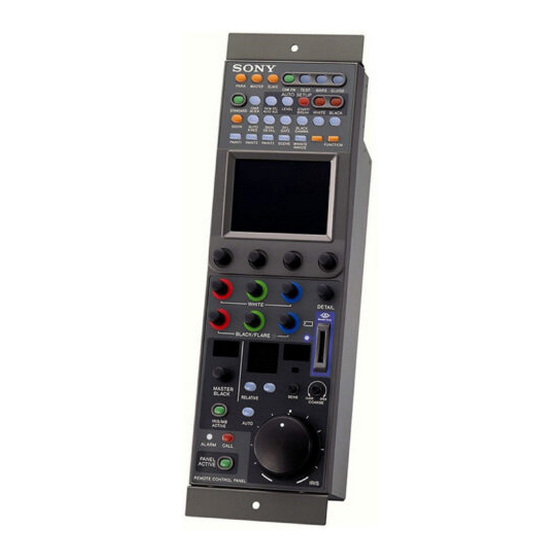
Page 7: 各部の名称と働き
各部の名称と働き 操作パネル RCP-750 0 電源 出力信号選択部 1 コントロール選択部 PARA MASTER SLAVE CAM PW TEST BARS CLOSE AUTO SETUP STANDARD AUTO SETUP 部 ボタン CHAR SKIN DTL LEVEL START/ STANDARD WHITE BLACK ACTER AUTO HUE BREAK /CCU 3 カメラ 機能 5600K... - Page 8 各部の名称と働き 5600K 1 コン トロール選択部 : 5600K の電気色温度補正機能 AUTO KNEE (オートニー) :オー トニー機能。 ONでは、 画面 の明る さに応じて自動的にニーが働き ます。 SKIN DETAIL (スキンディテール) :スキン ト ーンディ テール 機能 DTL GATE (ディテールゲート) :スキン ト ーンディ テールゲー ト機能。 ON では、スキン トーンディ テールの調整範囲が PIX PARA MASTER SLAVE (ピクチャー)...
- Page 9 ALARM CLOSE (アラーム) インジケーター (アイ リスクローズ) ボタン システムに異常が発生し、 カメ ラヘッ ドやCCU/HDCUで自己診断 押して点灯させる と、絞りがクローズします。 も う1 度押すとボタ ン 機能が動作する と、赤く 点灯します。 は消灯し、 クローズが解除されます。 CALL (コール) ボタン AUTO SETUP (オー トセッ トアップ) 部 押すとビデオカメ ラにコール信号が送出され、 カメ ラ側のCALLボ タンが点灯します。また、カメ ラのタ リ ーランプとCCU/HDCU の レ...
- Page 10 各部の名称と働き qs メニュー操作部 (液晶ディスプレイ) タッチパネル 通常はステータス を表示します。 (14(J)ページ参照) MODEボタ ンを押すと、 選択したモー ドのメニューが表示され、 各 種の設定が可能になり ます。 PAINT 1 PAINT 2 PAINT 3 SCENE MAINTE FUNCTION C 調整つまみ (ロータリーエンコーダー) NANCE タ ッチパネルで選択した項目を調整します。 DETAIL (ディテール調整) つまみ ディ テールレベルを調整します。 メ ンテナンスメニューを使用して、 HDディ テールを調整するか、 SD ディ...
- Page 11 RCP-750 アイリス マスターブラック調整部( ) IRIS/MB ACTIVE ボタン AUTO ボタン ナンバー表示部 インジケーター IRIS/MB ACTIVE MASTER BLACK 表示部 SENS つまみ MASTER SENS BLACK AUTO MASTER BLACK COARSE つまみ RELATIVE ボタン RELATIVE RELATIVE CLOSE OPEN COARSE 9 マスターブラック調整リング IRIS レバー IRIS IRIS RELATIVE ボタン...
- Page 12 AUTOボタ ン消灯時に動かすと、 レンズの絞り を手動で調整でき ま 相対値モード 絶対値モード す。 (RELATIVE ボタン点灯 (RELATIVE ボタン消灯 AUTOボタン点灯時は、絞りの自動調整の基準値を微調整(± IRISレバー OPEN からCLOSEまでの SENS つまみとCOARSE 1F) します。 (RCP-750)/ 約 1/4 の範囲を相対値で つまみで設定した可変範 IRIS つまみ 調整します。 囲内で絞り を調整します。 ◆「アイ リ ス調整機能」 表(右記) を、併せてご覧く ださい。 (RCP-751) COARSE OPEN からCLOSEまでの CLOSE 側の下限を設定 つまみ 全範囲を相対値で調整し...
-
Page 13: コネクターパネル
IRIS/MB ACTIVE AUTO (アイ リス マスターブラックアクティ ボタン ブ) ボタン 押して点灯させる と、 レンズの絞りが入力光に応じて自動的に調整 押して点灯させる と、 本機で絞り とマス ターブラ ッ クの調整が行えま されます。 す。 ボタ ン点灯時は、絞りの自動調整の基準値を±1F の範囲で微調 PANEL ACTIVEボタ ンを押すと、 このボタ ンも同時に点灯します。 整する ことができます。 また、消灯させる とパネルはロ ック され、誤動作防止になり ます。 も う1 度押すと消灯し、絞りの手動調整が可能になり ます。 IRIS RELATIVE (アイ... -
Page 14: コンソールへの取り付け
コンソールへの取り付け RCP-750/751は、下図のよ う にコンソールに取り付ける こ とができ ます。 12 (J) -
Page 15: メニューの構成と基本操作
メニューの構成と基本操作 RCP-750/751では、 メニュー操作によ り、 システム機器の調整など 操作する項目を選択する。 様々な機能に対応します。 メニュー画面の項目ボタ ンを押し、設定・調整画面または操 作エリ アを表示させます。 基本操作手順 メニューが複数ページある場合は ペイ ン ト メニューやフ ァ ンク シ ョ ンメニューのよ う にメニューが複 数ページある場合は、 vまたは Vを押して、必要に応じてメ ニューのページを切り換えます。 ◆次ページ 「初期画面 (ペイ ン ト メニュー) 」参照。 サブメニューがある場合は PAINT 1 PAINT 2 PAINT 3 SCENE MAINTE... -
Page 16: メニュー画面の基本構成
メニューの構成と基本操作 メニュー画面の基本構成 ステータス表示 メニュー操作部の MODEボタン (PAINT1、 PAINT2、 PAINT3、 MAINTENANCE、 FUNCTION、 SCENE) を選択しないと (すべ て消灯) 、ディ スプレイ は下図のよう なステータス表示になり ます。 ステータス表示では、各項目は状態表示 Shutter M. Gain Gamma のみで、設定はファンクションメニュー これらの項目は、ファンクションメ 0.45 や操作パネルのつまみで行います。 ニューで設定できます これらの項目は、操作パネルの White Detail WHITE BLACK/FLARE 、 、 DETAIL の各つまみで調整できます。 Black Detail Black および... - Page 17 設定・調整画面 (ペイントメニュー) ペイ ン ト メニューの初期画面で項目を選択する と、 画面の下半分が 選択した項目の設定・調整画面になり ます。 例:初期画面で White を選択したとき 初期画面で選択した項目名が表示されま 1 / 7 Clear す。 Clear を押してからこの部分を押すと、 White Black Flare Gamma 選択した項目の全調整値が標準状態に戻 ります。 押すと、モニター出力設定画面(次 WF/PIX White RGB Select ページ参照)が上半分に表示されま Color す。 ON/OFF 調整に関連する 機能がある Temp 場合は、この列に表示されます。 Master 12.0dB 選択した項目の調整パラメーターおよ...
- Page 18 メニューの構成と基本操作 モニター出力設定画面 (拡張メニュー) ペイ ン ト メニューの設定 ・ 調整画面で[WF/PIX Select]を押して点灯 させると、画面上半分にモニター出力設定画面が表示されます。 R/G/B :それぞれ 信号、 信号、 信号を選択します。 : 信号、 信号、 信号を組み WF/PIX Monitor Select 合わせて選択できます。 : 出力のみ有効で、 、 、 の つの信号の波形をシーケン WF/PIX 表示を戻したいときは、もう 度 シャルモードでモニターすること Select この項目を押してください。 ができます。 :エンコードされた信号が出力 されます。 シーンファイル操作メニュー画面 メニュー操作部の...
- Page 19 ファンクションメニュー画面 メニュー操作部の FUNCTIONボタンを押すと、 ファンクシ ョ ンメ ニュー画面になり ます。 Operation 選択時 Vを押して希望するフィルターを選択します。 フィルター、 フィルターの枚数はカメラに依存します。 Opera- tion Filter Ctrl を押して色を変えると Filter Gamma Ctrl Vを押してガンマ値を選択します。 この画面でフィルターを選択でき 0.05 ± ステップで変更できます。 る状態になります。 0.45 Master Shutter Vを押してマスターゲインを選択し Gain ます。 30.00 vを押すたびに値が大きくなり、 Vを押すたびに小さくなります。 それぞれ対応する位置の調整つまみで 調整できます。 選択時 Opera- tion ページ番号...
-
Page 20: メニュー項目
メニューの構成と基本操作 メニュー項目 操作/調整項目欄で が付いている項目は調整つまみに割り当てられる項目、 それ以外の項目は、 メニュー画面上で操作する項目です。 ● ペイントメニュー ペイ ン ト メニューはページ1 ∼ 7 で構成されています。 ページ1∼ 3は、 MODEボタ ンのPAINT1、 PAINT2、 PAINT3を押して直接選択する こ とができます。 MODEボタ ンで選択したページ の v/Vを押すこ とによって、ページ1 ∼ 7を順次切り換える こ とができます。 ページ メニュー サブメニュー 操作 調整項目 機能 Paint 1 White R/G/B/Master ホワイ... - Page 21 ぺ−ジ メニュー サブメニュー 操作 調整項目 機能 Paint 3 Knee Point R/G/B/Master ニーポイ ン ト調整 ● Knee Off ニーON/OFF Knee Slope R/G/B/Master ニースロープ調整 ● Knee Off ニーON/OFF Matrix Matrix 1 R-G/G-B/B-R マ ト リ ッ クス定数設定 ● User Matrix ユーザーマ ト リ ッ クスON/OFF Preset Matrix プリ...
- Page 22 メニューの構成と基本操作 ページ メニュー サブメニュー 操作 調整項目 機能 Paint 5 Detail 2 H/V Ratio HD ディ テール H/Vレシオ調整 ● (続き) N. Freq HD ディ テールブース ト周波数調整 ● Mix Ratio HD ディ テールミ ックス レシオ調整 ● Comb HD ディ テールコム調整 ● Detail Off HD ディ...
- Page 23 ページ メニュー サブメニュー 操作 調整項目 機能 Paint 6 Auto Iris Pattern オー ト アイ リ スパターン調整 ● (続き) Phase スキン ト ーンオー ト アイ リ ス色相調整 ● Width スキン ト ーンオー ト アイ リ ス色相幅調整 ● Normal Mode オー ト アイ リ ス ノ ーマルモー ド選択 Skin Mode オー...
- Page 24 メニューの構成と基本操作 次メニュー 次メニュー サブメニュー 操作 調整項目 機能 File Reference File Store リ フ ァ レンスフ ァイ ル登録 Reference File Transfer CAM → MS リ フ ァ レンスフ ァイ ル転送 (カメ ラからメモリ ースティ ッ ク) MS → CAM リ フ ァ レンスフ ァイ ル転送 (メモリ ースティ ッ クからカメ ラ) Scene File Transfer CAM →...
- Page 25 次メニュー 次メニュー サブメニュー 操作 調整項目 機能 RCP Config Date/Time Set Date Year 本機内蔵の時計の日付合わせ ● (続き) Month ● ● Cancel Time Hour 本機内蔵の時計の時刻合わせ ● Minute ● Second ● Cancel Information 本機のソフ ト ウェアバージ ョ ン表示 Preview Setting RCPコンタク ト プレビュー CCU Rearプレビュー CNU S-BUS CNU S-BUSプレビュー...
- Page 26 メニューの構成と基本操作 ファンクションメニュー メニュー サブメニュー 操作 調整項目 機能 Operation Filter Ctrl フ ィ ルター リ モー ト/ローカルモー ドの選択 ND (1/2/3/4/5) NDフ ィ ルターの選択 CC (A/B/C/D/E) CCフ ィ ルターの選択 Gamma ステップガンマの選択 Master Gain マスターゲイ ンの選択 Shutter シャ ッ ターモー ドのON/OFF ECSモー ドの ON/OFF Shutter シャ...
-
Page 27: 初期設定
初期設定 RCP-750/751 の動作環境の設定 RCP Config Menu Exit Date メ ンテナンスメニューのRCPコ ンフ ィ ギュ レーシ ョ ンメニューやLCD Adjusting Setting Time 設定画面では、 RCP-750/751に内蔵されている時計の時刻合わ Pre- CAMERA せや、警告ブザー音の音量、 イ ンジケーターやディ スプレイ の明る view さ を調整する こ と もでき ます。 Secu- rity /LCD コンフィギュレーションメニュー 設定... -
Page 28: ブザーを設定する
:メニュー画面 (タ ッチパネル) に表示された操作ボ [Exit] を押してメニューを抜けます。 タ ンを押したときのブザーの音量 Switch : 操作パネル上のボタ ンを押したときのブザーの音 量 ブザーを設定する Master 右端のつまみ( ) で、全体の音量を調整できます。 RCP-750/751 では、 コール信号を受信したときや、パネルを操作 ON/OFF ブザーを個別に するには する とブザー音が聞こえます。 対応するボタ ンを押します。点灯時が ONになり ます。 必要に応じて、 ON/OFFしたり 、音量を調整してく ださい。 [Call Buzzer] :コール信号受信時のブザー 設定は、次の手順で行います。 [Touch Click] :... -
Page 29: Ledの明るさを設定する
の明るさを設定する Exit RCP-750/751 では、操作ボタ ンやタ リ ー表示部の LED の明る さ と コン ト ラス ト を調整できます。 Rotary Encoder Setting [RCP Adjusting] RCPコンフ ィ ギュ レーシ ョ ンメニューの を押し BLACK/FLARE DETAIL Detail て、 RCP 設定メニューに切り換える。 Black Flare ( HD ) Detail [LED Bright] RCP 設定メニューの... -
Page 30: メモリースティック
メモリースティック メモリースティックの取り付け メモリースティックについて 別売りの メモリースティック を使用する と、 フ ァイ ル情報を保存し、 メモリースティックとは? 他の RCP でも同じフ ァイ ル情報を共有する こ とができます。 メモリースティック には、標準サイ ズのものとその小型サイ ズの “メモリ ースティ ックデュオ” があ り ます。 さ らに、 デュオサイ ズよ り小 メモリースティックを取り付けるには 型の “メモリ ースティ ッ クマイ クロ” ( “M2” )... - Page 31 ― 湿気の多い場所や腐食性のある場所 (直接装着する こ とはできません。 必ずメモリ ースティ ッ ク デュオ ア • 持ち運びや保管の際は付属の収納ケースに入れてく ださい。 ダプターをご使用く ださい。 ) • RCP-750/751で使用でき る容量のメモリ ースティ ッ クは、 カメ ラ側 では 使用できない場合があ り ます。 データ読み込み/書き込みスピードについて メモリ ースティ ッ クを使ってカメ ラ とデータを交換する際は、 カメ ラ とRCP- 750/751双方で使用可能な容量のメモリ ースティ ッ ク をご...
-
Page 32: 主な仕様
最大外形寸法 RCP-750:102 126.5 mm × × RCP-751:102 86.5 mm × × (幅 / 高さ/ 奥行き) 質量 RCP-750:1.5 kg RCP-751:1.3 kg 入出力 REMOTE CCU/CNU: 8ピンマルチコネクター (1) AUX: 8ピンマルチコネクター (1) EXT I/O 9ピンD-subコネクター (1) 付属品 オペレーシ ョ ンマニュアル(1) 別売りアクセサリー リモー ト ケーブル CCA-5-3(3 m)... - Page 33 à la pluie ou à l’humidité. (controlled EMC environment, ex. TV studio). Afin d’écarter tout risque d’électrocution, garder le coffret The manufacturer of this product is Sony Corporation, 1-7-1 fermé. Ne confier l’entretien de l’appareil qu’à un personnel Konan, Minato-ku, Tokyo, Japan.
- Page 34 Der Hersteller dieses Produkts ist Sony Corporation, 1-7-1 Konan, Minato-ku, Tokyo, Japan. Der autorisierte Repräsentant für EMV und Produktsicherheit ist Sony Deutschland GmbH, Hedelfinger Strasse 61, 70327 Stuttgart, Deutschland. Bei jeglichen Angelegenheiten in Bezug auf Kundendienst oder Garantie wenden Sie sich bitte an die in den separaten Kundendienst- oder Garantiedokumenten aufgeführten Anschriften.
- Page 35 Basic Operating Procedure ............13(E) Basic Configuration of Menu Display...........14(E) Menu Items ..................18(E) Initial Settings ..................25(E) Setting the Operating Conditions of the RCP-750/751 ....25(E) Setting the Built-in Clock .............. 25(E) Adjusting the Buzzer Sound ............26(E) Adjusting the Brightness of the LEDs ...........27(E) Changing the Functions of the Rotary Encoders ......
-
Page 36: Overview
The RCP-750 and RCP-751 are completely identical in selected. their functions except with respect to the iris and master black adjustments. For the iris and master black adjustments, the RCP-750 Signal transmission via a digital line uses a joystick type control while the RCP-751 uses rotary knobs. -
Page 37: Locations And Functions Of Parts
Locations and Functions of Parts Operation Panel RCP-750 1 Control select block 0 Power and output signal select block PARA MASTER SLAVE CAM PW TEST BARS CLOSE AUTO SETUP 2 STANDARD button qa AUTO SETUP block CHAR SKIN DTL LEVEL... - Page 38 Locations and Functions of Parts 1 Control select block 5600K: 5600K electric color temperature conversion function AUTO KNEE: Auto knee function. When this button is lit (ON), the knee point is automatically adjusted according to the light content of the picture. SKIN DETAIL: Skin tone detail function DTL GATE: Skin tone detail gate function.
- Page 39 6 Camera number/tally indication window B Signal output select buttons The number of the camera being controlled from this Press and light up one of these buttons to activate the panel is displayed in orange. test signal generator of the video camera and send the When a red tally signal is sent to the camera, the respective signals.
- Page 40 Locations and Functions of Parts D BLACK (black balance) button B LCD/touch panel Press to automatically adjust the black balance and Normally displays the statuses (see page 14(E)) black set. When you press a MODE button, the corresponding The button lights during adjustment and goes dark menu is displayed to permit you to adjust the displayed when adjustment is completed.
- Page 41 Iris/master black control block (RCP-750) 3 IRIS/MB ACTIVE button 4 AUTO button 5 f-number display 6 EXT indicator IRIS/MB ACTIVE 1 MASTER BLACK display 7 SENS control knob MASTER SENS BLACK AUTO 2 MASTER BLACK RELATIVE 8 COARSE control knob...
- Page 42 (RELATIVE button not lit) 0 IRIS control lever IRIS lever Adjusts the iris with Adjusts the iris (RCP-750)/ relative values within within the variable When the AUTO button is not lit, you can adjust the IRIS control 1/4 of the total range range set by the iris manually by moving the lever.
-
Page 43: Connector Panel
4 IRIS RELATIVE (iris relative) button qa AUTO button When the IRIS/MB ACTIVE button is lit, the iris Press and light the button to automatically adjust the adjustment mode can be selected with this button. iris according to the amount of input light. Press and light up the button for Relative mode or When this button is lit, the reference value for press so that it goes dark for Absolute mode. -
Page 44: Mounting On A Console
Mounting on a Console The RCP-750/751 can be mounted on a console as shown below: 12(E) -
Page 45: Menu Configuration And Basic Menu Operations
Menu Configuration and Basic Menu Operations The RCP-750/751 provides menu operations for Select the item to be adjusted. various functions such as adjustments of system equipment. Press the button that shows the name of the item on the menu to obtain the corresponding adjustment display or operation area. -
Page 46: Basic Configuration Of Menu Display
Menu Configuration and Basic Menu Operations Basic Configuration of Menu Display Status display When you do not select any of the MODE buttons (PAINT 1, PAINT 2, PAINT 3, SCENE, MAINTENANCE, FUNCTION) of the menu operation block (all unlit), the LCD shows the following status display: On the status display, each item is Shutter... - Page 47 Adjustment display (Paint menu) When you select an item on the initial display of the Paint menu, the lower half of the panel becomes the adjustment display for the selected item. Example: when you select “White” from the initial display The name of the item selected on the 1 / 7 Clear...
- Page 48 Menu Configuration and Basic Menu Operations Monitor output set display (Expansion menu) [WF/PIX Select] When you press on an adjustment display of the Paint menu, the upper half of the panel becomes the monitor output setting display. R/G/B: To independently select the R, WF/PIX Monitor Select G, or B signal.
- Page 49 Function menu displays When you press and light the FUNCTION button of the menu operation block, the scene file operation menu display is obtained. When “Operation” is selected Press v or V to select the desired filter. The number of ND and CC filters you may select depends on the camera.
-
Page 50: Menu Items
Menu Configuration and Basic Menu Operations Menu Items The “Control items” marked with are those assigned to the control knobs. The other items are operated on the menu display. Paint menu Paint menu consists of pages 1 to 7. You can select page 1 through 3 directly by pressing the MODE buttons, PAINT 1, PAINT 2, or PAINT 3. Pressing v or V of the page selected with a MODE button flip pages 1 through 7 in sequence. - Page 51 Page Menu Submenu Control item Function Paint 3 Knee Point R/G/B/Master Adjusts the knee point. Knee Off Turns the knee ON/OFF. Knee Slope R/G/B/Master Adjusts the knee slope. Knee Off Turns the knee ON/OFF. Matrix Matrix 1 R-G/G-B/B-R Adjusts the matrix coefficients. User Matrix Turns the user matrix ON/OFF.
- Page 52 Menu Configuration and Basic Menu Operations Page Menu Submenu Control item Function Paint 5 Detail 2 H/V Ratio Adjusts the HD detail H/V ratio. (Continued) N. Freq Adjusts the HD detail boost frequency. Mix Ratio Adjusts the HD detail mix ratio. Comb Adjusts the HD detail comb.
- Page 53 Page Menu Submenu Control item Function Paint 6 ECS/S-EVS Adjusts the slow-shutter speed. (Continued) Shutter Adjusts the shutter speed. Adjusts the ECS frequency. S-EVS Adjusts the Super EVS. Slow Shutter Turns the slow-shutter mode ON/OFF. Shutter Turns the shutter mode ON/OFF. Turns the ECS mode ON/OFF.
- Page 54 Menu Configuration and Basic Menu Operations Menu 2ndary menu Submenu Control item Function SD Adjusting SD Matrix Matrix 1 R-G/G-B/B-R Set the matrix coefficients. User Matrix Turns the user matrix ON/OFF. Preset Matrix Turns the preset matrix ON/OFF. Matrix Off Turns all the matrixes ON/OFF Matrix 2 R-B/G-R/B-G...
- Page 55 Menu 2ndary menu Submenu Control item Function RCP Config Date/Time Date Year Adjusts the date for the built-in clock of this unit. (Continued) Month Cancel Time Hour Adjusts the time for the built-in clock of this unit. Minute Second Cancel Information Displays the software version of this unit.
- Page 56 Menu Configuration and Basic Menu Operations Function menu Menu Submenu Control item Function Operation Filter Ctrl Selects the filter remote or local mode. ND (1/2/3/4/5) Selects ND filters. CC (A/B/C/D/E) Selects CC filters. Gamma Selects the step gamma. Master Gain Selects the master gain.
-
Page 57: Initial Settings
Adjusting Setting Time By using the RCP Configuration menu or LCD setting Pre- display, you can set the built-in clock of the RCP-750/ CAMERA view 751 and adjust various conditions of the RCP-750/751, Secu- such as the sound volume of the warning buzzer and rity the brightness of the indicators and LCD. -
Page 58: Adjusting The Buzzer Sound
(Master). Adjusting the Buzzer Sound To turn on/off the buzzers independently A buzzer sounds on the RCP-750/751 when it receives Press the corresponding button. When it is lit, the call signal or a panel control is operated. -
Page 59: Adjusting The Brightness Of The Leds
[RE Setting] Press on the RCP Configuration Adjusting the Brightness of the menu to obtain the Rotary Encoder Setting display. LEDs Exit You can adjust the brightness of the LEDs of the panel buttons and camera number/tally indication window. To adjust the brightness, proceed as follows. Rotary Encoder Setting [RCP Adjusting]... -
Page 60: Memory Sticks
Memory Sticks Using a Memory Stick Notes on Memory Stick When a Memory Stick is inserted in the panel, the file On Memory Stick data can be stored on the Memory Stick, which enables you to share data among RCPs. Memory Stick media are available in three sizes: standard size, compact “Memory Stick Duo”... - Page 61 On MagicGate Memory Stick, be sure to use Memory Sticks of a MagicGate is copyright-protection technology that size that can be used with both the RCP-750/751 and uses encryption technology. the camera. Structure of Memory Stick •...
-
Page 62: Specifications
Note Always verify that the unit is operating properly before use. SONY WILL NOT BE LIABLE FOR DAMAGES OF ANY KIND INCLUDING, BUT NOT LIMITED TO, COM- PENSATION OR REIMBURSEMENT ON ACCOUNT OF THE LOSS OF PRESENT OR PROSPECTIVE PROFITS... - Page 63 The material contained in this manual consists of information that is the property of Sony Corporation and is intended solely for use by the purchasers of the equipment described in this manual. Sony Corporation expressly prohibits the duplication of any...
- Page 64 * 3 - 2 0 6 - 9 1 4 - 0 5 * Printed in Belgium Sony Corporation RCP-750/751(SY) 2008.06.08 2002 3-206-914-05(1)