
Related Manuals for AIRTRONICS MT-S


Summary of Contents for AIRTRONICS MT-S
- Page 1 MT- S Telemetry System with Sanwa Synchronized Link Support 2.4GHZ FH4T RADIO SYSTEM USER'S GUIDE ( 90478 )
-
Page 2: Table Of Contents
MT- S Telemetry System with Sanwa Synchronized Link Support 2.4GHZ FH4T RADIO SYSTEM USER'S GUIDE TABLE OF CONTENTS GENERAL Introduction......................3 FUNC Menu ....................26 Liability Statement ..................3 Trim Menu (Servo Trim) ..............26 Packaging......................3 ALB Menu (Anti-Lock Braking) ............27 Safety ........................3 Offset Menu (Throttle Offset) .............29 Service and Support ..................4 TH Type Menu (Throttle Type) ............30 FCC Compliance Statement ..............4... -
Page 3: Introduction
The MT-S is designed for the user who wants more than an entry-level system, but doesn't need a top of the line system. The MT-S falls perfectly between these two extremes, providing true Telemetry capability and Sanwa Synchronized Link (SSL) support, with many additional programming features typically found only in higher end systems, all at a reasonable price that makes the MT-S affordable for most users. -
Page 4: Service And Support
RF Exposure Statement: This transmitter has been tested and meets the FCC RF exposure guidelines when used with the Airtronics accessories supplied or designated for this product, and provided at least 20cm separation between the antenna the user's body is maintained. Use... -
Page 5: 2.4Ghz Frequency Band Precautions
The RX-482 2.4GHz FH4T Super Response SSL receiver features an internal antenna. Do to the internal antenna position, this receiver is not suitable for use in R/C boats. It should be used in R/C cars and trucks only. The MT-S radio system can be used with R/C boats if you use a compatible receiver that features an external antenna, such as the RX-472 2.4GHz FH4T... -
Page 6: System Features
GENERAL The following accessories are included with your MT-S. If an accessory is missing or if any parts appear damaged in any way, please contact the Airtronics or Sanwa service center in your region. For more information, see the Service and Support section on page 4. -
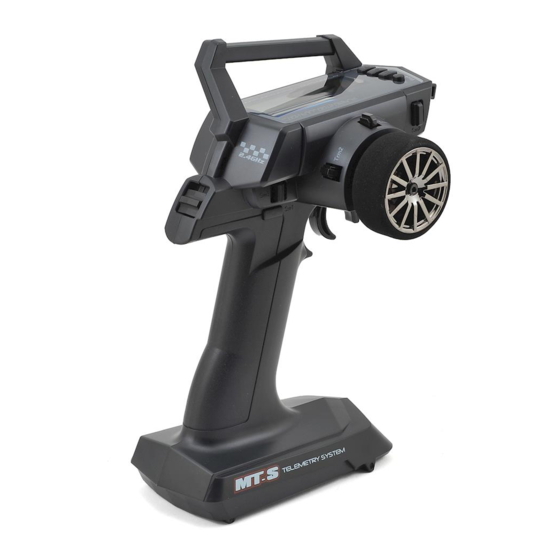
Page 7: Transmitter Overview Diagrams
MT- S Telemetry System with Sanwa Synchronized Link Support 2.4GHZ FH4T RADIO SYSTEM USER'S GUIDE TRANSMITTER OVERVIEW DIAGRAMS GENERAL Use the diagrams in this section to familiarize yourself with the layout of your transmitter. Descriptions of these features can be found in the Transmitter and Receiver Overview Diagram Descriptions section on pages 9 and 10. -
Page 8: Receiver Overview Diagram, Connections And Mounting
Use the diagrams in this section to make receiver connections and to familiarize yourself with the RX-482 2.4GHz FH4T Super Response SSL receiver included with your MT-S radio control system. Descriptions of the features can be found in the Transmitter and Receiver Features Descriptions on the next two pages. -
Page 9: Transmitter And Receiver Overview Diagram Descriptions
MT- S Telemetry System with Sanwa Synchronized Link Support 2.4GHZ FH4T RADIO SYSTEM USER'S GUIDE RECEIVER OVERVIEW DIAGRAM, CONNECTIONS AND MOUNTING GENERAL Mounting Tips: • For the best reception distance possible, the top of the receiver MUST be toward the top of your model (as shown in the illustration on the previous page) and the receiver should be mounted as high as possible in your model. • The receiver can be mounted inside a receiver box, however, when mounting inside a receiver box, the antenna position will be lower and the reception distance may be shorter. -
Page 10: Transmitter Led Condition Indicator And Warning Alarms
TRANSMITTER LED CONDITION INDICATOR AND WARNING ALARMS GENERAL The MT-S is equipped with several different Audible Warning Alarms to warn you of an abnormal transmitter condition. In addition, the LED Condition Indicator is used to indicate various conditions at a glance. -
Page 11: Transmitter Battery Options
GENERAL The MT-S transmitter has a Nominal Input Voltage range of 4.8 to 7.4 volts and an Operating Voltage Range of 4.0 to 9.6 volts. This allows you to use several different battery types, depending on your preference. Use the information below to determine what type of battery to use. -
Page 12: Throttle Trigger Position Adjustment
MT- S Telemetry System with Sanwa Synchronized Link Support 2.4GHZ FH4T RADIO SYSTEM USER'S GUIDE THROTTLE TRIGGER POSITION ADJUSTMENT GENERAL The position of the Throttle Trigger can be adjusted forward or backward to change the feel of the Throttle Trigger during use. Some users may prefer the Throttle Trigger positioned farther forward and some users my prefer the Throttle Trigger positioned farther back. -
Page 13: Programming Keys Overview And Functions
MT- S Telemetry System with Sanwa Synchronized Link Support 2.4GHZ FH4T RADIO SYSTEM USER'S GUIDE PROGRAMMING KEYS OVERVIEW AND FUNCTIONS GENERAL Navigating through the Status screen, Telemetry screen, the various Programming Menus and changing Programming Values is done using the ENTER, UP, DOWN and BACK keys. PRO TIP: While navigating Programming Menus and changing Programming Values, keep the following in mind: (A) To open the PROGRAMMING MENU screen from the STATUS screen or the TELEMETRY screen, press the ENTER key. - Page 14 Press the DOWN and UP keys to switch between the STATUS and TELEMETRY Screens. UP/DOWN Full Telemetry support is available only when used with an Airtronics or Sanwa RX-461 or RX-462 FH4T Telemetry receiver, or when the included RX-482 2.4GHz FH4T Super Response SSL receiver is used along with a Sanwa Super Vortex series ESC.
-
Page 15: Setup Wizard (Car Type Templates)
MT- S Telemetry System with Sanwa Synchronized Link Support 2.4GHZ FH4T RADIO SYSTEM USER'S GUIDE SETUP WIZARD ( CAR TYPE TEMPLATES ) GENERAL The Setup Wizard allows you to quickly and easily program the transmitter based on the type of model you're driving. Eight Car Type Templates are provided. - Page 16 SHR - Use with any brand of Digital servos only (Faster Response Time). SSR - Use with Airtronics or Sanwa Super Response SRG Digital servos only (Fastest Response Time) - FH4T Only. 3) Press the ENTER key, then press the UP or DOWN keys to choose the desired Channel Response Mode value for the selected channel.
-
Page 17: Programming Menu Structure Overview
2.4GHZ FH4T RADIO SYSTEM USER'S GUIDE PROGRAMMING MENU STRUCTURE OVERVIEW GENERAL The MT-S features a PROGRAMMING screen that is accessed by pressing the ENTER key from either the STATUS screen or the TELEMETRY screen. Press ENTER Key The PROGRAMMING screen contains all of the MT-S's various Programming Menus, categorized into six different menus. -
Page 18: Transmitter And Receiver Binding
MT- S Telemetry System with Sanwa Synchronized Link Support 2.4GHZ FH4T RADIO SYSTEM USER'S GUIDE TRANSMITTER AND RECEIVER BINDING GENERAL The Binding function allows you to Bind the transmitter and receiver pair. When new, it is necessary to pair the transmitter and receiver to prevent interference from transmitters operated by other users. -
Page 19: Setting Menu Overview
MT- S Telemetry System with Sanwa Synchronized Link Support 2.4GHZ FH4T RADIO SYSTEM USER'S GUIDE SETTING MENU OVERVIEW SETTING To access the various SETTING menu Programming Menus, turn the transmitter ON, then press the ENTER key to open the PROGRAMMING screen. Press the UP or DOWN keys to highlight the SETTING menu, then press the ENTER key to open the SETTING menu. -
Page 20: Speed Menu (Servo Speed)
MT- S Telemetry System with Sanwa Synchronized Link Support 2.4GHZ FH4T RADIO SYSTEM USER'S GUIDE D / R MENU ( DUAL RATE ) SETTING Changing the Dual Rate Percentage Values, Continued: You are able to adjust the Dual Rate percentage values for the Throttle High Side and the Throttle Brake Side separately by pressing the UP or DOWN keys to highlight the selected Rate percentage value, either RATE TH or RATE BR. -
Page 21: Curve Menu (Adjustable Rate Control)
MT- S Telemetry System with Sanwa Synchronized Link Support 2.4GHZ FH4T RADIO SYSTEM USER'S GUIDE SPEED MENU ( SERVO SPEED ) SETTING Adjusting the Return to Neutral Speed Value: 1) Press the DOWN key to highlight RETURN 0. 2) Press the ENTER key, then press the DOWN key to Decrease the Return to Neutral Speed value. -
Page 22: F/S Menu (Fail Safe)
MT- S Telemetry System with Sanwa Synchronized Link Support 2.4GHZ FH4T RADIO SYSTEM USER'S GUIDE CURVE MENU ( ADJUSTABLE RATE CONTROL ) SETTING Changing the Rate Percentage Value: The Rate percentage value determines the amount of Adjustable Rate Control, either Quick, Mild or Linear (see diagram on the previous page). -
Page 23: Receiver Battery Voltage Fail Safe
MT- S Telemetry System with Sanwa Synchronized Link Support 2.4GHZ FH4T RADIO SYSTEM USER'S GUIDE F / S MENU ( FAIL SAFE ) SETTING Three Fail Safe options are available for each channel as described below: FREE - Fail Safe is Disabled for this channel. Servos can move freely when the signal is lost. HOLD - When Fail Safe Activates, the servo will be held in the last position it was in when the signal was lost. -
Page 24: Base Menu
MT- S Telemetry System with Sanwa Synchronized Link Support 2.4GHZ FH4T RADIO SYSTEM USER'S GUIDE F / S MENU ( FAIL SAFE ) SETTING Setting the Receiver Battery Voltage Fail Safe Function, Continued: 3) Press the ENTER key, then press the UP or DOWN keys to choose the desired Receiver Battery Fail Safe Voltage value. -
Page 25: Sub-T Menu (Servo Sub-Trim)
MT- S Telemetry System with Sanwa Synchronized Link Support 2.4GHZ FH4T RADIO SYSTEM USER'S GUIDE BASE MENU ( SERVO REVERSING, SUB-TRIM AND END POINT ADJUSTMENT ) SETTING SUB-T MENU [ Servo Sub-Trim ] The Sub-Trim function allows you to correct the Neutral Trim setting for the Steering, Throttle, Auxiliary 1 and Auxiliary 2 channels, making it possible to center the Trim Switches while ensuring the servo horns remain centered. -
Page 26: Func Menu
Trim Switch, you can still Trim the Auxiliary 1 channel from within the TRIM menu. The MT-S features Digital Trim Memory. Any amount of Trim that you set during use using the Trim Switches or through the TRIM menu is automatically stored in memory for that specific channel and for that specific model. The Trim values for the selected model will automatically be loaded when the transmitter is turned ON. -
Page 27: Alb Menu (Anti-Lock Braking)
MT- S Telemetry System with Sanwa Synchronized Link Support 2.4GHZ FH4T RADIO SYSTEM USER'S GUIDE FUNC MENU ( TRIM, ANTI-LOCK BRAKE, THROTTLE OFFSET AND THROTTLE TYPE ) SETTING TRIM MENU [ Servo Trim ] In the default configuration, Trim Switch Trm1 and Trm2 move the Steering and Throttle/Brake Trim in 5% increments. If you want to Increase or Decrease the Trim Resolution, see the Changing the Trim Switch Step Value section on page 59. - Page 28 MT- S Telemetry System with Sanwa Synchronized Link Support 2.4GHZ FH4T RADIO SYSTEM USER'S GUIDE FUNC MENU ( TRIM, ANTI-LOCK BRAKE, THROTTLE OFFSET AND THROTTLE TYPE ) SETTING ALB MENU [ Anti-Lock Brake ] Anti-Lock Braking Programming Values can be changed while you're driving by Throttle Assigning these functions to a Trim Switch.
-
Page 29: Offset Menu (Throttle Offset)
MT- S Telemetry System with Sanwa Synchronized Link Support 2.4GHZ FH4T RADIO SYSTEM USER'S GUIDE FUNC MENU ( TRIM, ANTI-LOCK BRAKE, THROTTLE OFFSET AND THROTTLE TYPE ) SETTING ALB MENU [ Anti-Lock Brake ] Changing the Point Percentage Value, Continued: 2) Press the ENTER key, then press the UP or DOWN keys to choose the desired Point percentage value. -
Page 30: Th Type Menu (Throttle Type)
MT- S Telemetry System with Sanwa Synchronized Link Support 2.4GHZ FH4T RADIO SYSTEM USER'S GUIDE FUNC MENU ( TRIM, ANTI-LOCK BRAKE, THROTTLE OFFSET AND THROTTLE TYPE ) SETTING OFFSET MENU [ Throttle Offset ] Selecting the Menu and Channel, Continued: 2) Press the BACK key so that the cursor is flashing over Channel/Options. -
Page 31: Aux Menu Overview
MT- S Telemetry System with Sanwa Synchronized Link Support 2.4GHZ FH4T RADIO SYSTEM USER'S GUIDE FUNC MENU ( TRIM, ANTI-LOCK BRAKE, THROTTLE OFFSET AND THROTTLE TYPE ) SETTING TH TYPE MENU [ Throttle Type ] Selecting the Menu and Channel: 1) From within the SETTING menu, press the UP or DOWN keys to highlight the FUNC menu. -
Page 32: Step Aux Menu (Step Auxiliary)
MT- S Telemetry System with Sanwa Synchronized Link Support 2.4GHZ FH4T RADIO SYSTEM USER'S GUIDE STEP AUX MENU ( STEP AUXILIARY ) The Step Auxiliary function allows you to program the Auxiliary 1 (Channel 3) and Auxiliary 2 (Channel 4) servos to move a defined amount when toggled using an Auxiliary Switch. -
Page 33: Point Aux Menu (Point Auxiliary)
MT- S Telemetry System with Sanwa Synchronized Link Support 2.4GHZ FH4T RADIO SYSTEM USER'S GUIDE STEP AUX MENU ( STEP AUXILIARY ) Changing the Step Auxiliary Position Value, Continued: 3) Press the UP or DOWN keys to choose A1 STEP or A2 STEP, depending on which Auxiliary channel you want to change the Step Auxiliary Position value for. - Page 34 MT- S Telemetry System with Sanwa Synchronized Link Support 2.4GHZ FH4T RADIO SYSTEM USER'S GUIDE POINT AUX MENU ( POINT AUXILIARY ) Choosing the Key Option (Key Assign Function), Continued: 1) Press the ENTER key, then press the UP or DOWN keys to highlight KEY. 2) Press the ENTER key to open the KEY ASSIGN menu, then Assign AUX1 POINT or AUX2 POINT to Auxiliary Switch Sw3 or a Trim Switch (Trim Switch Trm3). For more information, see the KEY ASSIGN Menu section on pages 56 through 60.
-
Page 35: 4Ws Mix Menu (Four Wheel Steering Mixing)
MT- S Telemetry System with Sanwa Synchronized Link Support 2.4GHZ FH4T RADIO SYSTEM USER'S GUIDE 4WS MIX MENU { FOUR WHEEL STEERING MIXING } The Four Wheel Steering Mixing function provides you with two Steering channels. It allows you to control either the Front or Rear Steering independently or Mix the Front and Rear Steering to have Parallel Four Wheel Steering (Crab) or Tandem Four Wheel Steering. - Page 36 MT- S Telemetry System with Sanwa Synchronized Link Support 2.4GHZ FH4T RADIO SYSTEM USER'S GUIDE 4WS MIX MENU { FOUR WHEEL STEERING MIXING } Choosing the Four Wheel Steering Mixing Mode: 1) From within the AUX SET menu, press the BACK key so the cursor is flashing over Channel/Options.
-
Page 37: Moa Mix Menu (Motor On Axle Mixing)
MT- S Telemetry System with Sanwa Synchronized Link Support 2.4GHZ FH4T RADIO SYSTEM USER'S GUIDE MOA MIX MENU { MOTOR ON AXLE MIXING } The Motor on Axle Mixing function provides you with two Throttle channels. It is typically used for Rock Crawlers and allows you to control either the Front and Rear motors together or independently, giving you Dig and Burn functions. - Page 38 MT- S Telemetry System with Sanwa Synchronized Link Support 2.4GHZ FH4T RADIO SYSTEM USER'S GUIDE MOA MIX MENU { MOTOR ON AXLE MIXING } Changing the Motor on Axle Mixing Power Distribution Options: You are able to program OFF (Balanced), Dig and Burn functions by changing the Power Distribution between the Front and Rear motors. 1) From within the AUX SET menu, press the BACK key so the cursor is flashing over Channel/Options.
-
Page 39: Aux Mix Menu (Auxiliary Channel Mixing)
MT- S Telemetry System with Sanwa Synchronized Link Support 2.4GHZ FH4T RADIO SYSTEM USER'S GUIDE AUX MIX MENU { AUXILIARY CHANNEL MIXING } The Auxiliary Channel Mixing function allows you to Mix either Steering Channel 1 or Throttle Channel 2 to Auxiliary 1 (Channel 3) or Auxiliary 2 (Channel 4), while maintaining separate Sub-Trim, EPA, Servo Reversing and other settings. -
Page 40: Code Aux Menu (Code Auxiliary)
MT- S Telemetry System with Sanwa Synchronized Link Support 2.4GHZ FH4T RADIO SYSTEM USER'S GUIDE AUX MIX MENU { AUXILIARY CHANNEL MIXING } Changing the Rate Percentage Value: The Rate percentage value defines how far the Auxiliary 1 (Channel 3) or Auxiliary 2 (Channel 4) servo travels relative to either the Steering servo or the Throttle servo. - Page 41 MT- S Telemetry System with Sanwa Synchronized Link Support 2.4GHZ FH4T RADIO SYSTEM USER'S GUIDE CODE AUX MENU { CODE AUXILIARY } This section details programming the CODE Auxiliary function for both Auxiliary 1 (Channel 3) and Auxiliary 2 (Channel 4), since programming each of them is the same.
-
Page 42: Model Menu Overview
MT- S Telemetry System with Sanwa Synchronized Link Support 2.4GHZ FH4T RADIO SYSTEM USER'S GUIDE CODE AUX MENU { CODE AUXILIARY } Changing the CODE Auxiliary Values, Continued: 3) Press the UP or DOWN keys to highlight which CODE Auxiliary value you want to change. -
Page 43: Model Name Menu (Model Name)
MT- S Telemetry System with Sanwa Synchronized Link Support 2.4GHZ FH4T RADIO SYSTEM USER'S GUIDE MODEL SELECT MENU { MODEL SELECT } MODEL Selecting a Model: 1) From within the MODEL menu, press the UP or DOWN keys to highlight the MODEL SELECT menu. -
Page 44: Model Copy Menu (Copy Model Programming Data)
MT- S Telemetry System with Sanwa Synchronized Link Support 2.4GHZ FH4T RADIO SYSTEM USER'S GUIDE MODEL NAME MENU { MODEL NAMING } MODEL Changing the Model Name, Continued: 3) Press the UP or DOWN keys to move the underscore to the character you would like change. 4) Press the ENTER key, then press the UP or DOWN keys to highlight a character in the Character List. -
Page 45: Model Clear Menu (Clear Model Programming Data)
MT- S Telemetry System with Sanwa Synchronized Link Support 2.4GHZ FH4T RADIO SYSTEM USER'S GUIDE MODEL COPY MENU { COPY MODEL PROGRAMMING DATA } MODEL Copying Model Programming Data, Continued: 4) Press the ENTER key. COPY TO THIS MODEL? NO/YES will be displayed. Press the UP or DOWN keys to highlight YES, then press the ENTER key. All Model-specific Programming Data, including the Model Name will be copied to the highlighted model. If you want to go back and change models or you don't want to Copy the Programming Data for any reason, choose NO or press the BACK key prior to EXECUTING. -
Page 46: Timer Menu Overview
MT- S Telemetry System with Sanwa Synchronized Link Support 2.4GHZ FH4T RADIO SYSTEM USER'S GUIDE TIMER MENU OVERVIEW TIMER To access the various TIMER menu Programming Menus, turn the transmitter ON, then press the ENTER key to open the PROGRAMMING screen. Press the UP or DOWN keys to highlight the TIMER menu, then press the ENTER key to open the TIMER menu. - Page 47 MT- S Telemetry System with Sanwa Synchronized Link Support 2.4GHZ FH4T RADIO SYSTEM USER'S GUIDE LAP MENU { LAP TIMER } TIMER Setting the Interval Timer (Target Time), Continued: 4) To set the Interval Timer Seconds value, press the ENTER key, then press the DOWN key to highlight 00. Press the ENTER key a second time, then press the UP or DOWN keys to set the desired Interval Timer Seconds value.
-
Page 48: Int Menu (Interval Timer)
MT- S Telemetry System with Sanwa Synchronized Link Support 2.4GHZ FH4T RADIO SYSTEM USER'S GUIDE INT MENU { INTERVAL TIMER } TIMER The Interval Timer (Target Time) function notifies you when a set Interval elapses while you are driving, giving you an idea of how close you are to your Target Time. -
Page 49: Down Menu (Countdown Timer)
MT- S Telemetry System with Sanwa Synchronized Link Support 2.4GHZ FH4T RADIO SYSTEM USER'S GUIDE INT MENU { INTERVAL TIMER } TIMER Starting the Interval Timer: 1) In the default configuration, Auxiliary Switch Sw1 controls the Timer function (the Timer function can only be Assigned to Auxiliary Switch Sw1). -
Page 50: Viewing Lap Times
MT- S Telemetry System with Sanwa Synchronized Link Support 2.4GHZ FH4T RADIO SYSTEM USER'S GUIDE DOWN MENU { COUNTDOWN TIMER } TIMER Starting the Countdown Timer: 1) In the default configuration, Auxiliary Switch Sw1 controls the Timer function (the Timer function can only be Assigned to Auxiliary Switch Sw1). -
Page 51: Logger Menu (View Telemetry Data Logs)
00.1 seconds to 45.9 seconds. IMPORTANT: Full telemetry support requires the use of an Airtronics or Sanwa RX-461 or RX-462 FH4T Telemetry receiver and associated Temperature and RPM Sensors, or when the included RX-482 2.4GHz FH4T Super Response SSL receiver is used along with a Sanwa Super Vortex series ESC. -
Page 52: Alert Setting Menu
MT- S Telemetry System with Sanwa Synchronized Link Support 2.4GHZ FH4T RADIO SYSTEM USER'S GUIDE ALERT SETTING MENU { CHANGE TELEMETRY ALERTS } TELEMETRY The ALERT SETTING menu allows you to change the values at which the different Telemetry Alert alarms will sound. For example, you can change the Temperature Alert value for Temperature 1 to alert you when your nitro engine's cylinder head temperature is getting too hot or you can change the Voltage Alert value to alert you when your receiver battery is getting too low for proper servo function. - Page 53 MT- S Telemetry System with Sanwa Synchronized Link Support 2.4GHZ FH4T RADIO SYSTEM USER'S GUIDE TELEMETRY SETTING MENU { CHANGE TELEMETRY SETTINGS } TELEMETRY Turning the Telemetry System ON and OFF, Continued: 2) Press the ENTER key to open the TELEMETRY SETTING menu. ON/OFF ON will be highlighted. 3) Press the ENTER key, then press the UP or DOWN keys to choose the desired option, either ON or OFF.
-
Page 54: Te-Clr (Telemetry Clear Function)
Assigned to Auxiliary Switch Sw1. This function will only work if with an Airtronics or Sanwa RX-461 or RX-462 FH4T Telemetry receiver. In addition, only the TEMP1, TEMP2 and RPM Maximum values will be Reset. The VOLT Maximum value is unaffected. -
Page 55: Bind Menu (Bind, Modulation Type And Ch Response)
The Modulation Type function allows you to choose the transmitter Modulation Type. The Modulation Type should be changed to match the receiver you're using. For example, if you use an Airtronics or Sanwa 2.4GHz FH3 surface receiver with your transmitter, you would need to change the Modulation Type to FH3. The Modulation Type should be chosen prior to Binding the transmitter and receiver pair. -
Page 56: Key Assign Menu
SHR and SSR Channel Response Modes should only be used with Digital servos. While the SHR Channel Response Mode can be used with any brand of Digital servo, the SSR Channel Response Mode should ONLY be used with Airtronics or Sanwa Super Response SRG Digital servos. -
Page 57: Auxiliary Switch Function Assignments
MT- S Telemetry System with Sanwa Synchronized Link Support 2.4GHZ FH4T RADIO SYSTEM USER'S GUIDE KEY ASSIGN MENU { KEY ASSIGNMENTS } SYSTEM Auxiliary Switch Function Assignments The Auxiliary Switch Assign function allows you to Assign various functions to the three Auxiliary Switches Sw1, Sw2 and Sw3. This allows you to use the Auxiliary Switches to control various functions while you're driving. - Page 58 MT- S Telemetry System with Sanwa Synchronized Link Support 2.4GHZ FH4T RADIO SYSTEM USER'S GUIDE KEY ASSIGN MENU { KEY ASSIGNMENTS } SYSTEM Changing the Switch Mode: Some functions allow you to change how Auxiliary Switch Sw1 operates. The following Switch Modes are available: TOGGLE - When selected, press Auxiliary Switch Sw1 to turn the function ON and press Auxiliary Switch Sw1 a second time to turn the function OFF.
-
Page 59: Trim Switch Function Assignments
MT- S Telemetry System with Sanwa Synchronized Link Support 2.4GHZ FH4T RADIO SYSTEM USER'S GUIDE KEY ASSIGN MENU { KEY ASSIGNMENTS } SYSTEM Trim Switch Function Assignments The Trim Switch Assign function allows you to Assign various functions to the three Trim Switches Trm1, Trm2 and Trm3. This allows you to use the Trim Switches to control those functions while you're driving. -
Page 60: Buzzer Menu (Audible Key Tones)
MT- S Telemetry System with Sanwa Synchronized Link Support 2.4GHZ FH4T RADIO SYSTEM USER'S GUIDE KEY ASSIGN MENU { KEY ASSIGNMENTS } SYSTEM Changing the Trim Switch Direction of Travel: The direction that the Trim Switches move the servos or function parameter values can be changed from Normal to Reverse. In Normal mode, the Trim Switches will move the servos toward the High Side or Increase function values when the Trim Switches are pushed Forward. - Page 61 BATTERY MENU { TRANSMITTER LOW VOLTAGE ALERT AND LIMIT ALARMS } SYSTEM The MT-S transmitter features two different programmable Low Voltage alarms. ALERT VOLT - The Low Voltage Alert alarm will sound to indicate the transmitter batteries are getting low and should be replaced or recharged.
-
Page 62: Lcd Menu (Lcd Contrast And Backlight Options)
MT- S Telemetry System with Sanwa Synchronized Link Support 2.4GHZ FH4T RADIO SYSTEM USER'S GUIDE BATTERY MENU { TRANSMITTER LOW VOLTAGE ALERT AND LIMIT ALARMS } SYSTEM Changing the Low Voltage Limit Alarm Value (Custom), Continued: 2) Press the ENTER key, then press the UP or DOWN keys to choose the desired Limit Voltage value. -
Page 63: Vr Adjust Menu (Control Calibration)
MT- S Telemetry System with Sanwa Synchronized Link Support 2.4GHZ FH4T RADIO SYSTEM USER'S GUIDE LCD MENU { LCD CONTRAST AND BACKLIGHT OPTIONS } SYSTEM Changing the LCD Backlight On-Time: The LCD Backlight On-Time determines how long the LCD Backlight will stay ON before turning OFF automatically. 1) From within the LCD menu, press the UP or DOWN keys to highlight LIGHT-TIME 10sec. -
Page 64: And Rx-462 Receiver Telemetry Connections
Temperature Sensors and an RPM Sensor (available separately) can be connected and installed in your model to view RPM, Temperature and Receiver Voltage Telemetry Data on the MT-S transmitter's TELEMETRY screen. IMPORTANT: The information in this section only pertains if you are using an Airtronics or Sanwa RX-461 or RX-462 2.4GHz FH4T Telemetry receiver and associated Telemetry Sensors with your MT-S transmitter. -
Page 65: Troubleshooting Guide
Quickly press ENTER key in BIND menu after releasing receiver Bind Button receiver Bind Button Attempting to Bind incompatible receiver Use only Airtronics or Sanwa 2.4GHz FH3, FH4 or FH4T surface receivers Using Electronic Speed Control (ESC) Disconnect ESC and use dry cell battery for Binding... -
Page 66: Glossary Of Terms
VR Adjust function expected CODE Auxiliary function does not work Must use Airtronics or Sanwa receiver and accessories Using incorrect receiver and/or Accessories that support Sanwa Synchronized Link (SSL) Cannot control Auxiliary functions... - Page 67 Fail Safe: Automatically moves the servos to a predetermined position in the event that the signal between the transmitter and the receiver is interrupted, whether due to signal degradation or low transmitter battery. FH3 Modulation: Frequency Hopping 3rd generation FHSS technology. FH3 Modulation is used in newer-generation Airtronics and Sanwa radio control systems, such as the M11X and MX-3X.
- Page 68 00':00".00 (Minutes : Seconds : 1/100th of a Second). Latency: The Response Time between the transmitter and receiver. The MT-S and 2.4GHz FH4T Super Response SSL receiver combination offer an incredibly fast Response Time, making you feel more connected to your model than ever.
- Page 69 Do not use with Analog servos! SSR Channel Response Mode: When used with Airtronics or Sanwa Super Response SRG Digital servos, this will provide the fastest Response Time. This results in the ultimate feel and response, making you feel more in control of your model than ever.
-
Page 70: Notes
Wrist Strap Anchor: Used to attach the wrist strap anchor to the transmitter. Z-Connector: The type of servo and battery connector used by Airtronics and Sanwa. The Z-Connector is a universal connector which is electronically compatible with the components of other radio control system manufacturers. - Page 71 MT- S Telemetry System with Sanwa Synchronized Link Support 2.4GHZ FH4T RADIO SYSTEM USER'S GUIDE NOTES REFERENCE...
- Page 72 MT- S Telemetry System with Sanwa Synchronized Link Support 2.4GHZ FH4T RADIO SYSTEM USER'S GUIDE Airtronics is Imported Exclusively in North America by: Global Hobby Distributors 18480 Bandilier Circle Fountain Valley, CA 92708 Telephone: (714) 963-0329 Fax: (714) 964-6236 Email: service@airtronics.net http://globalservices.globalhobby.com...
Need help?
Do you have a question about the MT-S and is the answer not in the manual?
Questions and answers