Nortel 1210 User Manual
1200 series
Hide thumbs
Also See for 1210:
- User manual (120 pages) ,
- Reference manual (6 pages) ,
- Quick reference card (2 pages)

Related Manuals for Nortel 1210


Summary of Contents for Nortel 1210
- Page 1 Nortel IP Phones 1200 Series SIP User Guide Release: 1.0 Document Revision: 01.00 www.nortel.com NN30001-001...
- Page 2 CONDITION OF ANY KIND, EITHER EXPRESS OR IMPLIED. The information and/or products described in this document are subject to change without notice. Nortel, Nortel Networks, the Nortel logo, and the Globemark are trademarks of Nortel Networks. All other trademarks are the property of their respective owners.
-
Page 3: Table Of Contents
EMC ...........................6 Safety..........................6 Other ...........................6 Introduction..................7 IP Phone 1200 Series ..................7 Basic Features....................8 IP Phone 1210 ......................8 IP Phone 1220 ......................9 IP Phone 1230 ......................10 Installing Your IP Phone ................11 Phone Components....................11 Attaching the Foot Stand (optional) ................13 Connecting the Handset .....................13... - Page 4 Call Forwarding ......................27 Reset Phone.......................29 Web Configuration..................31 General........................32 Phone Configuration....................33 Phonebook ........................36 Change Password ......................38 Auto-Configuration ..................39 Using Your IP Phone ............... 40 Making Calls....................40 Answering Calls....................42 Rejecting an Incoming Call................43 Placing Calls on Hold ..................43 Retrieving a call from hold: ..................44 Activating Mute....................
- Page 5 Handsfree......................51 Headset ......................51 Adjusting Volume.................... 52 Instant Messages (IM)..................52 Call Logs ......................53 Book Settings ....................53 Speed Dialing ....................55 Managing Speed Dial Entries ..................56 Log In / Log Out Settings................58 Login.........................58 Logout........................59 Upgrade .................... 60 Using your phone’s Web Interface ..............
-
Page 6: Regulatory And Safety Information
Regulatory and Safety Information • United States: FCC 47 CFR Part 15 Class B • Canada: ICES-003 Class B • Australia/New Zealand: CISPR 22 • European community: – EN55022 Class B – EN 55024 – EN 61000-3-2 – EN 61000-3-3 •... -
Page 7: Introduction
IP Phone 1200 Series Your IP Phones 1200 series include three models, namely IP Phone 1210, IP Phone 1220 and IP Phone 1230. The choice of the three phone models enables you to choose the functionality and price that is just right for your business use. -
Page 8: Basic Features
Basic Features IP Phone 1210 The IP Phone 1210 is the entry-level deskset in the exciting IP Phone 1200 Series that comes pre-programmed with key features used by today’s businesses. It is a standard-level desktop phone for basic communication needs. -
Page 9: Ip Phone 1220
IP Phone 1220 The IP Phone 1220 is one of the desksets in the exciting IP Phone 1200 Series that comes pre-programmed with key features used by today’s businesses. The IP Phone 1220 is an intermediate-level desktop that is ideally positioned for office workers with moderate call activity. -
Page 10: Ip Phone 1230
IP Phone 1230 The IP Phone 1230 comes pre-programmed with key features used by today’s businesses. It is a premium-intermediate deskset and is best suited for power users with advanced communication needs, users such as managers, knowledge workers and administrative assistants. The phone includes the following features: •... -
Page 11: Installing Your Ip Phone
Installing Your IP Phone Phone Components This section details the steps and precautionary measures to perform during the installation of your IP Phone. The standard package includes the following accessories: • Foot Stand • Handset • Handset Cord • 2.1 meters (7 feet) CAT5e Ethernet Cable •... - Page 12 Figure 1: Connections on an IP Phone 1200 Series IP Phone 1200 SIP User Guide...
-
Page 13: Attaching The Foot Stand (Optional)
Attaching the Foot Stand (optional) Attach the foot stand in the appropriate slots depending on the desired angle for your IP Phone. If you insert the foot stand into the upper slots, your IP Phone sits at a 25-degree angle. If you insert the foot stand into the lower slots, your IP Phone sits at a 55-degree angle. -
Page 14: Connecting Ac Power (Optional)
Connecting AC Power (optional) Your IP Phone supports AC power and Power over Ethernet (PoE). For AC power, use only the Nortel-approved Global Power Supply (N0146475) and the country-specific IEC cable that you can order separately. To use PoE, your connected LAN must support PoE. -
Page 15: Wall Mounting (Optional)
Wall Mounting (Optional) You can install your IP Phone on a wall. Wall-mount the IP Phone using the two keyholes on the back of the IP Phone. You do not need the foot stand for wall- mounted applications. 1. Remove the foot stand, if already attached. 2. -
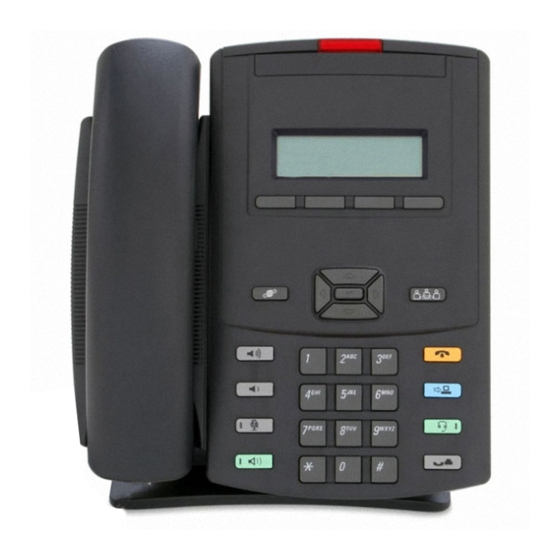
Page 16: Description Of Keys And Components
Description of Keys and Components You should look at the following figures to understand the locations of the keys and components on your IP Phone 1210, 1220 or 1230. For a description of the keys and components on your IP Phone, look at Table 1 –... - Page 17 Figure 2: IP Phone 1210 IP Phone 1200 SIP User Guide...
- Page 18 Figure 3: IP Phone 1220 IP Phone 1200 SIP User Guide...
- Page 19 Figure 4: IP Phone 1230 IP Phone 1200 SIP User Guide...
- Page 20 (These user defined line keys are not available on the IP Phone 1210, whereas there are ten line keys in IP Phone 1230 four in IP Phone 1220) Shows the call information and phone status icons and Display Screen guides you while using features.
- Page 21 press this key to back up one level to the previous display. Quit: To close an active menu or dialog box. Pressing the Quit key does not affect the state of active calls. Message: To open your Voicemail box. For more information about mailbox options, refer to Voicemail.
- Page 22 Press the Mute key to listen to the receiving party without transmitting audio. Press the Mute key again to return to two-way conversation. The Mute LED indicator on the Mute Mute key key flashes to indicate that the microphone is muted. The microphone remains muted for your current call and all other calls until you press the Mute key again to turn the microphone on.
-
Page 23: Configuring Your Ip Phone
Configuring Your IP Phone Once your telephone is connected to the LAN, you need to configure it. You also may need to modify the configuration from time to time. There are three ways of doing this: • You may use menus that are accessible on the telephone’s LCD (Local Configuration) •... -
Page 24: Tones Setting
Tones Setting You may customize your call and ringer tones according to your preference as explained below: • Setting Call Processing Tone Use the following procedure to set your preferred country specific call processing tones: o Press the Services key and press the Setup softkey. o Now select Config, followed by Phone softkey. -
Page 25: Time Zone
o Now select Config, followed by Phone softkey. o Press Tones, followed by Route softkey option. o Choose whether to enable or disable the routing tone by pressing On or Off. o Further confirm your selection by pressing Yes or No. Time Zone Use the following procedure to set your time zone: o Press the Services key and select Setup softkey. -
Page 26: Line Name
• Default You may set your time as given by default network servers. By selecting this option, your phone retrieves time from phone’s default time servers. The procedure is as follows: o Press the Services key and select Setup. o Select Time softkey, followed by Server option and further select Deflt. -
Page 27: Auth Id
o Press Enter to save. Auth ID Use the following procedure to set your auth ID: o Press the Services key and select Setup. o Select Config softkey, followed by Lines. o Use the Up/Down navigation key to scroll and choose a line by pressing Select softkey. - Page 28 • Set Call Forwards Use the following procedure to set call forwarding: o Press the Services key and press the Setup softkey. o Now select Config and Lines. o Use the Up/Down navigation keys to scroll and Select the line on which you wish to set call forwarding.
-
Page 29: Reset Phone
Reset Phone • Phone You have an option to reset (or reboot) your phone anytime you want without changing your phone settings, by following the procedure below: o Press the Services key and select Setup softkey. o Now select Reset, followed by Phone softkey. o Select Yes to confirm or No to cancel and go back to the welcome page. - Page 30 o Select Yes to confirm or No to cancel. o To abort and go back to the previous menu, press Services key. o Your phone restarts with factory default settings if you press Yes. NOTE: If your phone is in a network from which it automatically picks up auto-configuration, the phone may first restore defaults, reboot, and then proceed to auto-configure.
-
Page 31: Web Configuration
Web Configuration There are several areas to configure on the website, all reachable through links on the main page at http://<network address>/, where <network address> is the network address of your telephone, e.g., 10.0.0.167. You can determine what this address is by pressing the Services key on the phone. The address is displayed momentarily on the phone’s LCD. -
Page 32: General
General After logging onto your IP phone’s web interface, the initial display on your computer screen appears as follows: IP Phone 1200 SIP User Guide... -
Page 33: Phone Configuration
Phone Configuration The phone-configuration page contains basic settings and features that a user initially sets up and might want to change from time to time. A part of your page looks as follows: • When the Enable Do Not Disturb feature is checked, your telephone does not receive any incoming call. - Page 34 • You can control whether your telephone beeps when it receives an Instant Message, by checking Enable IM Beep Alert. • When Blink Light on Incoming Calls checkbox is checked, the light at the top of the telephone starts blinking whenever there is an incoming call. •...
- Page 35 The next part of the Phone Configuration page allows you to configure attributes that are specific to time. It looks as follows: • Your telephone contacts a time server to determine what time and date it is. There are two ways it determines which servers to contact: 1.
-
Page 36: Phonebook
Phonebook From this page you can Load a phonebook from your PC as a text file that you created through some other means, or add numbers on the Phonebook web page. Click the Browse button to import the File to be uploaded on your phone, and click the OK button. - Page 37 The phonebook page looks as follows: IP Phone 1200 SIP User Guide...
-
Page 38: Change Password
Change Password On this page you specify the admin and user passwords that grant access to your telephone's website. The website access admin password is the same as the phone LCD admin password. The LCD menu does not have a user password. -
Page 39: Auto-Configuration
Auto-Configuration Your phone may be auto configured. Please contact the administrator of your telephony system to enable this for you. IP Phone 1200 SIP User Guide... -
Page 40: Using Your Ip Phone
Using Your IP Phone This section provides information about features and functionality of IP Phones 1210, 1220, and 1230. Making Calls To talk to another party, you may use one of the various methods of dialing on your phone interface, as follows:... - Page 41 When unregistered - not possible (only Uri dialing) Manually entering number When registered - Enter number > Dial softkey Note: When there is Dial Plan configured on your phone, the call is placed as soon as the phone recognizes a valid phone number. Without picking up the Handset (ON HOOK) and without pressing Handsfree / Headset buttons and without pressing any Line Key, do one of the following-...
-
Page 42: Answering Calls
METHOD PROCEDURE When unregistered - Redial > Up/Down > Dial softkey / Redial Feature Key From Redial list When registered - Redial > Up/Down > Dial Softkey / Line Key / Redial Feature Key When unregistered- Book > Up/Down > Dial softkey From Phone book When registered - Book >... -
Page 43: Rejecting An Incoming Call
• Pick up the handset or press Handsfree / Headset button. • Press the Line Key on which the call is received. • To answer another incoming call on the same line, either press the Flash softkey or the Accept softkey. •... -
Page 44: Retrieving A Call From Hold
• Press the Hold button to hold an active call; “Hold: <callee number>” (without angular brackets) is displayed on your phone’s LCD, whereas “Held: <caller number>” is displayed on the called party’s LCD. • Press the Flash softkey to make some other call when there is already an active call, thereby putting the former call on hold. -
Page 45: Call Waiting
• Press the Line button of the line on which you want to disconnect the call. • In handset mode, place the handset back in the cradle. • An intercom call ends automatically after a configurable timeout (15 seconds by default), except when the receiver of the call turns it into a regular call. -
Page 46: Caller Id And Call-Waiting Caller Id
Note: When there are two calls already running on a single line and there is an incoming call on the same line, the call goes to voicemail if voicemail is enabled. If voicemail is not enabled, the caller gets a busy response. This behavior, however, changes if multiple Line keys are assigned to the same line. -
Page 47: Call Forwarding
Cfna) next to your Line key icon, instead of the line name/number. When call forwarding is set on an IP Phone 1210, the phone displays your selected call forwarding mode (Cfb / Cfu / Cfna) on the left side of second information line. -
Page 48: Auto Dial
call back the last caller. This feature is not available natively from the phone if * feature codes are turned off in the phone’s configuration. Auto Dial Your IP Phone supports a feature by which you can get a number configured on your phone from your telephony administrator on which you wish to dial automatically when you Pick up the Receiver, press the Line Key or press the Handsfree / Headset button. -
Page 49: Conferencing
Conferencing Conference feature allows more than two phones to converse with each other at the same time. Conference can be done in one of two ways: up to 3-way conferencing performed natively on the telephone, or n-way conferencing using a conferencing server. -
Page 50: Call Pickup
Call Pickup You may pick-up an incoming call ringing at some other phone. This may be done in either of two ways: • Go off-hook, press the Right Navigation Key, press Pkup softkey, and then enter the number of the phone that has an active incoming call on it (ringing). -
Page 51: Group Page
To make an intercom call, Select the Line from which you wish to call, press the Applications (Intercom) key, and Dial the number that you want to call. The call automatically gets picked up at the other end. Intercom invocation has three methods. -
Page 52: Adjusting Volume
• To switch to your headset when you are on a handset call, press Headset key and place the handset back on the cradle. Lift the handset and press Headset key again to switch back. • To switch to your headset when you are on a Handsfree call, press Headset key. -
Page 53: Call Logs
OPERATION PROCEDURE Reading A Message Services > IM > Read > Up/Down Services > IM > Write + Enter > Select a Book/Logs Writing A Message entry or Enter digits using dialpad > Send/ Press a Line Key Turning Beep On/Off Services >... - Page 54 o Press Enter to accept displayed number, or enter/edit Name and press Enter. o Enter Speed dial index if you wish to add as a speed dial, else leave blank, and press Enter to save. • Delete a Contact You may delete a contact from your phonebook by the following procedure: o Select Book softkey or press Directory Feature key, followed by Up/Down navigation keys to scroll through your phonebook list and...
-
Page 55: Speed Dialing
You may also save a number from your call logs, the procedure for which is given below: o Press Services key and select Logs. o Choose amongst In/Out/Missed softkey options. o Use Up/Down navigation keys to scroll through the call list and select Save softkey when you reach the number you wish to add into your phonebook. -
Page 56: Managing Speed Dial Entries
index numbers assigned to them. So if you assign index numbers 1, 4, and 5, the speed dial list will show them as 1, 2, and 3. You may also assign the same index number to multiple speed dial entries. The speed dial entries with same index number will appear on your speed dial list sorted according to the alphabetical order of their display name. - Page 57 o Enter Speed dial index (if you want to add it as a speed dial, else leave it blank) and press Enter to save. o To go back to the previous menu, simply press Services key. • To Save an Entry from Call Logs as Speed Dial You may save a number from your call logs by following the procedure below on your phone interface: o Press Services key, select Logs followed by In/Out/Missed softkey...
-
Page 58: Log In / Log Out Settings
• To Remove an Entry from Speed Dial and Save in Book You may remove an entry from your speed dial line key and still store it in your phonebook by following the procedure below: o Select Book softkey, followed by Up/Down navigation keys to scroll through your phonebook list and select Edit when you reach the entry you wish to change. -
Page 59: Logout
o Now assign a user id if a new line is selected or edit the previous user id if line selected is an already registered line, and press Enter to continue. o Type in a Password and press Enter. o Enter registrar Uri and press Enter to save. After logging in, you will find the icon next to the line key changes to <User Name>... -
Page 60: Upgrade
Upgrade tab. Updated software for your telephone may be obtained directly from Nortel or through your distributor. On pressing Upgrade, your phone will automatically look for available software updates and upgrade to new available software. -
Page 61: Glossary
Glossary Cradle The depression in the base of your telephone where the handset is placed when not in use DHCP Server A service provided by a device on the network that assigns network addresses to other devices, such as your telephone and computer. Fixed Keys The hard-labeled keys on your IP Phone Goodbye Key... - Page 62 Liquid Crystal Display Light Emitting Diode. A semiconductor used as a visual indicator. Navigation Key Keys used to scroll through menus and lists appearing on the LCD. Network Address IP address. Uniquely identifies a device on the network. Used for routing information to that device.
- Page 63 SIP Proxy Server A device on the network that acts on behalf of your telephone, translating and routing call-control messages SIP Registrar A device on the network that manages user-location information SIP Uri Analogous to a telephone number, e.g. SIP:rhood@example.net. In fact, a URI may contain what at least appears to be a telephone number, e.g., sip:+14085550100@172.16.0.222.
Need help?
Do you have a question about the 1210 and is the answer not in the manual?
Questions and answers