Table of Contents
Advertisement
Owner's Manual
254 mm (10 in.) Stationary
TABLE SAW
Model No.
315.272350
Save this manual for
future reference
CAUTION:
Read and follow all Safety
Rules and Operating Instructions before first
use of this product.
Customer Help Line: 1-877-369-8665
Sold by: Sears Canada Inc. Toronto M5B 2B8
Visit the Craftsman web page: www.sears.com/craftsman
972000-783
10-02
• Safety
• Features
• Assembly
• Operation
• Maintenance
• Parts List
C
R
US
Advertisement
Table of Contents

Related Manuals for Craftsman 315.272350


Summary of Contents for Craftsman 315.272350
-
Page 1: Table Saw
Read and follow all Safety Rules and Operating Instructions before first • Operation use of this product. • Maintenance Customer Help Line: 1-877-369-8665 • Parts List Sold by: Sears Canada Inc. Toronto M5B 2B8 Visit the Craftsman web page: www.sears.com/craftsman 972000-783 10-02... -
Page 2: Table Of Contents
WARRANTY FULL TWO YEAR WARRANTY ON CRAFTSMAN TABLE SAW If this Table Saw fails to operate within two years from the date of purchase, return it to the nearest Sears Canada Inc. (“Sears”) store and “Sears” will repair it, free of charge. -
Page 3: Table Of Contents
Making a Large Panel Cut ..........................39 Making a Non-Through Cut .......................... 39 Making a Dado Cut ............................40 Maintenance ..............................41 Lubrication ..............................41 Troubleshooting ............................42-44 Exploded View and Repair Parts List ...................... 46-63 Parts Ordering / Service ........................back page ® TABLE SAW 315.272350... -
Page 4: Rules For Safe Operation
DO NOT leave tools or pieces of wood on the tentionally contacted. saw while it is in operation. ® TABLE SAW 315.272350... - Page 5 WARNING: When servicing, use only identical Use only a cord heavy enough to carry the Craftsman replacement parts. Use of any other current your product will draw. An undersized parts may create a hazard or cause product cord will cause a drop in line voltage resulting in damage.
-
Page 6: Rules For Safe Operation
Blade coasts after being turned off. loan someone this tool, loan them these instruc- ALLOW THE MOTOR TO COME UP TO FULL tions also. SPEED before starting a cut to avoid blade binding or stalling. SAVE THESE INSTRUCTIONS ® TABLE SAW 315.272350... -
Page 7: Electrical
Figure 1. It also has a grounding pin like the one shown. ELECTRICAL CONNECTION Your Sears Craftsman Table Saw is powered by a precision built electric motor. It should be connected to a power supply that is 120 volts, 60 Hz, AC only (normal household current). -
Page 8: Glossary And Product Specifications
Table Size without table extensions 20 in. x 27 in. Cutting Capacity with Miter at 0°/Bevel 0°: 3-3/8 in. Table Size with table extensions 44 in. x 27 in. Cutting Capacity with Miter at 0°/Bevel 45°: 2-1/4 in. ® TABLE SAW 315.272350... -
Page 9: Unpacking And Accessories
Such chemicals can weaken or destroy plastic. ACCESSORIES FOR A COMPLETE SELECTION OF ACCESSORIES FOR THIS AND OTHER DO NOT EXPOSE CRAFTSMAN POWER AND BENCH TO RAIN OR USE IN TOOLS, VISIT YOUR NEAREST SEARS DAMP LOCATIONS RETAIL STORE. ®... -
Page 10: Loose Parts List
M. Motor ..............1 (Shown Separately) ..........1 N. Motor Mounting Plate Y. Hardware for Blade Guard Bracket and (Hardware Shown Separately) ......1 Blade Guard Assembly (Shown Separately) ..1 Z. Owner’s Manual (Not Shown) ....... 1 ® TABLE SAW 315.272350... -
Page 11: Small Parts List
(5/16-18) ..........4 flat washer (#10) ..........4 Fig. 2 b W. Hardware for Table Extensions ......1 hex bolt (5/16-18 x 1 in.) ........8 flat washer (5/16 in.) ........16 hex nut (5/16-18) ..........8 ® TABLE SAW 315.272350... -
Page 12: Small Parts List
(#8-32 x 1/2 in.) ........2 Fig. 2 c Note: Cord clip and screw mount to the either side of saw cabinet and are used to secure motor cord, depending upon operator preference of switch assembly. ® TABLE SAW 315.272350... -
Page 13: Tools Needed
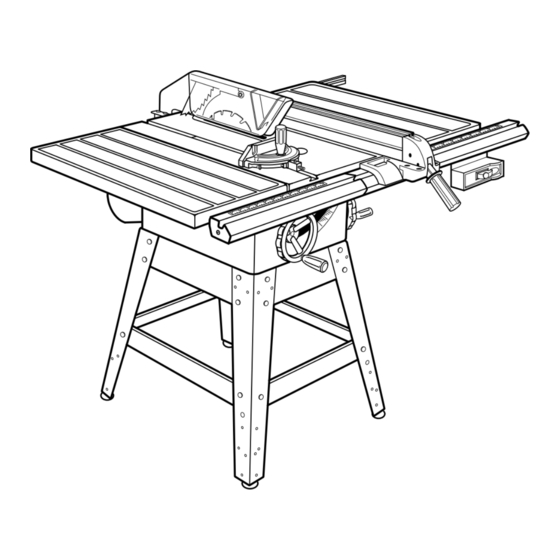
8 mm, 10 mm, and 12 mm HEX KEYS (PROVIDED) 2 mm, 3 mm, 4 mm, 5 mm, and 6 mm COMBINATION SQUARE HAMMER ° TRIANGLE WRENCHES: 8 mm, 10 mm, and 12 mm ADJUSTABLE WRENCH FRAMING SQUARE Fig. 3 ® TABLE SAW 315.272350... - Page 14 EXTENSION MITER BLADE GAGE GROOVE SCALE TABLE EXTENSION FRONT RAIL MITER GAGE SWITCH BEVEL WITH KEY HANDWHEEL BEVEL RIP FENCE SCALE HANDLE HEIGHT HANDWHEEL LEG STAND BELT COVER LEVELING FOOT BEVEL LOCK HANDLE MOTOR Fig. 4 ® TABLE SAW 315.272350...
-
Page 15: Features
V-belt drive, and is housed in a sturdy steel of the workstand shows the exact blade angle. base. BLADE - This saw is provided with a Craftsman 64 RAILS - Front and rear rails provide support for large tooth, 10 in. steel blade. The blade is adjusted with workpieces and the rip fence. -
Page 16: Assembly
TABLE SAW BASE UPPER BRACE WASHER WASHER HEIGHT HEX NUT HANDWHEEL SHAFT END SCREW Fig. 5 CARRIAGE BOLT HEX NUT LOWER BRACE WASHER HEX NUT LEVELING FOOT Fig. 6 ® TABLE SAW 315.272350... -
Page 17: Mounting The Leg Stand On The Table Saw Base
Use the same steps to install the lower braces. braces. Make sure the Craftsman label faces the Tighten all hex nuts with a 12 mm wrench. front of the saw (same side as height handwheel). -
Page 18: Assembling Table Extensions
Get help to stand saw assembly upright using the and right front pieces first. Align and secure these center saw table. Do not grasp saw by extensions. pieces, then use the connectors provided to secure left rear and left front pieces. ® TABLE SAW 315.272350... -
Page 19: Installing The Rear Rail
Put the end caps on rail ends. Insert the screws and tighten with a phillips head screwdriver. TABLE SLOT EXTENSION REAR RAIL END CAP REAR RAIL HEX NUT SQUARE SCREW FLAT REAR OF SAW Fig. 13 HEAD BOLTS WASHER Fig. 11 ® TABLE SAW 315.272350... -
Page 20: Installing The Front Rail
Place the switch out of the TABLE immediate work area to avoid accidentally EXTENSION turning it off during operation. SAW TABLE TABLE EXTENSION RAIL SLOT FRONT RAIL SWITCH SLOT 7-1/8 in. MARK SWITCH RIGHT SCALE WITH KEY FRONT RAIL Fig. 15 ® TABLE SAW 315.272350... -
Page 21: Aligning Rip Fence And Rails
RODS HOOK OVER Fig. 16 REAR RAIL HERE REAR RAIL TO INSTALL SCALE INDICATOR ON LEFT SIDE MOTOR MOTOR BRACKET SUPPORT RIP FENCE ASSEMBLY FRONT RAIL FLAT WASHER 1 in. HEX BOLTS Fig. 18 Fig. 17 ® TABLE SAW 315.272350... -
Page 22: Installing The Belt And Belt Guard
2 mm SETSCREW MOTOR SUPPORT FRAMING SQUARE HEX KEY ASSEMBLY THROAT PLATE FLAT HEAD SCREW TABLE TOP BELT MOTOR HEIGHT PULLEY HANDWHEEL MOTOR SCREWS Fig. 19 BEVEL HANDWHEEL Fig. 21 ® TABLE SAW 315.272350... -
Page 23: Installing The Blade Guard
FLAT Securely tighten with a 5 mm hex key. RIVING WASHER KNIFE Raise the blade all the way up. BLADE CRADLE GUARD BRACKET ANTI-KICKBACK PAWLS LOCK WASHER Fig. 24 BOLT Fig. 22 ® TABLE SAW 315.272350... -
Page 24: Aligning The Riving Knife With The Blade
Securely tighten the screw with a 5 mm hex key. RIVING KNIFE RIVING KNIFE BLADE THROAT TABLE PLATE FRAMING SQUARE BLADE FRAMING SQUARE Fig. 25 TOP VIEW OF SAW WITH RIVING KNIFE SHOWN CENTERED OVER BLADE Fig. 27 ® TABLE SAW 315.272350... -
Page 25: Check Heeling (Paralleling) Of The Saw Blade To The Miter Gage Groove
FRAMING needed. SQUARE If the distances measured are different, adjust the table bracket underneath the saw. See “Heeling (Paralleling) The Sawblade To The Miter Gage Groove” in the Adjustments sec- tion. MITER GAGE GROOVE Fig. 29 ® TABLE SAW 315.272350... -
Page 26: Checking Rip Fence And Blade Alignment
RIP FENCE Note: To insure proper self alignment when position- ing rip fence, push sides of scale indicator housing against front rail before locking rip fence handle. SCREWS RIP FENCE HANDLE Fig. 32 ® TABLE SAW 315.272350... -
Page 27: Checking Squareness Of Extension Tables To Saw Table
Raise or lower extension table until it is square with the saw table. Tighten hex nuts securely. Check extension table on opposite side of blade. EXTENSION EXTENSION Repeat the above procedure if necessary. TABLE TABLE Fig. 33 ® TABLE SAW 315.272350... -
Page 28: Adjustments
Securely tighten the screw. If the throat plate is not flush with the table, adjust the setscrews with a 2 mm hex key. Do not allow the throat plate to bow up above the table surface. ® TABLE SAW 315.272350... -
Page 29: Heeling (Paralleling) The Sawblade To Miter Gage Groove
If the blade was too far from the miter gage groove, distances are the same, the blade and the miter move the rear bracket toward the miter gage gage groove are parallel. No adjustments are groove. Tap with a block of wood and hammer. needed. ® TABLE SAW 315.272350... -
Page 30: Setting The Bevel Stops And Indicator
Tighten the 90° stop screw and recheck that the blade is square in a 90° position. If not, repeat. When the blade is square, check the scale indica- tor. If it is not at zero, reset the scale indicator as before. ® TABLE SAW 315.272350... -
Page 31: Adjusting The Miter Gage
You can set the miter gage at 0° and plus or minus LOCK NUT 45° with the miter gage stop pin and adjustable stop STOP PIN screws. Fig. 42 Note: The miter gage provides close accuracy in angled cuts. For very close tolerances, test cuts are recommended. ® TABLE SAW 315.272350... -
Page 32: Removing / Replacing The Throat Plate
If not, adjust the four set screws with a 2 mm hex key. See the procedure in the Assembly section. Fig. 43 Securely tighten throat plate screw. Do not allow the throat plate to bow up above the table surface. ® TABLE SAW 315.272350... -
Page 33: Operation
WARNING: Place the featherboard against the Always use clean, sharp, and properly-set blades. uncut portion of the workpiece, to avoid Never make cuts with dull blades. kickback that could cause serious personal injury. ® TABLE SAW 315.272350... -
Page 34: Types Of Cuts
WARNING: All blades and cutting accessories must be rated for at least 5,000 rpm to prevent Compound (bevel) Miter Cut possible injury. Fig. 45 ® TABLE SAW 315.272350... -
Page 35: Making A Cross Cut
PLACE LEFT HAND ON Remove the miter gage and attach the rip fence WORKPIECE AND ON LEFT SIDE OF BLADE over the rails. MITER GAGE HERE PLACE RIGHT HAND ON MITER GAGE KNOB HERE Fig. 46 ® TABLE SAW 315.272350... -
Page 36: Making A Miter Cut
To change the height, turn the height hand wheel. To set the wood angle, loosen the miter gage knob, set the angle with the indicator on the miter gage, LOOSEN then retighten miter gage knob. Fig. 50 TO TIGHTEN ® TABLE SAW 315.272350... -
Page 37: Making A Bevel Rip Cut
Use a pushstick to move small pieces of wood into and past the blade. WARNING: Make sure the blade guard is lowered over blade and is working properly to prevent possible injury. Fig. 52 ® TABLE SAW 315.272350... -
Page 38: Making A Compound (Bevel) Miter Cut
Let the blade build up to full speed. Hold the work firmly against the miter gage and push the miter gage to feed the work into the blade. When the work is completed, press the switch off and remove the key. ® TABLE SAW 315.272350... -
Page 39: Making A Large Panel Cut
Let the blade build up to full speed before feeding the workpiece into the blade. When the work is completed, press the switch off and remove the switch key. Unplug the saw, then reinstall the riving knife and the blade guard. ® TABLE SAW 315.272350... -
Page 40: Making A Dado Cut
Unplug the saw, remove the the blade when it is on or you could be seriously dado insert and dado blade. Reinstall the blade, hurt. riving knife, blade guard and throat plate. ® TABLE SAW 315.272350... -
Page 41: Maintenance
Frequently vacuum or blow out any sawdust from WARNING: When servicing, use only identical the motor. Craftsman replacement parts. Use of any other part may create a hazard or cause product WARNING: If the power cord is worn, cut, or damage. -
Page 42: Troubleshooting
3. Dull blade. 3. Replace the blade. 4. Fuses or circuit breakers are 4. Replace fuses or circuit wrong size or defective. breakers. 5. Feeding workpiece too rapidly. 5. Feed workpiece into blade slower. ® TABLE SAW 315.272350... - Page 43 1. See Setting the Bevel Stops and 45° positions. justed. Indicator in the Adjustments sec- tion. 2. See Setting the Bevel Stops and 2. Positive stops inside base are Indicator in the Adjustments sec- not accurate. tion. TABLE SAW 315.272350 ®...
- Page 44 2. Rails are dirty or sticky. 1. See the Assembly section for Wood edges away from rip fence 1. Rip fence is misaligned. when ripping. Checking Rip Fence and Blade Alignment and Aligning Rip Fence and Front Rail procedures . ® TABLE SAW 315.272350...
- Page 45 NOTES NOTES TABLE SAW 315.272350 ®...
-
Page 46: Exploded View And Repair Parts List
CRAFTSMAN TABLE SAW – MODEL NO. 315.272350 The model number will be found on a plate attached to the cabinet. Always mention the model number in all correspondence regarding your TABLE SAW or when ordering repair parts. FIGURE A ®... - Page 47 CRAFTSMAN TABLE SAW – MODEL NO. 315.272350 The model number will be found on a plate attached to the cabinet. Always mention the model number in all correspondence regarding your TABLE SAW or when ordering repair parts. PARTS LIST FOR FIGURE A...
- Page 48 CRAFTSMAN TABLE SAW – MODEL NO. 315.272350 The model number will be found on a plate attached to the cabinet. Always mention the model number in all correspondence regarding your TABLE SAW or when ordering repair parts. FIGURE B...
- Page 49 CRAFTSMAN TABLE SAW – MODEL NO. 315.272350 The model number will be found on a plate attached to the cabinet. Always mention the model number in all correspondence regarding your TABLE SAW or when ordering repair parts. PARTS LIST FOR FIGURE B...
- Page 50 CRAFTSMAN TABLE SAW – MODEL NO. 315.272350 The model number will be found on a plate attached to the cabinet. Always mention the model number in all correspondence regarding your TABLE SAW or when ordering repair parts. FIGURE C...
- Page 51 CRAFTSMAN TABLE SAW – MODEL NO. 315.272350 The model number will be found on a plate attached to the cabinet. Always mention the model number in all correspondence regarding your TABLE SAW or when ordering repair parts. PARTS LIST FOR FIGURE C...
- Page 52 CRAFTSMAN TABLE SAW – MODEL NO. 315.272350 The model number will be found on a plate attached to the cabinet. Always mention the model number in all correspondence regarding your TABLE SAW or when ordering repair parts. FIGURE D...
- Page 53 CRAFTSMAN TABLE SAW – MODEL NO. 315.272350 The model number will be found on a plate attached to the cabinet. Always mention the model number in all correspondence regarding your TABLE SAW or when ordering repair parts. PARTS LIST FOR FIGURE D...
- Page 54 CRAFTSMAN TABLE SAW – MODEL NO. 315.272350 The model number will be found on a plate attached to the cabinet. Always mention the model number in all correspondence regarding your TABLE SAW or when ordering repair parts. FIGURE E...
- Page 55 CRAFTSMAN TABLE SAW – MODEL NO. 315.272350 The model number will be found on a plate attached to the cabinet. Always mention the model number in all correspondence regarding your TABLE SAW or when ordering repair parts. PARTS LIST FOR FIGURE E...
- Page 56 CRAFTSMAN TABLE SAW – MODEL NO. 315.272350 The model number will be found on a plate attached to the cabinet. Always mention the model number in all correspondence regarding your TABLE SAW or when ordering repair parts. FIGURE F...
- Page 57 CRAFTSMAN TABLE SAW – MODEL NO. 315.272350 The model number will be found on a plate attached to the cabinet. Always mention the model number in all correspondence regarding your TABLE SAW or when ordering repair parts. PARTS LIST FOR FIGURE F...
- Page 58 CRAFTSMAN TABLE SAW – MODEL NO. 315.272350 The model number will be found on a plate attached to the cabinet. Always mention the model number in all correspondence regarding your TABLE SAW or when ordering repair parts. fr om le ss...
- Page 59 CRAFTSMAN TABLE SAW – MODEL NO. 315.272350 The model number will be found on a plate attached to the cabinet. Always mention the model number in all correspondence regarding your TABLE SAW or when ordering repair parts. PARTS LIST FOR FIGURE G...
- Page 60 CRAFTSMAN TABLE SAW – MODEL NO. 315.272350 The model number will be found on a plate attached to the cabinet. Always mention the model number in all correspondence regarding your TABLE SAW or when ordering repair parts. FIGURE H...
- Page 61 CRAFTSMAN TABLE SAW – MODEL NO. 315.272350 The model number will be found on a plate attached to the cabinet. Always mention the model number in all correspondence regarding your TABLE SAW or when ordering repair parts. PARTS LIST FOR FIGURE H...
- Page 62 CRAFTSMAN TABLE SAW – MODEL NO. 315.272350 The model number will be found on a plate attached to the cabinet. Always mention the model number in all correspondence regarding your TABLE SAW or when ordering repair parts. 15 16 52 9...
- Page 63 CRAFTSMAN TABLE SAW – MODEL NO. 315.272350 The model number will be found on a plate attached to the cabinet. Always mention the model number in all correspondence regarding your TABLE SAW or when ordering repair parts. PARTS LIST FOR FIGURE I...
- Page 64 Owner’s Manual MODEL NO. 315.272350 Sears service is available at or through your Sears Retail Store or Catalogue Sales Office. How to order repair parts When ordering repair parts always give: SERVICE AND REPAIR PARTS 1. The Part Number CALL 1-800-665-4455* 2.
Need help?
Do you have a question about the 315.272350 and is the answer not in the manual?
Questions and answers