Table of Contents
Advertisement
Quick Links
See "INSTRUCTION MANUAL" for menu settings
or details of the operation.
Contents
1 NAMES AND FUNCTIONS OF PARTS ......... 1
Front panel ...................................................... 1
1 PREPARING FOR USE .................................. 3
Operation display area .................................... 3
display area ..................................................... 4
Changing the language ................................... 4
Setting the time ............................................... 5
2 VIEWING VIDEO FROM A CAMERA ............ 6
Viewing on the full screen ............................... 6
Viewing on quad screens ................................ 6
Viewing on multi 6 screens ............................. 6
3 RECORDING .................................................. 7
Normal recording ............................................ 7
Timer recording ............................................... 7
Alarm recording ............................................... 8
4 PLAY BACK ................................................... 9
Playing video on a full screen ......................... 9
Fast-forward and fast-rewind playback ........... 9
(forward or reverse) ...................................... 10
5 SEARCHING FOR RECORDED VIDEO ...... 11
Alarm search ................................................. 11
Alarm thumbnail search ................................ 12
Time/date search .......................................... 12
Microdrive ..................................................... 14
card on a PC ................................................. 15
Advertisement
Table of Contents

Related Manuals for Sanyo DSR-3506


Summary of Contents for Sanyo DSR-3506
-
Page 1: Table Of Contents
Contents 1 NAMES AND FUNCTIONS OF PARTS ..1 Front panel ............1 See “INSTRUCTION MANUAL” for menu settings 1 PREPARING FOR USE ........3 or details of the operation. Operation display area ........3 Changing the position of the operation display area ............. -
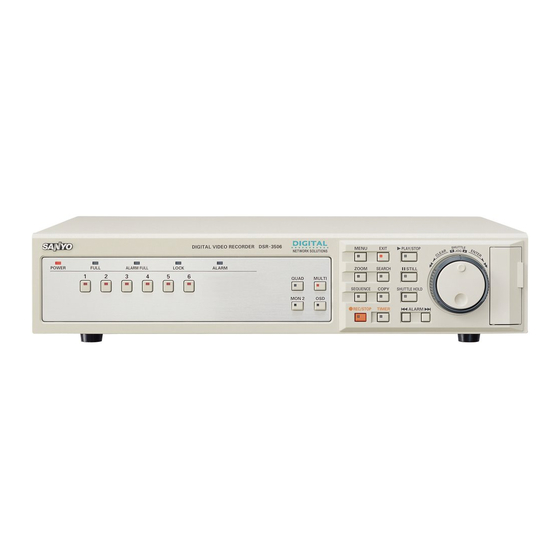
Page 2: Names And Functions Of Parts
NAMES AND FUNCTIONS OF PARTS MENU EXIT PLAY/STOP SHUTTLE POWER FULL ALARM FULL LOCK ALARM ZOOM SEARCH STILL QUAD MULTI SEQUENCE COPY SHUTTLE HOLD MON 2 REC/STOP TIMER ALARM MENU RESET 20 21 Front panel During quad or multi 6 screen display: The indicators corresponding to the cameras being POWER indicator displayed on the monitor are lit up. - Page 3 NAMES AND FUNCTIONS OF PARTS MENU EXIT PLAY/STOP SHUTTLE POWER FULL ALARM FULL LOCK ALARM ZOOM SEARCH STILL QUAD MULTI SEQUENCE COPY SHUTTLE HOLD MON 2 REC/STOP TIMER ALARM MENU RESET 20 21 12. [EXIT] button and indicator When a password has been set, furthermore, this button The [EXIT] button is used to exit the main menu or a sub- can be pressed for at least three seconds to activate the menu.
-
Page 4: Preparing For Use
PREPARING FOR USE [OSD] button POWER indicator (4) Remaining memory in recording area Operation display area Displays the remaining area memory as a percentage when overwriting in the normal recording area or the Whenever the power is turned on, the operation display alarm recording area is forbidden. -
Page 5: Changing The Position Of The Operation Display Area
PREPARING FOR USE Turn the jog dial to select “1. INITIAL Changing the position of the SET”, and then turn the shuttle dial operation display area clockwise. Press the [OSD] button several times. The <INITIAL SET> screen is displayed. As the [OSD] button is pressed, the operation display area moves to a different location or is hidden. -
Page 6: Setting The Time
PREPARING FOR USE Turn the shuttle dial clockwise. Setting the time “01” flashes (indicating the month). (Default: 01-01-2004 THU 00:00:00) Be sure to set the correct date and time as these settings are used during recording and searching. Example: Setting 8:30 on May 22, 2004 Press the [MENU] button. -
Page 7: Viewing Video From A Camera
VIEWING VIDEO FROM A CAMERA [MULTI] button [SEQUENCE] button [CAMERA SELECT] buttons [MON2] button [QUAD] button Each time this button is pressed, the content of the split Viewing on a full screen screen will toggle between video from cameras No. 1 through No. -
Page 8: Recording
RECORDING POWER indicator [EXIT] button [REC/STOP] button [TIMER] button Normal recording Timer recording Use the following procedure to record the monitored video Use the following procedure to record the monitored video in the normal recording area. for a preset length of time in the normal recording area. Press the [REC/STOP] button. -
Page 9: Alarm Recording
RECORDING Alarm recording When the space remaining in the alarm recording area drops below a preset value, the FULL indicator on the Use the following procedure to automatically record alarm digital video recorder’s front panel starts to flash. If video to the alarm recording area when an alarm signal is recording is continued beyond this point, the alarm detected. -
Page 10: Playback
PLAYBACK Use the following procedure to play video stored in the normal recording area (during normal or timer recording). [STILL] button POWER indicator [QUAD] button [PLAY/STOP] button Normal Shuttle dial recording area [SEARCH] button [MULTI] button [SHUTTLE HOLD] button Jog dial Playing video on a full screen Ending playback Press the [PLAY/STOP] button. -
Page 11: Performing Flame Advance
PLAYBACK Performing frame advance (forward or reverse) Press the [STILL] button during playback. The STILL indicator lights up and playback video is paused. The symbol “ ” appears in the operation display area. STILL 01-01-04 00:00:00 REPEAT EN A ALARM 0000 Turn the jog dial clockwise or counter- clockwise while playback is paused. -
Page 12: Searching For Recorded Video
SEARCHING FOR RECORDED VIDEO Images stored in the normal recording area, alarm [SEARCH] button recording area or archive area can be located by searching Shuttle dial and can then be played back. See INSTRUCTION MANUAL for searching the archive area. Archive area Jog dial Alarm recording... -
Page 13: Alarm Thumbnail Search
SEARCHING FOR RECORDED VIDEO The nine most-recent alarm recordings are displayed. To view alarm video before or after the current An alarm number is indicated together with each alarm playback recording, and the number of the currently selected recording will flash. Press the appropriate [ALARM] button during playback. - Page 14 SEARCHING FOR RECORDED VIDEO Turn the jog dial to select “TIME/DATE Turn the jog dial to select “CHANNEL”. (1) Turn the shuttle dial clockwise, turn the jog dial to SEARCH”. select “05”, and then turn the shuttle dial clockwise once again. (2) Turn the shuttle dial clockwise, and then turn the jog dial to change to “01”...
-
Page 15: Saving (Copying) Recorded Video
SAVING (COPYING) RECORDED VIDEO Turn the jog dial to select “COPY Copying video to a CompactFlash TO”, and then turn the shuttle dial card or Microdrive clockwise. Use the following procedure to copy video either to a “ARCHIVE AREA” flashes. Microdrive and to a CompactFlash card. -
Page 16: Viewing Images Copied To A Compactflash Card On A Pc
The cursor moves to “START”. 00000003.JPG IMG00003 INDEX.HTM (1) A folder with the name “SANYO” is created inside the Turn the shuttle dial clockwise. root directory. (2) Within this, folders are created based on the date of copied images or video.