Advertisement
3530
ENG
PRIMUS
IMPORTANT: Read these instructions carefully and
Eta Express
TM
familiarize yourself with the product before fitting
the appliance to the LP Gas cartridge. Review the
instructions periodically to maintain awareness.
Design and Quality Primus AB Sweden
Retain these instructions for future reference.
Tel: +46 8 564 842 30
USE OUTDOORS ONLY! Never leave the
www.primus.se
appliance unattended while in operation
-0845-12
ID: 845BS-0033
NEVER cover the stove (gas cartridge) with wind shields,
rocks or similar which may cause "over heating"
and damage the stove and cartridge. Overheating a
gas cartridge by this means is highly dangerous.
1. INTRODUCTION
Fig 1
1.1
This appliance shall be used exclusively with Primus
Propane/Butane/Isubutane mix cartridges 2206.
1.2
It may be hazardous to attempt to fit other types of
gas cartridges.
2
1.3
Gas consumption: 160 g/h / 2.2 kW on butane at a
pressure of 1 bar.
198 g/h / 8600 Btu/h on butane at a pressure of
1.45 bar.
1.4
Jet nipple: 0.30 mm, 732060.
1.5
This gas appliance conforms to the provisions of
EN521
1
2. SAFETY INFORMATION (fig.1)
2.1
Ensure that the appliance seals (1) are in place and
in good condition before fitting the gas cartridge.
Fig 2
O-ring shall be loosely fitted in the valve body.
2.2
The appliance should be used outdoors only.
2.3
The appliance must be operated on a level surface.
6
2.4
Make sure that no inflammable materials are near
the gas appliance, see section 5.6.
2.5
Always change or fit the gas cartridge in a safe
place, only outside, away from any source of igni-
tion such as naked flames, pilot lights, electric fires
4
5
and away from other people.
2.6
If you have to check the gas soundness of the
appliance, do this outdoors. Do not check for leaks
2
with a naked flame. Use soapy water only.
2.7
Never use an appliance with damaged or worn
seals and never use a leaking, damaged or malfun-
3
ctioning appliance.
2.8
Never leave the appliance unattended when lit.
2.9
Do not allow pans to boil dry.
3. HANDLING THE APPLIANCE
3.1
Be careful not to touch hot parts of the appliance
during, or after use.
3.2
Storage: Always unscrew the cartridge from the
appliance when not in use. Store them in a safe dry
Fig 3
place away from heat.
3.3
Do not misuse the appliance, or use it for anything
for which it has not been designed.
3.4
Handle the appliance with care. Do not drop it.
7
4. ASSEMBLING THE APPLIANCE (fig.2)
4.1
Make sure that the control knob (2) is fully closed
(by turning it clockwise as far as it will go). (Push
the trigger (5) downwards and check that a spark is
fired and strikes the burner, with the piezo igniter (5)
if standard.)
4.2
Keep the cartridge (3) upright when fitting it to the
9
valve.
4.3
Place the valve squarely on top of the cartridge (as
shown in fig .2).
4.4
Gently screw the cartridge into the valve until it
meets the O-ring of the valve. Be careful not to
Fig 4
fit the cartridge cross threaded. Screw hand tight
only. Do not overtighten or you will damage the
cartridge valve.
4.5
Ensure that a complete gas seal has been made.
If you have to check the gas soundness of the
appliance, do this outdoors. Do not check for leaks
with a naked flame. Use soapy water only, applied
to the joints and connections of the appliance.
Any leakage will show up as bubbles around the
leakage area. If you are in doubt or you can hear
or smell gas, do not attempt to light the appliance.
Unscrew the cartridge and contact your local
dealer.
4.6
Rotate the legs (pot supports) (6) into their correct
operating positions.
4.7
Make sure that the burner is securely screwed in.
4.8
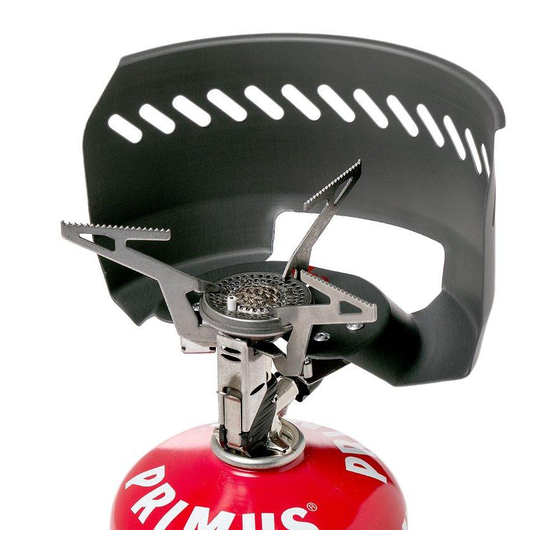
Rest the windshield on the red silicone pad (see
52301 / 3
3530 PRIMUS Eta Express
, Stove
figure 4). Then push the wind shield in the direc-
™
tion of the red arrow until the magnets attach to
INSTRUCTIONS FOR USE
the pot supports. The stove is now ready for use.
5. OPERATING THE APPLIANCE
5.1
Always operate the appliance on firm level of
surface.
5.2
Turn the knob anticlockwise (2) and light the burner
(4) immediately (with the piezo igniter (5) if stand-
ard).
5.3
Adjust the size of the flame by turning the control
knob (2).
5.4
After lighting, operate the appliance upright and
do not move it around. Flaring may occur if the
appliance has not fully warmed, or if it is moved
carelessly.
5.5
After use, ensure that the valve is fully shut (con-
trol knob turned fully clockwise).
5.6
Distance to inflammable materials must be ensu-
red. Minimum distance to combustibles at least
500 mm (20 inches) from sides and from top.
To avoid a fire hazard these minimum distances
must be complied with.
6. CHANGING THE CARTRIDGE
6.1
Shut the valve fully. Be sure the flame is exting-
uished and no other flame is nearby. Take the
unit outdoors away from other people. Unscrew
the cartridge from the valve and replace the
appliance sealing O-ring if it is cracked or worn.
Avoid cross threading by puting the valve onto
the cartridge screw thread squarely and screw on
hand tight only, as described in section 4.
7. MAINTENANCE
7.1
If gas pressure drops or the gas will not light,
check if there is gas left in the cartridge (3). If so,
the jet nipple (9) might be blocked.
Cleaning the jet nipple
7.2
Fully turn off the control knob (2) and unscrew
the cartridge (3).
7.3
Unscrew the two small screws (7) at the side of
the stove and lift the burner part (4) smoothly
from the valve body.
7.4
Unscrew the jet nipple (9) from the valve using a
6 mm spanner.
7.5
Clean out the jet nipple by blowing through the
tiny hole at the front. Do not use an incorrect
size picker or any type of pin etc. to clean the
blockage or you may damage the hole and make
the appliance unsafe.
7.6
Re-fit the jet nipple and screw it tightly to ensure
a gas seal. Re-fit the cartridge by following the
description in section 4. For extra safety, check
the joint with warm soapy water. If bubbles
appear, the joint is not tight enough.
7.7
Push the burner part (4) to the valve body and
secure with the two small screws (7).
8. ROUTINE SERVICE AND MAINTENANCE
8.1
Always ensure that the O-ring sealing is in place
and in good condition. Always check this each
time prior to fitting the appliance. Replace the
O-ring if it is damaged or worn.
8.2
New sealing O-rings are available from your local
dealer.
9. SERVICE AND REPAIR
9.1
If you cannot rectify any fault by following these
instructions, return the appliance to your local
retailer.
9.2
Never attempt any other maintenance or repair.
9.3
Never modify the appliance. This may cause the
appliance to become unsafe.
10. SPARES AND ACCESSORIES
10.1 Use only Primus brand spares and accessories.
Be careful when fitting spares and accessories.
Avoid touching hot parts.
10.2 Replacement Cartridges: Use only Primus 2206
Propane/Butane mix gas cartridges with this
appliance.
10.3 Spare parts
732060
Jet nipple
732440
O-ring
(732110
Piezo igniter, 321483)
An optional cartridge support 721171 (for
extra stability) is available.
10.4 In the event of difficulties in obtaining spare parts
or accessories, consult the distributor in your
country. Visit www.primus.se
Advertisement
Table of Contents

Related Manuals for Primus Eta Express 3530


Summary of Contents for Primus Eta Express 3530
- Page 1 1. INTRODUCTION Distance to inflammable materials must be ensu- Fig 1 This appliance shall be used exclusively with Primus red. Minimum distance to combustibles at least Propane/Butane/Isubutane mix cartridges 2206. 500 mm (20 inches) from sides and from top.
- Page 2 Cet appareil est exclusivement prévu pour une utilisa- you. aux matières éventuellement combustibles. L’appareil tion avec cartouches de gaz Primus 2206 remplies Never use this appliance in an enclosed doit par ailleurs être au moins à 500 mm du plafond d’un mélange de propane et de butane.
- Page 3 Vid för hård Sie die Gasdichtigkeit des Gerätes überprüfen müssen, 10.1 Gebruik uitsluitend originele Primus-onderdelen en -Zubehör von Primus. Seien Sie beim Anbringen von 10.1 Usare solo ricambi e accessori originali Primus. toccare la guarnizione della valvola stessa. Curare tun Sie dies grundsätzlich im Freien.
- Page 4 HUOM! Kaasusäiliö on kierrettävä tillbehör. Var försiktig vid montering av reservdelar 10.1 Bruk bare originale Primus reservedeler og tilleggs- keita. Noudata varovaisuutta asentaessasi varaosia oppstå skader på gassbeholderen. geschroefd. Bij te hard vastschroeven kan de gaspa- venttiiliin vain käsivoimin.
-
Page 5: Instrukcja Użytkowania
500 mm for at være sikker på at forebygge w sąsiedztwie nie ma innego płomienia. Wynieść urządzenie Dette apparat er kun til brug sammen med Primus Ez a készülék kizárólag a 2206 cikkszámú După folosire asiguraţi-vă că supapa este închisă... -
Page 6: Ro Instrucţiuni De Folo Sire
Helyezze a szélfogót a piros szilikon alátétre 3530 Газовая плитка Не проверяйте герметичность соединений 3530 PRIMUS EtaExpress ™ 炉具 当磁铁贴住锅具支脚时停止推动。 Aparat de gătit PRIMUS Express, model 3530 (lásd 4. ábra)! Ezután nyomja a szélfogót a PRIMUS Eta Express ™ открытым пламенем. Применяйте INSTRUCŢIUNI DE FOLO SIRE piros nyíl irányába mindaddig, amíg a mágnesek... -
Page 7: Návod K Použití
10.1 Use apenas as peças sobresselentes e acessórias само на ръка. Не затягайте прекалено или ще značky Primus. Při instalaci náhradních dílů Primus. Obrar con cuidado al montar los repuestos y pozor, abyste kartuši nenašroubovali přes závit. Verifique se o gás ficou totalmente vedado. O controle повредите... - Page 8 İzobütan karışımı kartuşlar ile kullanılmalıdır. При наличие на запалими материали, уредът dikkat edin. Tutuşabilir maddelere minimum emplearse con los cartuchos Primus 2206 con mezcla Diğer tür gaz kartuşlarının takılmaya çalışılması следва да се постави на достатъчно разстояние mesafe, yanlarda ve üzerinde en az 500 mm( 20 de propano/butano.
Need help?
Do you have a question about the Eta Express 3530 and is the answer not in the manual?
Questions and answers