Table of Contents
Advertisement
Advertisement
Table of Contents

Related Manuals for Geemarc Ampli550


Summary of Contents for Geemarc Ampli550
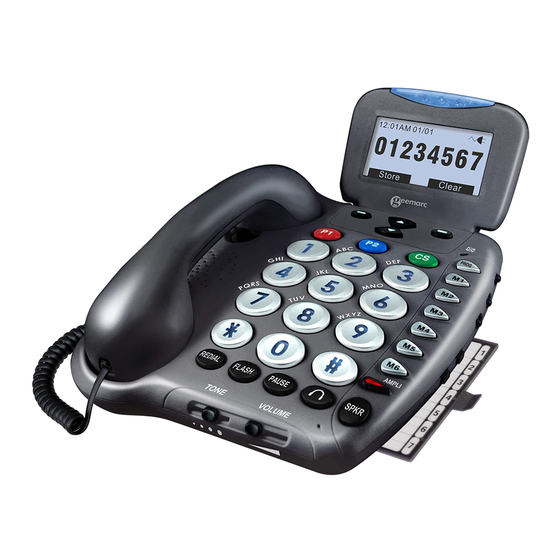
- Page 1 Ampli550 Amplified Big Button Telephone English...
-
Page 2: Table Of Contents
INTRODUCTION CONTENTS CONTENTS INTRODUCTION Contents Introduction Unpacking the Telephone Description General Description Key Description LCD Description Installation Night Light Function Wall Mounting Settings Making a Call Pause Receiving a Call Muting the Microphone Using the Amplification Function Using you Phone with hearing aids Using Audio and Headset jacks Hands-free Hold Function... - Page 3 CONTENTS Feature List Troubleshooting Safety Information Regulatory Compliance Guarantee...
-
Page 4: Introduction
It is important that you read the instructions below in order to use your Geemarc telephone to its full potential. Keep this user guide in a safe place for future reference. This guide explains how to use the following telephone: Ampli550 * To use the caller display facility, you must subscribe to your network provider’s caller display... -
Page 5: Unpacking The Telephone
When unpacking the telephone, you should find the following in the box: • Wall mount bracket • 1 Ampli550 unit • 1 Ampli550 handset with curly cord • 2 Telephone line cords (one long and one short) • 1 power adaptor • 4 AAA rechargeable batteries •... -
Page 6: Description
DESCRIPTION General Description 1. Handset Hanger 11. Amplifier key/indicator (AMPLI) 2. Hook Switch 12. Speaker Key (SPKR) 3. Large LCD Screen 13. Headset Key ( 4. Left Soft Key 14. Microphone 5. Up/Down Scroll 15. Pause Key 6. Right Soft Key 16. - Page 7 DESCRIPTION 1. Headset jack 2.5mm 2. Audio neckloop jack 3.5mm 3. Optional Bed Shaker jack 4. Volume Reset Override Switch (ON/OFF) 5. Power jack 6. Phone Line Cord jack 7. Back Light Switch 8. New Call Indicator Switch 9. Ringer / shaker / strobe select mode 10.
-
Page 8: Key Description
DESCRIPTION Key Description Make/Answer/End a call. Activates the speakerphone if pressed during a call, as described in page 14. Last number redial, as described in page 11. Insert a pause when pre-dialing a number Highlight or scroll through the menu options. Enter the CID list, as described in page 23. -
Page 9: Lcd Description
DESCRIPTION LCD Description In standby mode, the large LCD display will show as below: If you forget to connect the phone line cord, "No line" will show on the screen. When you press the Menu soft key, the display will show the main menu. - Page 10 DESCRIPTION If the caller has exercised the option to prevent their name and number from being sent, "Blocked number" will be shown on the display. This message will display when someone calls from an area where the telephone company is not offering the caller identification services or is not yet providing number delivery to your area.
-
Page 11: Installation
INSTALLATION Night Light Function If you move the back light switch ( ) located on the right side of the phone to position, the LCD back light will alway be bright so your phone can also be used as a night light. Wall Mounting 1. -
Page 12: Settings
SETTINGS Making a Call 1. To make a call, lift the handset, listen for a dial tone and adjust your volume & tone settings (see page 12). 2. You can dial a number manually or press one of the memory dial buttons. -
Page 13: Pause
SETTINGS Pause Pressing the PAUSE key will insert a 3 second pause in the dialing sequence. This is intended to be used with memory dialing. Receiving a Call When a new call is received the phone will ring and the visual ring indicator will flash. -
Page 14: Using You Phone With Hearing Aids
SETTINGS Diagram 3 CAUTION: This telephone can produce very high (loud) sound levels. Repeated incremental exposure to amplification levels greater than 18 dB may be harmful to people without hearing loss. Always adjust the volume control to the minimum setting after using the phone. -
Page 15: Hands-Free
SETTINGS Audio Neckloop Jack Using this jack allows you to listen through your neckloop or headphones while speaking into the handset or speakerphone. Headset Jack This jack can accommodate many hands-free headsets. Using this jack you can listen and speak through your hands-free headset. -
Page 16: Ringer Setting
SETTINGS Ringer Setting You can select your own base ringer tone and adjust the ringer volume. You can also adjust the volume to "Ringer OFF" in order to turn off the ringer. 1. Press Menu soft key to display the main menu list. 2. -
Page 17: Storing Memory Numbers
SETTINGS Storing Memory Numbers 1. Use the keypad to enter the number you want to store. You can use the Clear soft key to edit the number. 2. Press and hold one of the Memory dial keys, then press the Save soft key. - Page 18 SETTINGS Note: If you record a voice prompt for an entry, an icon will appear before the name of this entry. Two-touch Memory Your phone allows you to program 10 frequently two-touch memory numbers (0~9). Each memory key can store up to 24 digits.
-
Page 19: Flash Signal
SETTINGS system will announce the name, otherwise it can only announce the number. • Record Voice: allows you to record the name for the selected entry. • Erase Voice: allows you to delete the name you have recorded for the selected entry. •... -
Page 20: Caller Id
SETTINGS Caller ID This telephone automatically displays an incoming caller's number/name along with the date and time of the call. It will record up to 30 calls of up to 15 digits and store the data into memory. IMPORTANT: You must subscribe to Caller ID Service from your local telephone company to utilize this feature. -
Page 21: Phone Book
SETTINGS SETTINGS Phone Book The phonebook built in your phone allows you to store frequently used numbers so that you can easily make a call without having to remember or enter the phone number. Character Map To enter a specific alphanumeric character, press one or more times the relevant key for the required character according to the following table: once for the first character, twice for the second and so on. - Page 22 SETTINGS Notes: If you make a mistake while entering a name or a number, use the Clear soft key to correct it. Each time you press this key, the last digit is deleted. Viewing the Phonebook Entries 1. Press the PhoneBk soft key in standby mode to enter the phonebook.
-
Page 23: Menu Functions
MENU FUNCTIONS Menu Navigation To access a menu option: 1. To display menu list, press the Menu soft key. 2. To scroll through menu options, press repeatedly. 3. To select a menu, press the Select soft key when the desired menu appears on the display. -
Page 24: Set Display
MENU FUNCTIONS MENU FUNCTIONS Set Display Using this feature, you can customize the display settings, according to your requirements (language, contrast, smaller font and hour format). Language Setting The phone supports up to 4 predefined languages: English, Spanish, French and German. You can change the language used to display the menu messages. -
Page 25: Set Phone
MENU FUNCTIONS Hour Format Setting 1. Press Menu soft key to display the main menu list. 2. Press Select soft key to access Set Display. 3. Press key repeatedly to move to Hour Format, press Select soft key. 4. Press key repeatedly to choose 12 hour clock or 24 hour clock and then press Select soft key. - Page 26 MENU FUNCTIONS 2. Press the key to move to Set Phone and then press Select soft key. 3. Press the key to move to Call Waiting and then press Select soft key. The display shows the current setting. 4. Use key to select ON/OFF to activate/deactivate the call waiting function, press Select soft key to confirm.
-
Page 27: Setting Date & Time
MENU FUNCTIONS left off the hook. This will restore your line to be able to receive another call even if you leave the handset off the base. 1. Press Menu soft key to display the main menu list. 2. Press the key to move to Set Phone and then press Select soft key. -
Page 28: Set Talk
MENU FUNCTIONS Set Talk Dialing Talking This feature allows you to check the number you have entered in standby mode without looking at the display. 1. Press Menu soft key to display the main menu list. 2. Press key repeatedly to move to Set Talk, press Select soft key. - Page 29 MENU FUNCTIONS MENU FUNCTIONS associates with this number. To activate this feature, do the following steps: 1. Press Menu soft key to display the main menu list. 2. Press key repeatedly to move to Set Talk, press Select soft key. 3.
-
Page 30: Caller Id On Call Waiting
CALLER ID ON CALL WAITING When you subscribe to Call Waiting service from your local telephone company and activate the Call Waiting function via menu, the telephone will display the name and number of the second caller while you are having a conversation. Caller two's information Caller ID info displayed is displayed... -
Page 31: Feature List
FEATURE LIST • FSK and DTMF dual system Caller ID • Extra Large Caller ID Screen • Caller ID list with up to 30 entries • Caller ID/Call Waiting • Phonebook with up to 39 entries • Amplification function • Amplified Headset jack •... - Page 32 FEATURE LIST Extra Large Caller ID Screen Volume Amplification Memory Card Big Keypad Buttons...
-
Page 33: Troubleshooting
TROUBLESHOOTING No dial tone • Check that all phone cord connections are securely plugged into the telephone & wall jack. • Check that the phone is in the correct dialing mode, tone or pulse. • Plug another phone into the wall jack to make sure your phone service is working properly. -
Page 34: Safety Information
SAFETY INFORMATION General Only use the power supply included with the product. Do not open the unit. Contact the helpline for all repairs. The phone is capable of amplifying sounds to a loud volume. It is important to instruct all potential users of its proper operation. It is advised to adjust the volume control to its minimum level (Low) when not in use and alert other users that hearing damage can potentially result from misuse. -
Page 35: Regulatory Compliance
REGULATORY COMPLIANCE - This equipment complies with Part 68 of the FCC rules and the requirements adopted by the ACTA. On the bottom of this equipment is a label that contains, among other information, a product identifier in the format US: AAAEQ##TXXXX. If requested, this number must be provided to the telephone company. - Page 36 REGULATORY COMPLIANCE Warning: Changes or modifications to this unit not expressly approved by the party responsible for compliance could void the user’s authority to operate the equipment. NOTE: This equipment has been tested and found to comply with the limits for a Class B digital device, pursuant to Part 15 of the FCC Rules.
- Page 37 REGULATORY COMPLIANCE GUARANTEE void the warranty. For service or repairs, call 1-888-864-2446 (RMA@sonicalert.info) - Connection to party line service is subject to state tariffs. Contact the state public utility commission, public service commission or corporation for information. - If your home has specially wired alarm equipment connected to the telephone line, ensure the installation of this telephone equipment does not disable your alarm equipment.
-
Page 38: Guarantee
Sonic Alert shall not be responsible for loss of time, inconvenience, property damage caused by your phone or any other accidental or consequential damages Warranty service is available only with proof of purchase. Simply send the Ampli550 (postpaid) and a copy of your sales slip... - Page 39 as proof of purchase to: CS Green Customer Service key at top has been pre- programmed with our USA customer service number. Press the CS key to direct dial for any Customer Service or technical related help or questions. Our customer service department is available from 9Am-5Pm Monday through Friday Central time.
Need help?
Do you have a question about the Ampli550 and is the answer not in the manual?
Questions and answers
How do I set up voicemail? Is there a default pin? I **** trying to set it up for my grandmother