
Related Manuals for JR XP6102


Summary of Contents for JR XP6102
- Page 1 INSTRUCTION MANUAL FOR AIRPLANE AND HELICOPTER XP6102 6-CHANNEL COMPUTER RADIO SYSTEM www.modelflight.com.au – World’s best source of JR products...
-
Page 2: Table Of Contents
CHAPTER 4: ALARM AND ERROR DISPLAY • AIRPLANE ..18 Battery Alarm and Display ..18 SECTION II • AIRCRAFT ....11 Channel Assignment/ Throttle Alt ......11 Control Identification and Location ......11 XP6102 - Introduction www.modelflight.com.au – World’s best source of JR products... - Page 3 Model Selection ......30 Servo Travel Screen ....43 Accessing the Model Select Function ....30 Accessing the Servo Travel Screen ....43 Function Mode ......31 XP6102 Data Sheet ....44 Accessing the Mode Function ......31 XP6102 - Introduction www.modelflight.com.au – World’s best source of JR products...
- Page 4 Mode Function ......63 HELICOPTER ....52 Key Input and Display ....52 System Mode ......53 Normal Mode ......53 CHAPTER 10: ALARM AND ERROR DISPLAY • HELICOPTER 52 Battery Alarm and Display ..52 XP6102 - Introduction www.modelflight.com.au – World’s best source of JR products...
- Page 5 Servo Travel Screen ....82 Accessing the Servo Reversing Function ....65 Accessing the Servo Travel Screen ....82 Sub Trim ......66 XP6102 Data Sheet - Heli ..83 Accessing the Sub Trim Function ....66 General Notes ......85 Travel Adjust ......67 Accessing the SECTION IV • IMPORTANT Travel Adjust Function ....67...
-
Page 6: Chapter 1: Using This Manual
The R770's Slimline design allows it to fit modulations from other common radio into most model applications. frequencies, such as RC transmitters or local paging systems. XP6102 - Introduction www.modelflight.com.au – World’s best source of JR products... -
Page 7: Transmitter Specifications
Approximately 750mw CURRENT DRAIN 200mA (70mA with DSC) 200mA (70mA with DSC) POWER SOURCE 1.2Vx Ni-Cd (9.6V) 600mAh 1.2Vx Ni-Cd (9.6V) 600mAh OUTPUT PULSE 1000–2000 (1500 Neutral) 1000–2000 (1500 Neutral) XP6102 - Introduction www.modelflight.com.au – World’s best source of JR products... -
Page 8: Airborne Battery Pack
HELICOPTER MODEL NUMBER B1100 B1100 VOLTAGE 4.8 V 4.8 V SIZE (in) (W x L x H) 2.24 x 0.63 x 1.70 2.24 x 0.63 x 1.70 WEIGHT (oz) XP6102 - Introduction www.modelflight.com.au – World’s best source of JR products... -
Page 9: Charger
® CHARGER PIGTAIL FOR TRANSMITTER Systems is negative. Therefore, the center BLACK TO POSITIVE pin on all JR chargers is negative, not positive. This is different from many other manufacturers' chargers and radio systems. Beware of improper RED TO NEGATIVE connections based on "color-coded"... -
Page 10: Advanced Digital Trims
ADVANCED DIGITAL TRIMS The XP6102's digital trims feature the Please also note that unlike conventional Direct Access display function. While at mechanical trim levers, when the X-6102 the Normal display screen, if a trim lever transmitter is in the off position, no... -
Page 11: Section Ii • Aircraft
This gives easy, accurate idle ELEV Elevator Channel adjustments without affecting the high RUDD Rudder Channel throttle position. GEAR Gear Channel AUX 1 Auxiliary 1 Channel (Flap) XP6102 - Airplane Manual www.modelflight.com.au – World’s best source of JR products... -
Page 12: Transmitter Callouts
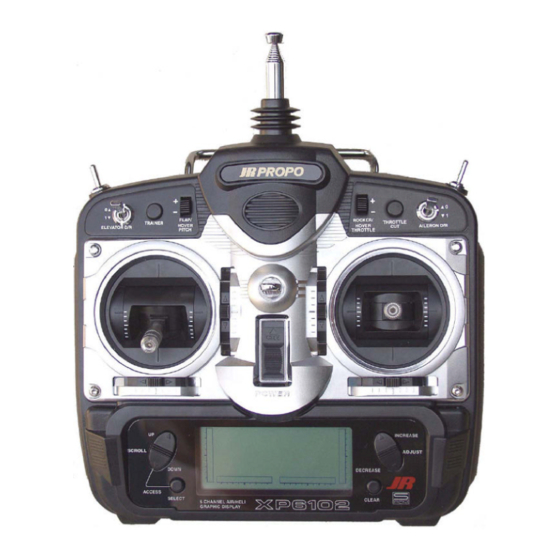
Control Stick Throttle/Rudder Stick Neck Strap Eyelet Digital Aileron Digital Rudder Trim Lever Trim Lever Increase/Decrease Programming Buttons Up/Down Clear Key Scroll Buttons LCD Display On/Off Select Key Switch XP6102 - Airplane Manual www.modelflight.com.au – World’s best source of JR products... -
Page 13: Transmitter Rear
FCC rules. ELEVATOR TENSION RUDDER TENSION SCREW SCREW AILERON TENSION SCREW THROTTLE TENSION SCREW XP6102 - Airplane Manual www.modelflight.com.au – World’s best source of JR products... -
Page 14: Direct Servo Control (Dsc)
To adjust the stick length, use the is approximately one inch longer than 2mm Allen wrench (supplied with your standard. This stick, crafted from bar XP6102 transmitter) to unlock the set stock aluminum, is available at your screw. Turn the wrench counterclockwise local JR dealer. -
Page 15: Frequency Notes/Aircraft Only Frequencies
BASE LOADED ANTENNA An optional base-loaded antenna is the antenna to your XP6102. The Base available for use with the XP6102 Loaded Antenna (JRPA155) is made of a transmitter. It is considerably shorter than flexible coil and is covered with a soft the standard antenna. -
Page 16: Chapter 2: Connections
The brass eyelets are pushed from the Servo Mounting Tab Screw Rubber Grommet Brass Eyelet XP6102 - Airplane Manual www.modelflight.com.au – World’s best source of JR products... -
Page 17: Connections
CHARGER - (JRPC221) SYSTEM AUX1 RUDDER GEAR RUDD 7 CHANNEL SPCM RECEIVER ELEVATOR ELEV 72 MHz AILE THRO JAPAN REMOTE CONTROL CO., LTD AILERON MADE IN MALAYSIA THROTTLE XP6102 - Airplane Manual www.modelflight.com.au – World’s best source of JR products... -
Page 18: Backup Error Display
All by improper removal or replacement, transmitter programs will return to the only JR Horizon Service Center is authorized to make this change. BACK ERROR XP6102 - Airplane Manual www.modelflight.com.au – World’s best source of JR products... -
Page 19: System Mode
3. Use either the U p or Down key to AIRPLANE DATA RESET scroll through the menu and access the Model Name applicable function. Entry [MODEL NAME] PLANE SPCM pg 29 ALPHA 40 XP6102 - Airplane Manual www.modelflight.com.au – World’s best source of JR products... -
Page 20: Wing Type Selection
Flaperon and V-Tail will be direction for use as flaps or spoilers unavailable. Finally, with V-Tail active, Elevon will be unavailable. XP6102 - Airplane Manual www.modelflight.com.au – World’s best source of JR products... -
Page 21: Flaperon Wing Type Selection
9. Press the U p key to access the Servo Reversing function. MODEL SEL function. 10. Exit the WING TYPE function by pressing the Down and S e l e c t keys simultaneously. XP6102 - Airplane Manual www.modelflight.com.au – World’s best source of JR products... -
Page 22: Elevon Type Selection
Elevon Type Selection Elevon Wing Mixing is available as an option with your XP6102. This style of aircraft also employs two wing servos. Connect left servo Connect right servo However, there is not an elevator to the aileron port to the elevator port present. -
Page 23: V-Tail Type Selection
Servo 11. To exit the WING TYPE function, Reversing section in this manual. press the Down and S e l e c t keys simultaneously. XP6102 - Airplane Manual www.modelflight.com.au – World’s best source of JR products... -
Page 24: Accessing The Modulation Function
SWITCH SELECT The XP6102 allows the several options to The gear channel can be programmed be programmed for the dual rate, gear to operate on one of four switched or and flap switches. rockers or it can be inhibited, helpful for some types of mixing. -
Page 25: Trainer Function
Pilot transmitter. In normal mode, when the Link + Slave - This mode is used only when the XP6102 is being used as a trainer switch is activated, the student slave transmitter and the other Master has control of all functions and switches. -
Page 26: Modulation Selection
MODULATION SELECTION The Modulation Selection function enables your XP6102 to transmit to a variety of JR ® receivers. You can select from either S-PCM (Pulse Code Modulation) or from PPM (Pulse Position Modulation [FM]). Toggle between PPM and S-PCM Model Number and Name... -
Page 27: Model Copy Function
7. Press the Down and S e l e c t selected model. keys simultaneously to exit the MODEL COPY function. XP6102 - Airplane Manual www.modelflight.com.au – World’s best source of JR products... -
Page 28: Model Type Selection
MODEL TYPE SELECTION The XP6102 is capable of performing as a helicopter or airplane radio with full functions for each. Model Type function Model Number and Name Change model type selection Go to Model Copy menu [MODEL TYPE] ALPHA 40... -
Page 29: Model Name Entry
MODEL NAME ENTRY The XP6102 allows an 8-digit name to be input for each of the ten models available. The current model will be displayed in the Normal display. Go to Model Type menu Change selected character Model Number and Type... -
Page 30: Model Selection
MODEL SELECTION The XP6102 system offers memory for Entry function be used in conjunction ten completely separate models. with each model setup. Another very Therefore, it is possible to have a mixture useful function of the Model Selection of helicopter and airplane setups function is the ability to set one aircraft retained in memory. -
Page 31: Function Mode
3. Use either the U p or Down to scroll On position. through the menu and access the applicable function. 2. Press the Down and S e l e c t keys simultaneously. XP6102 - Airplane Manual www.modelflight.com.au – World’s best source of JR products... -
Page 32: Dual Rates And Exponential
Either a 0 or a 1 will be shown, keys simultaneously to exit the corresponding to the position of the DUAL RATE AND EXPONENTIAL switch. To select the opposite switch mode. position, move the appropriate Dual XP6102 - Airplane Manual www.modelflight.com.au – World’s best source of JR products... -
Page 33: Servo Reversing
5. After you have determined which simultaneously. channel(s) need to have the throw directions reversed, use the S e l e c t key to call up the appropriate channel. XP6102 - Airplane Manual www.modelflight.com.au – World’s best source of JR products... -
Page 34: Sub Trim
Up key. of Sub Trim. 8. Exit the SUB TRIM function by pressing the Down and S e l e c t keys simultaneously. XP6102 - Airplane Manual www.modelflight.com.au – World’s best source of JR products... -
Page 35: Travel Adjust
The for each direction individually. The factory XP6102 offers travel adjust for all six default (Data Reset) value is 100% for channels. The Travel Adjust range is from each direction of servo travel. -
Page 36: Elevator To Flap Mixing
Clear key, bringing the mixing value to the factory default (0%), and increase the value using the opposite key (+) or (-) from the key originally selected. XP6102 - Airplane Manual www.modelflight.com.au – World’s best source of JR products... -
Page 37: Aileron To Rudder Mixing
Clear key, bringing the mixing value to the factory default (0%), and increase the value using the opposite key (+) or (-) from the key originally selected. XP6102 - Airplane Manual www.modelflight.com.au – World’s best source of JR products... -
Page 38: Throttle Cut Switch
3. Use the (+) and (-) keys to change the value of the Throttle cut function. Note: Pressing the Clear key will Inhibit the Throttle Cut, turning it off until it has been reactivated. XP6102 - Airplane Manual www.modelflight.com.au – World’s best source of JR products... -
Page 39: Flap System
Down and S e l e c t 5. Press the S e l e c t key to select the keys simultaneously. desired channels to be adjusted. XP6102 - Airplane Manual www.modelflight.com.au – World’s best source of JR products... -
Page 40: Programmable Mixing (1-4)
Offset value Change selected value Mix percentages [MX1] THR OFFSET ALWAYS ON Change highlighted selection Switch selection Switch condition Go to Flap System menu Reset selection to default XP6102 - Airplane Manual www.modelflight.com.au – World’s best source of JR products... -
Page 41: Accessing The Programmable Mixing Function
With a little practice, programmable this mix is currently selected to always mixing will become easier to be active (ON). understand. Mixing is only limited by your imagination. XP6102 - Airplane Manual www.modelflight.com.au – World’s best source of JR products... -
Page 42: Fail Safe
FAIL SAFE The Fail Safe/Hold function is available As noted earlier, if you are in the PPM only when you use the XP6102 modulation, the Fail-Safe/Hold function transmitter in PCM modulations. This is not applicable. Therefore, the Fail- function is designed to help minimize... -
Page 43: Servo Travel Screen
3. Move the sticks. The the indicators correspond to the following: Indicator Throttle Indicator 2: Aileron Indicator 3: Elevator Indicator 4: Rudder Indicator 5: Gear Indicator 6: Flap XP6102 - Airplane Manual www.modelflight.com.au – World’s best source of JR products... -
Page 44: Xp6102 Data Sheet
MODULATION PPM • SPCM ELEV NOTES: FLAP FLAP SYSTEM GEAR SWITCH FLAP SELECT Feel free to make photocopies of the data sheet for use with all your models. XP6102 - Airplane Manual www.modelflight.com.au – World’s best source of JR products... - Page 45 This gives easy, accurate idle ELEV Elevator Channel adjustments without affecting the high RUDD Rudder Channel GEAR Gyro Channel throttle position. AUX 1 Auxiliary 1 Channel (Pitch) XP6102 - Helicopter Manual www.modelflight.com.au – World’s best source of JR products...
-
Page 46: Transmitter Callouts
Control Stick Throttle/Rudder Stick Neck Strap Eyelet Digital Aileron Digital Rudder Trim Lever Trim Lever Increase/Decrease Programming Buttons Up/Down Clear Key Scroll Buttons LCD Display On/Off Select Key Switch XP6102 - Helicopter Manual www.modelflight.com.au – World’s best source of JR products... -
Page 47: Transmitter Rear
FCC rules. ELEVATOR TENSION RUDDER TENSION SCREW SCREW AILERON TENSION SCREW THROTTLE TENSION SCREW XP6102 - Helicopter Manual www.modelflight.com.au – World’s best source of JR products... -
Page 48: Direct Servo Control (Dsc)
To adjust the stick length, use the is approximately one inch longer than 2mm Allen wrench (supplied with your standard. This stick, crafted from bar XP6102 transmitter) to unlock the set stock aluminum, is available at your screw. Turn the wrench counterclockwise local JR dealer. -
Page 49: Only Frequencies
Neck Strap (JRPA023). This when you use the neck strap. BASE LOADED ANTENNA An optional base-loaded antenna is attach the antenna to your XP6102. The available for use with the XP6102 Base Loaded Antenna (JRPA155) is transmitter. It is considerably shorter than made of a flexible coil and is covered the standard antenna. - Page 50 Servo Mounting Tab Screw Rubber Grommet Brass Eyelet XP6102 - Helicopter Manual www.modelflight.com.au – World’s best source of JR products...
-
Page 51: Connections
CHARGER - (JRPC221) SYSTEM RUDDER AUX1 GEAR RUDD 7 CHANNEL SPCM RECEIVER ELEVATOR ELEV 72 MHz AILE THRO JAPAN REMOTE CONTROL CO., LTD AILERON MADE IN MALAYSIA THROTTLE XP6102 - Helicopter Manual www.modelflight.com.au – World’s best source of JR products... -
Page 52: Backup Error Display
All Center is authorized transmitter programs will return to the to make this change. factory default settings, and the data you BACK ERROR XP6102 - Helicopter Manual www.modelflight.com.au – World’s best source of JR products... -
Page 53: System Mode
3. Use either the Up or Down key to DATA RESET scroll through the menu and access the Model Name applicable function. [MODEL NAME] pg 61 HELI SPCM VENTURE XP6102 - Helicopter Manual www.modelflight.com.au – World’s best source of JR products... -
Page 54: Model Selection
MODEL SELECTION The XP6102 system offers memory for Entry function be used in conjunction ten completely separate models. with each model setup. Another very Therefore, it is possible to have a mixture useful function of the Model Selection of helicopter and airplane setups function is the ability to set one aircraft retained in memory. -
Page 55: Swashplate Type Selection
SWASHPLATE TYPE SELECTION The Swashplate options are: The Swashplate Mixing function enables the XP6102 system to operate many 1 Servo: Non-CCPM, standard mixing different types of swashplate control type helicopter. systems, including 3 versions of CCPM. 2 Servo/180° CCPM 3 Servo/120° CCPM (JR style, most ®... -
Page 56: Switch Select
SWITCH SELECT The XP6102 allows the several options to The gear channel can be programmed be programmed for the dual rate, gear to operate on one of 4 switched or and flight mode switches. rockers or it can be inhibited, helpful for some types of mixing. -
Page 57: Trainer Function
Pilot transmitter. In normal mode, when the Link + Slave - This mode is used only when the XP6102 is being used as a trainer switch is activated, the student has slave transmitter and the other Master control of all functions and switches. -
Page 58: Modulation Selection
MODULATION SELECTION The Modulation Selection function enables your XP6102 to transmit to a variety of JR ® receivers. You can select from either S-PCM (Pulse Code Modulation) or from PPM (Pulse Position Modulation [FM]). Toggle between PPM and S-PCM Model Number and Name... -
Page 59: Model Copy Function
MODEL TYPE function. selected model. 7. Press the Down and S e l e c t keys simultaneously to exit the MODEL COPY function. XP6102 - Helicopter Manual www.modelflight.com.au – World’s best source of JR products... -
Page 60: Model Type Selection
MODEL TYPE SELECTION 11.I The XP6102 is capable of performing as a helicopter or airplane radio with full functions for each. Model Type function Model Number and Name Change model type selection Go to Model Copy menu [MODEL TYPE] VENTURE... -
Page 61: Model Name Entry
MODEL NAME ENTRY The XP6102 allows an 8-digit name to be input for each of the ten models available. The current model will be displayed in the Normal display. Go to Model Type menu Change selected character Model Number and Type... - Page 62 XP6102 - Helicopter Manual www.modelflight.com.au – World’s best source of JR products...
-
Page 63: Function Mode
3. Use either the U p or Down to scroll On position. through the menu and access the applicable function. 2. Press the Down and S e l e c t keys simultaneously. XP6102 - Helicopter Manual www.modelflight.com.au – World’s best source of JR products... -
Page 64: Dual Rates And Exponential
Either a 0 or a 1 will be shown, keys simultaneously to exit the corresponding to the position of the DUAL RATE AND EXPONENTIAL switch. To select the opposite switch mode. position, move the appropriate Dual- XP6102 - Helicopter Manual www.modelflight.com.au – World’s best source of JR products... -
Page 65: Servo Reversing
S e l e c t keys simultaneously. 5. After determining which channel(s) need to have the throw directions reversed, use the S e l e c t key to call up the appropriate channel. XP6102 - Helicopter Manual www.modelflight.com.au – World’s best source of JR products... -
Page 66: Sub Trim
Up key. the desired amount and direction of 8. Exit the SUB TRIM function by Sub-Trim. pressing the Down and S e l e c t keys simultaneously. XP6102 - Helicopter Manual www.modelflight.com.au – World’s best source of JR products... -
Page 67: Travel Adjust
The for each direction individually. The factory XP6102 offers travel adjust for all six default (Data Reset) value is 100% for channels. The Travel Adjust range is from each direction of servo travel. -
Page 68: Ccpm Swashplate Mixing
U p key. selected in the System mode on 10. Exit the CCPM SETUP screen Page 55. by pressing the Down and S e l e c t keys simultaneously. XP6102 - Helicopter Manual www.modelflight.com.au – World’s best source of JR products... - Page 69 Ch6 = Pitch swashplate, and are spaced at 120 degrees apart. This is the most common form of CCPM, and is found in and other brands of Helicopters. ® XP6102 - Helicopter Manual www.modelflight.com.au – World’s best source of JR products...
-
Page 70: Throttle Cut Switch
3. Use the (+) and (-) keys to change the value of the Throttle cut function. Note: Pressing the Clear key will Inhibit the Throttle Cut, turning it off until it has been reactivated. XP6102 - Helicopter Manual www.modelflight.com.au – World’s best source of JR products... -
Page 71: Throttle Hold
8. To exit the THROTTLE HOLD adjustable range is (-20%-+50%). Once function, press the Down and you establish the proper idle value for S e l e c t keys simultaneously. XP6102 - Helicopter Manual www.modelflight.com.au – World’s best source of JR products... -
Page 72: Throttle Curves
THROTTLE CURVES The XP6102 offers two (2) separate Note: The throttle trim and hovering throttle curves with five adjustable points throttle levers are only operable per curve. This function allows you to when the flight mode switch is in the customize the throttle curve and pitch normal position. -
Page 73: Throttle Time Settings
Normal mode. The throttle trim lever has position. no effect on positions 1 or throttle hold. XP6102 - Helicopter Manual www.modelflight.com.au – World’s best source of JR products... -
Page 74: Hovering Throttle Lever Settings
+/-9%. Note: The Hovering Throttle has no effect on flight mode switch position 1. Throttle Trim Operating Range P-LOW P-MID P-HIGH Throttle Stick XP6102 - Helicopter Manual www.modelflight.com.au – World’s best source of JR products... -
Page 75: Accessing The Pitch Curve Function
Down and S e l e c t keys points. If any of the other points have simultaneously. been changed while these points XP6102 - Helicopter Manual www.modelflight.com.au – World’s best source of JR products... -
Page 76: Hovering Pitch Lever
0 to 100 to ease your understanding of other curves. Throttle Pitch 100% 100% Normal Hover Throttle Pitch 100% 100% Stunt 1 Aerobatics Pitch 100% Throttle Hold XP6102 - Helicopter Manual www.modelflight.com.au – World’s best source of JR products... -
Page 77: Accessing The Revolution Mixing Function
The XP6102 offers two Change value/Switch selection Go to Programmable Mixing menu [REVO MX]... -
Page 78: Setting Up Revolution Mixing (Non-Heading Lock Gyros Only)
At a safe altitude, main rotor acceleration (and deceleration) torque. close the throttle; the helicopter will descend and the body will turn in the XP6102 - Helicopter Manual www.modelflight.com.au – World’s best source of JR products... -
Page 79: Programmable Mixing (1-2)
Offset value Change selected value Mix percentages [MX1] THR OFFSET ALWAYS ON Change highlighted selection Switch selection Switch condition Go to Flap System menu Reset selection to default XP6102 - Helicopter Manual www.modelflight.com.au – World’s best source of JR products... -
Page 80: Accessing The Programmable Mixing Function
ON" indicates the current switch that a little practice, programmable this mix is currently selected to always mixing will become easier to be active (ON). understand. Mixing is only limited by your imagination. XP6102 - Helicopter Manual www.modelflight.com.au – World’s best source of JR products... -
Page 81: Fail Safe
As noted earlier, if you are in the PPM The Fail Safe Function is available only modulation, the Fail Safe Function when you use the XP6102 transmitter in is not applicable. Therefore, the PCM modulations. This function is designed to help minimize damage to... -
Page 82: Servo Travel Screen
3. Move the sticks. The the indicators correspond to the following: Indicator Throttle Indicator 2: Aileron Indicator 3: Elevator Indicator 4: Rudder Indicator 5: Gear Indicator 6: Pitch XP6102 - Helicopter Manual www.modelflight.com.au – World’s best source of JR products... -
Page 83: Xp6102 Data Sheet - Heli
ELEV RUDD NORMAL DOWN REVO MIX DUAL RATE DOWN • STUNT EXPO NOTES: Feel free to make photocopies of the data sheet for use with all your models. XP6102 - Helicopter Manual www.modelflight.com.au – World’s best source of JR products... - Page 84 XP6102 - Helicopter Manual www.modelflight.com.au – World’s best source of JR products...
-
Page 85: General Notes
• Ensure the servo horn is securely fastened to the servo. Use only the JR • Make sure all servos move freely ® servo arm screws provided; the size is through their rotations and no linkages different from other manufacturers. -
Page 86: Daily Flight Checks
Make sure that the switch 4. Perform a ground range check before harness moves freely in both directions. each day's flying session. The range check should be as follows: XP6102 - Manual www.modelflight.com.au – World’s best source of JR products... -
Page 87: Frequency Chart
Commission (FCC) requires that by a non-certified technician may result changes in transmitter frequency must be in a violation of FCC rules. performed only Channels 12–14 are not available through JR ® XP6102 - Manual www.modelflight.com.au – World’s best source of JR products... -
Page 88: Warranty Information
Repair Normal Non-Warranty Repairs Should Service Directions your repair cost exceed 50% of the In the event that your JR radio needs retail purchase cost, you will be service, please follow the instructions provided with an estimate advising you of listed below. - Page 89 NOTES: XP6102 - Manual www.modelflight.com.au – World’s best source of JR products...
- Page 90 © 2003, Horizon Hobby, Inc. 4105 Fieldstone Road Champaign, Illinois 61822 (877) 504-0233 www.horizonhobby.com #6209 www.modelflight.com.au – World’s best source of JR products...
Need help?
Do you have a question about the XP6102 and is the answer not in the manual?
Questions and answers