Table of Contents
Advertisement
USER MANUAL FOR YOUR
HUZ107.1 107 litre
Built-under freezer
NOTE
: This User Instruction Manual contains important
information, including safety & installation points, which will
enable you to get the most out of your appliance. Please keep it
in a safe place so that it is easily available for future reference, for
you or any person not familiar with the operation of the appliance.
GS 18/05/12
Advertisement
Table of Contents

Related Manuals for HomeKing HUZ107.1


Summary of Contents for HomeKing HUZ107.1
- Page 1 USER MANUAL FOR YOUR HUZ107.1 107 litre Built-under freezer NOTE : This User Instruction Manual contains important information, including safety & installation points, which will enable you to get the most out of your appliance. Please keep it in a safe place so that it is easily available for future reference, for you or any person not familiar with the operation of the appliance.
-
Page 2: Table Of Contents
Contents Environmental note Important safety information 4–5 Specifications of your freezer Dimensions Description of the appliance Using your freezer Before switching on During first use Turning on the appliance and setting the thermostat Arranging and storing food in the fridge section 9-11 Making ice-cubes Cleaning and maintenance... -
Page 3: Environmental Note
Environmental note Note : Before discarding an old appliance, switch off and disconnect it from the power supply. Cut off and render any plug useless. Cut the cable off directly behind the appliance to prevent misuse. This should be undertaken by a competent person. Disable the door lock to make sure that children cannot get stuck inside the appliance. -
Page 4: Important Safety Information
Important safety information Your safety is of the utmost importance to us. Please make sure that you read this instruction booklet before attempting to install or use the appliance. If you are unsure of any of the information contained in this booklet, please contact the Advice Li IMPORTANT: Any installation work must be carried... - Page 5 Child safety o Packaging material should be kept away from children. o Children should not be allowed to touch the controls or play with the appliance. General safety o Do not pull on the power supply cable to remove the plug from your mains supply socket.
-
Page 6: Specifications Of Your Freezer
Specifications of your freezer o Total gross capacity: 107 litres o Total net capacity: 95 litres o Manual defrost o Freezing capacity: 9 kg / 24 hours o Adjustable thermostat o Temperature rise warning light o 3 Freezer drawers o Reversible door o Door-on-door fittings Dimensions of appliance Height:... -
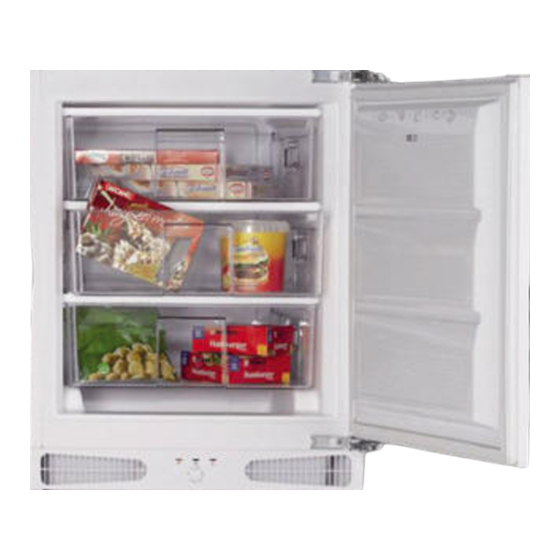
Page 7: Description Of The Appliance
Description of the appliance 1) Thermostat dial 2) Freezer drawers Using your freezer Before switching on o Make sure that it has been installed by a suitably qualified person, as per the information contained in the installation instructions. o After delivery, wait for eight hours before connecting the appliance to your mains supply. -
Page 8: During First Use
o The interior of the appliance should be cleaned with a solution of sodium bicarbonate dissolved in lukewarm water. The interior and accessories should be thoroughly dried, after the cleaning process has been completed. o There can be an odour when you first switch on the appliance. It will lessen as the appliance starts to cool. -
Page 9: Arranging And Storing Food In The Fridge Section
o Position <SF> will cause the compressor to run continuously with maximum performance. The freezer temperature will decrease appliance will switch lowest temperature. This can be used for food that needs to be frozen quickly. You should place the food to be frozen quickly ideally in the middle drawer. - Page 10 o For optimum appliance performance and to reach maximum freezing capacity, turn the thermostat dial to the <SF> position when placing fresh food in the freezer. o After placing fresh food in the freezer, 24 hours on <SF> mode is generally sufficient. After 24 hours you should deactivate the <SF>...
-
Page 11: Making Ice-Cubes
o Warm food should be allowed to cool down before you attempt to freeze it. If you place warm food in the freezer section, then the increased humidity will cause quicker ice formation and increase the amount of power that the appliance uses. Making ice-cubes o When making ice-cubes, fill the ice tray 2/3 with water and place it in the freezer compartment. -
Page 12: Defrosting The Freezer
o After washing the appliance, wipe over the area that you have cleaned with a damp cloth and then dry it thoroughly. o When cleaning is complete, dry your hands and then reconnect the plug to your mains supply. Defrosting the freezer IMPORTANT: Never use sharp metal tools to remove the frost as this can damage the refrigeration circuit. -
Page 13: Installation
o Clean the interior by hand using lukewarm water and a little detergent. NEVER use abrasive products or aggressive cleaning agents. o Dry the inside of the appliance and plug in the mains. Set the thermostat dial to position <5> for 24 hours before resetting the thermostat dial to the normal position. -
Page 14: Positioning
The blue wire must be connected to the terminal marked “N” (neutral), or coloured black. The green and yellow wire must be connected to the terminal marked “E” (earth), or by the earth symbol, or coloured green and yellow. o When the connection is completed, no stray strands or cut wire should be present. -
Page 15: Aperture And Appliance Dimensions
Aperture and appliance dimensions o The diagram above shows the aperture size that you will need to be able to install your appliance. Supplied installation components o The diagrams below show the contents of the supplied installation kit and the tools you will require to carry out the installation process. -
Page 16: Installing Your Freezer
7) Water gauge 8) Wrench 9) Setsquare 10) Screwdriver Installing your freezer If you need the appliance door to open from the other side, then please reverse the door before commencing the installation process. (See “Reversing the door” section). o Remove the screw (5) at the top of the appliance and place the top bracket (6) in its place. - Page 17 o Take out the gasket (11) located on the side panel and remove the protective tape. o Stick the gasket on the reverse side of the door hinges of the appliance. o You should use a water gauge (7) to ensure the appliance is level.
- Page 18 o Slide the appliance into the kitchen unit and align the hinge surface with the front surface of the kitchen unit using a setsquare (9). o Screw the hinges and metal bracket to the kitchen unit using screws (1). o Unscrew and remove the nuts and washers from the appliance door.
- Page 19 o Dimension B: Measure from the underside surface of the kitchen unit to the bottom of the door hang. o Dimension C: Measure from the underside surface of the kitchen unit to the top of the next unit door. o Subtract measurement C from measurement B. Place the door hang (2) using this dimension for the vertical position and place it in the centre for the horizontal position.
- Page 20 o Close the door and check the alignment with the other cabinet doors. Make the adjustment of the unit door by screwing or unscrewing the adjustment bolts using a screwdriver (10) for vertical adjustment and by the help of the slots on the door hang for other directions.
-
Page 21: Ventilation Requirements
o Slide the hang cover (4) onto the door hang. o Position the plinth providing a minimum 25 mm gap between the cabinet door and fix it. NOTE: There are ventilation slots in the front of this appliance. If the height of the plinth covers any of the ventilation slots, then a cut-out must be made in the plinth to ensure that all of the ventilation slots are exposed. -
Page 22: Reversing The Door Of Your Appliance
Reversing the door of your appliance Caution! After unscrewing any of the fixing hinges, hold the door to prevent it from falling and causing damage. Any parts that you remove from the appliance whilst reversing the door, should be retained for later use. o Unscrew the screws on the front surface of the appliance door. -
Page 23: Troubleshooting
o Move the hole plugs to the opposite side. o Assemble the door upper hinge and door lower hinge to the opposite corners of their original position. o Assemble the appliance door. Troubleshooting IMPORTANT: If your freezer appears not to be operating properly, before contacting the Customer Care Department, please refer to the checklist below. - Page 24 There is water in the base of the freezer or leaking out of my freezer. o Follow the “Defrosting the freezer” section on pages 12 - 13.
-
Page 25: Technical Data
Technical Data Manufacturer HOMEKING Model Number HUZ107.1 Product Category 8 – Upright Freezer Energy Efficiency Class (1) Annual Energy Consumption (2) 187 kWh Storage Volume of Fridge Compartment Storage Volume of Freezer 95 litres Compartment Star Rating Frost Free Compartments... -
Page 28: Contact Details
United Kingdom 6 Bennet Road, Reading, Berkshire RG2 0QX United Kingdom Customer Care (0118) 933 6918...
Need help?
Do you have a question about the HUZ107.1 and is the answer not in the manual?
Questions and answers
Where are the air vents
I have los the manual
I dont know the precise version all it says on the door is Home King where are the vebts on an old model
The vents are located in the front of the appliance.
This answer is automatically generated