Sub-Zero 315I Technical Service And Parts Manual
Hide thumbs
Also See for 315I:
- Service manual (9 pages) ,
- Technical service and parts manual (8 pages) ,
- Planning information (5 pages)
Table of Contents
Advertisement
Quick Links
T T e e c c h h n n i i c c a a l l S S e e r r v v i i c c e e
a a n n d d P P a a r r t t s s M M a a n n u u a a l l
M M o o d d e e l l 3 3 1 1 5 5 I I
M M o o d d e e l l 3 3 1 1 5 5 I I
( ( U U n n d d e e r r c c o o u u n n t t e e r r I I c c e e M M a a k k e e r r ) )
( ( U U n n d d e e r r c c o o u u n n t t e e r r I I c c e e M M a a k k e e r r ) )
© SUB-ZERO FREEZER COMPANY INC.
2005 ALL RIGHTS RESERVED
JOB AID #3757320
(Revision B. - August, 2005)
Advertisement
Table of Contents
Troubleshooting

Related Manuals for Sub-Zero 315I


Summary of Contents for Sub-Zero 315I
- Page 1 ( ( U U n n d d e e r r c c o o u u n n t t e e r r I I c c e e M M a a k k e e r r ) ) © SUB-ZERO FREEZER COMPANY INC.
- Page 3 General Information Model 315I (UC Ice Maker) SECTION 1 GENERAL INFORMATION #3757320 - Revision B - August, 2005...
-
Page 4: Introduction
Model 315I (UC Ice Maker) INTRODUCTION This Sub-Zero Technical Service and Parts Manual (Job Aid Part #3757320) for the Model 315W is a compilation of information provided by the Scotsman Company and has been reprinted by Sub-Zero Freezer Company, Inc., with the permission of the Scotsman Company. -
Page 5: Table Of Contents
Ice Making (Freeze) Cycle ..........3-4 Components Behind Panels & Shell ........ 5-9 Harvest Cycle ..............3-5 Inlet Water Valve .............. 5-9 What to Expect from the Model 315I........ 3-6 Harvest Cycle Timer ............5-9 Ice ..................3-6 Terminal Board ..............5-9 Storage ................ - Page 6 General Information Model 315I (UC Ice Maker) Page # Circulating / Spray Pump..........5-10 Bin Level Control .............. 5-11 Cube Size Control ............5-11 Reservoir Fill Tube............5-12 Drain Pump Assembly (315IP Only) ........ 5-12 Condenser Fan Assembly ..........5-13 High-Side Filter-Drier............
-
Page 7: Warranty Information
ONE & FIVE YEAR Non-Residential Warranty Warranty Notes: Summary (Example: Office, Yacht, etc.) • Sub-Zero Freezer Company, Inc. assumes no liability • One Year TOTAL PRODUCT warranty, *parts and or responsibility for Sub-Zero products that have been labor. altered in any way, including the use of parts and/or •... -
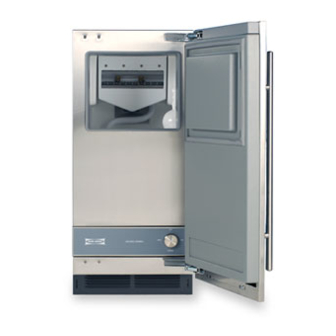
Page 8: Model Description
There are two 315I models with different drainage configurations, the Model 315I and Model 315IP: The model 315I is a gravity drain model that requires a drain tube that is pitched down from the outlet at the back of the cabinet directly to the sanitary sewer drain. -
Page 9: Section 2 - Installation Information
Installation Information Model 315I (UC Ice Maker) SECTION 2 INSTALLATION INFORMATION #3757320 - Revision B - August, 2005... -
Page 10: Pre-Installation Considerations
Other The model 315I uses a fan to take in room air through impurities are chemically bonded to the water mole- the front right side of the kickplate/grille and discharge cules, referred to as dissolved solids, and cannot be fil- warm air out the left side of the kickplate/grille. -
Page 11: Electricity
Drain There are two 315I models with different drainage con- figurations, the model 315I and model 315IP: The model 315I is a gravity drain model that requires a 1/8" 15" 1/8" drain tube that is pitched down from the outlet at the NOTE: This diagram back of the cabinet directly to the sanitary sewer drain. -
Page 12: Pre-Installation Specifications (Model 315I )
Leveling (Model 315I & 315IP) Note: The unit must be leveled prior to installation. There are four leveler legs on a model 315I, one at each corner. To level the unit, turn the leveler legs counterclockwise to raise the unit or clockwise to lower it. -
Page 13: Installation Instructions (Model 315I)
Check for leaks. 13. Replace all parts removed in step 2. Securing the Unit (Model 315I & 315IP) Once the icemaker is installed, secure the unit to the cabinet by inserting two #8 x 1/2” flat head screws (sup- plied with the unit) through the holes in the flange of each hinge. -
Page 14: Kickplate/Grille Adjustment
Figure 2-6. Kickplate/Grille Adjustment Door Reversing Door Swing Mounting Screws All model 315I units are manufactured with the hinges Upper on the right side of the door. The door and hinges are Door designed to be reversible, so that the hinges can be Panel moved to the left side of the door. -
Page 15: Stainless Steel Door Panels
Installation Information Model 315I (UC Ice Maker) Stainless Steel Door Panels Stainless steel door panels are available from local When the reveal on the hinge side of the door panel is Sub-Zero distributors/dealers. There are two sizes: less than 1/4”, use caution when closing the door as •... -
Page 16: Side Panels
Certain installations may require the door of the model upper and lower hinge covers, then adhere covers 315I to stop at 90° instead of the full 115°. A 90° door to top and bottom of each hinge bracket as shown stop pin is supplied with the unit. -
Page 17: Initial Start Up
Installation Information Model 315I (UC Ice Maker) Initial Start-Up When the installation is complete and all electrical and water hook-ups have been checked, be sure to remove all tape and packing materials before initial start-up. Follow the instructions below for initial start-up: 1. - Page 18 Installation Information Model 315I (UC Ice Maker) 2-10 #3757320 - Revision B - August, 2005...
-
Page 19: Section 3 - Theory Of Operation
Theory of Operation Model 315I (UC Ice Maker) SECTION 3 THEORY OF OPERATION #3757320 - Revision B - August, 2005... -
Page 20: Operating Systems
Theory of Operation Model 315I (UC Ice Maker) OPERATING SYSTEMS • Capillary Tube: The warm liquid refrigerant travels through the skinny capillary tube which is wrapped There are three operating systems in the icemaker: around the suction line and accumulator. As the warm liquid refrigerant travels through the capillary •... - Page 21 RELAY - CURRENT 115 / 60 / 1 CIRCUIT SCHEMATIC OVERLOAD COMPRESSOR LINE BIN LEVEL COMM TIMER CUBE SIZE CONTROL SWITCH CONTROL Figure 3-3. Electrical Schematic of Model 315I (During Ice Making Cycle) #3757320 - Revision B - August, 2005...
-
Page 22: Operational Cycles
Theory of Operation Model 315I (UC Ice Maker) OPERATIONAL CYCLES There are two operational cycles of the icemaker: • Ice Making (Freeze) Cycle • Harvest Cycle The ice making (freeze) cycle happens when water from the reservoir is sprayed into the ice cube molds at the bot- tom of the evaporator and the water freezes into cubes. -
Page 23: Harvest Cycle
Theory of Operation Model 315I (UC Ice Maker) Harvest Cycle During the harvest cycle the compressor is still operating, but the condenser fan and circulating spray pump are switched off. The hot gas valve opens, interrupting the flow of warm refrigerant from the compressor to the con- denser, diverting it to the evaporator. -
Page 24: What To Expect From The Model 315I
WHAT TO EXPECT FROM THE MODEL 315I The model 315I will release a batch of eight ice cubes approximately every thirty minutes. At the same time the cubes fall into the bin, water will be filling the reservoir and carrying the mineral impurities down the drain. -
Page 25: Maintenance & Cleaning
Maintenance & Cleaning Model 315I (UC Ice Maker) SECTION 4 MAINTENANCE, CLEANING AND ADJUSTMENT INFORMATION #3757320 - Revision B - August, 2005... -
Page 26: The Five Things To Keep Clean
Maintenance & Cleaning Model 315I (UC Ice Maker) ICE MAKER MAINTENANCE & CLEANING Never keep anything in the ice storage bin that is The ice maker should never be allowed to operate with- not ice. Objects such beverage containers may be out regular maintenance and cleaning. -
Page 27: Cleaning Ice Making System
To keep the ice machine operating properly, these impurities or minerals will have to be dissolved regularly with ice machine cleaner. (Sub-Zero part #19034306) 3. Pour four ounces of Ice Machine Cleaner (part THE ICE MACHINE CLEANER SOLD BY SUB-ZERO #19034306) into CONTAINS ACIDS WHICH MAY CAUSE BURNS. ice maker water ALWAYS WEAR HEAVY RUBBER GLOVES AND reservoir. -
Page 28: Winterizing The Ice Machine
Maintenance & Cleaning Model 315I (UC Ice Maker) Winterizing the Ice Machine Spray Pump The instructions below are for those units installed in homes left unoccupied for extended periods of time dur- ing winter months. If the ice maker is in a residence used year round, these directions need not be followed. -
Page 29: Adjustments
Maintenance & Cleaning Model 315I (UC Ice Maker) ADJUSTMENTS Adjusting Screw There are three items that may be adjusted: Cube Size, Harvest Cycle Time and Bin Ice Level. NOTE: Cube Size and Harvest Cycle Time Adjustments should only be performed by a qualified technician. -
Page 30: Bin Level Adjustment
Maintenance & Cleaning Model 315I (UC Ice Maker) Bin Ice Level Adjustment When the ice machine shuts off, the ice level in the bin should be even with the metal tube inside the bin. If the ice in the bin is too high or too low, turn the ice machine control knob to adjust the bin thermostat accordingly. -
Page 31: Component Access And Removal
Component Access/Removal Model 315I (UC Ice Maker) SECTION 5 COMPONENT ACCESS AND REMOVAL #3757320 - Revision B - August, 2005... - Page 32 Model 315I (UC Ice Maker) COMPONENT ACCESS AND REMOVAL This section explains how to access and remove components in a model 315I ice maker. This section is arranged as follows: Exterior components; followed by the internal components; followed by com- pressor area components.
-
Page 33: Exterior Components
Component Access/Removal Model 315I (UC Ice Maker) EXTERIOR COMPONENTS Kickplate Kickplate Removal The kickplate is held in place with two screws, one at each side. To remove the kickplate, extract the screws and pull the kickplate forward. (See Figure 5-1) Figure 5-1. -
Page 34: Door
Component Access/Removal Model 315I (UC Ice Maker) Door Removal The door is held in place by screws that pass through the top and bottom hinges into the face of the door. To remove the door, the door panel will need to be removed first. -
Page 35: Inner Control Access Panel
Component Access/Removal Model 315I (UC Ice Maker) Inner Control Access Panel Removal The inner control access panel is behind the control panel assembly. The access panel is held in place with Access three screws that pass through the panel into the unit... -
Page 36: Lower Cabinet Face Plate
Component Access/Removal Model 315I (UC Ice Maker) Lower Cabinet Face Plate Removal The lower cabinet face plate is attached to the cabinet with screws: two screws pass through the bottom hinge and the face plate, and two screws pass through the face plate on the handle side. -
Page 37: Components In Bin Area
Component Access/Removal Model 315I (UC Ice Maker) COMPONENTS IN BIN AREA Bin Thermostat Bracket Removal Push brack- et back; The bin thermostat bracket is a hollow cylindrical tube lift front up; which holds the bin thermostat control bulb. The brack- pull forward. -
Page 38: Reservoir Drain Hose
Component Access/Removal Model 315I (UC Ice Maker) O-Ring and Spray Bar Assembly Removal Spray Jet Circulating/Spray The spray bar is a copper tubing assembly with one Assembly Pump inlet port and two outlet ports. The inlet fits inside the circulating/spray pump discharge tube. An O-ring is positioned at the top of each spray bar outlet port. -
Page 39: Components Behind Panels & Shell
Component Access/Removal Model 315I (UC Ice Maker) COMPONENTS BEHIND PANELS AND Outlet SHELL Valve Inlet Water Valve Removal Inlet The inlet water valve is attached to the left side of the control box with screws. The inlet and outlet water lines are connected to the valve with compression fittings. -
Page 40: Hot Gas Solenoid Coil
Component Access/Removal Model 315I (UC Ice Maker) Hot Gas Solenoid Coil Removal Clip Solenoid Coil The hot gas solenoid coil is attached to the top of the hot gas valve body with a clip. The electrical leads of the coil pass through a grommet in the side of the con- trol box and plug into the terminal board. -
Page 41: Bin Level Control
Component Access/Removal Model 315I (UC Ice Maker) Bin Level Control (Thermostat) Removal Control Box Face Plate The bin level control is mounted to the right side of the Bin Level Control control box face plate with screws. Two wires are con- nected to the back of the control. -
Page 42: Reservoir Fill Tube
Component Access/Removal Model 315I (UC Ice Maker) Reservoir Fill Tube Assembly Removal Tape Water Valve Outlet The reservoir fill tube assembly is attached to the water valve outlet port. The tube is routed to the rear of the base assembly, up through a grommet in the base... -
Page 43: Condenser Fan Assembly
Component Access/Removal Model 315I (UC Ice Maker) Condenser Fan Assembly Removal The condenser fan motor is attached to the fan bracket with screws that pass up through the bracket into the Fan Blade motor body. The fan bracket is attached to the base... -
Page 44: Evaporator Assembly
Component Access/Removal Model 315I (UC Ice Maker) Evaporator Assembly Removal Tape The evaporator assembly consists of the evaporator, heat exchanger assembly and hot gas line from the gas Tape valve. The evaporator/cube mold sits inside the top of the reservoir insert. The evaporator/platen cover is... -
Page 45: Compressor
Component Access/Removal Model 315I (UC Ice Maker) Compressor Removal The compressor sits on the bottom plate of the base assembly. Two “U” shaped compressor brackets are passed up through the base plate, compressor grom- mets and washers. Cotter-pin clips are attached to the... - Page 46 Component Access/Removal Model 315I (UC Ice Maker) 5-16 #3757320 - Revision B - August, 2005...
-
Page 47: Section 6 - Parts Lists & Exploded Views
Parts Lists Model 315I (UC Ice Maker) SECTION 6 PARTS LISTS & EXPLODED VIEWS #3757320 - Revision B - August, 2005... -
Page 48: Cabinet
Parts Lists Model 315I (UC Ice Maker) CABINET 10 11 20 (Includes 21) Item # Part # Description 02385901 Cover, Upper Hinge/Door, RH 02385902 Cover, Upper Hinge/Door, LH A37854001 Bracket, Panel Mount Top 03163803 Screw, #8-32X3/8 (2) A37822001 Bracket, Panel Mount... -
Page 49: Major Assemblies
Parts Lists Model 315I (UC Ice Maker) MAJOR ASSEMBLIES 17 (includes 3 & 6) Not shown: Pump Wire Harness 26, 27 17a,17b, Item # Part # Description 02227401 Platen Cover 13067401 Tube (Requires 37") A34816001 Bin Thermostat Bracket 02348920 Evaporator (Does NOT... -
Page 50: Condensing Unit
Parts Lists Model 315I (UC Ice Maker) CONDENSING UNIT Item # Part # Description Item # Part # Description 18875210 Spacer 03140408 Screw (4) 18875211 18371001 Fan Blade 18875212 Screw A28798001 Fan Motor Bracket 12121310 Bushing 12239601 Fan Motor 13060900 Gasket ( Req. -
Page 51: Reservoir
Parts Lists Model 315I (UC Ice Maker) RESERVOIR Item # Part # Description Item # Part # Description 02247921 Curtain 13061708 O-Ring A24155001 Curtain Stiffener 02270401 Spray Bar Assy 03140416 Screw 05059301 SS Nipple 02184100 Nozzle 13061701 O-Ring A09543000 Spinner... -
Page 52: Control Box
Parts Lists Model 315I (UC Ice Maker) CONTROL BOX Item # Part # Description Item # Part # Description A25981001 Terminal board 12121312 Bushing 03140307 Screw 03140317 Screw 12198021 Timer and Switch 02224206 Spacer 11050321 Cube Size Control 02224205 Spacer... -
Page 53: Compressor
Parts Lists Model 315I (UC Ice Maker) COMPRESSOR Item # Part # Description 18877621 Compressor, Complete (Includes all parts listed below) 18877651 Relay 18877652 Overload 18877654 Cover 02349001 High-Side Filter-Drier 18470028 Grommet 03140708 Washer, 3/8” 03160000 Clip #3757320 - Revision B - August, 2005... - Page 54 Parts Lists Model 315I (UC Ice Maker) #3757320 - Revision B - August, 2005...
-
Page 55: Section 7 - Troubleshooting Guide
Troubleshooting Guide Model 315I (UC Ice Maker) SECTION 7 TROUBLESHOOTING GUIDE #3757320 - Revision B - August, 2005... -
Page 56: Troubleshooting Guide
Troubleshooting Guide Model 315I (UC Ice Maker) TROUBLESHOOTING GUIDE This section of the manual contains the Troubleshooting Guide which will help the Service Technician troubleshoot a model 315I. How to Use the Troubleshooting Guide The list below indicates how the Troubleshooting Guide is arranged. Identify the description of the problem that the unit is experiencing from the list and go to the page indicated. - Page 57 Troubleshooting Guide Model 315I (UC Ice Maker) PROBLEM POSSIBLE CAUSE TEST / ACTION A. Ice machine does not The ice machine control is turned to Turn ice machine control to ON or operate the OFF position NORMAL position Circuit breaker switch tripped off or Reset circuit breaker / replace fuse.
- Page 58 Troubleshooting Guide Model 315I (UC Ice Maker) PROBLEM POSSIBLE CAUSE TEST / ACTION B. Ice machine operates, No airflow through condenser a. Check for obstructions in vents of kick- but will not make ice plate. Move/clear obstruction. (Continued) b. Check for dirty condenser. Clean con- denser.
- Page 59 Troubleshooting Guide Model 315I (UC Ice Maker) PROBLEM POSSIBLE CAUSE TEST / ACTION D. Ice machine operates, Bin takes 24 - 36 hours for initial fill This is normal. Heavy/frequent ice con- makes ice, but does not sumption by customer will slow the refill fill bin process.
- Page 60 Troubleshooting Guide Model 315I (UC Ice Maker) #3757320 - Revision B - August, 2005...
-
Page 61: Technical Data
Technical Data Model 315I (UC Ice Maker) SECTION 8 TECHNICAL DATA #3757320 - Revision B - August, 2005... -
Page 62: Bin Capacity & Ice Production
Technical Data Model 315I (UC Ice Maker) BIN CAPACITY AND ICE PRODUCTION Bin Storage Capacity 26 lbs Ice Production (24 Hours) 18 - 30 lbs WATER VALVE FLOW RATE .2 gpm SEALED SYSTEM INFORMATION Refrigerant Charge (134a) 5 oz. Approximate Low Side Pressure (at End of Freeze Cycle) -
Page 63: Section 9 - Wiring Diagrams & Schematics
Wiring Diagrams/Schematics Model 315I (UC Ice Maker) SECTION 9 WIRING DIAGRAMS AND SCHEMATICS #3757320 - Revision B - August, 2005... - Page 64 Wiring Diagrams/Schematics Model 315I (UC Ice Maker) Model 315I Wiring Diagram and Schematic #3757320 - Revision B - August, 2005...
- Page 65 Wiring Diagrams/Schematics Model 315I (UC Ice Maker) Model 315IP Wiring Diagram and Schematic #3757320 - Revision B - August, 2005...
- Page 66 Wiring Diagrams/Schematics Model 315I (UC Ice Maker) #3757320 - Revision B - August, 2005...
Need help?
Do you have a question about the 315I and is the answer not in the manual?
Questions and answers