
Related Manuals for Kramer SID-X3N


Summary of Contents for Kramer SID-X3N
- Page 1 K R A ME R E LE CT R O N IC S L TD . USER MANUAL MODEL: SID-X3N Step-in Commander P/N: 2900-300304 Rev 2...
-
Page 4: Table Of Contents
Configuring and Maintaining the SID-X3N Setting the Configuration DIP-switch Technical Specifications Figures Figure 1: SID-X3N Step-in Commander Front Panel Figure 2: SID-X3N Step-in Commander Rear Panel Figure 3: Connecting the SID-X3N Step-in Commander Figure 4: Remote Step-In Switch and LED Wiring... -
Page 5: Introduction
Introduction Welcome to Kramer Electronics! Since 1981, Kramer Electronics has been providing a world of unique, creative, and affordable solutions to the vast range of problems that confront video, audio, presentation, and broadcasting professionals on a daily basis. In recent years, we have redesigned and upgraded most of our... -
Page 6: Getting Started
Avoid interference from neighboring electrical appliances that may adversely influence signal quality Position your Kramer SID-X3N away from moisture, excessive sunlight and dust This equipment is to be used only inside a building. It may only be connected to other equipment that is installed inside a building. -
Page 7: Recycling Kramer Products
Kramer Electronics has made arrangements with the European Advanced Recycling Network (EARN) and will cover any costs of treatment, recycling and recovery of waste Kramer Electronics branded equipment on arrival at the EARN facility. For details of Kramer’s recycling arrangements in your particular country go to our recycling pages at http://www.kramerelectronics.com/support/recycling/. -
Page 8: Overview
HDMI cable to a compatible switcher, (for example, the VS-62H). The device also provides an unbalanced, stereo audio output. When the SID-X3N is connected to a switcher, it can also control the input selection of the switcher. -
Page 9: Defining The Sid-X3N Step-In Commander
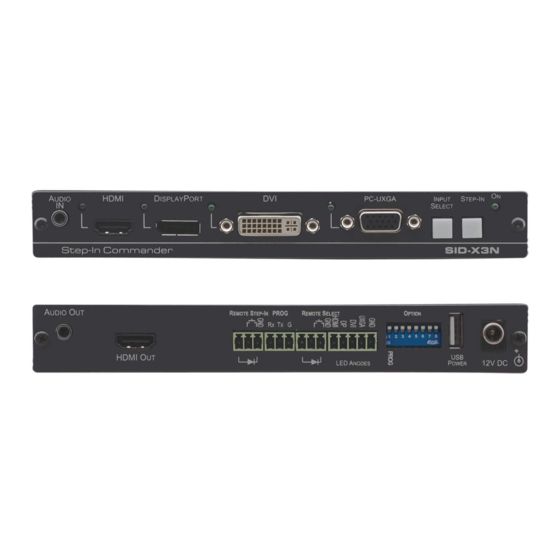
Defining the SID-X3N Step-in Commander Figure 1 defines the front panel of the SID-X3N. Figure 1: SID-X3N Step-in Commander Front Panel Feature Function AUDIO IN 3.5mm Mini Jack Connect to an unbalanced stereo audio source Lights green when the HDMI input is selected... -
Page 10: Figure 2: Sid-X3N Step-In Commander Rear Panel
Figure 2 defines the rear panel of the SID-X3N. Figure 2: SID-X3N Step-in Commander Rear Panel Feature Function AUDIO OUT 3.5mm Mini Jack Connect to an unbalanced, stereo audio acceptor, (see Section HDMI OUT Connector Connect to a compatible switcher, for example, VS-62H using an... -
Page 11: Connecting The Sid-X3N
Connecting the SID-X3N Switch off the power to all devices before connecting them to your SID-X3N. After connecting your SID-X3N connect the power to other devices. Figure 3: Connecting the SID-X3N Step-in Commander To connect the SID-X3N as illustrated in Figure 1. -
Page 12: Connecting The Remote Step-In Switch And Led
8. If required, connect a device requiring a 5V DC power supply, (for example, the KW-11T, not shown in Figure 9. Connect the power adapter to the SID-X3N and to the mains power, (not shown in Figure Note: All LED supplies include a current limiting resistor and are designed to work with any standard LED. -
Page 13: Connecting The Remote Select Switch And Led
You can connect a remote, contact closure, input selection switch to activate an input (momentary contact is sufficient to switch inputs), as well as an indicator LED to the terminal block on the rear panel of the SID-X3N. Figure 5 illustrates the connections from the terminal block to the switch and LED. -
Page 14: Connecting The Remote Input Selection Leds
Connecting the Remote Input Selection LEDs You can connect remote, input selection LEDS to the LED terminal block on the rear panel of the SID-X3N to indicate which is the active input. Figure 6 illustrates the connections from the terminal block to the LEDs. -
Page 15: Principles Of Operation
In last connected mode the SID-X3N selects the input based on which input was connected last. If the signal on this input is subsequently lost for any reason, the input with a live signal with the highest priority is selected automatically. -
Page 16: Audio Signal Control
Audio on Output On/Off On/Off On/Off 3.5mm mini jack On/Off Inserted HDMI/DP/DVI 3.5mm mini jack Not inserted Embedded HDMI/DP/DVI On/Off Inserted/Not inserted HDMI/DP Embedded HDMI/DP Inserted/Not inserted DVI Embedded DVI Inserted/Not inserted 3.5mm mini jack SID-X3N - Principles of Operation... -
Page 17: Operating The Sid-X3N
Taking Control of the Switcher Input When Connected to the VS-62H To activate the input of the VS-62H to which the SID-X3N is connected, press the STEP-IN button. If the VS-62H grants the SID-X3N access to the input, the STEP- IN button lights. -
Page 18: Locking The Edid
EDID, set DIP-switch 5 to ON (see Section 8.1). Note: The device must be power-cycled after you change this DIP-switch. Audio Mode Selection The Option DIP-switches 2 and 3 control the manner in which audio is handled (see Section 8.1). SID-X3N - Operating the SID-X3N... -
Page 19: Configuring And Maintaining The Sid-X3N
For future use Note: DIP-switch 2 must be set to ON to enable DIP-switch 3 to control the DVI audio mode selection. SID-X3N - Configuring and Maintaining the SID-X3N... -
Page 20: Technical Specifications
18.8cm x 11.3cm x 2.5cm (7.4” x 4.5” x 1”) W, D, H DIMENSIONS: WEIGHT: 0.48kg (1.1lbs) approx. INCLUDED Power adapter ACCESSORIES: 19“ Rack adapter RK-T2B, RTBUS-12, RTBUS-22, SID-X1BP Kit OPTIONS: (substitute black top plate for the SID-X3N to blend in with the color of the modular TBUS-10xl) SID-X3N - Technical Specifications... - Page 22 For the latest information on our products and a list of Kramer distributors, visit our Web site where updates to this user manual may be found. We welcome your questions, comments, and feedback. Web site: www.kramerelectronics.com E-mail: info@kramerel.com SAFETY WARNING...
Need help?
Do you have a question about the SID-X3N and is the answer not in the manual?
Questions and answers