Advertisement
Advertisement
Table of Contents

Summary of Contents for HotmixPRO Gastro
- Page 1 INSTRUCTION MANUAL...
-
Page 2: Table Of Contents
CONTENTS General information…………………………………………………………………………........page Warnings before use……………………………………………………………..……………......page Freight, package and storage....……………………….………..…………......page Product description………………………………………………………………………………......page Accessories…………………………………………………………….……………….…………......page Cleaning…………………………………...………………………………………….……….........page How to operate..……………………………………….…………………………………….......page How to use the product properly……………………………………………….……......page Recycling and waste..……………………………...………………………..………......page Technical specifications………………………………..……………….…………………......page Please read carefully this manual prior to the first use of the appliance. It is fundamental to get the best results out of the product and the highest level of safety. -
Page 3: General Information
GENERAL INFORMATION About the manual This manual contains information on installation, operation and maintenance of the equipment and must be consulted as a reference guide. Reading this book provides a safe and proper use of the appliance. In addition to the information provided with this manual, you must comply with local health standards and applicable general safety regulations. -
Page 4: Warnings Before Use
WARNINGS BEFORE USE • Before using the appliance, please check that the voltage of the electricity grid corresponds to the one indicated on the label of the device. Only connect the machine to an outlet that has a minimum capacity of 10 A and an effective earthing system. •... -
Page 5: Freight, Package And Storage
only a service facility authorized by the manufacturer and ask the use of original spare parts. Failure to comply with this rule may jeopardize the safety of the appliance. • When you decide to permanently delete the device, after removing the plug from the socket, it is recommended the cutting of the power cord. -
Page 6: Instructions For Use
- Avoid mechanical shock and vibrations. - In case of prolonged storage (> 3 months) make sure that the state of the package and all its parts are in good condition. If necessary, renew the packaging. INSTRUCTIONS FOR USE • Before using the appliance for the first time, thoroughly clean all the accessories such as bowl, lid, measuring cap, blades and spatula, following the procedures described later. -
Page 7: Product Description
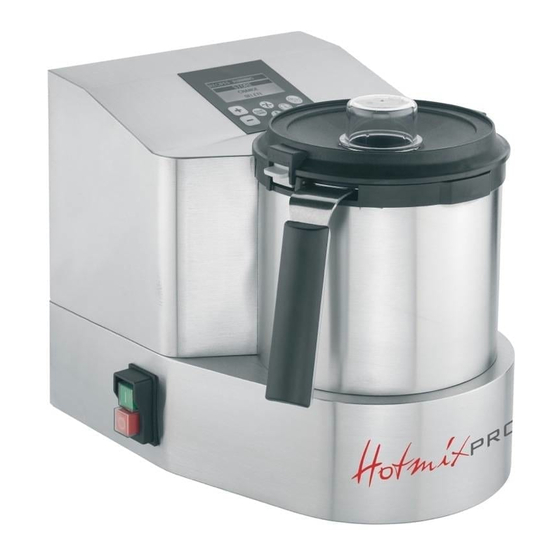
PRODUCT DESCRIPTION 1.Measuring cap 16. Liquid leaking hole 2. Cover 17. Mixing paddle 3. Magnet 18. Spatula 4. Flaps for lid opening and 19. Blades closing 20. Blades' locker 5. Lid gasket Optional accessories 6. Lid hole 21 Extra-sharped special 7. - Page 8 MACHINE DEVICES CONTROL PANEL (7) Menu: to access to the recipe menu. “+” “-“: to increase or decrease Speed, Time and Temperature parameters.. When "+" and "-" are used as pulse buttons, the parameters increase or decrease by one digit. If you keep pressing the buttons, the parameters will quickly increase or decrease, just depending on how long the buttons will stay pressed.
- Page 9 Speed: To set the operating speed, with 12 different options. HEATING ELEMENT (15) Electrical device for heating the bowl while cooking. WARNING: do not reheat the bowl when empty! WARNING: do not touch it, it could cause burns Gauge (14) It is the element enabled to control the temperature set.
-
Page 10: Accessories
slipping by. In case of severe fault, the spanner will switch on while anything else will switch off. The appliance must then be brought to a service center. MOTOR CONTROL THERMOSTATS Your appliance is equipped with two thermostats for motor protection: one dynamic and one static. - Page 11 CAUTION: Remove the seal periodically and clean the dirt between the seal itself and the cover. CAUTION: Take care to correctly reassemble the seal at its head, so that the lid closes well. CAUTION: Never put the lid in the dishwasher! MEASURING CAP (1) The cap has a dual function: when fit on the cover it prevents liquid leaking from the lid itself, and can be used as a handy measuring cup as well.
- Page 12 preparations volume increases, furthermore the higher speeds tend to increase the liquid level because of the centrifugal force. BOWL'S EXTRACTION Ensure that the unit is stopped, then press the buttons to open the lid. CAUTION: To stop the engine never open the lid. Use only the "START / STOP" switch. CAUTION: To remove the bowl, please use only the handle.
-
Page 13: Cleaning
WARNING: DO NOT put the blades in the dishwasher and do not use vinegar to clean them! CLEANING: Wash the blades only with water and detergent, possible using a toothbrush, trying to keep the bottom part of the blades protected by hand, so that little water may go through. -
Page 14: How To Operate
• Switch on the appliance by keeping the main switch pressed, the display will then switch on automatically and showing the HotmixPRO logo. To ensure safety and respect of energy saving, if you do not set any parameters, after about 5 minutes the unit will shut down, setting in "standby"... - Page 15 "+" and "-" symbols, define the new digits. Proceed as follows: • Press the START / STOP button to stop the appliance • Press the button corresponding to the parameter that you want to change for the setting • Press the "+" or "-" to set the new digit •...
- Page 16 TEMPERATURE Temperature selection: • Press the TEMPERATURE button. • Use "+" and "-" buttons to select the required temperature. The display will show the set temperature. • If you do not set any temperature as the machine has to work "cold", the display will show two horizontal lines to indicate that there is no heating.
- Page 17 The programs and the pre-stored recipes have been created by our chefs according to their personal taste, using ingredients available in our country. It is possible that different ingredients and a different personal taste will sort out a different outcome from what expected.
- Page 18 Delete of a pre-stored recipe STORAGE OF A RECIPE There are two ways to store one's own recipe: A. Directly from the machine, into the U file, it is possible to store number and name of a recipe, number of the steps required to complete it, and the operating parameters (speed, time and temperature).
- Page 19 accessory will flow on the display. On the next screen the indication “OPERATION COMPLETED” will appear. It will mean that all the necessary operations have been set. The indication will stay on for about 3 seconds, then a “beep” will announce the change to the next screen. In case a recipe needs to be prepared through various steps, press the START button ...
- Page 20 START to confirm and pass on to the line below. Position on YES with the “+” and “-” buttons and confirm by pressing the START button. The display will show the indication SURE DELETE, then get positioned on YES with the “+” ...
- Page 21 want the machine starts working; it must be confirmed by pressing "start / stop" as well. Next, the display shows the icon of the thermometer, if you want to set a temperature, always with the "+" and "-" buttons, and pressing the "start / stop" button to confirm. If you do not want any temperature, press the "start stop"...
-
Page 22: How To Use The Product Properly
In this case, the step being part of the chosen recipe starts. At the end of it, the machine stops and waits for the start of the next step, or it beeps while the recipe has been completed. WARNING: Always check that the ingredients are being introduced in the recommended amount as per the display indication. - Page 23 • After chopping very hard ingredients such as ice, nuts, chocolate, etc.., ALWAYS check that blades are still screwed perfectly. • When cooking, never exceed the litre and half of ingredients (including liquids and solids) otherwise you run the risk that the contents of the bowl could overspill. •...
-
Page 24: Recycling And Waste
and thus, in order to protect it, the intervention of a thermal protection will block the motor until it will cool down. Once cold, the unit will work again. • If, after preparing a "hot" recipe, you want to switch to a "cold" recipe, in order to speed up the cooling times it is recommended to let the appliance work at speed 10 for about 2 minutes. -
Page 25: Technical Specifications
TECHNICAL SPECIFICATIONS Power supply: 230V - 50 Hz Motor power: 1500 W Heater power: 800 W Bowl: Stainless Steel Max Capacity: 2 litres Overall dimensions: (H x W. X D) 29,6x25,8x31,2cm Weight: 11,1 Kg... - Page 26 INGREDIENT TOOL SPEED TIME TEMPERATURE QUANTITY Parsley, basil, aromatic herbs from 5 to 15 s.according to the recipe half a bowl Carrot, onion, celery from 4 to 6 from 10 to 30 s. according to the recipe min 50 g/max 500 g Blades Mixed vegetables from 5 to 10 s.
- Page 27 Vegetables Basket from 10 to 30 min. according to the recipe 100°C (212°F) 500 g Meat Fish...
Need help?
Do you have a question about the Gastro and is the answer not in the manual?
Questions and answers