Table of Contents
Advertisement
Zenit PhotoSniper
This text is identical to the one in the Instruction manual, English version.
Attention!
The present Instruction Manual contains brief characteristics and essential rules of using the
PHOTOSNIPER photogun.
Before using the photogun, make thorough study of the handling rules according to the present
Manual to master correct procedures.
Minor differences between the Description and your photogun may be due to ever-advancing
development of the camera and design.
To ensure long period and trouble/free operation of the camera the following should be kept
in mind:
Do not touch the surfaces of the optics with hands as it is likely to cause damage of the coating.
Do not turn the release button, if not necessary, while releasing the shutter to avoid the cutting out
of the shutter setting mechanism.
Do not rotate the shutter speed dial in the interval between "B" and "500".
While cocking the camera shutter, always turn the setting lever up to the mechanical limit to avoid
blank frames on the film.
Check the work of the shutter before loading the camera. To do this turn the shutter cocking lever
with one or more movements up to the mechanical limit. Then press the release button.
1. Application and Advantages
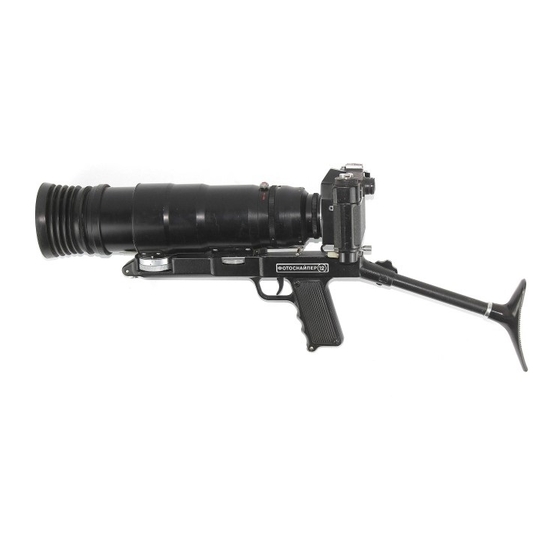
The PHOTOSNIPER photogun in a combination of a special TAIR-3-PhS long focus lens and ZENIT-
ES reflex camera. The lens with the camera is mounted on a gun stock with a grip fitted with a release
mechanism.
The photogun is designed for taking close-up picture of animals, birds and plants under natural
conditions.
The photogun can be successfully used for sports photograph as well as for taking close-up pictures
of distant architectural details.
The ZENIT-ES camera has many attractive features including an instant return mirror, providing
continuous watching of the subject to be photographed (except for the moment of exposure), built-in
exposure meter (particularly valuable when photographing on a colour film), shutter setting lever and
hinged back cover.
In the photograph of 13×18 cm size (5 times magnification of the negative picture size) one can
distinguish the details that can be clearly seen through the field glass. The size of the details
distinguishable in the picture equals approximately to 1/10000 of the taking distance.
The ZENIT-ES type camera of the photogun is fitted with a built-in uncoupled exposure meter and
an instant return mirror. Unlike the ZENIT-E camera, it has an additional release button at the bottom
of the camera body (coupling the camera with the grip trigger), more remote exit pupil of
the viewfinder eyepiece (for comfortable shooting) and 42×1 mm thread that makes possible to use
lenses from the Praktica, Asahi, Pentax, Pentacon, Edixa, etc. cameras as interchangeable ones.
Using the reflex viewfinder (ground glass focusing) and extension rings, one can do reproduction
Zenit PhotoSniper
– 1 –
User manual, 1992 year
Advertisement
Table of Contents

Related Manuals for Zenit PhotoSniper


Summary of Contents for Zenit PhotoSniper
- Page 1 The ZENIT-ES type camera of the photogun is fitted with a built-in uncoupled exposure meter and an instant return mirror. Unlike the ZENIT-E camera, it has an additional release button at the bottom of the camera body (coupling the camera with the grip trigger), more remote exit pupil of the viewfinder eyepiece (for comfortable shooting) and 42×1 mm thread that makes possible to use...
- Page 2 Zenit PhotoSniper User manual, 1992 year works, take pictures with large magnification (macrophotography) and photograph with the aid of a microscope (microphotography). The standard long focus TAIR-3-PhS lens has an automatic spring-loaded (“jumping”) pre-set diaphragm closing down to the pre-set position at the moment of shooting (when pressing the release trigger of the grip).
- Page 3 Zenit PhotoSniper User manual, 1992 year 26. Shoulder butt 27. Cover, front 28. Light filters 29. Cover, back 30. Self-timer setting lever 31. Self-timer release button 32. Flash unit connector socket 33. Film rewind release button 34. Exposure time scale 35.
- Page 4 Zenit PhotoSniper User manual, 1992 year 37. Cassette chamber 44. Lock latch 38. Cassette spool guide 45. Take-up spool spring 39. Viewfinder eyepiece 46. Sprocket 40. Eye hood 47. Film channel slides 41. Take-up spool 48. Shutter release button 42. Camera swing back 49.
-
Page 5: Specifications
49×0,75 Tripod socket thread of the TAIR-3-PhS lens and the ZENIT-ES camera ....OVERALL DIMENSIONS Of the photogun ready to use, mm .. - Page 6 Zenit PhotoSniper User manual, 1992 year 3. Place the cassette into the cassette chamber. Before doing this, pull the film rewind knob upwards. 4. Return the film rewind knob into its initial position and fix in this position by turning it in the arrow direction.
- Page 7 Zenit PhotoSniper User manual, 1992 year against the index mark in the middle of the dial. Figures on the exposure time dial indicate fractions of a second; “B” indicates hand- controlled exposure time. To obtain long exposure tome cock the shutter, set the exposure time dial at “B”, press the release button and turn it counter-...
- Page 8 2.5 to 10 m will be sufficiently sharp on the film. 5. Photographing 5.1. Photographing with the “Photosniper” Photogun 1. Prepare the photogun for picture taking. 2. Select a light filter according to the type of film, conditions of photography and the scene, and screw it into the the lens mount.
- Page 9 For photographing in poor illumination use should be made of flash bulbs or electronic flash. For this aim the ZENIT-ES is fitted with a special device which synchronizes the bulb flash moment with the shutter operating time. To switch on a single action flash bulb the synchronization setting lever should be set at “MF”.
- Page 10 The photogun with accessories is packed un in a stamped aluminium case where it is securely protected in any route conditions. The TAIR-3-PhS lens with the ZENIT-ES photographic camera is fastened to a bracket with a tripod screw. Spring clamps secure the shoulder butt at the bottom of the case.
- Page 11 Zenit PhotoSniper User manual, 1992 year 6.2. Accessories 6.2.1. Light filters The complete photogun set includes five light filters: Yellow filter Y-2 is widely used in landscape photography;improves right colour condition of blue, green and yellow objects; emphasizes clouds and increases contrast of shadows and remote objects;...
Need help?
Do you have a question about the PhotoSniper and is the answer not in the manual?
Questions and answers