Table of Contents
Advertisement
Thank you very much for purchasing the ZOOM
Please read this manual carefully to learn about all the functions of the
be able to use it fully for a long time.
Keep this manual in a convenient place for reference when necessary.
Usage and Safety Precautions ............... 2
Introduction ....................................... 3
Terms Used in This Manual ..................... 3
Part Names ....................................... 4
Turning the Power ON ........................... 6
Adjusting the Tone and Volume ............... 8
Adjusting Effects ................................. 10
Using the Boost Function ..................... 15
Using the Anti-Feedback Function ............ 16
Selecting and Saving Patch Memories ...... 18
Copying or reproduction of this document in whole or in part without permission is prohibited.
OPERATION MANUAL
Contents
© 2013 ZOOM CORPORATION
.
Changing Patch Memories ..................... 20
Changing Various Settings ..................... 22
Using the Tuner .................................... 28
About the Firmware .............................. 30
Default Settings .............................. 32
Effect Types and Parameters .................. 33
Troubleshooting ................................. 42
Specifications .................................... 43
so that you will
Advertisement
Table of Contents

Related Manuals for Zoom A3


Summary of Contents for Zoom A3
-
Page 1: Table Of Contents
OPERATION MANUAL Thank you very much for purchasing the ZOOM Please read this manual carefully to learn about all the functions of the so that you will be able to use it fully for a long time. Keep this manual in a convenient place for reference when necessary. -
Page 2: Usage And Safety Precautions
Use only a ZOOM AD-16 AC adapter with this unit. to minimize external electromagnetic interference. However, Do not use do anything that could exceed the ratings of outlets and other electrical wiring equipment. -
Page 3: Introduction
Introduction Acoustic modeling restores body tone Presets for 16 body types and 28 model types simulate the sonic characteristics of a variety of acoustic guitars with different body shapes and material properties. By choosing a body and model according to the guitar that you are using, you can share the original rich and beautiful tone of your acoustic guitar with audiences when you perform live. -
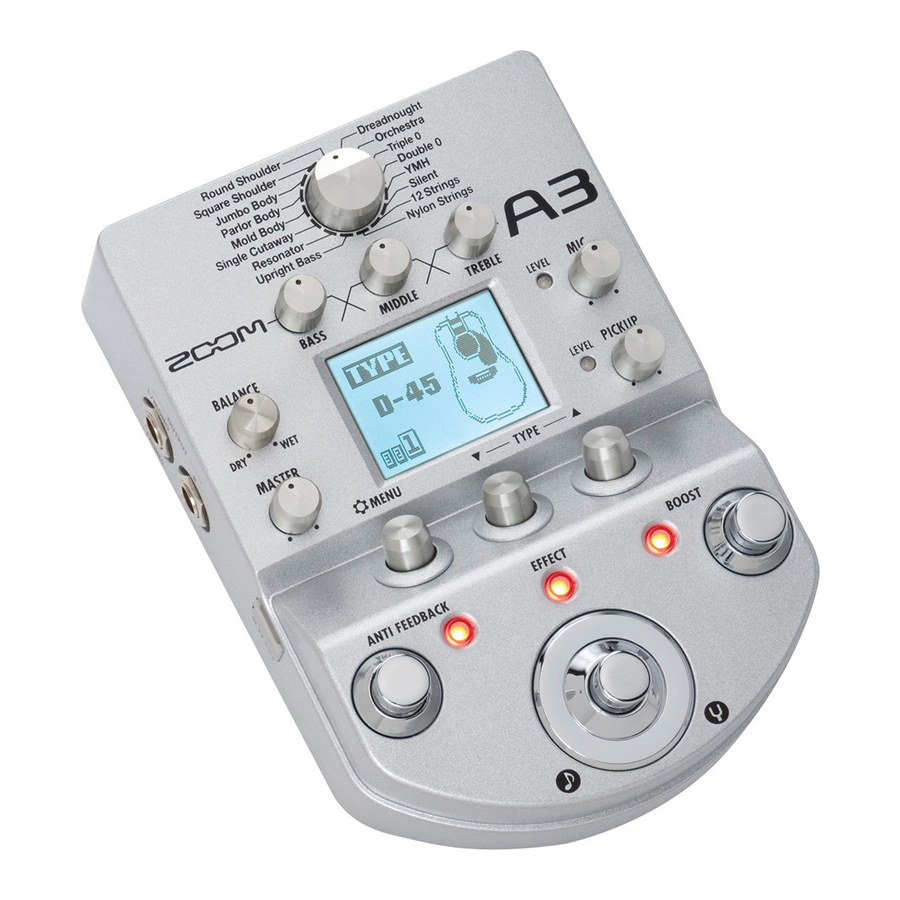
Page 4: Part Names
Top Panel Body type selector Headphones Equalizer knobs Balance knob OUTPUT jacks Master level knob Parameter knobs connector Anti-feedback PA system footswitch Anti-feedback switch Effect footswitch Rear Panel DC9V AC adapter jack Computer Microphone input jack Microphone ZOOM AC adapter (AD-16) - Page 5 Right Panel Pickup input jack Mic gain knob Display Pickup gain knob Effect switch Boost footswitch Acoustic Guitar Pickup type selection switch Use to set the best input characteristics Boost switch for the type of pickup used. Set it to PIEZO when using an acoustic guitar with a piezoelectric pickup or MAGNETIC when using a magnetic pickup.
-
Page 6: Turning The Power On
Turning the Power ON To turn the power ON Lower the volume of any connected amplifier or other audio equipment all the way. When using batteries When using an adapter Open the cover on the bottom of the unit Connect an AD-16 adapter. and insert batteries in the compartment. -
Page 7: Display Information
Display information The Home Screen shows the current effect Virtual knob Position of the selected effect in order Graphic for selected effect HINT to return to the Home Screen when any other screen is open. Edit Screen shows parameters being edited Page tabs Effect type Parameter names... -
Page 8: Adjusting The Tone And Volume
Adjusting the Tone and Volume To select the body type Choose the body type that matches your guitar. NOTE To adjust the input sensitivity For the pickup input For the mic input NOTE To select the model type on the Home Screen. to select Effect 1. - Page 9 To adjust the equalization HINT : Adjust to boost or cut low frequencies (around 60Hz) by up to ±12dB. : Adjust to cut middle frequencies (around 700Hz) by up to –12dB. : Adjust to boost middle frequencies (around 400Hz) by up to 12dB. : Adjust to boost or cut high frequencies (around 8kHz) by up to ±12dB.
-
Page 10: Adjusting Effects
Adjusting Effects Confirm that the Home Screen is shown. To turn an effect ON and OFF To select the effect to adjust to select the effect to adjust. HINT The selected effect appears on the Home Screen. NOTE... - Page 11 EDIT To select an effect type HINT NOTE Effect processing capacity allows you to combine 3 effects as you like. However, if you combine effect types that require great amounts of processing power, the available processing capacity might not be enough. If the processing required for an effect exceeds the available capacity, the effect is bypassed and a ”DSP Full!”...
- Page 12 Adjusting Effects To select the effect category for 1 second. to choose the category. HINT to cancel. To adjust parameters...
- Page 13 EDIT To change the page when the Edit Screen is open. To use the Tap Tempo function Delay effects and some modulation and filter effects can be synchronized to the tempo. Select an effect that can be synchronized, and set its Time, Rate or other parameter that can be synchronized to a or note value.
- Page 14 Adjusting Effects 2 or more times at the desired tempo. NOTE Press and hold for 1 second when becomes unlit and the effect turns OFF for 1 second. to return to the Home Screen. To set the tempo with the parameter knobs 2 or more times at the desired tempo.
-
Page 15: Using The Boost Function
Using the Boost Function BOOST You can increase the volume by up to 12 dB, allowing you to adjust the volume used during solos or when switching from strumming to finger picking. To turn the boost ON and OFF NOTE To adjust parameters Boost : Turn... -
Page 16: Using The Anti-Feedback Function
Using the Anti-Feedback Function The frequency range that is causing feedback can be detected automatically and cut to stop the feedback. To eliminate feedback NOTE when the unit starts up. turns ON. Detecting (blinking) , the unit detects the feedback frequency. Up to 3 frequencies can be cut at once. - Page 17 ANTI FEEDBACK To adjust parameters Depth of 1st filter: Turn Depth of 2nd filter: Turn Depth of 3rd filter: Turn NOTE To complete the setting...
-
Page 18: Selecting And Saving Patch Memories
Selecting and Saving Patch Memories You can save up to 20 effect settings as patches in the memory. When shipped from the factory, the automatic patch saving function is active. Changes to settings are saved automatically as soon as they are made. To select a patch memory on the Home Screen. - Page 19 MEMORY STORE To save a patch memory on the MEMORY screen. the patch memory. Turn to move the cursor. Turn to change the character. Press to change the type of character/symbol. Turn to select where to save the patch memory. NOTE HINT instead...
-
Page 20: Changing Patch Memories
Changing Patch Memories You can set in advance the order that patch memories are changed when you press the footswitch. You can add up to 20 patch memories to this order. To add or remove patch memories to a list that the footswitch cycles through on the Home Screen. - Page 21 MEMORY To cycle through patch memories in the list in order using the footswitch on the Home Screen. to select MEMORY. Each time you press the footswitch, the patch memory will change in the set order. HINT In the example on the right, pressing the footswitch cycles through the patch memories in alphabetical order like this.
-
Page 22: Changing Various Settings
Changing Various Settings To change various settings on the Home Screen. to select SETTINGS. HINT to return to the previous screen. to return to the Home Screen. - Page 23 SETTINGS To change mic input settings to select MIC. to select the item to set. to change the setting. PHANTOM settings LOW CUT settings MIC PHASE settings HINT NOTE to exit the PHANTOM page, the selected setting will become active. +48V setting, though, so it can help when using batteries.
- Page 24 Changing Various Settings To set the mix position of the mic input to select MIC MIX POSITION. to select the mic mix position. Effects 2 and 3 also affect Effect 3 also affects the mic No effects affect the mic the mic input.
- Page 25 SETTINGS To set the Auto Save function to select AUTO SAVE. to select the setting. HINT saved manually. (See page 19.) To select the battery type to select BATTERY TYPE. to set the type of batteries used. NEXT...
- Page 26 Changing Various Settings To check the remaining battery charge The remaining battery charge is shown at the top right of the MENU screen when batteries are in use. To adjust the display to select LCD SETTINGS. CONTRAST : Turn LIGHT (backlight time) : Turn...
- Page 27 SETTINGS To end making settings HINT to return to the previous screen.
-
Page 28: Using The Tuner
Using the Tuner To activate the tuner for 1 second. HINT A setting must be changed to make pressing and holding activate Tap Tempo. (See page 24.) To change the tuner’s standard pitch on the Tuner Screen. NOTE To select the tuner type on the Tuner Screen. - Page 29 TUNER String number/Note name Display Meaning GUITAR Standard tuning for guitars, including 7-string guitars OPEN A In open A tuning, the open strings make an A chord OPEN D In open D tuning, the open strings make a D chord OPEN E In open E tuning, the open strings make an E chord OPEN G...
-
Page 30: About The Firmware
About the Firmware To view the firmware versions on the Home Screen. to select VERSION. - Page 31 VERSION To download the latest firmware Update application To prepare to update the firmware , connect the unit to a computer using the USB cable. To update the firmware Launch the firmware update application on your computer, and execute the update. NOTE HINT firmware is being updated.
-
Page 32: Restoring The To Its Factory Default Settings
About the Firmware To complete updating has finished updating, “Complete!” appears on the display. HINT Restoring the to its Factory Default Settings 1. To use the All Initialize function , set the POWER switch to ON. 2. To execute the All Initialize function NOTE to cancel. -
Page 33: Effect Types And Parameters
Effect Types and Parameters Body Types Round Shoulder Dreadnought Best for guitars with round shoulders, such Best for dreadnought guitars, such as the as the Gibson J-45. Martin D-28. Square Shoulder Orchestra Best for guitars with square shoulders, Best for orchestra guitars, such as the such as the Gibson Hummingbird. - Page 34 Effect Types and Parameters Model Types D-28 D-18 D-45 000-28 Dreadnought Dreadnought Dreadnought Triple 0 Body characteristics Body characteristics Body characteristics Body characteristics o f a M a r t i n D - 2 8 , o f a M a r t i n D - 18 , o f a M a r t i n D - 4 5 , o f a M a r t i n 0 0 0 - which is a standard...
- Page 35 Parameter Parameter range Effect type Effect explanation This is a jet sound like an ADA flanger. Flanger Knob1 Knob2 Knob3 Depth 0–100 Rate 0–50 Reso -10–10 Page01 Sets the depth of the modulation. Sets the speed of the modulation. Adjusts the intensity of the modulation resonance. PreD 0–50 0–100...
- Page 36 Effect Types and Parameters ZOOM's unique noise reduction cuts noise during pauses in playing without affecting the tone. Knob1 Knob2 Knob3 THRSH 1–25 DETCT GtrIn, EfxIn Level 0–150 Page01 Adjusts the effect sensitivity. Sets control signal detection level. Adjusts the output level.
- Page 37 Chorus This effect mixes a shifted pitch with the original sound to add movement and thickness. Knob1 Knob2 Knob3 Depth 0–100 Rate 1–50 0–100 Page01 Adjusts the amount of effected sound Sets the depth of the modulation. Sets the speed of the modulation. that is mixed with the original sound.
- Page 38 Effect Types and Parameters [DELAY] This long delay has a maximum length of 4000 ms. Delay Knob1 Knob2 Knob3 Time 1–4000 F .B 0–100 0–100 Page01 Adjusts the amount of effected sound Sets the delay time. Adjusts the feedback amount. that is mixed with the original sound.
- Page 39 StompDly By turning the feedback up on this stomp-style delay, you can make it self-oscillate. Knob1 Knob2 Knob3 E.LVL 0–120 F .B 0–100 Time 1–600 Page01 Adjusts amount of effect sound Adjusts the feedback amount. Sets the delay time. mixed with original sound. Sync OFF , –...
- Page 40 Effect Types and Parameters Spring This reverb effect simulates a spring reverb. Knob1 Knob2 Knob3 Decay 1–30 Tone 0–10 0–100 Page01 Adjusts the amount of effected sound Sets the duration of the reverberations. Adjusts the tone. that is mixed with the original sound. PreD 1–100 Level...
- Page 41 SlapBack This reverb creates a repeating echo effect. Knob1 Knob2 Knob3 Time 0–1000 Decay 1–30 0–100 Page01 Adjusts the amount of effected sound Sets the delay time. Sets the duration of the reverberations. that is mixed with the original sound. F .B 0–100 Tone...
-
Page 42: Troubleshooting
There is a lot of noise about 5 hours with alkaline batteries. Check shielded cables for defects. Use only a genuine ZOOM AC adapter. The sound distorts strangely/has an odd timbre P8). →... -
Page 43: Specifications
S/N (equivalent input noise) 120dB Noise floor (residual noise) -100dBm Power AC adapter DC9V (center minus plug) 500mA (ZOOM AD-16) Batteries 8 hours of continuous operation using 4 AA alkaline batteries Dimensions 160.3mm(D) x 108mm(W) x 54.9mm(H) Firmware update Weight... -
Page 44: Declaration Of Conformity
Connect the equipment to an outlet on a circuit different from that to which the receiver is connected. For EU Countries Declaration of Conformity ZOOM CORPORATION 4-4-3 Kanda-Surugadai, Chiyoda-ku, Tokyo 101-0062 Japan http://www.zoom.co.jp Z2I-1597-0...
Need help?
Do you have a question about the A3 and is the answer not in the manual?
Questions and answers