Table of Contents
Advertisement
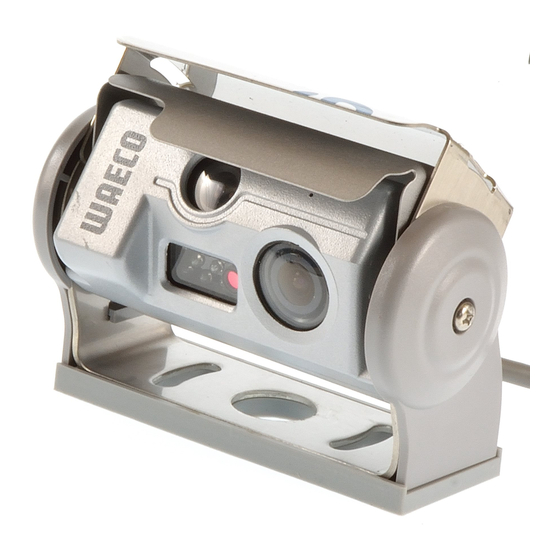
PerfectView CAM44
DE
11
Rückfahrvideokamera
Montage- und Bedienungsanleitung
EN
30
Rear View Video Camera
Installation and Operating Manual
47
Caméra vidéo de recul
FR
Instructions de montage et de service
ES
66
Cámara de vídeo de marcha atrás
Instrucciones de montaje y de uso
IT
85
Videocamera per la retromarcia
Istruzioni di montaggio e d'uso
104 Achteruitrijvideocamera
NL
Montagehandleiding en gebruiks-
aanwijzing
DA
121 Bakvideokamera
Monterings- og betjeningsvejledning
SV
138 Backningsvideokamera
Monterings- och bruksanvisning
153 Ryggevideokamera
NO
Monterings- og bruksanvisning
FI
170 Peruutusvideokamera
Asennus- ja käyttöohje
RU
187
Видеокамера заднего вида
Инструкция по монтажу и
эксплуатации
207
PL
Kamera cofania
Instrukcja montażu i obsługi
Advertisement
Table of Contents

Related Manuals for Waeco PerfectView CAM44


Summary of Contents for Waeco PerfectView CAM44
- Page 1 PerfectView CAM44 Rückfahrvideokamera 121 Bakvideokamera Montage- und Bedienungsanleitung Monterings- og betjeningsvejledning Rear View Video Camera 138 Backningsvideokamera Installation and Operating Manual Monterings- och bruksanvisning Caméra vidéo de recul 153 Ryggevideokamera Instructions de montage et de service Monterings- og bruksanvisning Cámara de vídeo de marcha atrás...
- Page 2 PerfectView CAM44...
- Page 3 PerfectView CAM44...
- Page 4 PerfectView CAM44 Ø 16 mm...
- Page 5 PerfectView CAM44 10 mm 10 mm 15 mm 20 mm...
- Page 6 PerfectView CAM44 90°...
- Page 7 PerfectView CAM44...
- Page 8 PerfectView CAM44 9012000078...
- Page 9 PerfectView CAM44 AMP100 Monitor (RCA) 12 - 24V Camera Input...
-
Page 10: Table Of Contents
PerfectView CAM44 Please read this manual carefully before installing and starting up the device and store it in a safe place. If the device is handed over to another person, this operating manual must be handed over along with Contents Explanation of symbols . -
Page 11: Explanation Of Symbols
PerfectView CAM44 Explanation of symbols Explanation of symbols WARNING! Safety instruction: Failure to observe this instruction can cause fatal or serious injury. CAUTION! Safety instruction: Failure to observe this instruction can lead to injury. NOTICE! Failure to observe this instruction can cause material damage and impair the function of the product. - Page 12 PerfectView CAM44 Safety and installation instructions Please observe the following instructions: To prevent short circuits, always disconnect the negative terminal of the vehicle’s electrical system before working on it. If the vehicle has an additional battery, its negative terminal should also be disconnected.
- Page 13 PerfectView CAM44 Safety and installation instructions Observe the following installation instructions: Secure the parts of the camera installed in the vehicle in such a way that they cannot become loose under any circumstances (sudden braking, ac- cidents) or cause injuries to the occupants of the vehicle.
-
Page 14: Scope Of Delivery
PerfectView CAM44 Scope of delivery Scope of delivery No. in fig. 8, Quantity Description Item no. page 5 Camera with motorised protec- tive cover Cover Camera guard Camera bracket Insulation pad CAM44 adapter box 9012000078 Extension cables 9102200030 – Fastening material... -
Page 15: Technical Description
PerfectView CAM44 Technical description Technical description The colour camera with integrated microphone is encased in an aluminium housing and transmits image and sound to a monitor via a cable. It has a close-up lens and a long-range lens. The infrared LEDs improve night vision. -
Page 16: Notes On The Electrical Connections
PerfectView CAM44 Notes on the electrical connections Notes on the electrical connections Laying cables NOTICE! Risk of damage! To prevent damage, when drilling ensure that there is sufficient space on the other side for the drill head to come out. - Page 17 PerfectView CAM44 Notes on the electrical connections Protect every through-hole made in the bodywork against water penetra- tion, e.g. by using a cable with a sealant and by spraying the cable and the the cable sleeve with sealant. NOTE...
-
Page 18: Fitting The Camera
PerfectView CAM44 Fitting the camera Proceed as follows to solder two cables together: ➤ Strip the two cables (fig. c A, page 6). ➤ Place a shrink sleeve with a length of approx. 20 mm over the cable (fig. c B, page 6). - Page 19 PerfectView CAM44 Fitting the camera Fitting the camera CAUTION! Select a location for the camera and attach it firmly enough so that it cannot under any circumstances fall off and injure bystanders (e.g. by being knocked off by branches brushing over the roof of the vehicle).
- Page 20 PerfectView CAM44 Fitting the camera If you are not sure about the location you have chosen, ask your vehicle manufacturer or dealer. NOTE We recommend greasing the threads of the screws to prevent cor- rosion. To perform the installation, proceed as follows: ➤...
- Page 21 PerfectView CAM44 Fitting the camera If you would like to attach the camera with threaded screws fitted through the construction (fig. g, page 7) NOTICE! When tightening the nuts, make sure that they cannot be pulled through the construction. You may have to use bigger washers or plates.
- Page 22 PerfectView CAM44 Fitting the camera Attaching the camera and camera guard NOTICE! Never mount the camera without the additional camera guard. To mount the camera guard, only use the M3 x 8 mm screws provid- ed. Longer screws will damage the camera.
- Page 23 PerfectView CAM44 Fitting the camera Connecting the camera NOTE Lay the camera cable so that should you need to remove the camera, you can access the plug connection between the camera and the extension cable easily. This considerably eases dismantling work.
- Page 24 PerfectView CAM44 Fitting the camera Connecting the AMP100 switchbox (fig. o, page 10) NOTE If you would like to use both camera modules when driving for- wards, you will need to fit the flip switch supplied (see the installa- tion and operating manual for AMP100).
-
Page 25: Using The Camera
PerfectView CAM44 Using the camera Using the camera Estimating distances The camera produces three distance marks in reversing mode which are shown on a connected colour monitor as coloured lines (fig. p, page 10). The lines make it easier to estimate the distance of the vehicle to an obstacle. -
Page 26: Disposal
PerfectView CAM44 Disposal Disposal ➤ Place the packaging material in the appropriate recycling waste bins wherever possible. If you wish to finally dispose of the product, ask your local recycling centre or specialist dealer for details about how to do this in accordance with the applicable disposal regulations. - Page 27 Dometic WAECO International GmbH Hollefeldstraße 63 · D-48282 Emsdetten +49 (0) 2572 879-195 · +49 (0) 2572 879-322 Mail: info@dometic-waeco.de · Internet: www.dometic-waeco.de Europe Overseas + Middle East Dometic Austria GmbH Dometic Norway AS Dometic Australia Neudorferstrasse 108...
Need help?
Do you have a question about the PerfectView CAM44 and is the answer not in the manual?
Questions and answers