Advertisement
Advertisement
Table of Contents

Related Manuals for Orbit OBE794


Summary of Contents for Orbit OBE794
-
Page 2: Important Safety Notice
Before You Start Thank you for purchasing this Elliptical trainer! For your safety and benefit, read this manual carefully before using the machine. IMPORTANT SAFETY NOTICE PRECAUTIONS ★Note the following precautions before assembling or operating the machine. 1、 Check all the screws, nuts and other connections before using the machine for the first time and ensure that the trainer is in the safe condition. -
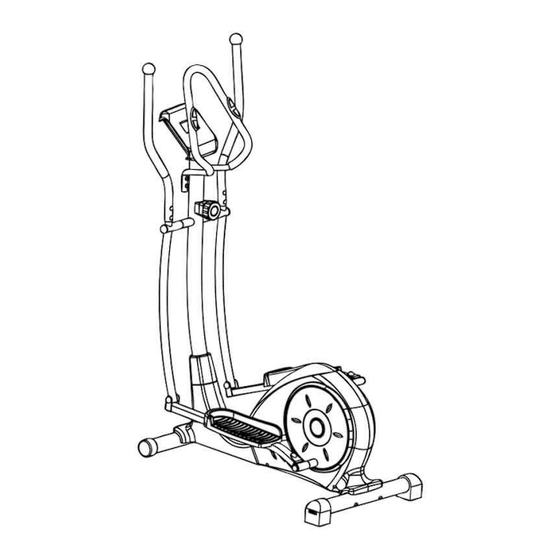
Page 3: Exploded Diagram
EXPLODED DIAGRAM Page 2... - Page 4 Page 3...
-
Page 5: Parts List
PARTS LIST DESCRIPTION Q’TY DESCRIPTION Q’TY Main frame Spring washer Handlebar Post Axle sleeve Front stabilizer Connecting joint Rear stabilizer Flat washer 5L/R Pedal tube 1p.r. Spring washer 6L/R Swing tube 1p.r. Hex bolt 7L/R Handlebar 1p.r. Round cap Handrail Round cap Meter 1pr. -
Page 6: Assembly Instruction
for assembling; before assembling please check whether all needed parts are available. It is strongly recommended this machine to be assembled by two or more people to avoid possible injury. ASSEMBLY INSTRUCTION STEP 1 Attach the front stabilizer (3) and the rear stabilizer (4) to the main frame (1) with the Carriage bolt (12) and Arc washers (13) as shown. - Page 7 STEP 3 Attach the left and right Swing tube (6L/R) to the shaft on Handlebar post (2) with Bolt (28), Spring washer (27), Wave washer (23) and Flat washer (26), and Long axle(39)But don’t tighten them first. Attach the Left Pedal support (5L) to the Crank (21L) with Bolt (28), Spring washer (27), Spacer (22), Flat washer (26), and Wave washer (23), don’t tighten them first.
- Page 8 STEP 4 Through the Pulse sensor wire (46) to the handlebar(2) and then attach the handrail (8) the handlebar(2) with hex bolt(47),arch washer(41) and nut(40). Attach the handlebar (7L/R) to the swing tube (6L/R) with bolt (42),arch washer (41) and nut (40). STEP 5 Connect the Connection wire (20) and pulse sensor wire (46) with the...
-
Page 9: Warm-Up And Cool-Down
WARM-UP and COOL-DOWN A successful exercise program consists of a warm-up, aerobic exercise, and a cool-down. Do the entire program at least two and preferably three times a week, resting for a day between workouts. After several months, you can increase your workouts to four or five times per week. WARM-UP The purpose of warming up is to prepare your body for exercise and to minimize injuries. -
Page 10: Operation
MONITOR WITH BODYFAT&PULSE RECOVERY INSTRUCTION MANUAL BUTTONS NO.00171 1. MODE Press this button to changeover display or choose the window needs to be set. 2. RECOVERY / UP In setting status, press this button to increase setting value in relevant flashing window for TIME, DIST, CAL and TEMP(℃... -
Page 11: Battery Replace
UP/DOWN to increase/decrease the value rapidly. Press RESET to reset value in relevant flashing window. 2. PULSE RATE Before measuring your pulse rate, press any button to change “P” into “ ” in the window, then enter pulse mode. Please place both your palms on the contact pads and the monitor will show your current heart beat rate in beats per minute (BPM) on the LCD after 3~4 seconds.
Need help?
Do you have a question about the OBE794 and is the answer not in the manual?
Questions and answers