Table of Contents
Advertisement
Advertisement
Table of Contents

Related Manuals for Advance acoustic IMPRESS 3


Summary of Contents for Advance acoustic IMPRESS 3
- Page 1 IMPRESS User manual...
- Page 2 Edition 2 / 04-2012...
-
Page 3: Table Of Contents
Maintenance, repair and care ............32 The IMPRESS 3................6 Maintenance ................32 Welcome on board! ..............6 Check ..................33 Notable features of the IMPRESS 3 ..........6 Repairs ..................33 More important details ..............7 Disposal ..................34 Saftey advice ................... 8 Technical details ................ -
Page 4: Thank You For Flying Advance
Any new safety-related findings about the product will be published there. For questions or problems please contact your supplier or ADVANCE direct. We wish you a lot of fun with the IMPRESS 3 and, as always, “happy landings”. Team ADVANCE... -
Page 5: About Advance
About ADVANCE ADVANCE is one of the leading worldwide paraglider manufacturers, on-going interaction with customers brings new insights that find and is based in Switzerland. Since the company was founded in their way into ADVANCE products – thus completing the «Circle of 1988 it has maintained its own policies and concepts, both in devel- Service». -
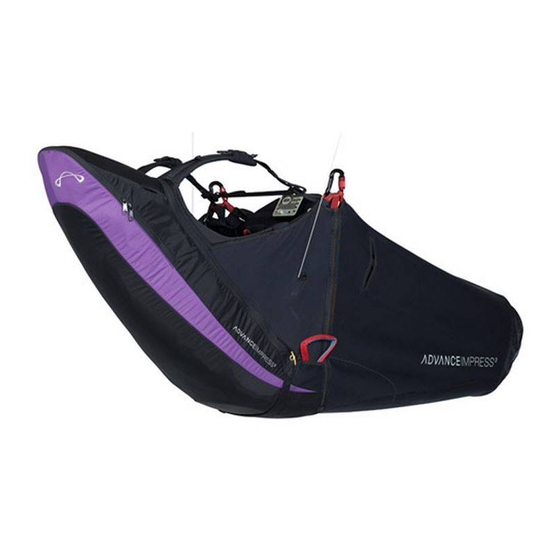
Page 6: The Impress 3
Perfect aerodynamics of the unique LIGHTNESS concept, without seatboard, provides the A lot of wind tunnel work was done during the IMPRESS 3 develop- highest level of comfort and lowest aerodynamic drag. With its LTF certified back protector the IMPRESS 3 weighs only 4.7 kg, and is ment, mainly concentrating on the airflow around the chest and leg very light and compact. -
Page 7: More Important Details
More important details • The harness has the proven ADVANCE two-buckle strapping sys- tem, combining chest and leg straps (called the Safe-T-System). • A well-placed lead-out for a drink system, to provide for convenient LIGHTNESS conzept drinking on long flights. •... -
Page 8: Saftey Advice
Safety advice As with all commercial reserve parachutes paraglider harnesses, be- cover and licence. A pilot must be able to correctly assess the weath- cause of their design, are not at all suitable for freefall parachuting. er conditions before taking off. His or her capabilities must be ade- The reserve and its attachments are not designed for an abrupt quate for the actual paraglider. -
Page 9: Using The Harness
• Reserve V-connection and reserve handle with its attached four-flap inner container • Integrated cockpit with removable instrument panel The IMPRESS 3 harness is delivered with the foam protector installed under the seat, the comfort foam in the back, and a fitted speedbag, • Foam protector under the seat footboard and speed lines. -
Page 10: Adjusting The Harness
The shoulder, back and chest straps can be adjusted in flight. The rest of the IMPRESS 3 adjustment system can only be set on the ground. ADVANCE therefore recommend that you get well acquainted with the adjustments before your first flight in the harness. - Page 12 1. Start at the basic settings To begin with make sure all the straps, including the speedbag straps, are at their basic settings. This is the case when the free end of each strap reaches the white mark. The harness will have been delivered like this.
- Page 13 Info: Compared with the Impress 2 you need much less load - The front edge of the harness should not be pressing the backs of on the IMPRESS 3 footboard to hold your legs level. New an- your knees. gle geometry has achieved this.
- Page 14 (8). If there’s not enough support under the knees pull these (8) in slightly. The IMPRESS 3 is provided with the Closure Remember System. This is a safety device attached to the chest/leg straps which draws Adjusting the leg straps the pilot’s attention to the chest strap when he closes the speedbag...
- Page 15 Caution: Always close the chest strap first, then the Closure Remember System, and after that the speedbag. Check be- fore every takeoff and especially after a failed takeoff in par- ticular – by a physical tug –, that you have correctly closed both quick release buckles.
-
Page 16: Cockpit And Instrument Panel
Speed system Connect the speed system to the glider using Brummel hooks or an anchor hitch. The length of the speed system can be adjusted on the short orange lines inside the speedbag. Move the overhand knots symmetrically. The speed system is correctly adjusted if you can use the glider’s whole accelerate range. -
Page 17: Stowage/Ballast Compartment
There is an 8 litre volume compartment in the perfect place under the seat, close to the centre of gravity, for your choice of equipment or ballast. More details Shoulder mountings Both IMPRESS 3 shoulder straps have a Velcro and a loop, suitable for fixing an emergency alarm or Solario. - Page 18 Drink system In the back compartment there is a pocket for a drinks container (Camelbak). The drinks tube can be led out through either side of the compartment and secured to a shoulder strap through the neoprene band provided. Radio pocket The radio pocket supplied goes over a main carabiner.
-
Page 19: Installing The Reserve
Installing the reserve The following instructions apply to inner containers delivered after 19.03.2012. These new inner containers have a red border. You can continue to use the old, pre 19.03.2012 container provided that the compatibility test has been correctly carried out and the sys- tem works faultlessly. - Page 20 The cer- run into the reserve compartment in the channel provided. The nor- tified volumes for the IMPRESS 3 are specified as a function of har- mal harness V-connection (not used) can be led into the back pocket...
- Page 21 It is simple to operate and works reliably – and at the same time is well protected from the outside world, meaning that accidental re- leases are most unlikely. A well-designed release system guarantees reliable and fast opening. Caution: Installing a reserve should be done by a qualified person.
- Page 22 Packing the reserve in the inner container Pack your reserve to match the shape and size of the delivered inner container; for the IMPRESS 3 inner container this means that the re- serve has to be packed in a long and narrow shape. Put the reserve lines on the opposite side to that of the reserve handle.
- Page 23 is installed with the closure flaps facing upwards. The reserve handle connection must not be twisted. Caution: If the reserve has been packed but does not fit the shape of the inner container it must be folded again to match the inner container.
- Page 24 ADVANCE dealer. The reserve must release as a result of the correct throwing action – for the IMPRESS 3 a pull to the side. If this is not the case releasing may be a problem. The following factors can make reserve throwing difficult or prevent it, especially if they apply together: •...
- Page 25 • The reserve is not thrown using the correct technique. A sideways throwing motion is required (Caution: don’t pull it upwards). • The reserve volume was OK when fitted into a new harness, but it became too big after a repack. •...
-
Page 26: Using The Harness In Flight
General Using the speedbag The IMPRESS 3 is flown in a reclining position. If you have adjusted Keep a forward upper body position after lift off and pick up the the harness correctly information from the wing will be transmitted speedbag (which will be hanging slightly behind) with your right heel. -
Page 27: Throwing The Reserve
All ADVANCE harnesses are suitable for winching. Connect your stress the speedbag material. (See also “Fitting the speed system” in IMPRESS 3 to the tow link using rope loops or Maillons from the main the section ”Using the harness“.) carabiners. If in doubt always consult the winch driver, or someone authorised by the manufacturer. -
Page 29: Replacing Parts
Replacing parts The IMPRESS 3 harness is delivered with a foam protector under the seat, comfort foam in the back and a fitted speedbag, footboard and speed lines. These parts can be removed for replacement or repair. Foam protector and comfort foam The foam protector compartment is under the seat, between the re- serve and the ballast stowage. - Page 30 Caution: Hang all the red loops in the carabiners, otherwise the speedbag zips will be irreparably damaged by loading. Info: The footboard is a part of the speedbag, and provides an essential support for the reclining position. The IMPRESS 3 harness only works with the speedbag. Footboard A new footboard should be pushed into the footboard pocket in the speedbag, and the pocket secured with the Velcro.
- Page 31 Speed loop To fit a new speed loop start at the grey connecting loop on the end. This attaches to the bungee coming from the footboard inside the speedbag. Now lead the grey speed lines through the first pulleys, (1) then through the red markings (2).
-
Page 32: Maintenance, Repair And Care
Maintenance, repair and care Maintenance Info: Before and after flight do not leave the harness in the sun for no reason (UV-light). The life of your harness depends very much on how you look after it. We recommend that you investigate any signs of wear, damaged Reserve parachute seams and webbing and, if necessary, replace individual components. -
Page 33: Check
Wet harness Repairs Your wet or damp harness must be allowed to fully dry out at room You should never repair your harness yourself. The various seams are temperature, or outside in the shade. Take the foam protector out sewn with great precision. Because of this you should only have re- of its compartment under the seat, and the comfort foam out of the pairs done by the manufacturer or an authorised Service Centre, us- back (see ‘Foam protector and Comfort foam’... -
Page 34: Disposal
Disposal Environmental considerations play an important role in the choice of materials and the production of an ADVANCE product. We use only non-toxic materials that are subjected to continuous quality and envi- ronmental impact assessments. When your harness reaches the end of its life please remove all metal parts and dispose of the rest of the harness in a waste incineration plant. -
Page 36: Technical Details
Technical details IMPRESS 3 Pilot height 155-170 171-185 186-200 Seatboard width n/a * n/a * n/a * Carabiner height n/a * n/a * n/a * Chest strap width 40-48 40-48 40-48 Weight of harness incl. Speedbag, 2 Alu carabiners Load test... -
Page 37: Materials Used
Certification We routinely inspect and test the materials available to us many times The IMPRESS 3 harness has been tested and approved in accord- over. Like all ADVANCE products the IMPRESS 3 is developed and ance with LTF II 91/09 and DIN EN-Norm 1651 at a weight of 120 kg. -
Page 38: Service
Service ADVANCE Service Centres • find out about new, safety-related knowledge and advice about ADVANCE products. • download the PDF form you can use when sending your equip- ADVANCE operates two of its own service centres that carry out checks and repairs of any kind. These service centres, based in Swit- ment to ADVANCE for a check. - Page 39 facturing fault is to be rectified (repair, replacement of parts, or of the product). This warranty is valid for 3 years from the date of purchase of the product. The ADVANCE warranty does not cover any other claim. In particular it does not cover damage caused by careless or incorrect use of a product (e.g.
-
Page 40: Size Guide
Size guide Height (cm) ➔ Weight (kg) generally fits well has to be tested individually (depends on the back and leg length) -
Page 42: List Of Components
List of components Main suspension points Main strap Shoulder straps Back straps Chest strap Safe-T-System Leg straps Main support loadshare strap Speedbag Upper and lower speedbag straps Speed lines Stowage for stores/ballast Stowage for stores/ballast Harness/reserve V-connection cover Back pocket Hole for drinking tube Foam protector under the seat Comfort foam in the back... - Page 46 a d v a n c e t h u n a g f o n + 41 3 3 225 70 10 w w w. a d v a n c e.c h u t t i g e n g s t r a s s e 87 f a x + 41 3 3 225 70 11 i n f o @ a d v a n c e.c h c h 3 6 0 0 t h u n...
Need help?
Do you have a question about the IMPRESS 3 and is the answer not in the manual?
Questions and answers