Table of Contents
Advertisement
Advertisement
Table of Contents

Related Manuals for Vicovation Vico-Marcus 4


Summary of Contents for Vicovation Vico-Marcus 4
- Page 1 Vico-Marcus 4 Instruction Guide EXTREME HD 2304 x 1296 ULTRA HIGH DYNAMIC RANGE...
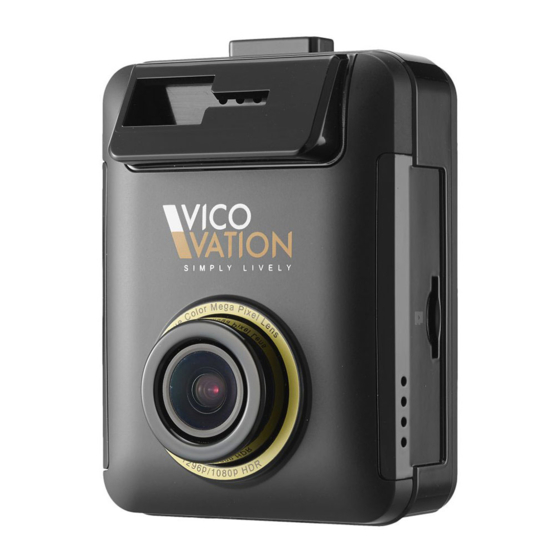
- Page 2 Vico-Marcus 4 Installation Guide Thank you for choosing Vico-Marcus 4 Car Camcorder. Please follow the installation guide for more detail when using Vico-Marcus 4, and notice our highlight parts as important reminders. Vico-Marcus 4 Outlook Introduction: 1. Power button 9. External GPS socket 2.
-
Page 3: Mounting Bracket (Optional)
Quick Mounting Bracket(Optional) Installation The Quick Mounting bracket is an optional accessory. Please check the following steps to reconnect quick mounting bracket with suction bracket. Mounting Bracket (Optional) Please loosening the cap nut on Ball Head of Suction bracket first, and pull out T-type ball head. - Page 4 Ultra-HDR (High Dynamic Range) @1080p 30fps HDR Mode Vico-Marcus 4 applies all new Ultra-HDR technology which provides great balance of bright and dark side of image, generating extreme high quality 1080p video recording. Default resolution setting of Marcus 4 is under 1080p HDR mode.
-
Page 5: First Time Installation
First Time Installation Installation Steps Always use original VicoVation USB Cigar Car charger in box. Install USB Cigar charger into car cigarette Lighters socket, and another USB side insert into Marcus 4 USB socket. Install bracket in proper position on windshield and avoid any view-blocking for driver. -
Page 6: First Time Operation
First Time Operation Insert Micro SD card firstly. (Please aware the direction of Micro SD card data pins.) Marcus 4 support Extreme Micro SD HD 1296p recording. Micro SD card under Class10 is forbidden. Normal Recording Time Table (Not including 10 sets Emergency Record) 2560p 30fps 1296p 30fps 1080p 30fps... -
Page 7: Main Display
Main Display Recording mode Under normal recording, icons represent (From upper left): 5/10 Red dot recording sign/ Current Time/ Recording Size/ G-Sensor function sign/ Emergency Recording Numbers. Icons from bottom left: Emergency recording/ Recording sign/ Menu/ Voice recording on/off switch Power ON/Off User Interface 1.Video settings... -
Page 8: Video Settings
Setting Detail Video Settings Set video resolution and EV value. G-Sensor Settings Setup sensibility of G-Sensor (Default setting is OFF). GPS Settings To activate this function, please install Marcus GPS Module (Optional) and plug the GPS socket properly. 5/10 GPS relative function can be only activated while GPS installed correctly. - Page 9 Setting Detail (optional Marcus GPS module) LDWS (Lane Departure Warning System) When current speed reach your setting value (For example: 60km/h), Marcus 4 will notify drivers with Beep sound and alert Icon while lane departure. FCWS (Forward Collision Warning System) When current speed over 60km/h, Marcus 4 will notify drivers with Beep sounds and alert Icon if distance...
-
Page 10: Over-Speed Warning
Setting Detail (optional Marcus GPS module) Over-speed Warning Users can choose 80/90/100/110/120/130km. When the driving speed is higher than setting, Marcus 4 will notify with warning beep and Alert Icon to remind driver. Over-Speed camera detection: For some specified countries, this feature is available. -
Page 11: Display Settings
Display Settings LCD Auto Off Default setting is Always ON. Users can choose 1 min/ 3 mins/ 5 mins. After Marcus 4 power on, LCD screen will be OFF (Sleep mode) according to your setting. LCD screen can be waked up by tap ON/OFF button. LCD Brightness Default setting is Standard. -
Page 12: Audio Settings
Audio Settings Audio Recording Default of Audio recording is ON. By pressing Down Key button (When recording), audio record on/off can be switched rapidly. (hot-key switch) Volume Control Default setting is Medium. Volume of videos in playback mode can be set as High/Medium/Low. Playback Settings Enter MENU, Select Playback. -
Page 13: System Settings
Please manually setup system time for first time operation. Language: Default setting is English. 15 more languages can be selected. Version: Display current software version. Follow our official website and Facebook page for latest news about updating and change logs. www.vicovation. www. English... - Page 14 Video brightness and clarity will be different because of window film. Please adjust the EV value to achieve better image. Marcus has super capacitors built-in instead of Li-ion battery. Please power on Marcus 4 with VicoVation Marcus Cigar Car Charger. English...
- Page 15 3 Axis Gravity Sensor G-sensor Marcus has built-in G-Sensor which can detect accident bump/crash and trigger emergency record automatically. To avoid any false alarm during initial installtion, G-sensor function is defaulted as OFF. Please install device properly first and then enter MENU to activate this function manually.
- Page 16 Emergency Record Function You may manually press orange button to trigger emergency record when emergency happens. Bottom side of LCD monitor will pop up with red triangle signal. Marcus will pack 30 seconds before and after you trigger the emergency button (total 1 min video) into emergency folder. The file will be protected from circular recording.
-
Page 17: Optional Accessories
Marcus GPS module (Optional) LDWS (Lane Departure Warning System). FCWS (Forward Collision Warning System). GPS Tracking, work with VicoPlayer. Download from www.vicovation. Over Speed warning system. GPS location/Speed info overlay on video. Marcus CPL Filter & Quick Mounting Bracket (Optional) Marcus Quick mounting bracket is compatible with standard 52mm CPL filter. - Page 18 Marcus series + PushCam VicoVation crossover PushCam Service, providing PushCam Platform for Dash Cam video uploading/sharing. Download PushCam Player (Support Windows & iOS) from PushCam website. Take out SD card from Marcus 4 and connect with PC. Open the video files by PushCam Player.
-
Page 19: Limited Warranty Statement
VicoPlayer Download Please visit VicoVation official website www.vicovation. Enter “Service” page → “Download”. Download VicoVation Vico-Player. (Vico-Player currently only supports Windows system.) After install Vico-Player to PC, please select “Folder” on the top of player. Choose videos from SD card or HDD.
Need help?
Do you have a question about the Vico-Marcus 4 and is the answer not in the manual?
Questions and answers