Studer OnAir 1500 Operating Instructions Manual
Hide thumbs
Also See for OnAir 1500:
- Operating instructions manual (290 pages) ,
- Quick start manual (56 pages)
Table of Contents
Advertisement
Quick Links
Advertisement
Chapters
Table of Contents

Related Manuals for Studer OnAir 1500


Summary of Contents for Studer OnAir 1500
- Page 1 Studer OnAir 1500 Digital Mixing Console SW Version 6.0 Operating Instructions...
- Page 2 Prepared and edited by Copyright by Studer Professional Audio GmbH Studer Professional Audio GmbH Technical Documentation Order no. BD10.943002-01 (0814) Riedthofstrasse 214 CH-8105 Regensdorf - Switzerland http://www.studer.ch Subject to change Studer is a registered trade mark of Studer Professional Audio GmbH, Regensdorf...
- Page 3 • Only use attachments/accessories specified by the manufacturer. • Use only with the cart, stand, tripod, bracket or table specified by the manufacturer, or sold with the apparatus. When a cart is used, use cau- tion when moving the cart/apparatus combination to avoid injury from tip-over. • Refer all servicing to qualified service personnel. Servicing is required when the apparatus has been damaged in any way, such as the power supply cord or plug is damaged, liquid has been spilled or objects fallen into the apparatus, the apparatus has been exposed to rain or moisture, does not operate normally, or has been dropped. Note: It is recommended that all maintenance and service on the product should be carried out by Studer or its authorised agents. Studer cannot accept any liability whatsoever for any loss or damage caused by service, maintenance or repair by unauthorised personnel. WARNING: To reduce the risk of fire or electric shock, do not expose this apparatus to rain or moisture. Do not expose the apparatus to dripping or splashing and do not place objects filled with liquids, such as vases, on the appara- tus. • No naked flame sources, such as lighted candles, should be placed on the apparatus. • Ventilation should not be impeded by covering the ventilation openings with items such as newspapers, table cloths, curtains etc. WARNING: Do not use this apparatus in very dusty atmospheres, or in atmospheres containing flammable gases or chemicals.
- Page 4 Safety Information • Protective Earth (Ground): Green/Yellow (US: Green or Green/ Yellow) • Neutral: Blue (US: White) • Live (Hot): Brown (US: Black) As the colours of the wires in the mains lead may not correspond with the coloured markings identifying the terminals in your plug, proceed as follows: • The wire which is coloured Green and Yellow must be connected to the terminal in the plug which is marked with the letter E or by the earth symbol. • The wire which is coloured Blue must be connected to the terminal in the plug which is marked with the letter N. • The wire which is coloured Brown must be connected to the terminal in the plug which is marked with the letter L. Ensure that these colour codes are followed carefully in the event of the plug being changed • This unit is capable of operating over a range of mains voltages, as marked on the rear panel.
-
Page 5: Safety Information
Safety Information Conforming to this directive will minimise the risk of hearing damage caused by long listening periods. A simple rule to follow is: The longer you listen, the lower the average volume should be. Please take care when working with your audio system –... - Page 6 Installation General Installation Instructions Please consider besides these general instructions also any product-specific instructions in the “Installation” chapter of this manual. Unpacking Check the equipment for any transport damage. If the unit is mechanically damaged, if liquids have been spilled or if objects have fallen into the unit, it must not be connected to the AC power outlet, or it must be immediately disconnected by unplugging the power cable.
- Page 7 Installation / EMC Class I Equipment (Mains Operation) Should the equipment be delivered without a matching mains cable, the latter has to be prepared by a trained person using the attached female plug (IEC 320 / C13 or IEC 320 / C19) with respect to the applicable regulations in your country.
- Page 8 EMC / Maintenance / ESD • Use a system grounding concept that satisfies the safety requirements (class I equipment must be connected with a protective ground conduc- tor) and that also takes into consideration the EMC require ments. When deciding between radial, surface, or combined grounding, the advantages and disadvantages should be carefully evaluated in each case.
- Page 9 ESD / Repair • When performing a repair by replacing complete assemblies, the removed assembly must be sent back to the supplier in the same packing material in which the replacement assembly was shipped. If this should not be the case, any claim for a possible refund will be null and void. • Unpacked ESD sensitive components should only be handled in ESD protected areas (EPA, e.g.
- Page 10 Repair / Disposal SMD Components Studer has no commercially available SMD components in stock for service purposes. For repair, the corresponding devices have to be purchased locally. The specifications of special components can be found in the service manual. SMD components should only be replaced by skilled specialists using appro- priate tools.
- Page 11 Any changes or modifications not expressly approved by the manufacturer could void the user’s authority to operate the equipment. Also refer to relevant information in this manual. CE Declaration of Conformity Studer Professional Audio GmbH, CH-8105 Regensdorf, declare under our sole responsibility that the product Studer OnAir 1500, Digital Broadcast Mixing Console (starting with serial no. 30270026),...
- Page 12 Under these conditions the unit or system starts and works without any prob- lem. Beyond these specifications, possible problems are described below. Ambient Temperature Units and systems by Studer are generally designed for an ambient tempera- ture range (i.e. temperature of the incoming air) of +5 °C to +40 °C. When rack mounting the units, the intended air flow and herewith adequate cooling must be provided. The following facts must be considered: • The admissible ambient temperature range for operation of the semicon-...
- Page 13 Appendix evaporation (sublimation) may be expected; otherwise the system must be heated and dried while switched off. A system without visible internal formation of ice or condensation should be heated up with its own heat dissipation, as homogeneously (and subsequently as slow) as possible;...
- Page 14 Appendix Appendix 2: Mains Connector Strain Relief For anchoring connectors without a mechanical lock (e.g. IEC mains connec- tors), we recommend the following arrangement: Procedure: The cable clamp shipped with your unit is auto-adhesive. For mounting please follow the rules below: • The surface to be adhered to must be clean, dry, and free from grease, oil, or other contaminants.
- Page 15 The following Terms and Conditions grant the right to use all programs of Studer that are part of the System and/or its options at the time of its delivery to the Customer, as well as the installation software on the original data disk and the accompanying documentation (‘License Material’). In this Agreement...
- Page 16 Reverse engineering is only permitted with the express consent of Studer. The consent of Studer can be obtained but is not limited to the case in which the interface software can not be provided by Studer. In any case Studer has to be informed immediately upon complete or partial reverse engineering.
-
Page 17: Table Of Contents
OnAir 1500 Digital Mixing Console CHAPTER 1 Introduction ..................................3 OnAir 1500 Audio Block Diagram ..........................4 Definitions, Acronyms, Abbreviations........................6 Color Code .................................. 6 Momentary/Latching Key Activation ........................6 Options / License Key Code ............................7 USB Memory Devices ..............................7 Introduction 1-1 Date printed: 06.08.14... - Page 18 OnAir 1500 Digital Mixing Console 1-2 Introduction SW V6.0 Date printed: 06.08.14...
-
Page 19: Introduction
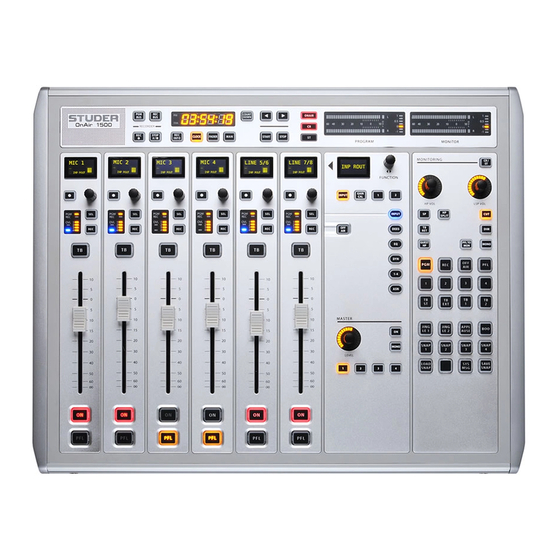
OnAir 1500 Digital Mixing Console InTRoduCTIon Main Features • Modular design with extremely low-profile desk; I/O and DSP in separate Nano SCore • 6-fader layout with 100 mm manual faders, may be upgraded to 12 faders by adding/attaching an optional 6-fader module • OLED (Organic LED) displays in fader strips and central section for clear, high-contrast indication • Red lights for on-air and open mic indication in control room and studio • I/O in established signal formats (16 analog mic/line inputs, 16 line outputs, 4 stereo AES/EBU inputs with SRC, 4 stereo AES/EBU outputs, 8 channels of I/O on a USB socket). Additional, optional I/O in AES/EBU, MADI, ADAT, TDIF, Livewire formats etc. available. 8 GPI/O for control purposes • Every channel input with four-band parametric EQ and full dynamics (com- pressor, limiter, noise gate, expander, de-esser) • One stereo program bus, one stereo record bus, one audition bus, and four stereo Mix-Minus (N–1/N–X/AUX) busses • VoiceMix, Studer Auto-Mix algorithm (optional) • USB track recorder/player and USB jingle player • Easy networking and integration thanks to I/O sharing (‘Relink’) and CMS (Studer Call Management System) support • Complete integration with Radio Automation Systems; optional Ember and Monitora protocols via serial interface or tunnelled via TCP/IP • Configurable router control via ProBel... -
Page 20: Onair 1500 Audio Block Diagram
OnAir 1500 Digital Mixing Console onAir 1500 Audio Block diagram V6.0 Nano SCore INPUTS INPUT CHANNELS INS SEND VMixControlGain to VMix De-S GR METER CH METER FADER ON/OFF CHANNEL OUT N–X PHASE CH INP PAN / CHANNEL PRG A Voice Mix... - Page 21 OnAir 1500 Digital Mixing Console Nano SCore Σ MASTER / SEND AND MONITORING OUTPUTS Master Listen N–X DIR OUT PP DIR OUT AP INS SEND CHANNEL OUT L (M) PRG A MASTER LOGICAL R (M) OUT 1 FADER L (M)
-
Page 22: Definitions, Acronyms, Abbreviations
OnAir 1500 Digital Mixing Console definitions, Acronyms, Abbreviations Description After-fader (as opposed to PF, ‘pre-fader’) Balance (for stereo input sources) If the ‘broadcast PFL mode’ (also referred to as ‘PFL cut on channel active’ function) is enabled, audio Broadcast PFL signals are cut from the PFL bus if the channel is ON and the fader is open. -
Page 23: Options / License Key Code
OnAir 1500 Digital Mixing Console options / License Key Code When adding an option to the system (CAB, ProBel or CMS support, I/O sharing, USB track player/recorder, VoiceMix), the System ID code is used together with the option’s license key in order to generate the Option Key code that is entered using the configuration tool. Unavailable options will not be displayed. For details on configuration refer to chapter 6.5.36. uSB Memory devices Important Any USB memory device MUST NOT BE REMOVED from its socket DURING DATA ACCESS – only remove it after its LED has stopped flash-... - Page 24 OnAir 1500 Digital Mixing Console 1-8 Introduction SW V6.0 Date printed: 06.08.14...
- Page 25 OnAir 1500 Digital Mixing Console CHAPTER 2 General ....................................3 Utilization for the Purpose Intended ........................... 3 First Steps ................................... 3 2.2.1 Unpacking and Inspection ............................. 3 2.2.2 Accessories and Options ............................3 2.2.3 Adjustments, Repair, Cleaning ..........................4 2.2.4 USB Sockets................................
- Page 26 OnAir 1500 Digital Mixing Console 2-2 General SW V6.0 Date printed: 06.08.14...
-
Page 27: General
OnAir 1500 Digital Mixing Console GEnERAl Utilization for the Purpose Intended The OnAir 1500 mixing console is intended for professional use. It is presumed that the unit is operated only by trained personnel. Servicing is reserved to skilled technicians. The electrical connections may be connected only to the voltages and signals designated in this manual. -
Page 28: Adjustments, Repair, Cleaning
(never wet) cloth. Never use any solvent! 2.2.4 USB Sockets The OnAir 1500’s Nano SCore is equipped with different USB slots that are used for different purposes: Core, Front: Used for user login as well as for saving/loading console snapshots. This also... -
Page 29: Technical Specifications (Subject To Change)
OnAir 1500 Digital Mixing Console Technical Specifications (subject to change) Mic / Line Inputs Conditions / Details Value General Conditions: Gain setting 15 dBu 0 dB unless otherwise noted Impedance electronically balanced 3.6 kΩ for 0 dB , adjustable in steps of 1 dB;... -
Page 30: Dimensions
OnAir 1500 Digital Mixing Console 2.3.1 Dimensions 2.3.1.1 Desk Unit 447 mm / 17.6” 141 mm / 5.5” CORE 18 mm / 0.7” 204 mm / 8.1” (M4 fixation points. Max. screw length: 15 mm / 0.6”) 39 mm 1.5”... -
Page 31: Core Frame
OnAir 1500 Digital Mixing Console 2.3.1.2 Core Frame 483 mm / 19” 38 mm / 1.5” 2 mm / 0.1” 42 mm 1.7” 363 mm / 14.3” General 2-7 Date printed: 06.08.14 SW V6.0... -
Page 32: 6-Fader Extension (Optional)
OnAir 1500 Digital Mixing Console 2.3.1.3 6-Fader Extension (Optional) 287 mm / 11.3” 67 mm / 2.6” CORE 82 mm / 3.2” (M4 fixation points. Max. screw length: 15 mm / 0.6”) 39 mm 1.5” 3.6° 89 mm / 3.5”... -
Page 33: Desk Unit With 19" Rack / Table Mount Kit (Optional)
Desk Unit with 19” Rack / Table Mount Kit (Optional) 483 mm / 19” 466 mm / 18.4” CORE 443 mm / 17.4” 75 mm / 3” Studer OnAir 1500 Desk, Rack-/Table-Mount Dimensions 2011-10-27 General 2-9 Date printed: 06.08.14 SW V6.0... -
Page 34: 6-Fader Extension With Table Mount Kit (Optional)
OnAir 1500 Digital Mixing Console 2.3.1.5 6-Fader Extension with Table Mount Kit (Optional) 323 mm / 12.7” 306 mm / 12” CORE 283 mm / 11.2” 75 mm / 3” 2-10 General SW V6.0 Date printed: 06.08.14... - Page 35 OnAir 1500 Digital Mixing Console General 2-11 Date printed: 06.08.14 SW V6.0...
- Page 36 OnAir 1500 Digital Mixing Console CHAPTER 3 Setup ....................................3 Desk Rear View ................................4 Core Front View ................................4 Core Rear View ................................5 Connector Pin Assignments ............................6 System Power ................................7 Setup 3-1 Date printed: 06.08.2014 SW V6.0...
- Page 37 OnAir 1500 Digital Mixing Console 3-2 Setup SW V6.0 Date printed: 06.08.14...
-
Page 38: Setup
OnAir 1500 Digital Mixing Console SETuP Important It is presumed that all the preparatory steps described in the OnAir 1500 Quick Start Guide shipped with your console have been carefully performed. Nevertheless some information is repeated here for easy reference. -
Page 39: Desk Rear View
OnAir 1500 Digital Mixing Console Desk Rear View CORE The OnAir 1500 desk has two connectors only: CORE (RJ45) for the Cat5 link to the core, and (RJ11) for the analog audio link from the core’s (SPEAKER) XLR socket to the integrated PFL speaker. -
Page 40: Core Rear View
OnAir 1500 Digital Mixing Console Core Rear View The rear side of the Nano SCore features the following elements: MIC/LINE IN 16 electronically balanced inputs on female XLRs with remote-controlled individual gain, low-cut filter and 48 V phantom power. 16 electronically balanced line outputs on male XLRs with globally jumper- LINE OUT selectable output level. -
Page 41: Connector Pin Assignments
OnAir 1500 Digital Mixing Console Connector Pin Assignments MIC/LINE IN (XLR 3f) (XLR 3m) LINE OUT AES/EBU / SYNC IN / AES/EBU OUT (XLR 3f/m) Signal (Input) Signal (Output) Screen Screen In + Out + In – Out – (Headphones, 6.3 mm TRS socket) -
Page 42: System Power
System Power Power Supply The OnAir 1500’s Nano SCore is equipped with an autoranging primary power supply unit (input voltage range 100...240 V AC/50...60 Hz) with power factor correction. The mains switch is located at its rear, next to the power inlet. - Page 43 OnAir 1500 Digital Mixing Console 3-48 Setup SW V6.0 Date printed: 06.08.14...
- Page 44 OnAir 1500 Digital Mixing Console CHAPTER 4 Operating Elements ................................3 Fader Section ................................3 Central Section ................................6 4.2.1 FUNCTION Controls (‘Rotary Assign Keys’) ..................... 6 4.2.2 MASTER Controls ..............................7 4.2.3 MONITORING and Talkback Controls ........................ 7 4.2.4 Meter Bridge .................................
- Page 45 OnAir 1500 Digital Mixing Console 4-2 Operating Elements SW V6.0 Document generated: 06.08.14...
-
Page 46: Operating Elements
OnAir 1500 Digital Mixing Console OPERATing ElEmEnTs Fader section The fader section with the OLED (organic LED) display contains six fader strips (only one of them shown in the illustration on the left; approx. 60% OLED Display original size). The fader strip has been designed with a minimum of operating elements. - Page 47 OnAir 1500 Digital Mixing Console If one of the oval function keys in the central section is active, the ‘Mini Vis- tonics’ view for parameter editing is activated for this channel upon pressing this key. Assignment Display At the left of the REC and SEL keys an indicator field with a red overload LED, six yellow LEDs for channel-to-bus assignment indication (for PGM, REC, and N–1 1-4 busses) and a blue channel-active LED.
- Page 48 OnAir 1500 Digital Mixing Console Second Label The 2nd label area is used exclusively for indication of the I/O sharing producer system name. It is blanked as long as the rotary is touched, except during input channel routing. Rotary Parameter The rotary parameter area indicates the parameter name if a rotary function is assigned to this channel.
- Page 49 OnAir 1500 Digital Mixing Console For more details refer to chapter 5.3.2. 4-6 Operating Elements SW V6.0 Document generated: 06.08.14...
-
Page 50: Central Section
OnAir 1500 Digital Mixing Console Central section 4.2.1 FUnCTiOn Controls (‘Rotary Assign Keys’) Rectangular Keys The four rectangular keys in the top row - INPUT, GAIN/CAL, 1 and 2) are used for input routing, gain/cal and AUX bus 1/2 settings. Less important functions without dedicated keys –... -
Page 51: Master Controls
OnAir 1500 Digital Mixing Console Oval Keys The oval keys in the FUNCTION area (INPUT, DEES, EQ, DYN, 1-4, ASN) are dedicated to assign functions to the encoders and their keys in the fader strips. The function of the key depends on the selected parameter and can be, e.g., On/Off or Enter. -
Page 52: Meter Bridge
OnAir 1500 Digital Mixing Console Dims (attenuates) the monitor loudspeakers if pressed, or indicates a dim event if illuminated. MONO Sets the monitor loudspeaker signal to mono if pressed. PFL TO MON If active, the PFL signal is switched to monitoring as soon as at least one channel PFL key is activated. - Page 53 OnAir 1500 Digital Mixing Console Note: The USB player/recorder keys (PGM BUS, REC BUS, REC=, STOP;/<, REC INFO) are supported since SW V4.1. For details refer to chapter 5.16. Level Meter Characteristics: One out of six different meter characteristics can be selected for the main level meters.
- Page 54 OnAir 1500 Digital Mixing Console get lost in this case), or by attaching it with a thin, transparent, double-sided adhesive tape that can easily be removed (such as Scotch Poster Tape). ® If a label needs to be removed after the adhesive has settled, there are two possibilities.
-
Page 55: Compact Monitoring/Tb Box
OnAir 1500 Digital Mixing Console Compact monitoring/TB Box This box allows connecting up to 32 additional monitoring places for roles or functions in the studio environment who need to select monitoring sources and talkback functions, such as the Producer, Presenter or Studio Manager. - Page 56 OnAir 1500 Digital Mixing Console Operating Elements 4-13 Document generated: 06.08.14 SW V6.0...
- Page 57 OnAir 1500 Digital Mixing Console CHAPTER 5 Operation .................................... 5 Mouse and Keyboard Operation (Advanced Users Only) ..................5 User Login .................................. 6 Desk Operation ................................8 5.3.1 Global View ................................8 5.3.1.1 Global View Operation ........................... 10 5.3.2 Local View Operation ............................16 5.3.2.1...
- Page 58 OnAir 1500 Digital Mixing Console User Access and Management (Advanced Users Only) ................... 46 5.9.1 Purpose ................................46 5.9.2 General ................................46 5.9.3 Users ..................................46 5.9.4 Privileges ................................47 5.9.5 Policies ................................47 5.9.6 Department Snapshots ............................47 5.9.7 Parameters ................................
- Page 59 OnAir 1500 Digital Mixing Console 5.12.4 Monitoring Pages ..............................98 5.12.4.1 CR (Control Room) Page ..........................98 5.12.4.2 CR LSP (Loudspeakers) Page ........................99 5.12.4.3 CR HP (Headphones) Page ..........................99 5.12.4.4 CR CUE Page ............................... 100 5.12.4.5 Studio 2 Page ..............................101 5.12.4.6 TB SP Page ..............................
- Page 60 OnAir 1500 Digital Mixing Console 5.17.4 Remote Configuration Tool ..........................151 5.17.5 Remote Configuration Tool - Tools Menu ......................154 5.17.5.1 Change System ............................. 154 5.17.5.2 Export/Import Labels ............................ 155 5.17.5.3 Import routable sources ..........................156 5.17.5.4 Bridge Card Firmware ..........................156 5.17.5.5 Backup/Restore .............................
-
Page 61: Operation
In addition to these hardware elements on the desk and the optional GUI, the OnAir 1500 can also be operated by a PC or laptop computer where the OnAir 1500 user GUI is emulated. All hardware controls, such as keys... -
Page 62: User Login
User Login It is presumed that during normal operation neither screen nor keyboard/ mouse are connected to the OnAir 1500 system. Without them, user login from the user GUI is not possible. The default user is automatically selected when powering the console on. - Page 63 OnAir 1500 Digital Mixing Console This information can also be displayed during operation by pressing the FUNCTION rotary knob. When logging out (i.e. pulling out the login USB stick), the system auto- matically activates the default user. The previously loaded console snapshot remains active.
-
Page 64: Desk Operation
OnAir 1500 Digital Mixing Console Desk Operation Note: Most of the following functions are available for users with appropriate access rights only, as defined by the system administrator. For desk operating elements please refer to chapter 4 and to the printed OnAir 1500 Quick Start Guide shipped with your console. - Page 65 OnAir 1500 Digital Mixing Console Channel Label The 8-digit channel label area normally indicates the (local or remote) channel label if a logical input is assigned to the channel strip. As long as its rotary knob is touched, the display shows the current parameter value, depending on the selected function.
-
Page 66: Global View Operation
OnAir 1500 Digital Mixing Console 5.3.1.1 Global View Operation In global view all OLED displays show the same parameter for every channel strip, while the light bar below the OLED displays remains dark. Any changes to settings as well as the currently active global view will automatically be reset to the default values (i.e. - Page 67 OnAir 1500 Digital Mixing Console Input channel routing can also be described with the diagram below : lock Normal Locked set to locked unlock set to normal StripAssign operation touch change timeout long press lock activate selector exit exit exit...
- Page 68 OnAir 1500 Digital Mixing Console AoIP-stream input routing Assigning an AoIP-stream to the current fader channel can also be done directly on the desk surface. The following diagram describes the different levels of the input selector. In general, a short pressure on the rotary button changes to the next level and a long pressure changes to the previous level.
- Page 69 OnAir 1500 Digital Mixing Console Level 1: Strip State ‘Normal’ / ‘Locked’ Due to the on-air restrictions, the Input Selector doesn’t provide neither any Input Selection nor Stream Patching if the corresponding Strip Channel is locked. The Input Selector will be closed immediately when the selected Strip Channel gets locked.
- Page 70 OnAir 1500 Digital Mixing Console Input Gain / Calibration In order to set input gain or calibration for a channel, first press GAIN/CAL in the FUNCTION field. For local microphone inputs, gain mode is displayed. The rotary knob adjusts either the input gain level for local microphone inputs, or the calibration level for non-microphone inputs as well as shared mic inputs.
- Page 71 OnAir 1500 Digital Mixing Console Panorama / Balance In order to set input pan (L/R panning, for mono channels) or balance (for stereo channels), first use the 34 rotary knob in the FUNCTION field to select PAN/BAL mode. The channel rotary knob then adjusts panning or balance, both in 30 steps to the left or right from the center position.
-
Page 72: Local View Operation
OnAir 1500 Digital Mixing Console 5.3.2 Local View Operation Note: Most of the following functions are available for users with appropriate access rights only, as defined by the system administrator. In the local view (also nicknamed ‘Mini Vistonics’), a set of up to six param- eters is displayed for one selected channel. -
Page 73: Input Local Views
OnAir 1500 Digital Mixing Console off display is dimmed. Parameter sets of functions consisting of more than 6 parameters (such as EQ or Dynamics) can be toggled through using their oval local view key. Local view can be switched over to a next channel directly with this channel’s SEL key, or canceled by pressing the currently active SEL key again 5.3.2.1... - Page 74 OnAir 1500 Digital Mixing Console Local View 1 for a Stereo Analogue Line or Digital Input (e.g. USB or AES/EBU): Input Channel Routing * Generator Generator Phase Stereo/ Stereo ON/OFF Routing Normal/Inv. Mono Mode Level * Input Channel Routing The local view input channel routing works exactly as described in chapter 5.3.1.1...
-
Page 75: Dees (De-Esser) Local Views
OnAir 1500 Digital Mixing Console 5.3.2.2 DEES (De-Esser) Local Views Center Attenuation AutoThr DEES Frequency ON (/OFF) ON/OFF DEES ON/OFF Enables/disables the de-esser section of this channel; the key is illuminated if ON; default setting is OFF. Center Frequency Center frequency of the de-esser’s filter band. It is indicated in kHz and can be adjusted in a 4-14 kHz range. -
Page 76: Eq (Equalizer) Local Views
OnAir 1500 Digital Mixing Console 5.3.2.3 EQ (Equalizer) Local Views Local View 1 (Low and Low-Mid Bands): LF Gain LF Q LMF Gain LMF Q (Boost/Cut) Frequency (Boost/Cut) Frequency ON/OFF Local View 2 (High-Mid and High Bands): HMF Gain HMF Q... -
Page 77: Dyn (Dynamics) Local Views
OnAir 1500 Digital Mixing Console 5.3.2.4 DYn (Dynamics) Local Views The dynamics section consists of four different views, one each for limiter, compressor, expander, and gate. Each part can be switched ON/OFF individu- ally, in addition to the ON/OFF switch for the complete dynamics section. - Page 78 OnAir 1500 Digital Mixing Console Compressor Attack Time The attack time can be set in a range of 0.2 through 20 ms (milli-seconds). Compressor Release Time The release time can be set in a range of 10 ms through 10 s.
-
Page 79: Aux / N-X Bus Send) Local View
OnAir 1500 Digital Mixing Console Gate Attack Time The attack time can be set in a range of 0.2 through 1 ms (milli-seconds). Gate Release Time The release time can be set in a range of 10 ms through 10 s. -
Page 80: Monitoring, Talkback
OnAir 1500 Digital Mixing Console Assign to PGM A Bus ON/OFF Assigns the selected channel to the PGM A (Program) bus; the key and the yellow PGM LED in the indicator field are illuminated if ON; default setting is ON. - Page 81 OnAir 1500 Digital Mixing Console is dark, controls for the control room are active. If illuminated, the controls affect the studio settings. The monitor source selector has eight keys for quick selection of the most important sources (PGM, REC and OFF AIR busses, PFL and AUX/N–X busses 1-4).
- Page 82 OnAir 1500 Digital Mixing Console Guest Headphones The guest headphones are always fed with the same signal as the CR monitor speakers, but without cut or dim functions. GUEST HP For setting the guest headphone’s level, the HP VOL knob is used while press- ing the GUEST HP button.
-
Page 83: Studio Monitoring
OnAir 1500 Digital Mixing Console There is also a possibility to swap the two signals, so that the SP SRC signal is in the right channel, see chapter 6.5.24.1. 5.4.2 Studio Monitoring Compact Monitoring/TB Box: The compact monitoring/TB box offers an array of configurable buttons for monitoring source selection and talkback destinations, red light indication, and studio loudspeaker/headphone control. -
Page 84: Talkback
OnAir 1500 Digital Mixing Console 5.4.3 Talkback Momentary/Latching Talkback Keys A short press on one of the talkback keys latches this talkback function, mean- ing that talkback remains active until the same key is pressed a second time. A long press on one of the talkback keys makes this talkback function work in momentary mode, meaning that talkback is automatically canceled upon release of the key. - Page 85 Signaling The OnAir 1500 has full-way red light signaling, which means that the audio path must be open from the microphone to the master output in order that red light indication becomes active.
-
Page 86: Snapshots
OnAir 1500 Digital Mixing Console Snapshots 5.6.1 Basic Snapshot Operation The four snapshot keys SNAP 1-SNAP 4 can, together with LOAD SNAP and SAVE SNAP, be used for recalling (load) global snapshots from the console- internal memory to the desk, and, after modification (if required) for saving them as user snapshots of the user currently logged in. -
Page 87: Saving Initial Snapshots
OnAir 1500 Digital Mixing Console Category Data Type File Name (SW V3.1 & up) Extension Configuration Part containerID_initial .cfg Operational Part containerID_initial .ops Initial User Parameters containerID_initial .usr License Key Info containerID_initial .key Audio (any individual name) .aud Input Routing (any individual name) .irt... -
Page 88: User Snapshots
OnAir 1500 Digital Mixing Console 5.6.2.3.2 User Snapshots The user snapshots consist of up to four files containing audio, input routing, output routing, and/or assignment parameters. *.aud Audio Snapshots The audio snapshots contain the following parameters: • Logical inputs: most of the logical input parameters, including fader gain and channel on/off • Inserts: assignment and on/off status... -
Page 89: Snapshot Operation Details
OnAir 1500 Digital Mixing Console 5.6.2.5 Snapshot Operation Details For in-depth snapshot operation the user GUI is required. The available snapshot operations depend on the current selection within the local snapshot list: Selected Item >> << Rename Delete Creates a new global –... -
Page 90: Snapshot/Ext. Media Operation Details
OnAir 1500 Digital Mixing Console 5.6.2.6 Snapshot/Ext. Media Operation Details For snapshot/external media operation also refer to chapter 5.12.7.3. The available snapshot operations depend on the current selection within the local snapshot and the card snapshot lists: Selected Item <<... - Page 91 OnAir 1500 Digital Mixing Console overwrite it?’ pops up. When answering Yes, all selected parameter files will be overwritten. Note: If a snapshot containing audio, input routing, output routing, and assignment parameters is overwritten by a snapshot only containing e.g. audio param-...
-
Page 92: Snapshots During Login
OnAir 1500 Digital Mixing Console 5.6.2.7 Snapshots During Login • On login of any user, this user’s default snapshot is loaded if available • On login of the default user (or logout of any other user, respectively), the default user’s default snapshot is loaded if available. The default snapshot may include audio, input routing, output routing, and/ or assignment parameters, such as any other snapshot. -
Page 93: Routing
The routing functionality in an on-air console is different from the routing in a production console. While the OnAir 1500 keeps the channel settings at the input, a re-routed input has the same channel settings as were set the last time it was used. -
Page 94: Logical Audio Inputs
OnAir 1500 Digital Mixing Console 5.7.1.2 Logical Audio inputs Logical audio inputs are the link between the physical audio inputs and the input router. Only logical inputs/outputs can be routed and will be visible on the operating surface. Because the logical audio input holds the channel parameters, a logical input can be assigned only to one channel at a time. -
Page 95: Logical Audio Outputs
OnAir 1500 Digital Mixing Console 5.7.1.3 Logical Audio Outputs Each stereo master has a stereo and a mono output simultaneously. They can both be routed to logical audio outputs. The example below shows a situation where the PGM master is used for a simultaneous transmission of the program in stereo (FM) and in mono (AM). -
Page 96: Routing Operation
OnAir 1500 Digital Mixing Console 5.7.4 Routing Operation Input Routing Input routing is either done with the channel’s rotary encoder in INPUT global view mode (chapter 5.3.1.1), or in the user GUI’s Routing Input page. Example: Routing a new source (MIC 2 instead of CD 1 to channel strip #6). -
Page 97: Hot-Swapping
OnAir 1500 Digital Mixing Console 5.7.5 Hot-Swapping The hot-swapping feature allows 24-hour console operation without an audio interruption, even if the routing is changed and snapshots are loaded. Hot- swapping also works if the source is currently on-air. However, the destination channel must be inactive, otherwise channel protection is active. -
Page 98: Watch And Stopwatches
Watch and Stopwatches 5.8.1 Watch The OnAir 1500 displays the time-of-day in the meter bridge section as long as the CLOCK key is illuminated (default setting). The standard time reference is an internal real-time clock (RTC) with bat- tery back-up. The RTC continues to run when the console is switched off. -
Page 99: User Stopwatch
OnAir 1500 Digital Mixing Console 5.8.3 User Stopwatch If activated with the MAN stopwatch key, the user stopwatch acts as a normal time counter. It always starts from 00:00:00. Start The user stopwatch is started with START. While running, the START key is illuminated. -
Page 100: Gui Watches
OnAir 1500 Digital Mixing Console 5.8.5 GUi Watches If a user GUI screen is connected, the watch in the upper left corner of the screen gives a permanent display of the current time and date. The standard time reference is an internal real-time clock (RTC) with battery back-up. -
Page 101: Fader Stopwatches
OnAir 1500 Digital Mixing Console In free-running as well as in NTP sync modes, automatic daylight saving time switchover needs to be activated. In NTP mode, time zone selection is important for correct time and date display since the time information received corresponds to UTC, no matter in which time zone the console is located. -
Page 102: User Access And Management (Advanced Users Only)
User Access and Management (Advanced Users Only) 5.9.1 Purpose OnAir 1500 consoles are used in different studios with different working practice and different personnel structures. A large part of users in broadcast studios is not technically oriented. They request from a mixing console that it is simple to use, reliable, and free of ‘unnecessary’... -
Page 103: Privileges
OnAir 1500 Digital Mixing Console 5.9.4 Privileges A user GUI page or a console parameter group has a flag indicating whether it can be accessed or not; the flag values are Grant and Deny (i.e., access to the corresponding page or parameter group is granted or denied). The privileges are checked on every access. -
Page 104: Parameters
OnAir 1500 Digital Mixing Console 5.9.7 Parameters The following tables show GUI pages and console parameter groups for which privileges may be defined within a policy, together with the pre-defined (default) privileges for the Admin and Default users. Privileges of Default Policy... - Page 105 OnAir 1500 Digital Mixing Console Privileges of Default Policy Single Parameters Page Parameter Groups Admin Default Dynamics_On/Off Reset ResetDynamics Compressor_gain COMP/LIM Parameters Auto_make_up_On/Off Limiter_On/Off Limiter_threshold Limiter_attack_time Limiter_release_time Compressor_On/Off Compressor_threshold COMP Compressor_ratio Compressor_attack_time Chan::DYN Compressor_release_time Expander_On/Off Expander_threshold Expander_ratio Expander_attack_time Expander_release_time Gate_On/Off...
- Page 106 OnAir 1500 Digital Mixing Console Privileges of Default Policy Single Parameters Page Parameter Groups Admin Default Program_A_Master; Mono Program_A_Master; Gain All Parameters SUM::Master Record_Master; Mono Record_Master; Gain N–X 1:Other Parameters Mono N–X 1: Init InitLevels N–X 1: Mode Mode SUM::N–X N–X 4:Other Parameters...
- Page 107 OnAir 1500 Digital Mixing Console Privileges of Default Policy Single Parameters Page Parameter Groups Admin Default Save All Parameters SNAP::Ext Recall Create Modify Rename Delete ROUT::LIB Recall Load Copy/Paste Copy & Paste All Parameters Admin::Brightness DeskDriver; Module Table; All Parameters...
-
Page 108: Internal Access Handling
OnAir 1500 Digital Mixing Console 5.9.8 internal Access Handling The extensions providing the interface to the user are responsible for checking the corresponding privileges. 5.9.8.1 User GUi The user GUI extension checks the privileges on two different levels, i.e. for pages and for console parameters. For a user having no access right to a certain page, this page will not open. -
Page 109: Desk
OnAir 1500 Digital Mixing Console 5.9.8.2 Desk The desk extension checks the privileges for the desk keys and rotary encod- ers. Access to them depends of the current privilege flag setting: Grant The corresponding key or rotary encoder on the desk surface allows control- ling its parameter. -
Page 110: Principles
OnAir 1500 Digital Mixing Console 5.9.9.1 Principles The ‘user’ extension that provides the user configuration parameters runs on the central user management server as well as on each system core. The central user extension on the server provides all parameters, as they are used by all consoles in the network. -
Page 111: External Audio Synchronization (Advanced Users Only)
As soon as a valid external clock is available again, the console is re- synchronized. 5.11 Diagnostics (Advanced Users Only) The concept of the OnAir 1500 diagnostics system consists of three topics: Error Handling This is the distribution part for the detected errors, warnings and information from the diagnostics system. -
Page 112: Error Types
OnAir 1500 Digital Mixing Console 5.11.1.2 Error Types There are three types of user log messages: Information Information messages are generated in order to inform the user on a console status that doesn’t reduce the functionality of the console. Usually this is the information that an existing problem doesn’t appear anymore. -
Page 113: Snmp (Simple Network Management Protocol)
OnAir 1500 Digital Mixing Console During Operation The system diagnostics software continuously observes the system during operation in order to detect the following conflicts: • External sync clock loss • Power failure • Hardware modification. Restricted Functions Usually, there is no indication of any error or warning if the execution of functions is prohibited in case of restrictions, because the user immediately notes whether the desired function is performed correctly. -
Page 114: Error Messages
OnAir 1500 Digital Mixing Console 5.11.4 Error Messages 5.11.4.1 System Error Code Error Type Error Text / Comment SYSTEM, Fatal software error occurred - System will be stopped. For details see log-file. 1000 Error Appears if a SoftError occurred. Container closes automatically. - Page 115 OnAir 1500 Digital Mixing Console Error Code Error Type Error Text / Comment 7000 Warning CF CARD, Cannot read card. Unidentified Format! SYSTEM, Extension ‚UserGUI.ext‘ could not load User Buttons. Reason: ‹Did not find XML-File or XDR- 7002 Warning File: xml\ GUI_UserButtons.xml’.
-
Page 116: Core Driver
OnAir 1500 Digital Mixing Console 5.11.4.2 Core Driver Error Code Error Type Error Text / Comment (SCL: SCore Live; CSC: Compact SCore) CORE DRIVER, DSP card failure. DSP card in slot 1 missing. SCL: Appears during power-up if a card is missing which is expected in a certain physical slot by the cur-... -
Page 117: Usb Recorder/Player
OnAir 1500 Digital Mixing Console Error Code Error Type Error Text / Comment (SCL: SCore Live; CSC: Compact SCore) CORE DRIVER, DSP card in slot 1 detected. Please make sure, the CORE is rebooted in order to achieve system consistency. - Page 118 OnAir 1500 Digital Mixing Console Error Code Error Type Error Text / Comment USB RECORDER, Cannot read USB stick, invalid or unknown format. 2811 Warning Appears when an USB stick is inserted, but cannot be read due to unknown format.
-
Page 119: I/O 21
OnAir 1500 Digital Mixing Console 5.11.4.4 i/O 21 Error Code Error Type Error Text / Comment I/O 21, Rack “Int”: Reconfiguration required. 3001 Info Appears during power-up and runtime together with 3006. I/O 21, The Rack “Ext 1” was reconfigured. Please make sure, the CORE is rebooted in order to achieve... - Page 120 OnAir 1500 Digital Mixing Console Error Code Error Type Error Text / Comment I/O 21, Additional HD Link to a DSP card required. Rack ‚Int’ provides 128 outputs, but only 96 channels are connected to the CORE. 32 outputs not available.
-
Page 121: Gpio Functions
OnAir 1500 Digital Mixing Console 5.11.4.5 GPiO Functions Error Code Error Type Error Text / Comment GPIO, The GPIO function 3 does not work properly! Please check the selected arguments. For GPInput functions: Appears if arguments are missing - during activation of a GPInput function in the ConfigGUI... - Page 122 OnAir 1500 Digital Mixing Console Error Code Error Type Error Text / Comment AoIP, Connection established to local AoIP node with IP 192.168.0.10 on Livewire card in Slot 1 of Rack ‘Internal’. AoIP network ‘MyAudioNetwork’. 3208 Info Appears during operation, if the protocol dll establishes TCP/IP connection to an AoIP node specified for a connector in the D21m.XML file.
-
Page 123: Desk / User Gui / Configuration Tool
OnAir 1500 Digital Mixing Console 5.11.4.7 Desk / User GUi / Configuration Tool Error Code Error Type Error Text / Comment 4100 Warning DESK, No communication with Fader module at Port 43 on Container100. 4101 Warning DESK, File ‚fader3.hex‘ not found. Firmware download to Fader module at Port 43 on Container100 failed. -
Page 124: Snapshot Handling
OnAir 1500 Digital Mixing Console Error Code Error Type Error Text / Comment CONFIG, Insert “PCM 90” de-assigned from input “DVD 5.1”, since the format of the input has been changed to 5.1. 4215 Warning Appears when changing the format of a logical input from mono or stereo to 5.1 in the Config GUI if the logical input has an insert assigned. -
Page 125: Library Handling
OnAir 1500 Digital Mixing Console Error Code Error Type Error Text / Comment SNAPSHOT, Snapshot file server not properly configured. Check configuration and network connection. 5006 Warning Appears during snapshot operations (CREATE, RECALL, DELETE and RENAME) if the console cannot login to the file server where the central snapshots are located. -
Page 126: Routing
OnAir 1500 Digital Mixing Console 5.11.4.10 Routing Error Code Error Type Error Text / Comment Routing failure. The routing of channel 2 on Container100 could not be changed. Channel 2 on Con- 6000 Warning tainer100 is virtual. 6001 Warning Pending Routing. The routing of channel 2 on Container100 is not yet changed. Input Digi1 is on-air. -
Page 127: Cab Extension
OnAir 1500 Digital Mixing Console 5.11.4.12 CAB Extension Error Code Error Type Error Text / Comment 8001 Warning CAB, Broadcast Automation disconnected. 8100 Warning CAB (Monitora protocol), SELECT_SOURCE failed: No free stripchannel. CAB (Monitora protocol), SET_SAS_INPUTROUTING failed: HD-Link signal ID out of range. InputLine can- not be routed.»... - Page 128 OnAir 1500 Digital Mixing Console Error Code Error Type Error Text / Comment IOSHARING, Audio connection could not be established, since there are too few physical connections available. No audio on ‘left‘ channel of ‘Logical Input‘ ‘Label‘ ! 8504 Warning Appears as soon as a logical connection should be established, but no free physical connection is avail- able.
-
Page 129: Backup/Restore
OnAir 1500 Digital Mixing Console 5.11.4.16 Backup/Restore Error Code Error Type Error Text / Comment BACKUP/RESTORE, Backup Failed! Mandatory configuration file not found ‘config.xml’. No backup cre- 8700 ated. Warning Appears during backup operation if a mandatory configuration cannot be found. -
Page 130: Time Sync
OnAir 1500 Digital Mixing Console Error Code Error Type Error Text / Comment CUSTOM LOGICS, More than 10 gates cascaded at Gate ‘AND 21’! Source cleared. Appears during configuration of a source of a Custom Logic, the limit of cascades is exceeded configuring... -
Page 131: Gui Operation (Advanced Users Only)
OnAir 1500 Digital Mixing Console 5.12 GUi Operation (Advanced Users Only) GUI operation requires a DVI screen and a USB keyboard and/or mouse connected to the system. Basic information on mouse/keyboard operation is given in chapter 5.1. 5.12.1 Home Page The left, upper, and right borders of the screen are always visible. - Page 132 CR and ST red light indicators in the central section. An on-air con- dition is indicated by changing the color of the ‘Frisbee’ symbol next to the OnAir 1500 label to red (and lighting the central section’s ON-AIR indicator). Interface Indicators...
-
Page 133: Channel
OnAir 1500 Digital Mixing Console 5.12.2 Channel Pages To open the channel page and to automatically select the corresponding chan- nel, click on the Chan field in the main menu. The channel page pops up and displays the selected channel functions. -
Page 134: Input Page
OnAir 1500 Digital Mixing Console 5.12.2.1 input Page The CHAN - Input page is divided into two sections. The left part shows the parameters of the currently assigned active input (the picture is somewhat depending on the input type – the following screenshots show analog or digital stereo inputs), whereas in the right (GEN) part the test generator can be activated if the current user has been given appropriate access rights. - Page 135 OnAir 1500 Digital Mixing Console Input selection dialog (e.g. as used for selecting AoIP streams - “stream patching”) The Input Selection button on the CHAN - Input page opens the Input Selector popup dialog. It shows the Input Groups as configured for the con- sole.
- Page 136 OnAir 1500 Digital Mixing Console Source Selector Dialog The Source Selector dialog either provides a list of Stream Groups or a list of Streams within the previously selected Stream Group. It consists of a control area (left side) and a Stream Groups- or Stream area (right side).
- Page 137 OnAir 1500 Digital Mixing Console Source Selector Dialog 2 Control Area Stream Area Input indicates the label of the Input Logical Input currently assigned All Streams are listed here in to the selected Strip Channel. alphabetic order. Source Group Source Group indicates the previously selected Stream Group.
- Page 138 OnAir 1500 Digital Mixing Console Functions for Stereo Inputs (see the screenshot above) Mode Selector Stereo signals can be processed in the following modes: Mono Left and right channels are attenuated by 3 dB and mixed together Normal stereo mode...
- Page 139 OnAir 1500 Digital Mixing Console Functions for Mono Inputs Mono inputs have the same functionality as the stereo inputs, but without a stereo mode selector, as shown above. Functions for Microphone Inputs +48 V Enables/disables the phantom power for the corresponding mic input; the button is highlighted when enabled.
- Page 140 OnAir 1500 Digital Mixing Console Gain Here the microphone input gain can be set. The gain is indicated by the blue bar graph and in the Gain field; it is adjusted with the rotary encoder below the field. The Gain value displayed is depending on the systems reference line level for 0dBFS.
- Page 141 OnAir 1500 Digital Mixing Console When clicking on the Mic Control Access button its label changes to LOCAL on green background. At the same time all mic control parameters are displayed and ready to use, as shown in the next screenshot.
- Page 142 OnAir 1500 Digital Mixing Console If access is requested from another system, a user warning appears there: After confirmation with Yes, access is taken over by the other system where the green LOCAL button is displayed now, together with the mic parameter controls.
- Page 143 OnAir 1500 Digital Mixing Console Test Generator Functions For test purposes, the OnAir 1500 features an internal test signal generator available for every channel. While the generator is active, the normal channel buttons in the left part of the page are disabled and displayed in gray. The test generator may only be activated by users having the appropriate access rights configured by the system administrator.
-
Page 144: De-Esser Page
OnAir 1500 Digital Mixing Console 5.12.2.2 De-Esser Page Each channel has an integrated de-esser. This is a dynamically controlled filter, normally used to reduce the ‘s’ components of a microphone signal. The filter range is placed over the signal’s ‘s’ frequency components; if an ‘s’... -
Page 145: Equalizer Page
OnAir 1500 Digital Mixing Console Reset Button to reset all de-esser parameters of the current channel at once. 5.12.2.3 Equalizer Page Each channel has a parametric four-band equalizer. If the user has no access permission to the EQ parameters, the CHAN - EQ page is not displayed. -
Page 146: Dynamics Page
OnAir 1500 Digital Mixing Console 5.12.2.4 Dynamics Page Each channel has an internal dynamics processor consisting of a limiter, a compressor, an expander, and a gate section. The dB readings automati- cally consider the selected amount of headroom (i.e., 0 dB indication = 0 dB –... - Page 147 OnAir 1500 Digital Mixing Console Threshold The expander/gate threshold is displayed in dB and can be adjusted in a 96 dB range with the rotary encoder below the field. (Gate only): Please note that the gate has a fixed 6 dB hysteresis. This means that the gate is closed as soon as the level is equal to or below the adjusted threshold value;...
-
Page 148: N-X Page
OnAir 1500 Digital Mixing Console 5.12.2.5 n–X Page This page contains the controls for the N-X / Aux sends . N–X Mode This is an indication on which main output assignment the channel’s contribu- tion to the N–X bus depends (PRG A or REC), or whether the bus is used as AUX bus (AF or PF);... -
Page 149: Fdr/Bus Page
VMix Assign (optional) Using this button, the channel can be assigned to the VoiceMix process. (There is one single VoiceMix process on the OnAir 1500). Two numbers are shown next to the name of the VoiceMix process : the first number indicates how many channels can still be assigned, and the second number shows the maximum number of assignable channels. - Page 150 OnAir 1500 Digital Mixing Console To deassign the channel from the VMix process, simply touch on the VMix Assign button again. The VMix Assign button is greyed out if the logical input is assigned to a VoiceMix process, but cannot be processed as no free member is currently available.
- Page 151 OnAir 1500 Digital Mixing Console PAN or Balance Depending on the current channel format, this is a panorama (mono), or balance (ste reo) function. The PAN or Balance value is indicated by the yellow-colored bar graph. The exact value is displayed as a numerical value followed by L or R and can be set with the rotary encoder below the field in a range from 30L (fully left) over 0 (center) to 30R (fully right).
-
Page 152: Sum Pages
OnAir 1500 Digital Mixing Console 5.12.3 Sum Pages When clicking on Sum, the last used Master or N–X page opens for param- eter adjustment. 5.12.3.1 Master Page This page opens when selecting it from the Sum page. It allows parameter adjustments for the two main master buses PRG A and Record. -
Page 153: N-X Pages
OnAir 1500 Digital Mixing Console 5.12.3.2 n–X Pages The control elements for the four N–X or AUX master buses are all found on one single page.. Mono / Stereo The audio format of all N–X buses can be set to mono or stereo when clicking on these buttons;... -
Page 154: Monitoring Pages
OnAir 1500 Digital Mixing Console 5.12.4 Monitoring Pages Like all hardware elements, the console’s monitoring and talkback controls are available in the GUI as well and work completely in parallel. This has several advantages: A function can be controlled from a remote PC, e.g. for service purposes, or the user can control the parameters in the studio from his desk in the control room. -
Page 155: Cr Lsp (Loudspeakers) Page
OnAir 1500 Digital Mixing Console 5.12.4.2 CR LSP (Loudspeakers) Page Cut / Dim These buttons allow muting/dimming the speakers; highlighted if active. The amount of Dim attenuation can be configured (see chapter 6.5.24.1). (Loudspeaker) Volume The volume of the monitoring system is indicated with the bar graph. The exact value is displayed in dB and set with the adjacent rotary encoder. -
Page 156: Cr Cue Page
OnAir 1500 Digital Mixing Console MON or HP SPLIT=off The DJ headphones signal is the same stereo signal as selected for the CR monitor speakers by the CR source selector. SP SRC / MON or HP SPLIT=on The left DJ headphones signal is the mono SP SRC signal, while the right one is a mono mix of the CR monitor signal as selected for the CR monitor speakers by the source selector. -
Page 157: Studio 2 Page
OnAir 1500 Digital Mixing Console 5.12.4.5 Studio 2 Page The controls of the studio 2 page are operated in parallel to the controls on the monitoring/talkback box in the studio. Source Selector The source selector buttons can be configured with the desired sources; the currently selected source is highlighted. -
Page 158: Tb Sp Page
OnAir 1500 Digital Mixing Console 5.12.4.6 TB SP Page This page contains a part of the functionality found in the desk’s central sec- tion and works in parallel with its controls. For details refer to chapter 5.4. Talkback Destination Selector Buttons to select a talkback destination (or a group of destinations). -
Page 159: Routing Pages
OnAir 1500 Digital Mixing Console 5.12.5 Routing Pages 5.12.5.1 input Page The input routing page allows setting up the mixing console’s input router; the general rule is that each input can be routed to any channel, but to exactly one channel only. For a general description of the routing refer to chapter 5.7. -
Page 160: Output Page
OnAir 1500 Digital Mixing Console Lock, Unlock A connection may be protected from changes by selecting it and clicing on the Lock button. If locked, the Connect and Clear buttons are blanked, and a padlock symbol is indicated next to the input label. -
Page 161: Insert Page
OnAir 1500 Digital Mixing Console Connect When clicking on Connect, the connection is set at the crosspoint of the cursor lines. The blue bullet at the crosspoint indicates the selected type: Input DIR Out PP (pre-processing)* DIR Out AP (after processing)*... -
Page 162: Mic Group Page
OnAir 1500 Digital Mixing Console INSERT1...8 Clicking on one of these buttons opens a list of the available insert points to select from. The selected insert point is displayed in the field at the right of the INSERTx buttons. To de-assign an insert point, select None from the list. -
Page 163: Xl Assign Page
OnAir 1500 Digital Mixing Console 5.12.5.5 XL Assign Page Extended Line (XL) Module The XL module (‘XL box’) allows direct communication to up to twelve outside sources but may be used for different applications as well. This page allows assigning the desired sources to the XL box keys. -
Page 164: Bus Assign Page
OnAir 1500 Digital Mixing Console 5.12.5.6 Bus Assign Page The bus assign page gives a kind of ‘reverse contribution’ overview and allows routing channels to buses in a matrix style, as opposed to the conventional assignment from within the strip channels. It also gives the user a convenient view of the inputs currently assigned to a bus;... -
Page 165: Voicemix Page
Setting up of VoiceMix Process In the Configuration Tool, the label of the VMix process can be given. Please refer to chapter 6.5.18. The OnAir 1500 allows one VMix process with six assignable members. Operation 5-109 Document generated: 06.08.14 SW V6.0... - Page 166 OnAir 1500 Digital Mixing Console Cue/PFL Also in the configuration tool, the cue mode (alternative to pfl mode) can be chosen to be “Pre” or “After” VoiceMix processing. For selecting these cue modes, please see chapter 6.5.14. User Access Privilege For access to VMix parameters, privileges may be defined within a policy.
-
Page 167: Snapshot Pages
OnAir 1500 Digital Mixing Console 5.12.7 Snapshot Pages On this page the static (snapshot) automation is handled. For a general descrip- tion of the snapshot handling refer to chapter 5.6. 5.12.7.1 Shot Page Local Snapshot List The snapshot list in the left part of the page shows all snapshots available for the current user. -
Page 168: Route Page ('Partial Output Routing')
OnAir 1500 Digital Mixing Console renaming the selected entry with the keyboard appearing then. When finished, confirm with Enter. Delete The Delete button is displayed only if an entry has been selected in the Local snapshot list, and if deleting is available for this entry. It allows deleting the selected entry after confirmation. -
Page 169: Ext Page
OnAir 1500 Digital Mixing Console 5.12.7.3 EXT Page Note: This page appears if no central snapshot server is configured within the system (i.e. Snapshot Location is set to Local, refer to chapter 6.5.26). Local Snapshot List The snapshot list in the left part of the page shows the local snapshots saved in the console’s memory. -
Page 170: Lib Page
OnAir 1500 Digital Mixing Console 5.12.7.4 LiB Page With SW V5.0 and up, processing parameter settings can be handled in a more comfortable way; they may now be saved in local libraries. In case of a networked system, these libraries may also be located on a central server and accessed from every console within the network. -
Page 171: Admin (System Administrator) Pages
(LEDs in a 0...4095 range, the TFT screen in eight steps from 0 to 7, and the OLED displays in five discrete steps from completely dark to bright – how- ever, with a 0...4095 indication). All Screens This button is inactive on the OnAir 1500 and OnAir 2500 consoles. Operation 5-115 Document generated: 06.08.14 SW V6.0... -
Page 172: Fader Cal Page
OnAir 1500 Digital Mixing Console 5.12.8.2 Fader Cal Page First, select the fader module to be calibrated by clicking on the correspond- ing button. The screen then changes as follows: 0 dB Position Always required; please note that it is recommended to perform this calibra- tion for all faders of a fader module at a time. -
Page 173: Firmware Page
OnAir 1500 Digital Mixing Console FDR Start Trigger Point Please note that it is recommended to perform this calibration for all faders of a fader module at a time. First, move all faders not to be calibrated to their –20 dB position (this posi- tion is ignored during calibration). -
Page 174: Date Time Page
OnAir 1500 Digital Mixing Console 5.12.8.4 Date Time Page As long as no external time reference signal is configured, the internal clock is used as time reference, the Time Sync Reference indication is None, and the sync indicator in the upper left corner of the clock dial is gray. To set the system date or time, click on the corresponding Set Date or Set Time button. -
Page 175: Config Page
OnAir 1500 Digital Mixing Console If an external time reference signal is selected (requires an NTP or Monitora time signal, configuration in chapter 6.5.15), the Set Date and Set Time buttons disappear. If the external time reference is active, the sync indicator is white on black background, as shown below;... - Page 176 OnAir 1500 Digital Mixing Console Rename For renaming backup configuration files on the external medium. If the new name should already exist, a dialog box appears where overwriting the exist- ing backup has to be confirmed. Delete For deleting backup configuration files from the external medium. A dialog box appears where deleting the selected backup has to be confirmed.
-
Page 177: Setup Page
OnAir 1500 Digital Mixing Console 5.12.8.6 Setup Page This function allows switching between two different, customer-specific con- sole configurations (i.e., all parameters setup during console configuration, including the key assignment, user access rights and passwords). When starting the console for the first time, SETUP 1 is active per default. - Page 178 OnAir 1500 Digital Mixing Console Selecting a different setup is not allowed as long as any local or remote chan- nels are currently being on-air. In such a case the following message appears: 5-122 Operation SW V6.0 Document generated: 06.08.14...
-
Page 179: Gen Page
OnAir 1500 Digital Mixing Console 5.12.8.7 GEn Page For test purposes, the OnAir 1500 features an internal test signal generator that is activated from the Chan - Input page (see chapter 5.12.2.1) by users having the appropriate access rights configured. Waveform, frequency and level settings are performed here. -
Page 180: Lsp Pan Page
OnAir 1500 Digital Mixing Console 5.12.8.8 LSP Pan Page For the control room and all studios (CR/ST2), an additional static balance/ panning can be given to the monitor loudspeaker outputs. This can be useful to adapt the loudspeaker levels - and therefore the sound image - for an important person who is not located in the sweet-spot of the control room/studio. -
Page 181: Login Page
OnAir 1500 Digital Mixing Console 5.12.9 Login Page For details of user access rights please refer to chapter 5.9. To login, a user selects his name from the user list with the rotary encoder below the User Name field, followed by clicking on the Login button. If more than 50 users should be configured in a system, selection from a list is inconvenient;... -
Page 182: 5.12.10 Screen Level Meters
OnAir 1500 Digital Mixing Console returns to the Home page. If a wrong password is entered, the login fails and a user warning pops up: When a user logs in, the system generates an entry in the log file. Note: The factory default system administrator password is admin. - Page 183 External Meters If required, commercially available external level meters (such as meters by DK-Audio, RTW or Studer) may be installed as an option. Analog VU meters are very popular in some countries, these may be used as well. To do so, external level meter outputs must be configured in the Nano SCore frame.
-
Page 184: Relink (Advanced Users Only)
RELINK stands for ‘Resource Linking’, the feature formerly called ‘I/O Sharing’. The OnAir 1500’s I/O sharing allows routing one physical audio input to more than one logical audio input. If a physical audio input has unique control parameters (such as the micro-... -
Page 185: Producing Livewire Streams
OnAir 1500 Digital Mixing Console 5.14.2 Producing Livewire Streams The OnAir AoIP feature allows sending Livewire streams to the network. Basically all outputs that can be physically mapped by configuration to a D21m output card, are able to send a Livewire stream. These are Logical- and Patch Outputs*, FixedOutputs, etc. - Page 186 OnAir 1500 Digital Mixing Console Under the following condition, the OnAir application software handles Label Transfer for a LogicalInput as described above : • Network- and connector definition are properly configured as described chapter 6.6. • The first source of the physical input mapping of the LogicalInput must be mapped to a Listener of a Livewire card. For AoIP details and configuration, refer to chapters 6.6 and 9.
-
Page 187: 5.15 External Router Control
VSM Servers Logical Inputs / Destination IDs: The OnAir 1500 console allows free assignment of destination IDs (as used by the RCS for identifying a router output) to the logical inputs to which the router outputs are connected. The destination IDs are used to set crosspoints when the user selects a source in the CHAN - Input page (see below), and when the RCS reports labels. - Page 188 OnAir 1500 Digital Mixing Console return lines, but from the same codecs. After selecting an external line by clicking on one of the Line... buttons, a list with the different router groups opens. In our example, the Codecs button opens a list of all sources provided by the selected router group (codecs in our example) available for selection;...
- Page 189 OnAir 1500 Digital Mixing Console Codec Status Locked – codec #1 is in use and locked to facility #1304; gray text on red button. Cannot be selected. Listen mode is disabled, too. Busy – codec #12 is in use, including the return line, by facility #3303; In this example the LineTakeOver setting is off and therefore it’s only possible...
-
Page 190: Interactions
OnAir 1500 Digital Mixing Console (including return line) is dependent on the LineTakeOver setting. - If LineTakeOver is off, then such a busy line is only selectable in “listen mode”. This means just as input source (2-wire) to one of the inputs in group “External Input 1-8”. -
Page 191: Configuration
OnAir 1500 Digital Mixing Console 5.15.3 Configuration For correct operation, the following points must be considered: • The assignment of logical inputs to the external router destinations is configured under Config - LogicalInputs (configuration tool, chapter 6.5.1). • The facility ID of the console is entered under UserGUI - Settings (configuration tool, chapter 6.5.38.1... -
Page 192: 5.16 Usb Player/Recorder
OnAir 1500 Digital Mixing Console 5.16 USB Player/Recorder 5.16.1 Basics Starting with SW V4.1, the OnAir 1500 console supports an integrated wave file player/recorder for playback from and recording to USB memory devices, such as a USB stick or hard drive. Jingle Player The jingle player is a stereo playback-only device intended for short audio clips such as station identifier jingles, applause etc., that are triggered from... -
Page 193: Supported Audio Files
OnAir 1500 Digital Mixing Console 5.16.1.1 Supported Audio Files All players/recorders listed above require audio files with the following properties: • USB memory device formatted with FAT32 file system (also refer to chapter 5.16.1.3); maximum file size is 4 GB. -
Page 194: Memory Formatting
OnAir 1500 Digital Mixing Console Track Recorder Recorded files are automatically saved in the Music folder and named by the system. The first recorded file is named T00000.wav, the next one T00001.wav and so on, up to T99999.wav. When reaching the file T99999.wav, the system selects the lowest gap in the file list between... -
Page 195: Jingle Player Operation
OnAir 1500 Digital Mixing Console 5.16.3 Jingle Player Operation After plugging the memory stick to the Nano SCore’s REC / PLAY USB socket, the system first checks for valid files. Provided that a compliant file system, a folder named Jingle and files with correct names are available, jingle playback is no problem. -
Page 196: Track Recorder Operation
OnAir 1500 Digital Mixing Console 5.16.4 Track Recorder Operation After plugging the USB memory device to the Nano SCore’s REC / PLAY USB socket, the system first checks for valid files. Provided that a compliant file system, a folder named Music and free memory are available on the memory device, the two LEDs next to RECORDER are lighted in green, and recording is allowed. -
Page 197: Track Player Operation
OnAir 1500 Digital Mixing Console During recording the REC= key is illuminated in red. If during recording the remaining time counter is selected with REC INFO, it is displayed counting backwards indicating the remaining recording time. If REC= is pressed during recording, a new track is started immediately. If the recorded file size reaches 4 GB, a new track is automatically started as well. -
Page 198: Track Selection
OnAir 1500 Digital Mixing Console 5.16.5.1 Track Selection Let us assume that the memory device contains tracks named T00001.wav to T00017.wav in the \Music folder, and that track T00005.wav should be played. If not done yet, route the USB channels 3 and 4 to the desired fader strip: • Press the rectangular INPUT key in the desk’s FUNCTION section. -
Page 199: Track Pre-Listening
OnAir 1500 Digital Mixing Console From now on, the file name is displayed instead of the channel label until either the memory device is removed from the system, a different track is selected or the system is restarted. 5.16.5.2 Track Pre-Listening Once a track is selected, it can be pre-listened. - Page 200 OnAir 1500 Digital Mixing Console Notes: If however the PFL function is activated while the track is paused by either closing the fader or deactivating the ON key (channel inactive), PFL playback is resumed from the current track position; when deactivating PFL the track player is switched to stop.
-
Page 201: 5.17 Remote Operation
OnAir network. Remote Console Studer OnAir mixing consoles can either be controlled and configured directly at the console (using their GUI and/or a connected USB keyboard and mouse), or over a network using the Remote Console application running on a Win- dows PC. - Page 202 OnAir 1500 Digital Mixing Console • The short file defines which addresses are used MulticastGroups.ini for multicast communication. If the default addresses are not ok, please ask your IT/network administrator for assistance and modify them. The default file is shown below.
-
Page 203: Remote Console Application
OnAir 1500 Digital Mixing Console 5.17.3 Remote Console Application Installation Important for Windows Vista and Windows 7 PCs: Make sure that you have write access to the selected location. • Locate the folder for your console type on the Product x_SW_Vx.x.x.xx DVD shipped with your console. - Page 204 OnAir 1500 Digital Mixing Console ########################################################################## # container.ini: Necessary for initialization of each container (.exe) # Digital Mixing Console: OnAir3000 # Studer Professional Audio GmbH, Regensdorf, Switzerland Last modification : Sep, 1st 2006 Compatible with OATreeLib : V2.1 Author : xSP, SO...
- Page 205 OnAir 1500 Digital Mixing Console # containerid = 160 : CHANNEL Screen of the Secondary Desk for Channels 1..6 # containerid = 161 : CHANNEL Screen of the Secondary Desk for Channels 7..12 # containerid = 162 : CHANNEL Screen of the Secondary Desk for Channels 13..18 # containerid = 163 : CHANNEL Screen of the Secondary Desk for Channels 19..24...
- Page 206 OnAir 1500 Digital Mixing Console Operation Start the Remote Console application by a double-click on either the desktop shortcut (shown left) or directly on in its folder. If RemoteConsole.exe everything is correct, the Home page of your console will pop up: On from here, the console can be operated as usual.
-
Page 207: Remote Configuration Tool
OnAir 1500 Digital Mixing Console 5.17.4 Remote Configuration Tool The (Remote) Configuration Tool is very similar to the Configuration Tool that can be started from the Remote Console’s Admin - Config page. The only difference is that it allows selection of the console to be configured – so it is, in fact, useful only in case of a larger networked system. - Page 208 OnAir 1500 Digital Mixing Console ########################################################################## # container.ini: Necessary for initialization of each container (.exe) # Digital Mixing Console: OnAir3000 # Studer Professional Audio GmbH, Regensdorf, Switzerland Last modification : Sep, 1st 2006 Compatible with OATreeLib : V2.1 Author : xSP, SO # Rules: # - always leave one blank before and after the ‘=’...
- Page 209 OnAir 1500 Digital Mixing Console # containerid = 161 : CHANNEL Screen of the Secondary Desk for Channels 7..12 # containerid = 162 : CHANNEL Screen of the Secondary Desk for Channels 13..18 # containerid = 163 : CHANNEL Screen of the Secondary Desk for Channels 19..24 # containerid = 164 : CHANNEL Screen of the Secondary Desk for Channels 25..30...
-
Page 210: Remote Configuration Tool - Tools Menu
OnAir 1500 Digital Mixing Console Operation Start the Remote Config Tool application by a double-click on either the desk top shortcut (shown left) or directly on in its folder. ConfigTool.exe When started, the Config Tool window will look similar to the screenshot... -
Page 211: Export/Import Labels
OnAir 1500 Digital Mixing Console 5.17.5.2 Export/import Labels The Configuration Tool supports import and export of labels using CSV for- matted files. A CSV formatted file is an implementation of a delimited text file, which uses a tab (originally comma) to separate values. Providing such files allows to easily edit labels in an editor of choice (e.g. -
Page 212: Import Routable Sources
OnAir 1500 Digital Mixing Console Supported Labels These labels may be imported / exported : Assignable Product Inputs Outputs Processes OnAir3000 / LogicalInputs LogicalOutputs PatchInputs PatchOutputs Route3000 OnAir1500/ LogicalInputs LogicalOutputs OnAir2500 Route6000 RLogicalInputs RLogicalOutputs Delays Downmixes Dynamics FadeInOuts Filters Generators... - Page 213 OnAir 1500 Digital Mixing Console Backup Root Product SW Version System Name Backup Name one folder per subsystem (container) with configuration files Backup Root path The Backup Root path can be specified in the Configuration Tool. This allows the user to save backups anywhere.
- Page 214 OnAir 1500 Digital Mixing Console current system. Subsystem Name Each subsystem (DNet container) has its own folder within the backup-folder. It contains the configuration files related to that subsystem in a file structure as follows : The folder name is generated according to the ContainerID and the Contain- erName: cID_name, where ID is the ContainerID and name is the Contain- erName as defined in the container.ini-file...
- Page 215 OnAir 1500 Digital Mixing Console The user can either create a new backup or overwrite an existing. • When creating a new backup, the user is prompted to enter a backup name. If a backup already exists with this name, a confirmation dialog appears to ask the user, if he really wants to overwrite the existing backup. The new backup is automatically created into the backup folder of the current system.
-
Page 216: Create Login File
OnAir 1500 Digital Mixing Console Reboot Reboots all WinCE subsystems of the selected system. E.g. Core, Desks and ChannelScreens of an OnAir3000. Note : Rebooting a console is only possible if none of the channels are on-air ! 5.17.5.6 Create Login File Create Login File allows the creation of login files which are used for login with a USB memory stick. - Page 217 OnAir 1500 Digital Mixing Console 7 Click on Create File. The newly created Login.ID file is saved in the same folder that contains the Remote Config Tool application. 8 Copy it from there to the user’s USB stick. When opening this file with a text editor such as Notepad, you will see its contents: the user’s name and his encrypted password:...
-
Page 218: System Information
OnAir 1500 Digital Mixing Console When logging out (i.e. pulling out the login USB stick), the system automati- cally activates the default user but will keep the last loaded snapshot. 5.17.5.7 System information System Information allows to collect configuration and runtime information of a system. - Page 219 OnAir 1500 Digital Mixing Console Operation 5-163 Document generated: 06.08.14 SW V6.0...
- Page 220 OnAir Digital Mixing Consoles CHAPTER 6 Configuration ..............................5 Desk Settings ..............................6 Configuration Backup ............................7 Auto(matic) Configuration ..........................8 6.3.1 I/O Init ................................... 9 6.3.2 Desk Init ................................9 6.3.3 GPIO Init ................................9 Configuration Tool ............................10 6.4.1 Navigation and Handling ............................ 11 6.4.2 Undo / Exit / Save Config ...........................
- Page 221 Compact Monitor/Talkback Units (CompactMonTBs) ..................110 6.5.31 Pro-Bel ................................111 6.5.31.1 Settings ................................... 111 6.5.31.2 Routable Sources ..............................112 6.5.32 Ember ................................113 (OnAir 1500 only) ....................113 6.5.33 Recorder and Player 6.5.34 Audio Clock ..............................114 6.5.34.1 Settings ...................................114 6.5.35 User (User Management) ..........................115 6.5.35.1...
- Page 222 OnAir Digital Mixing Consoles 6.5.35.4 Policies, Departments .............................118 6.5.36 License Manager ............................... 120 6.5.36.1 Information ................................120 6.5.36.2 Options ...................................120 6.5.37 Desk................................... 121 6.5.37.1 Fader Assign 1 - Group 1 ............................121 6.5.37.2 Rotary Assign 2 - Group 2 (OnAir 3000 only) ......................122 6.5.37.3 Assignable Rotary Functions ..........................123 6.5.37.4...
- Page 223 OnAir Digital Mixing Consoles 6-4 Configuration SW V6.0 Document generated: 06.08.14...
-
Page 224: Configuration
Please Note: Some features mentioned in this chapter are not supported by the OnAir 1500 and/or OnAir 2500 consoles. If a feature is not available for the OnAir 1500 and/or OnAir 2500 consoles, it is mentioned in the text. Most of the screenshots in this chapter are taken from an OnAir 3000 main screen but are also useful for the OnAir 2500 and OnAir 1500 units. -
Page 225: Desk Settings
OnAir Digital Mixing Consoles If the system administrator is logged in, a Config button appears in the Admin screen’s menu bar. When touching it, the central part of the screen is subdi- vided into three sections: Desk Settings – Save (see chapter 6.1), Config Tool –... -
Page 226: Configuration Backup
Slots for external memory media are provided (OnAir 3000: CF card and USB sockets; OnAir 1500/2500: USB socket). If using the remote configuration tool, the files can be saved at any desired location. -
Page 227: Auto(Matic) Configuration
OnAir Digital Mixing Consoles Auto(matic) Configuration Unless the console is shipped with a specific, customer-defined configura- tion, the automatic configuration functions may be applied when powering it up for the first time. Manually configuring all the different parameters can be quite a time-consuming task, so Auto Configuration is the recommended procedure in such a case. -
Page 228: I/O Init
Configuration Tool application after I/O Init has been completed. Since OnAir 1500/2500 consoles are available in fixed configurations only, I/O Init is normally not necessary, unless the console is combined with an external D21m I/O frame. -
Page 229: Configuration Tool
The optional Ember function group only appears on consoles equipped with the option and having it configured in the file. .ini Some of the menu tree items are supported by the OnAir 3000 only and will not be displayed on an OnAir 1500 or 2500 console. 6-10 Configuration SW V6.0 Document generated: 06.08.14... -
Page 230: Navigation And Handling
The selection can then be done by touching the desired menu item. Some of the menu tree items are not supported by OnAir 1500 and/or OnAir 2500 consoles. They will then not be shown in the tree. 6.4.2 undo / Exit / Save Config Normally, configuration changes are immediately executed. -
Page 231: Configuration Details
OnAir Digital Mixing Consoles Configuration Details 6.5.1 Logical inputs For every logical input that shall be routable to an input channel strip, a physi- cal input (or, if required, a master output or, if required and configured, a tie line) has to be defined. For tieline configuration refer to the service manual. Basic Label This is the channel label that is normally displayed in the channel strip and in the GUI if this input is routed. - Page 232 Defines the audio format of the logical input. Selections: Stereo, Mono, or 5.1. The format selected here will be automatically assigned to the console channel to which this logical input is routed. OnAir 1500/2500: 5.1-channel inputs not supported. OnAir 3000: 5.1-channel support optional.
- Page 233 OnAir Digital Mixing Consoles Then a list for selection of the desired physical input appears . It can be scrolled up and down with the rightmost rotary encoder or the navigation buttons at its upper and lower margins. However, when using a Remote Configuration Tool running under Windows XP, the navigation buttons are replaced by a vertical scrollbar.
- Page 234 OnAir Digital Mixing Consoles Livewire Inputs The physical input mapping of Livewire inputs to LogicalInputs differs from that of all other consumers (PatchInputs, Returns, Extern PFL- and Moni- toring Sources, etc.), in order to make sure the following mapping rules are applied: • A LogicalInput is always mapped to the left- and right channel of a Listener.
- Page 235 OnAir Digital Mixing Consoles Since Livewire Listeners are logical sources of format stereo, the OnAir application software (especially the Configuration Tool) handles consecutive sources (Source Right, etc.) as known from other logical sources - they are ignored and grayed out. LVDS inputs associated to Livewire I/O cards can also be mapped to Logi- calInputs, but without a Listener mapped to the first source of a Logical Input, neither stream selection/patching nor label transfer is provided for that...
- Page 236 Since SW V3.0, the mic clip limiter is activated here instead of on the main screen. It is only available for local sources; in case of a net source it is dis- played in gray. Selections: On or Off. OnAir 1500: Mic clip limiter not supported. Input Location This parameter is used for the monitoring dim/cut (mute) function.
- Page 237 External CMS Fader With SW V2.1 and later, the console can communicate commands and status messages with the Studer Call Management System (CMS) via TCP/IP. Selection: - (none) or 1-16. In addition, a Facility ID must be entered in the UserGUI - Settings con-...
-
Page 238: Trim Analog Level
OnAir Digital Mixing Consoles 6.5.1.1 Trim Analog Level Trim Analog Level can be used on a source that refers to a Mic/Line input card, but has the input type configured to be a Line source. This enables the administrator of the console, to use combined Mic/Line input cards also for ‘real’... - Page 239 OnAir Digital Mixing Consoles Label This is the string displayed in the output routing page. The label may have up to eight characters and is defined as described in chapter 6.5.1. Format Defines the audio format of the logical output. Selections: Stereo, Mono, or 5.1.
-
Page 240: Fixed Outputs
D21m frames; Stagebox # = D21m frame in stagebox), Slot #, Card type, and Output # (e.g. Int, Slot 2, Line Out, Ch. 2), or ‘–’ (if no physical output is assigned to the logical output). OnAir 1500/2500: 5.1-channel outputs are not supported. OnAir 3000: 5.1-channel outputs are optional. -
Page 241: Fixed Out Meter
Format parameter is read only. For systems with primary/secondary desk configuration, up to four meter outputs can be configured (two per desk). OnAir 1500/2500: OnAir 1500/2500 only support stereo metering outputs. These are configu- rable but will not be used by the default configuration. 6-22 Configuration SW V6.0... -
Page 242: Insert Sends
OnAir Digital Mixing Consoles 6.5.5 insert Sends For each of the eight inserts available in the digital domain, a send/return pair may be configured. For the insert sends, the same applies as is said in chapter 6.5.2 above, except that no Format parameter is available here. Please note that the insert returns are configured on the Insert Returns page (refer to chapter... -
Page 243: Encoder Sends (Onair 3000 Only)
OnAir Digital Mixing Consoles After touching the Source... field, a list appears for selection of the SCore, external D21m, or stagebox frame, or ‘-’. Then a list for selection of the desired physical input is displayed. It can be scrolled up and down with the navigation buttons at its upper and lower margins, or with the rightmost rotary encoder. -
Page 244: Encoder Returns (Onair 3000 Only)
OnAir Digital Mixing Consoles 6.5.8 Encoder Returns (OnAir 3000 only) On this page the inputs from an external surround decoder are defined. Pro- ceed according to chapter 6.5.6. 6.5.9 Patch inputs (OnAir 3000 only) Basic Label / Label (read only) This are the strings displayed in the output routing page. They may have up to eight characters and are defined as described in chapter 6.5.1. -
Page 245: Patch Outputs (Onair 3000 Only)
OnAir Digital Mixing Consoles Source (Left), Source Right... These fields define the physical audio inputs that are used to establish the channels for the logical input. For details refer to chapter 6.5.1. I/O Sharing Net Mode Logical connections may either be defined as Static (permanently reserved for a certain signal) or Dynamic (default;... -
Page 246: Masters
OnAir Digital Mixing Consoles 6.5.11 Masters The parameters for the summing (master) outputs are set here. Not all param- eters are available for all of the masters; the audition output, e.g., only has a label. Label This is the string displayed in the routing output page. The label may have up to eight characters and is defined as described in chapter 6.5.1. -
Page 247: Extern Pfls
TALK/READY (talkback function with additional ready indica- tion controlled by a GPInput) , USR1/2 (user keys) or blank (no function). OnAir 1500/2500: The Joker key is not supported by the default configuration. Subgroup Mode Sub-group masters can be switched over to VCA masters here (selections: Subgroup or VCA). -
Page 248: Extmonsrc (External Monitoring Sources)
OnAir Digital Mixing Consoles 6.5.13 ExtMonSrc (External Monitoring Sources) For the 16 external monitor sources (inputs), the same parameters can be set as for the patch inputs; refer to chapter 6.5.9. 6.5.14 Settings On this page global parameters valid for the whole console are set. Broadcast PFL Two different versions of this function are available. - Page 249 OnAir Digital Mixing Consoles from a channel becoming active; or Nothing. Note : The Aux Mode BC PF also follows this global Broadcast PFL settting. (OnAir 2500 and OnAir 3000 only). Cue/PFL Here, the standard PFL mode can be changed to Cue mode, sometimes also referred to as ‘Positional Solo’.
- Page 250 OnAir Digital Mixing Consoles the two channels; in white/yellow). For the M/S setting, an additional 20 dB boost for the S bargraph can be selected as well. This is indicated either by L and R, or by M and S (or M/S+20) below the bargraph meters. Additional red clipping indicators are provided above the bargraphs.
- Page 251 (usually, only the VCA master fader effects the VCA members). Only available if the VCA option is licensed and activated. Selections: On or Off, default value: Off. OnAir 1500/2500: Not supported. Generator off for on-air channels If set to On, this function disables the GEN button on the channel pages for all channels currently being on-air;...
-
Page 252: System Time
The type of external time reference signal can be selected here from: None, MONITORA (time information according to the Monitora protocol, e.g. from a Studer DigiMedia CAB system), Ext.Time Sync*, or NTP (if the console has access to an internet time server over a network). If None is selected, the console operates on its own, internal real-time clock. -
Page 253: User Functions
OnAir Digital Mixing Consoles 6.5.16 user functions User Functions can be assigned as arguments for the ‘UserLED’ GPI func- tion and for the ‘UserKey’ GPO function. This page is used to enter labels for up to 20 user functions. The labels may have up to eight characters and are defined as described in chapter 6.5.1. -
Page 254: Voicemixes
OnAir Digital Mixing Consoles 6.5.18 VoiceMixes This page is used for entering the labels of the (maximum) four VoiceMix processes. Configuration 6-35 Document generated: 06.08.14 SW V6.0... -
Page 255: Partial Output Routing
OnAir Digital Mixing Consoles 6.5.19 Partial output Routing Up to 1024 partial output routing presets may be preconfigured in order to be activated either from the Snap - Route page, or by general purpose inputs (GPI) and/or desk keys. Partial output routings can be configured here. Label Enter the partial output routing snapshot’s label here, as described in chapter... -
Page 256: Selections
OnAir Digital Mixing Consoles 6.5.20 Selections ‘Selections’ is a special section that allows selecting various I/O, insert, and meter parameters. 6.5.20.1 input groups This page defines the grouping of inputs when touching the Input Selection field on the CHAN - Input page, or in the alphanumeric display in the fader strip if the INP (input) function is selected on the fader assign module while the fader strip rotary encoder is touched. - Page 257 OnAir Digital Mixing Consoles When touching INSERT, a list of all available inputs appears. Navigation within this list depends on whether you are currently working at the console or with the Remote Console application on a PC; in the former case, you can either use the Λ...
-
Page 258: Patch Groups (Onair 3000 Only)
OnAir Digital Mixing Consoles 6.5.20.2 Patch groups (OnAir 3000 only) This page defines the assignment of patch inputs to patch groups that are displayed in the ROUT - Output page. Selection is done as described in chapter 6.5.20.1. In addition, each patch group can be given a label. 6.5.20.3 Master out(put)s This page defines the order in which the Master Outputs are displayed in the... -
Page 259: Master Faders
OnAir Digital Mixing Consoles 6.5.20.4 Master faders This page defines the summing buses and groups that can be assigned to a fader. This also defines the order in which the Master Faders are displayed in the (vertical) column on the ROUT - Input page. The definitions made here are used for strip assignment (Strip ... -
Page 260: Strip Assign
OnAir Digital Mixing Consoles 6.5.20.6 Strip Assign This page defines the presentation of the ROUT - Input page. Input Routing Column shows the input groups displayed in the ROUT - Input page when touching the Select Group field. Desk Group 1-8 Columns shows the input groups displayed in the Chan - Input page when touching the Input Selection button, or in the alphanumeric display in the fader strip if the INP (input) function is selected on the fader assign module while the fader strip rotary encoder is touched. -
Page 261: Out(Put) Routing
OnAir Digital Mixing Consoles 6.5.20.7 out(put) Routing This page defines the presentation of the ROUT - Output page when touch- ing the Select Group field, and the logical outputs displayed in the rows on the ROUT - Output page. Since the same output label may exist more than once –... -
Page 262: Meter S(Ou)Rc(E)
Selection is done as described in chapter 6.5.20.1. OnAir 1500/2500: Meter Src 1 and Meter Src 2 supported only. 6.5.20.10 Ducking Key inputs (Option, OnAir 3000 only) This page allows selecting the keying signals for the automatic ducker. Selec-... -
Page 263: Core Driver (Onair 3000 With Scorelive Only)
OnAir Digital Mixing Consoles 6.5.21 Core Driver (OnAir 3000 with SCoreLive only) With SW V6.0 the CoreDriver function group has been introduced. Under DSPCards, the automatically detected DSP cards are displayed. If ALink DSP cards are used, the mode of ALink1 and ALink2 can be defined as well as the redundancy behaviour between main and redundant ALink ports. - Page 264 OnAir Digital Mixing Consoles Force Mode Alink1 Defines the redundancy behaviour of Alink1 Force Mode Alink2 Defines the redundancy behaviour of Alink2 The following settings are possible : Main only I/O signals on the ‘Redundant’ port are ignored. When the ‘Main’ port loses a valid A-Link signal, the DSP card will not switch over to the ‘Redundant ‘ port.
-
Page 265: I/O Sharing (Option)
OnAir Digital Mixing Consoles 6.5.22 i/o Sharing (option) I/O sharing allows accessing any signal (input, master, PFL, monitoring, etc.) of one system by another one within the same controller network. When con- necting several systems, some additional things must be considered during configuration: • Hard-wired (‘physical’) connections between the SCores (MADI, ADAT, AES/EBU, or even analog) must be established. - Page 266 OnAir Digital Mixing Consoles Notes: Processing parameters (such as EQ, filters, dynamics, panorama/bal- ance, timer start, etc.) of Net inputs are linked to the target system when defining the logical connection; however, they may be individually modi- fied once the connection is established, and saved in snapshots, too. Signaling parameters of Net inputs, such as red-light signals and dim/cut of the monitoring speakers for microphone inputs, are automatically linked to the parameters of the target system.
-
Page 267: Distributed Control
OnAir Digital Mixing Consoles 6.5.22.1 Distributed Control Starting with SW V2.1, the distributed control feature has been introduced for the Fader Start, On Master, Locate, and Ready control functions. This allows using a GP output or input on a Net Producer system as a control output or input for one or several Net Consumer system(s) without additional wiring. -
Page 268: Define Physical Connections
OnAir Digital Mixing Consoles 6.5.22.2 Define Physical Connections Using the Configuration Tool on the target system, select I/O Sharing - Physical Connections and select an input with the Horizontal rotary encoder (HD Link In 1 in the example below). Then define a source for it by first touching the Source field that is, in our case, still empty (indicated by a ‘-’... - Page 269 OnAir Digital Mixing Consoles Note: The definition must represent the actual physical (hard-wired) connections established by MADI, AES/EBU etc. wiring. Select one of the outputs (System27, Int, Slot 8, AES, Ch. 1) to define the physical connection. It is displayed afterwards in the corresponding Source field, as shown below. In order to save this physical connection, touch the Save Config button.
-
Page 270: Define Net Inputs
OnAir Digital Mixing Consoles 6.5.22.3 Define net inputs In two-step I/O sharing, Net Inputs must be defined in order to make a neigh- boring Net Source available, e.g. on the Star DEMO 5OG system. Start the Configuration Tool on the target system and select I/O Sharing - Net Inputs. When selecting the Net Source parameter, the Configuration Tool shows a pop-up menu listing the names of all systems that can be reached by physical connections. - Page 271 OnAir Digital Mixing Consoles The label of the specified Net Source is copied to the Net Input, and audio will be connected immediately. If there is any problem connecting to the source system, the label indicates an asterisk (*), as shown below. To save this Net Input definition, touch the Save Config button.
-
Page 272: Define Net Consumer Groups / Net Consumers
OnAir Digital Mixing Consoles 6.5.22.4 Define net Consumer groups / net Consumers These two pages are used for editing the different net consumer groups (above) and the net consumers (below). Selection is done as described in chapter 6.5.20.1. Configuration 6-53 Document generated: 06.08.14 SW V6.0... -
Page 273: Codec Management
OnAir Digital Mixing Consoles 6.5.23 Codec Management 6.5.23.1 Basics Sharing of common codecs, either from independent systems with the I/O sharing option, or from an A/B desk, is called codec management. I/O Sharing The concept is explained on a dual, I/O sharing system; the goal is that a codec connected to system A may also be used on system B. -
Page 274: Configuration
OnAir Digital Mixing Consoles 6.5.23.2 Configuration Configuration details of the I/O sharing option see chapter 6.5.22. Step 1: System B (Net Consumer) System A (Net Producer) N–X N–X NetLI The codec’s input must be mapped to a patch output (PO). The codec’s output must be mapped to a logical input (LI) that is an N–X bus owner. -
Page 275: Operation
OnAir Digital Mixing Consoles Codec Return Activation Specifies the way in which the return line is connected to the patch output when the (net) logical input is assigned to a fader. Available selections: Con- nect Never, Connect If Not In Use, Connect Always. 6.5.23.3 operation Basically, if a codec input is assigned to a fader, the corresponding return line... - Page 276 OnAir Digital Mixing Consoles Forced 4-Wire Connection When assigning the (net) logical codec input to a fader strip on the desk surface, the return line is connected to the codec’s patch output immediately, and the key will then be bright. This connection type is automatically established if the Codec Return Activation is set to Connect Always.
-
Page 277: Monitoring
Yes defines whether an extra PFL speaker is installed in the control room (CR). ST1 PFL Speaker Yes defines two separate PFL circuits for control room and studio 1. OnAir 1500/2500: Studio 1 not supported. If ADD is activated on the monitoring module, two sources can be monitored CR / ST1 ADD Mode simultaneously –... - Page 278 ST1 LSP Split enable This mode enables the ST1 LSP signal to be split into left and right signal, depending on the HP Split Mode in a similar way as for the headphone. OnAir 1500/2500: Studio 1 not supported. CR / ST1 HP/LSP Split: Monitoring on left channel Either the monitor signal is on the left HP/LSP channel, and the PFL signal on the right one (Yes), or vice versa (No).
- Page 279 ‘Rehearsal Mode’. Re-Injection mode may be activated either with desk keys (up to 4 per location) or, if a main screen is available, with soft buttons at its right edge. OnAir 1500/2500: Studio 1 / Studio 3 not supported. 6-60 Configuration SW V6.0...
-
Page 280: Tb Dim Offsets
OnAir Digital Mixing Consoles 6.5.24.1.1 TB Dim Offsets TB Dim Offsets Allows adjusting the talkback dim offset level separately for the master, N–X and subgroup outputs, as well as for the monitor speaker, headphone and PFL speaker outputs in the control room and all supported studios. Adjustment range is from –40 to +40 dB in steps of 1 dB. -
Page 281: Rotary (Monitoring Rotary Source Selector)
SELECT rotary encoder on the CR (control room) and ST1 (studio 1) monitoring/talkback modules is defined here. Selection is done as described chapter 6.5.20.1. All router inputs and outputs may be selected here for monitoring purposes. OnAir 1500/2500: Studio 1 not supported. 6.5.24.3 SP Src (PfL/TB Speaker Source) 6-62 Configuration SW V6.0... -
Page 282: Signaling
(for details see chapters 5.4.1 5.4.2). Selection is done as described in chapter 6.5.20.1. All router inputs and outputs may be selected here for monitoring purposes. OnAir 1500/2500: Studio 1 not supported. 6.5.25 Signaling 6.5.25.1 Settings Selects the condition for switching the ON AIR light on: Internal (i.e., when... -
Page 283: Snapshot
OnAir Digital Mixing Consoles 6.5.26 Snapshot 6.5.26.1 Parameters On this page either the parameters required for Local snapshot operation, or the ones needed for accessing a central snapshot file server (Remote) can be configured. Snapshot Location - Local Snapshot Location Selects the location of the snapshots displayed in the user GUI; either Local, i.e., in the console memory, or Remote (in case of a central snapshot server). - Page 284 OnAir Digital Mixing Consoles UserSnapshot: Loading Input Fader Gain If set to Off, the user snapshots do not contain the input fader values; i.e. when loading a user snapshot, the input fader values (or fader positions in case of optional motor faders) remain as they are. If set On, the input fader values/positions are saved with the user snapshot and get updated with the saved values when the snapshot is loaded to the console.
- Page 285 OnAir Digital Mixing Consoles UserSnapshot: Loading Mic Parameters Allows user snapshots to temporarily access the microphone preamp param- eters (high-pass filter, phantom power and gain) of either only local or local and free remote channels. All global and user snapshots may be saved on a central file server. This is Snapshot Location - Remote ...
-
Page 286: Library
OnAir Digital Mixing Consoles 6.5.27 Library This page is used to define whether the parameter libraries that were intro- duced with SW 5.0 are saved locally, that is, in the desk’s memory, or on an external, networked server. Configuration 6-67 Document generated: 06.08.14 SW V6.0... -
Page 287: Talkback
OnAir Digital Mixing Consoles 6.5.28 TalkBack 6.5.28.1 Settings In contrast to the studios, the control room features only one dedicated input for talkback to the studios. If this should not be sufficient, up to four physical inputs may be defined for use as alternate talkback sources to the studios, such as the DJ mic, a Headset mic, etc. - Page 288 TB from Extern, and 16 or 48 additional external talkback sources TB from Ext 1..., depending on the DSP core configuration. OnAir 1500/2500: Talkback from studios 1 and 3 not supported. Up to 4 external talkback sources supported.
-
Page 289: Tb/Xl Box Configuration Examples/Tutorials
OnAir Digital Mixing Consoles 6.5.28.2.1 TB/XL Box Configuration Examples/Tutorials The following paragraphs can be used as configuration guides for two differ- ent XL box ‘advanced mode’ applications: • Standard intercom • Listening to external lines that are not assigned to a fader strip. Intercom With XL Box Instead of using the TB section of a Monitoring/Talback module, the XL Box may be used for talkback control;... - Page 290 OnAir Digital Mixing Consoles Outgoing TB: • Config – LogicalInputs – LogicalInputX – Source(Left): Select a used LogicalInput for the TB mic. It should not be in any of the InputSelections as we do not want to assign it to a StripChannel (shall not be assigned to a channel strip). Configure the Source(Left) to be the TB Mic signal.
- Page 291 OnAir Digital Mixing Consoles • Incoming call signaling, e.g. a DTMF decoder indicated by Ready GPInput (PFL button light is flashing) • Control of the digital input gain of each TB input (±24 dB; hold the PFL key and adjust with the rotary encoder) • Master volume control using the rotary encoder (TB return level) • Talk to external lines (TALK key) • Setup of the analog gain of a mic input (Channel – Input page of the user GUI). Configuration: The following configuration steps only relate to the ‘advanced mode’ con- figuration of the XL Box.
-
Page 292: General
6.5.29.2 (Remote) gPio Remote GPIO is a powerful building brick of the Studer RELINK concept. In order to make GPIO ready to be used for internal Custom Logic as well as to allow access to remote systems, GPInputs and GPOutputs have been split up into GPInputs/GPOutputs (physical control inputs/outputs) and GPInput/ GPOutput functions. - Page 293 OnAir Digital Mixing Consoles GPInput Function A GPInput function consists of the part of the former GPInput function (SW V3.1 and earlier) that had implemented the logic as specified by the Func_Type parameter. GPInput functions are, e.g., TBFromExtern, LSP Cut, Channel ON/OFF, etc.
- Page 294 OnAir Digital Mixing Consoles GPOutput A GPOutput consists of a control output on a D21m GPIO or Ethersound card and the appropriate output logic. FixedLabel Label Time Physical Level Polarity Input TriggeredEdge Activate Source FixedLabel is defined by the system and remains ‘read only’. It contains a text specifying the location of the physical ouput, such as ‘Int, Slot 3, Out 2’.
-
Page 295: Gpio Configuration Details
OnAir Digital Mixing Consoles 6.5.29.2.1 GPIO Configuration Details GP Inputs Fixed Label (read only) The label of the corresponding frame/GPIO card/input pin is displayed here for reference only. Label A label may be assigned to the GPI here as described in chapter 6.5.1. ... - Page 296 OnAir Digital Mixing Consoles In case the input Level should not be available, a replacement value may be Replacement Value entered here (low or high). Function Type When touching this button, a menu appears where all available functions can be selected from. For function/argument descriptions see table below. Argument 1-3 Depending on the selected function, up to three different parameters (‘argu- ments’) contribute to the internal processing of the input control signal.
- Page 297 OnAir Digital Mixing Consoles Defined by Triggered Edge and Action Settings (Toggle) In contrast to the GPInput Functions specified in ‘Defined by Triggered Edge and Action Settings (InputLevel)’ below, these functions toggle the specified DNet parameters in cases where Triggered Edge is not BOTH and Action is ALTERNATE.
- Page 298 OnAir Digital Mixing Consoles Momentary and Latching User Requests UserKey and User ON/OFF Requests. GPI Function Arguments Description Cough key, for mic and line inputs; input is muted, but no Cough 1: Logical Input change in signaling. Controls all logical inputs using the same physical mic input;...
- Page 299 OnAir Digital Mixing Consoles Example 1, Momentary Mode: Input Input Level Level Pin Attributes Setting Pin Attributes Setting Activate Activate 0 ms 0 ms Time Time positive negative Polarity Polarity Action Action both both Triggered Edge Triggered Edge Note: In order to avoid inconsistencies, please be careful when using a GP input in momentary mode in parallel with a desk key for the same function.
- Page 300 OnAir Digital Mixing Consoles GP Output Functions The GP output logic generates an output signal depending on the GP output function, its parameters, and the argument(s). Label The label of the corresponding frame/GPIO card/output pin is displayed here for reference. Function Type When touching this button, a menu appears where all available functions can be selected from, as shown above.
- Page 301 OnAir Digital Mixing Consoles GPO Function Arguments Description 1: Cue CR / *Cue ST1 Active if the selected cue source is on CueSourceSelector 2: MonitorCueKey GP Output pin Links the GP output to another GPO function LinkOutput 1: Logical Input Fader start with ON key and fader, or PFL FaderstartWithPFL 1: Logical Input...
- Page 302 OnAir Digital Mixing Consoles Example 1, Inactive If the output is deactivated, the output signal remains constant, regardless of the ‘Level’ attribute. Level Level Output Output Pin Attributes Setting Pin Attributes Setting Activate Activate Time Time positive negative Polarity Polarity both both Triggered Edge...
- Page 303 OnAir Digital Mixing Consoles Example 4, Pulse Output Mode To get a pulse at the output pin, the ‘Triggered Edge’ attribute must be set to either ‘rising’ or ‘falling’, the ‘Time’ attribute (> 0 ms) defines the pulse duration. Level Level Output Output...
- Page 304 OnAir Digital Mixing Consoles GP Outputs Fixed Label (read only) The label of the corresponding frame/GPIO card/output pin is displayed here for reference. Label A label may be assigned to the GP output here as described in chapter 6.5.1. Source Defines where the control signal to the GP output comes from: Local Source (i.e.
-
Page 305: Custom Logic
OnAir Digital Mixing Consoles 6.5.29.3 Custom Logic Custom logic was introduced in order to replace external wiring. It is con- figurable in the Configuration Tool during commissioning the console, its setup during manufacturing, but also later by the system administrator. By combining several custom logic gates of any predefined type, logic circuits can be designed that are processed in real time by the core host software. - Page 306 OnAir Digital Mixing Consoles In1 In2 Out – – In1 In2 In3 In4 In5 In6 Out – – – – – – – – – – – – – – – – – – – – – – – – –...
-
Page 307: Synchronization
OnAir Digital Mixing Consoles Pulse Function The new pulse function allows generating a pulse of defined duration and polarity that is triggered by a selectable GP input signal or custom logic cate output. The pulse gate can be thought of as ‘one shot’ gate or monostable multivibrator. -
Page 308: Custom Logic Configuration
OnAir Digital Mixing Consoles The setting of switch 2 is defined as follows: Source SWITCH 2 If the source of the local system is not available (container missing or not ready yet, missing tree parameter, etc.) If the source is from a remote system currently not available Replacement value Otherwise Source... -
Page 309: Custom Logic Examples
OnAir Digital Mixing Consoles Once the system is selected, a submenu opens, showing a selection of producer Fader Start Enable LED Fader categories. These are: 'Fallin CL 1 - Fader Start Enable • GPInputs • GPOutput Functions • AND Gates Fader Switch true • OR Gates Fader Start Enable Key... - Page 310 OnAir Digital Mixing Consoles OnAir 3000 (C1) OnAir 2500 (C2) GPOutputFunction 16 GPInputFunction 11 RedLight OnAir UserLED5 GPOutputFunction 1 Generator GPInputFunction 5 UserLED5 GPOutputFunction 11 UserKey5 Flashing: Call Initiated Flashing: Bright: Call Enabled Caller Indication Dark: Call Disabled GPInputFunction 17 UserKey5 GPOutputFunction 5 UserKey5...
- Page 311 OnAir Digital Mixing Consoles C1 Configuration Console 1 is an OnAir 3000, its identifier is FixFrame in our example. Step 1 GPInputFunction 11 is set to UserLED and Funct 5; this way, with its input signal, the LED of user key no. 5 can be turned on or off (of course this needn’t be GPInputFunction 11;...
- Page 312 OnAir Digital Mixing Consoles Step 3 GPOutputFunction 11 is set to UserKey and Funct 5, with the Active parameter set to On. Step 4 GPOutputFunction 1 is set to Generator and Alternate, with the Active parameter set to On. This is used to make the key LEDs flash. Configuration 6-93 Document generated: 06.08.14 SW V6.0...
- Page 313 OnAir Digital Mixing Consoles Step 5 In the AND section, perform the settings as shown below; the gate and gate input designators correspond to the ones in the logic diagram above. Step 6 Set all ReplacementValues for the AND gates 1-4 to Low. Step 7 In the AND –...
- Page 314 OnAir Digital Mixing Consoles Step 8 ‘Connect’ the inputs 1 and 2 of XOR 1 to NOT 1 and AND 1, as shown below. Step 9 Set the ReplacementValues of XOR 1 to Low. Step 10 Set the NOT 1 parameters as shown below. Now, the console 1 configuration is done; on console 2, only three more steps remain.
- Page 315 OnAir Digital Mixing Consoles Step 11 On console 2, set the GPInputFunction 5 parameters as follows: After scrolling down, the parameters Time are set to 0 ms, Triggered Edge to both, and Activate to On. Step 12 Set the GPOutputFunction 5 parameters on console 2 as follows: 6-96 Configuration SW V6.0 Document generated: 06.08.14...
- Page 316 OnAir Digital Mixing Consoles Step 13 Select the Function Type of GPOutputFunction 16 on console 2 as • RedLight_ONAIR, and set • Activate to On Now we’re ready for a test: • Make sure that console 2 (OnAir 2500) is currently not on-air, so the F5 key on console 1 is dark. • Press F5 on console 1 (OnAir 3000).
- Page 317 OnAir Digital Mixing Consoles Example 3 - Emulating an RS Flip-Flop An RS flip-flop is a logic element that has two stable logic output states (on and off) controlled by two different inputs; one of them (S) is used to set the output (Q), the second (R) to reset it (hence the name).
- Page 318 OnAir Digital Mixing Consoles parameters to rising Edge. For clearness you may want to label them as S and R. Step 2 Configure GPOutputFunction 30 as UserKey and its argument as Funct 1. If desired, you may label it as Q. (refer to the first screenshot of this example on the previous page).
-
Page 319: Error Handling
OnAir Digital Mixing Consoles If the test was successful and you want to keep this functionality, remember to save the console configuration. 6.5.29.3.6 Error Handling GPIO If the number of installed GPIO cards doesn’t match the number of GPInputs specified in the D21m.xml file, the following user message appears in a modal dialog during power-up: User Warning 3035: I/O 21, Missing GPIO Card(s). - Page 320 OnAir Digital Mixing Consoles To help identifying the cascade, a software warning is written into the log file of a running Logger, as shown below. If a Source is configured that creates a feedback, the following user warning is displayed: User Warning 8806: CUSTOM LOGICS, Feedback detected at Gate ‘AND 1’.
-
Page 321: Desk Common
OnAir Digital Mixing Consoles 6.5.30 Desk Common 6.5.30.1 Mon Keys and TB Keys OnAir 3000 These pages allow assigning monitoring sources to the CONTROL ROOM / MONITOR, and talkback destinations to the TALKBACK key fields of the moni- toring/talkback modules in the control room and in the studios. The Rotary ... - Page 322 OnAir Digital Mixing Consoles Mon/TB Module Key Nos.: CONTROL ROOM RED LIGHT ON AIR TALKBACK 11 12 13 14 15 16 17 18 19 20 PFL TO MON Tel1 SELECT (17) (18) (19) (20) MONO PFL / MON TB RETURN ST1-ST3 Key Nos.: MPX MASTER 9 10...
- Page 323 OnAir Digital Mixing Consoles Compact Mon/TB Module Key Nos.: MON: OnAir 2500 The same pages as shown under ‘OnAir 3000’ above allow assigning monitor- ing sources to the CR MONITOR and talkback destinations to the TALKBACK key fields of the console’s central module. The Rotary parameter stands here ...
- Page 324 OnAir Digital Mixing Consoles ST2 Key Nos.: 9 10 11 12 13 14 15 16 17 18 19 20 TB SP Key Nos.: 9 10 11 12 Compact Mon/TB Module Key Nos.: same as in the OnAir 3000 paragraph, see previous page. Configuration 6-105 Document generated: 06.08.14 SW V6.0...
- Page 325 OnAir Digital Mixing Consoles OnAir 1500 The same pages as shown under ‘OnAir 3000’ above allow assigning monitor- ing sources to the CR MONITOR and talkback destinations to the TALKBACK key fields of the console’s central module. These keys are duplicated by the 20 buttons on the MON - CR and MON - ST2 GUI pages, as well as by the 12 buttons on the MON - TB SP GUI page.
-
Page 326: Cue Keys
OnAir Digital Mixing Consoles 6.5.30.2 Cue Keys OnAir 3000 This page allows assigning ten selected cue feeds (i.e., any available input, output, or bus) to the CUE button field of the GUI MON - CR CUE and MON - ST1 CUE pages (in the control room and in studio 1). 9 10 Configuration 6-107 Document generated: 06.08.14... - Page 327 CUE button field of the on the GUI MON - CR CUE page (in the control room). 9 10 The same page on the OnAir 1500 console differs only by having four buttons instead of eight at the left side. 6-108 Configuration SW V6.0...
-
Page 328: Output Routing Keys
OnAir Digital Mixing Consoles 6.5.30.3 output Routing Keys This page allows assigning up to 24 Partial Output Routings to the output routing keys. Which hardware keys this will be on the desk must be defined in the Desk_KeyMapping.xml file. 6.5.30.4 XL Section The AUX bus required to listen to outside sources as well as the talkback source location are defined on this page. -
Page 329: Compact Monitor/Talkback Units (Compactmontbs)
AUX) is selected in the Listen field; advanced mode is automatically entered if one of the TB matrix outputs is selected. OnAir 2500 and OnAir 1500 AUX3/4 and studio 1/3 not supported; only up to two XL boxes supported; advanced mode not supported. -
Page 330: Pro-Bel
OnAir Digital Mixing Consoles 6.5.31 Pro-Bel The Pro-Bel extension provides an interface to remotely set or remove audio connections in the output routing of a controlled device. A remote device can send messages through a serial COM port or via TCP/IP, using the ‘Pro-Bel General Switcher Communication Protocol’. -
Page 331: Routable Sources
OnAir Digital Mixing Consoles 6.5.31.2 Routable Sources CLEAR Sources The top left CLEAR Sources field is colored brighter than the others; it can be used to clear all configured sources. If it is touched, clearing the sources has to be confirmed in a dialog box. L1, L2,... -
Page 332: Ember
It can be set in 9 steps from Off to 500 ms. Different meter update rates are allowed if more than one meter stream is available. 6.5.33 Recorder and Player (OnAir 1500 only) This page is used to select the logical input the integrated recorder/player works with. Configuration 6-113 Document generated: 06.08.14... -
Page 333: Audio Clock
EQ frequency are automatically modified when changing the sampling rate; frequency parameters are always displayed correctly. Sync Source can be selected from Internal, AES / EBU Clock, Word Clock, and either Video Clock (OnAir 3000 and OnAir 1500) or MADI Clock (OnAir 2500 only). Word Clock On/Off status display. -
Page 334: User (User Management)
OnAir Digital Mixing Consoles 6.5.35 user (user Management) 6.5.35.1 Admin The system administrator (‘Admin’, user no. 1) automatically has access to all features of the console and its configuration; for him, only the Admin policy (no. 1) is valid. No other policy may be assigned to him; however, the Admin policy may be assigned to other users, if required. -
Page 335: Default User
OnAir Digital Mixing Consoles 6.5.35.2 Default user For the default user (‘Default’, user no. 2) only the Default policy (no. 2) is valid, no different policy can be assigned to him; however, the Default policy may be assigned to other users too, if required. The default user’s name is Default;... - Page 336 OnAir Digital Mixing Consoles the system administrator (Admin, user no. 1) and the default user (Default, user no. 2) separate pages are available, as mentioned above. If more than 64 users and/or more than 16 policies are required, central user management must be used (refer to chapter 5.10.9).
-
Page 337: Policies, Departments
OnAir Digital Mixing Consoles 6.5.35.4 Policies, Departments Policies A set of eight policies is available per default. Policy no. 1 (Admin) grants access to all parameters and is normally assigned to the system administrator only; it may, however, be assigned to other users as well, if required (refer chapter 6.5.35.3, Users – Policies). - Page 338 OnAir Digital Mixing Consoles Access to the different parameter groups can be granted (Grant) or denied (Deny). If denied, the main screen buttons corresponding to that parameter or parameter group are blanked. For details on the parameters contained in the parameter groups please refer to chapter 5.9.7.
-
Page 339: License Manager
System ID code is used together with the option’s license key in order to generate the Option Key code entered here. Unavail- able options (such as Subgroups or MPX for OnAir 1500 or OnAir 2500) are not displayed. -
Page 340: Desk
OnAir Digital Mixing Consoles 6.5.37 Desk 6.5.37.1 fader Assign 1 - group 1 This page is used to assign functions to the fader rotary assign keys. Addi- tional tree items may appear if more modules are used and for split desk or A/B desk configurations. -
Page 341: Rotary Assign 2 - Group 2 (Onair 3000 Only)
OnAir Digital Mixing Consoles OnAir 1500 The four INPUT, GAIN/CAL, 1 and 2 keys are used for assigning input rout- ing, gain/cal and AUX bus 1/2 functions to the fader strip rotary knobs and keys, as well as to the OLED displays directly above them. These four assign functions are considered to be fixed (as also the fixed key labels imply). -
Page 342: Assignable Rotary Functions
OnAir Digital Mixing Consoles 6.5.37.3 Assignable Rotary functions (Fader Module) (Rotary Module) Key 2: Key 1: Function Name Rel. in SW Rotary Function Key 1 Function Key 2 Function * 51AssignmentMode V2.2 51AssignmentMode * 51Divergence/CenterLevel V2.2 51Divergence/CenterLevel * 51FrontRearPan V2.2 51FrontRearPan * 51LR_PanBal V2.2... - Page 343 OnAir Digital Mixing Consoles (Fader Module) (Rotary Module) Key 2: Key 1: Function Name Rel. in SW Rotary Function Key 1 Function Key 2 Function EQ_HF_Q_Only V4.0 EQ_HF_Q EQ_HMF_Freq V1.0 EQ_HMF_Freq EQ_On/Off EQ_HMF_Freq_Only V4.0 EQ_HMF_Freq EQ_HMF_Gain V1.0 EQ_HMF_Gain EQ_On/Off EQ_HMF_Gain_Only V4.0 EQ_HMF_Gain EQ_HMF_Q...
- Page 344 * Sur51BusB V2.2 Sur51BusBOnOff_Rotary TimerSelectA..D V2.1 TimerSelectA..D VoiceMix1...4 (** 1) V6.0 Weight_IfVmix1...4Assigned VoiceMix1...4_Assign Weight V6.0 Weight * not supported by OnAir 1500/2500 ** supported by OnAir 1500/2500 *** of the N–X bus controlled by the corresponding logical input Configuration 6-125 Document generated: 06.08.14 SW V6.0...
-
Page 345: Assignable Global Functions
OnAir Digital Mixing Consoles 6.5.37.4 Assignable global functions Global functions are not channel strip-related. They allow assigning a func- tion to a desk element in the Desk_KeyMapping.xml file (refer to the ‘Assignable to-’ columns below). Function Assignable to: Details Rel. Bus functions Aux1-4_Master_On/Off V2.1... - Page 346 OnAir Digital Mixing Consoles Function Assignable to: Details Rel. DisplayBright V1.0 ● sets the display brightness LedBright V1.0 ● sets the LED brightness LocalViewINPUT V4.0 ● sets an 'Input' page to the local view LocalViewDEES V4.0 ● sets a 'DeEsser' page to the local view LocalViewEQ V4.0 ●...
- Page 347 OnAir Digital Mixing Consoles Function Assignable to: Details Rel. PFL Speaker sets either the PFLSpeaker Vol (default), TBReturnVol, MPX Vol or HPSplitBalance depends MonPFLSPVol V4.0 ● on the MonSetTBRetVol, MonSetMPXVol and MonSetHPSplitBal functions. MonPFLSPVol_CR / _S1 V4.0 ● assign the HPSplitBalance to the MonPFLSPVol control, MonSetHPSplitBal V4.0 ●...
- Page 348 OnAir Digital Mixing Consoles Function Assignable to: Details Rel. assign the Guest HP volume to the MonHPDJVol control, MonSetGuestHPVolToHPVol V4.0 ● key in momentary mode assign the Guest HP volume to the MonHPDJVol control, MonSetGuestHPVolToHPVol_LO V4.0 ● key in latching mode assign the TB return volume to the MonHPDJVol control, MonSetTBRetVolToHPVol V4.0...
- Page 349 OnAir Digital Mixing Consoles Function Assignable to: Details Rel. Display function, shows either the selected rotary MonSrcRotary3rdHPDisplay V4.0 ● source or the selected 3rdHP source depends on the MonSrcSetHPSource function MonSrcRotary3rdHPDisplay_CR V4.0 ● / _S1 DisplayMode function, is used to dim the display of the MonSrcRotary3rdHPActive V4.0 ●...
- Page 350 OnAir Digital Mixing Consoles Function Assignable to: Details Rel. MonSurLSPCut_Right V5.0 ● switch on/off the corresponding LSP, illuminate if off MonSurLSPCut_RightSur V5.0 ● switch on/off the corresponding LSP, illuminate if off MonSurModeDirect V2.2 ● MonSurModeStereo V2.2 ● MPX functions MPX_CR_OnOff V2.2 ●...
- Page 351 OnAir Digital Mixing Consoles Function Assignable to: Details Rel. TBKey1-20_S1-3 V1.0 ● see TBKey1-20 TBKeyMO1-20 V2.0 ● momentary function of TBKey1-20 TBKeyMO1-20_S1-3 V2.0 ● momentary function of TBKey1-20_S1-3 User and CAB button functions CABButton1...48 V2.0 ● function without LED, key mode is momentary for long- UserButton1…255 V4.0 ●...
- Page 352 OnAir Digital Mixing Consoles Function Assignable to: Details Rel. Segment display SegmentDisplaySetClock V4.0 ● SegmentDisplaySetFaderStopwatch V4.0 ● SegmentDisplaySetManual V4.0 ● Stopwatch SegmentDisplaySetRecInfo V4.0 ● SegmentDisplayStart V4.0 ● SegmentDisplayState V4.0 ● SegmentDisplayStop V4.0 ● Reset Channel functions resets the DeEs, EQ and Dynamics functions of all chan- ResetAllFunc V5.0 ●...
-
Page 353: Assignable Channel Strip Functions
OnAir Digital Mixing Consoles Function Assignable to: Details Rel. CentralRotary1IncDec V3.0 ● CentralRotary2IncDec V3.0 ● CentralRotary3IncDec V3.0 ● CentralRotary4IncDec V3.0 ● CentralRotaryStart V3.0 ● start button of the stop watch, function without LED CentralRotaryStop V3.0 ● stop button of the stop watch, function without LED 6.5.37.5 Assignable Channel Strip functions Channel strip functions are related to a channel strip. - Page 354 OnAir Digital Mixing Consoles Function Assignable to: Details Rel. Module with Module with 2 LEDs per key 1 LED per key (red & yellow) (yellow) TBfromSrcMO1 V2.0 yellow momentary function of TBfromSrc1 TBfromSrcMO2-4 V2.0 yellow momentary function of TBfromSrc2-4 this function sets TB and PFL simultaneously but indi- TBPFLfromSrc1 V1.0 yellow...
- Page 355 OnAir Digital Mixing Consoles Function Assignable to: Details Rel. Module with Module with 2 LEDs per key 1 LED per key (red & yellow) (yellow) NextB_LED1 V3.0 yellow TimerSelectA-D V2.1 yellow TimerSelectA-D_Yellow V2.1 yellow Channel user functions ChannelUserFct1_Button V3.1 yellow momentary and latching ChannelUserFct1_ButtonLO V3.1...
- Page 356 OnAir Digital Mixing Consoles Function Assignable to: Details Rel. Module with Module with 2 LEDs per key 1 LED per key (red & yellow) (yellow) NXMasterOnOff V1.0 yellow CueToNXMode V5.0 yellow sets the CueToNXMode VoiceMix functions VoiceMix1...4_Assign V6.0 yellow Dynamic, EQ & Pan functions Comp_On/Off V1.0 yellow...
-
Page 357: Module Table
OnAir Digital Mixing Consoles 6.5.37.6 Module Table This page displays the desk module connections to the distribution uni and their location on the desk in the case of fader and rotary modules. First strip number is the allocation of the leftmost fader or rotary control. Note These connections must be set in the Desk_ModuleTable.xml file in the desk. -
Page 358: Master Section (Onair 3000 And Onair 2500)
6.5.37.8 Master Section (OnAir 3000 and OnAir 2500) This page will only be used if an OnAir 1500 desk module is used together with an OnAir 3000 or OnAir2500 console, for example in the studio or in a split desk application. The 1...4 keys in the desk module’s MASTER SECTION area may then be used to select busses. -
Page 359: Settings
OnAir Digital Mixing Consoles 6.5.37.9 Settings This page is used to set some parameters that are applied to the whole desk. AutoTakeoverWindows The size of the AutoTakeoverWindows is set here (1-5); for normal opera- tion, the default setting of 3 is recommended. Disable FaderTouch In case of problems with the fader touch sensor it can be deactivated here by setting Disable FaderTouch to On. -
Page 360: User Gui
When touching this field, the keyboard appears for entering a facility ID used for displaying labels imported from a VSM router control system, and/or for communication with the Studer Call Management System (CMS). Also refer chapter 5.15 as well as to External Router Destination and External CMS Fader,... -
Page 361: Desk Resources (Onair 3000 Only)
Pictures of the different layouts can be found chapter 5.2. OnAir 1500 / OnAir 2500 Since the OnAir 1500 and 2500 consoles do not feature channel screens, this setting is not supported. 6.5.38.2 Desk Resources (OnAir 3000 only) -
Page 362: Livewire Setup
OnAir Digital Mixing Consoles Livewire Setup With SW V6.0, all OnAir consoles are cabable of dealing withAoIP networks. As a first type of AoIP network, Axia Livewire is implemented, by using the D21m Livewire card. Concept The concept of how the OnAir application is dealing with Livewire networks is as follows : D21m LiveWire Card LVDS In 1... -
Page 363: Configuration Tool
OnAir Digital Mixing Consoles 6.6.1 Configuration Tool 6.6.1.1 Physical input Mapping The physical input mapping of Livewire inputs to LogicalInputs differs from that of all other consumers (PatchInputs, Returns, Extern PFL- and Moni- toring Sources, etc.), in order to make sure the following mapping rules are applied: • A LogicalInput is always mapped to the left- and right channel of a Listener. -
Page 364: Physical Input Mapping Of Logicalinputs
OnAir Digital Mixing Consoles 6.6.1.1.1 Physical Input Mapping of LogicalInputs For the first source of LogicalInputs, Listeners of Livewire I/O cards appear as logical sources like e.g. Master Outs in a dedicated group called Livewire. A Livewire Listener is always a logical source with stereo format. When selecting the Livewire group, all available Livewire Listeners, which are not yet assigned to a LogicalInput appear for selection. - Page 365 OnAir Digital Mixing Consoles The Label of a Livewire Listener is unique. It consists of the name of the D21m rack and the slot number, where the Livewire I/O card is located, as well as the connector number and the index of the Listener.
- Page 366 OnAir Digital Mixing Consoles The Configuration Tool indicates a Listener configured as Physical Input Mapping for a LogicalInput as shown for Logical Input 88 in the screenshot above. Note, that consecutive sources (Source Right,…) are grayed out. If the AoIP card was missing during core start-up, a “-“ is indicated in the place of the Listener.
- Page 367 OnAir Digital Mixing Consoles As shown above, for Logical Input 90, “Missing Card” is indicated in place of the card type only as it is mapped to an LVDS input. 6.6.1.2 Physical output Mapping Left- and Right Core Out of any output may be mapped to a LVDS Output associated with an AoIP capable I/O card like the Livewire card in traditional manner.
-
Page 368: D21M.xml
OnAir Digital Mixing Consoles 6.6.2 D21m.XML 6.6.2.1 Connector Definition 6.6.2.1.1 Connection Information As the Slots definition for I/O cards in the D21m.XML file is optional, the new AoIP section is needed when the settings of AoIP cards shall be controlled by the OnAir application software, e.g. Stream Patching, Stream Name, etc. The maximum of connectors per network is limited to 62 , which corresponds to a core with 31 Livewire cards. -
Page 369: Disable Stream Name Control
OnAir Digital Mixing Consoles Axia PathFinder is used or Livewire cards are used for I/O Sharing physical connections. By default, the OnAir application software controls Input Stream Patching on all Listeners of an AoIP Card. Optionally, Listeners can be excluded from OnAir application software Stream Patching. -
Page 370: Aoip.xml
NumberOfGroups Streams coming from one or more network nodes using the the same host name are grouped. This is usually a device like a Axia Node or Studer Core with several AoIP cards. NumberOfGroups shall be set according to the maximum number of devices expected in the AoIP network Configuration 6-151... -
Page 371: Oalaunch.ini
The DefaultGateway is the IP address of the router in the network that is capable to route TCP/IP packets from the OnAir control Network to the Livewire audio network. Using recommended Studer Switch configurations, this is the IP address of the master switch which is typically 192.168.0.1 Please refer to chapter 9.4.2 of the Networking section. - Page 372 OnAir Digital Mixing Consoles Configuration 6-153 Document generated: 06.08.14 SW V6.0...
- Page 373 OnAir 1500 Digital Mixing Console CHAPTER 9 Networking ................................3 Systems with Livewire ............................4 9.1.1 Stand-Alone Solution ............................5 9.1.1.1 Multi-Console Solution ..............................5 9.1.1.2 Single-Console Solution ............................6 9.1.2 Integrated Solution ..............................8 9.1.3 Routed ................................... 8 9.1.4 Livewire/OnAir audio clocking scheme ......................11 Requirement Summary .............................13...
- Page 374 OnAir 1500 Digital Mixing Console 9-2 Networking SW V6.0 Document generated: 06.08.14...
-
Page 375: Networking
OnAir 1500 Digital Mixing Console NETwoRkiNg This chapter has originally been written for the OnAir3000. Since some of the information is also useful for OnAir1500 consoles when used in context with a Livewire network, the chapter “Systems with Livewire” is also included with the OnAir1500 manual. -
Page 376: Systems With Livewire
XXX.YYY is 192.168 in the switch configurations provided by Studer. For the Livewire network, we recommend to allocate IP addresses according to the following class–C network scheme, to which all switch configurations as well as OnAir consoles and Livewire cards provided by Studer comply: From Standalone/Integrated... -
Page 377: Stand-Alone Solution
OnAir 1500 Digital Mixing Console 9.1.1 Stand-Alone Solution In both Standalone topology one or more OnAir consoles are in the OnAir Control network which should interact with a separated Livewire network. The OnAir console should connect to its Livewire nodes and the Livewire nodes should be able to send their Advertisement channel into the OA3k network. -
Page 378: Single-Console Solution
OnAir 1500 Digital Mixing Console • Scalability and stackability of the switch (Cisco Catalyst 2960-24S) • Only one type of switch required (Cisco C2960 Series) • No external routing device required for routing between OnAir Control- and Livewire network (done by Cisco C2960-24) • Cisco C2960G-8 has no fan... - Page 379 IP address. An additional Livewire node is connected to switch. We recommend using the manageable switch Cisco WS-C2960G-8TC-L Basic configuration files are provided by STUDER. Customer switch configurations for this type of network topology are avail- able for • Cisco 2960-8 (Master)
-
Page 380: Integrated Solution
OnAir 1500 Digital Mixing Console Customer switch configurations for this type of network topology are avail- able for • Cisco 2960-8 (Master) • Cisco 2960-8 Management Console Axia Livewire xNode Fix IP: 192.168.0.10 Fix IP: 10.0.0.10 Subnet: 255.255.0.0 Subnet: 255.255.255.0 Gateway: 192.168.0.1 Gateway: 10.0.0.1... - Page 381 • CAB Server, radio automation system • SMB Fileserver may be used as central storage for OnAir console con- figurations and snapshots • Central Server, the Studer DNet based PC application for centralized user- and snapshot management Workstation are used as : • User workplace PCs additionally running DNet based PC applications like the Configuration Tool, Remote Console or the Route1000 • CMS Clients using the CMS protocol to control OnAir consoles...
- Page 382 OnAir 1500 Digital Mixing Console From IT network to OnAir Control network: • TCP/IP packets for TCP/IP socket communication used by DNet, CMS-, ProBel, Ember and MONITORA protocols and SNMP. • UDP Multicast messages for DNet communication (See OALaunch.ini) • HTTP to access the web server of LW SIM modules and Bridge Cards • FTP for file management on OnAir consoles and for the Software Update...
-
Page 383: Livewire/Onair Audio Clocking Scheme
OnAir 1500 Digital Mixing Console Management LogScreen CMS, DHCP Console ProBel, SMBFileserver, WINS Central Server Server User PC User PC User PC MCG: MCG: MCG: 239.255.000.001 239.255.000.001 239.255.000.001 239.255.000.002 239.255.000.002 239.255.000.002 239.255.000.003 239.255.000.003 239.255.000.003 10.64.88.00 Internet Ethernet IT network Cisco C2960-24 Switch IP (VLan 1): 192.168.0.2 / 255.255.0.0... - Page 384 OnAir 1500 Digital Mixing Console Ext. Wordclock Input Ext. Wordclock Input Wordclock Output Wordclock Output D21m Livewire card set to be Clock Master SCoreLive SCoreLive Ethernet Switch Wordclock AoIP Multiple OnAir with LW Node D21 Mastersync Axia Livewire xNode Ext. Wordclock Input Ext.
-
Page 385: Requirement Summary
OnAir 1500 Digital Mixing Console Requirement Summary General: For a useful network speed a 100 Mbit/s switched Ethernet is recommended. The OnAir 3000 communication is based on TCP/IP. Server: DHCP A DHCP server is necessary. The WinCE based components are configured via DHCP. - Page 386 OnAir 1500 Digital Mixing Console 9-14 Networking SW V6.0 Document generated: 06.08.14...
Need help?
Do you have a question about the OnAir 1500 and is the answer not in the manual?
Questions and answers