
Related Manuals for 2gig Technologies GC3


Summary of Contents for 2gig Technologies GC3
- Page 1 2GIG ® GC3 Security & Automation System User Guide 10004670 Draft x07 | Proprietary & Confidential OWNER'S INSTRUCTION NOTICE WARNING: Not to be removed by anyone except occupant...
- Page 2 Copyright © 2015 Nortek Security & Control LLC. All Rights Reserved. U.S. Patent D727,857. Australian Patent No. 357098. Additional Patents Pending.
- Page 3 The 2GIG, GC3, GoControl, and Linear logos are registered trademarks of Nortek Security & Control LLC in the United States and/or other countries. Other Nortek Security & Control trademarks may also appear in these materials. Other names or brands may be claimed as the property of others. For more information, contact your 2GIG alarm dealer for pricing or visit www.nortekinc.com, www.nortekcontrol.com, or http://www.2gig.com.
- Page 4 CONTENTS Proprietary and Confidential Information Statement NTRODUCTION About this Guide Document Conventions Technical Support O YSTEM VERVIEW System Features and Capabilities Additional Accessories Setup and Installation Operational Concepts Features to Limit False Alarms Use and Care of the System Limitations of Alarm Products OUCHSCREEN ASICS Waking the Touchscreen...
-
Page 5: Table Of Contents
Table of Contents Proprietary & Confidential In the Event of a Carbon Monoxide Alarm Clear the Alarm History MERGENCY EATURES 24-Hour Alarm Buttons Activate a Manual Panic, Fire, or Emergency Alarm EMOTE ONTROL Remote Control Devices Operate the System with a Key Fob MART ONTROLS About the Smart Home Controls Menu... - Page 6 Proprietary & Confidential Table of Contents INDEX Copyright © 2015 Nortek Security & Control LLC...
-
Page 7: Proprietary And Confidential Information Statement
Nortek Security & Control and its authorized GC3 Beta Program participants. Any dissemination, distribution or copying of this guide in whole or in part is strictly prohibited. Upon termination of the GC3 Beta Program, all copies, including archival copies, if any, will be returned to Nortek Security & Control or destroyed. -
Page 8: 1 I Ntroduction
NTRODUCTION Before you get started, review the following information: About this Guide Document Conventions Technical Support Copyright © 2015 Nortek Security & Control LLC... -
Page 9: About This Guide
About this Guide Touchscreen Navigation This guide is designed for end users of the GC3 Security & Automation This table describes the action words used to inform users of methods for System. It provides general system information, safety precautions, and touchscreen navigation. - Page 10 O YSTEM VERVIEW This chapter includes the following information: System Features and Capabilities Additional Accessories Setup and Installation Operational Concepts Features to Limit False Alarms Use and Care of the System Limitations of Alarm Products Copyright © 2015 Nortek Security & Control LLC...
-
Page 11: System Features And Capabilities
Cellular Radio Module with Internal Antenna: A snap-in that display on the GC3 Panel , as well as for the audible system Cellular Radio Module with an internal antenna that fits neatly in announcements. For example, when someone opens the front the side panel, giving 2GIG installers a rapidly deployable radio door, the system can be set up to announce "front door."... -
Page 12: Additional Accessories
Consult your An installer can configure the GC3 Panel to show or hide three 24-hour installer to determine the schedule for testing your sensor alarm buttons on the touchscreen: Panic, Fire, and Emergency. - Page 13 The system monitors itself for abnormal operating conditions and alerts you when trouble is detected. Examples of alert conditions include AC power loss at the GC3 Panel, low battery conditions at a sensor, and more. See "Responding to Trouble Alerts" on page 26.The installer can configure the system to transmit a variety of trouble alerts to the Central Station.
-
Page 14: Features To Limit False Alarms
Proprietary & Confidential 2 System Overview Features to Limit False Alarms For compliance with ANSI/SIA CP-01-2010: Control Panel Standard - Features for False Alarm Reduction, the installer can set a variety of different options designed to limit occurrences of a False Alarm. Table 2-1 ANSI/SIA CP-01-2010 Features to Limit False Alarms ANSI/SIA CP-01-2010... - Page 15 2 System Overview Proprietary & Confidential ANSI/SIA CP-01-2010 2GIG System Feature User Guide 4.2.6.1 Use of Duress Feature User Duress Report "Transmit a User Duress Report" on page 35. 4.2.6.2 Duress Code Duress Code "Types of User Codes" on page 63 "Users" on page 63. 4.2.7 Initiation of Manual Alarms Panic, Fire, or Emergency Alarm "Activate a Manual Panic, Fire, or Emergency Alarm"...
-
Page 16: Use And Care Of The System
Extreme Heat or Cold Do not expose the system to extreme metal before they reach the GC3 Panel, even if the signal path heat or cold. The optimum operating temperature range is 32° to has been recently checked during a weekly test. Blockage can 120°... - Page 17 2 System Overview Proprietary & Confidential THIS PAGE INTENTIONALLY LEFT BLANK Copyright © 2015 Nortek Security & Control LLC...
- Page 18 OUCHSCREEN ASICS This chapter includes the following information: Waking the Touchscreen About the Home Screen System Status Messages System Icons Using the Inbox Using Bookmarks System Logo Viewing the Weather Forecast Using the System Menus Responding to Trouble Alerts Copyright © 2015 Nortek Security & Control LLC...
-
Page 19: Waking The Touchscreen
3 Touchscreen Basics Proprietary & Confidential Waking the Touchscreen Table 3-1 Home Screen Features During periods of inactivity, the touchscreen automatically times out and enters sleep mode. To place it into full-power mode, you must wake the To learn This feature… Does this…... -
Page 20: System Status Messages
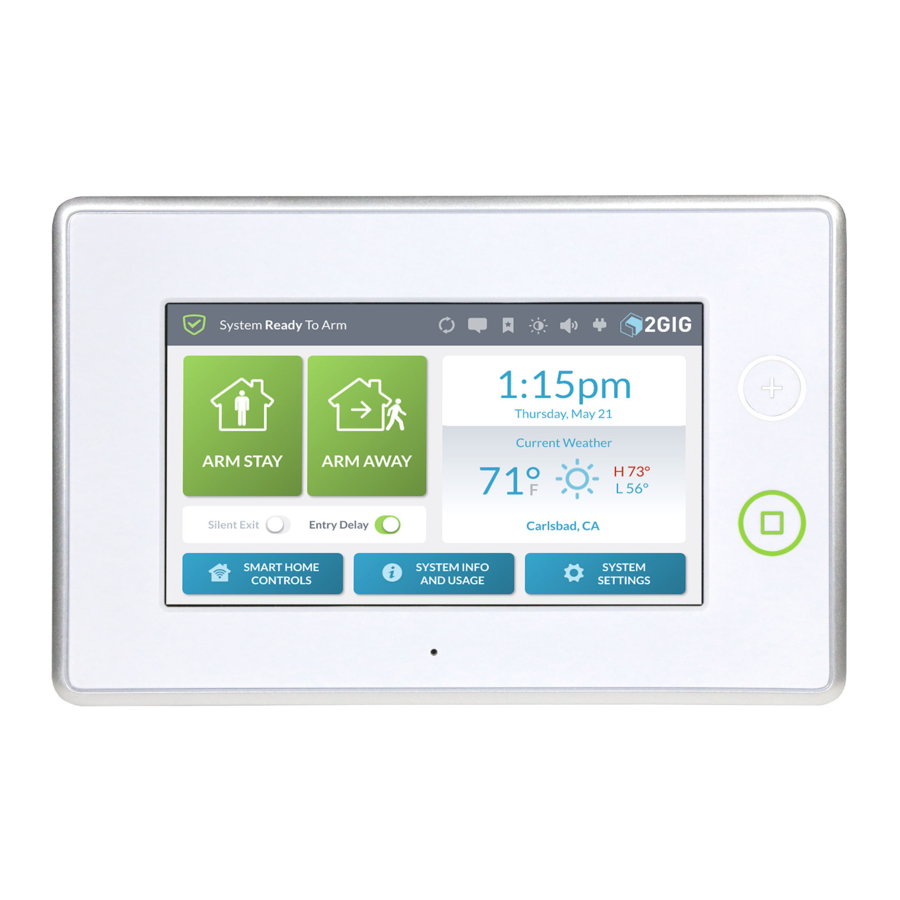
Proprietary & Confidential 3 Touchscreen Basics System Status Messages At the top-left of the screen, different messages appear to reveal the current system state. Figure 3 System Status Messages This table describes the different system status messages on the system. Table 3-2 System Status Messages This system status message…... -
Page 21: Using The Inbox
3 Touchscreen Basics Proprietary & Confidential Using the Inbox Reading Incoming Messages There are three (3) types of messages that arrive in the Inbox: Alerts, Your Remote Service Provider has the ability to transmit messages about Alarms, and Messages. When a new message arrives, the Messages system upgrades, additional services, special regional weather alerts, and system icon at the top of the screen blinks and shows the number of new, so on. - Page 22 Proprietary & Confidential 3 Touchscreen Basics Figure 10 Enter Your Code to Read the Message Figure 13 Messages > Mark as Unread Button 6. When the message appears, read the text. The system marks the message as unread. Deleting a Message If you want to permanently remove a message from the Inbox, you can delete it.
-
Page 23: Using Bookmarks
Installer Toolbox: 2GIG alarm dealers and installers can tap the logo and then enter the Installer Code to access the Installer Toolbox menu. See the GC3 Installation & Programming Guide. Figure 16 Bookmark this Screen Message The system bookmarks the screen or menu and a star appears on the bookmark icon. -
Page 24: Viewing The Weather Forecast
Proprietary & Confidential 3 Touchscreen Basics Viewing the Weather Forecast Changing the Forecast Location If your Remote Service Provider broadcasts weather forecasts, you can To change the forecast location: view the current weather, daily forecast, and hourly forecast directly from 1. Tap the city name in the forecast area. the Home screen of the touchscreen display. -
Page 25: Using The System Menus
Smart Home Controls menu. These options give users the ability to operate any Z-Wave smart home controls (if installed) directly from the GC3 Panel. To learn about options in this menu, see "About the Smart Home Controls Menu" on page 51. -
Page 26: Responding To Trouble Alerts
The system sounds six (6) alert tones every minute, until the alert Monitoring the System for Trouble Conditions is acknowledged. The system monitors the GC3 Panel and its sensors so it can notify you when the following trouble conditions occur: NOTE:... - Page 27 3 Touchscreen Basics Proprietary & Confidential THIS PAGE INTENTIONALLY LEFT BLANK Copyright © 2015 Nortek Security & Control LLC...
- Page 28 URGLARY ROTECTION This chapter includes the following information: Overview Important Concepts Sample Burglary Alarm Plan Arm the System Force Bypassing Use the Quick Exit Button In the Event of an Exit Error To Disarm the System Transmit a User Duress Report In the Event of a Burglary Alarm Copyright ©...
-
Page 29: Overview
Front Door, Back Door, Basement Window, Laundry Room, and so on. During programming, the installer may also create a voice descriptor for each zone. The GC3 Panel uses the voice descriptor in two ways: As a verbal announcement to notify occupants when a perimeter sensor is open, closed, or when an alarm is set off. -
Page 30: Sample Burglary Alarm Plan
Proprietary & Confidential 4 Burglary Protection Sample Burglary Alarm Plan Before the installation, your 2GIG alarm dealer will work with you to design, install, and configure a system intended to best protect your dwelling. This illustration is an example of a typical residential burglary alarm system offering both perimeter and interior protection: Figure 1 Sample Burglary Alarm Plan Copyright ©... -
Page 31: Arm The System
If you have purchased a key fob (or multiple fobs) to detects breaking glass (if glass break detectors have been installed). control the GC3 Security & Automation System, you can also To learn how to arm the system in Stay Mode, see "Arm the System (Stay arm the system using your key fob. -
Page 32: Force Bypassing
Residential alarm systems do not permit you to When a protected door or window is opened while the system is disarmed, bypass sensors installed in fire, carbon monoxide, or the GC3 Panel responds as follows: emergency zones. The system status message on the touchscreen reads System Not Ready to Arm. -
Page 33: Use The Quick Exit Button
4 Burglary Protection Proprietary & Confidential 1. Below the Sensors Not Ready list, tap Bypass All. Figure 6 Bypassed Sensors List You can now arm the system. See "Arm the System" on page 31. Canceling a Bypassed Sensor To remove a sensor from the Bypassed Sensor list: 1. -
Page 34: In The Event Of An Exit Error
If you arm the system and an Exit/Entry door is left in a violated state or condition at the time the Exit Delay countdown expires (for example, the door you exit from doesn't close behind you), the GC3 Panel sounds the local alarm. If you do not disarm the system when the Entry Delay... -
Page 35: Transmit A User Duress Report
4 Burglary Protection Proprietary & Confidential Entry Delay countdown expires to avoid setting off the alarm. 1. At the System Armed screen, tap Disarm. To disarm the system from Away Mode: 1. Enter the premises using one of the Exit/Entry doors. The system's Entry Delay beeps sound. -
Page 36: In The Event Of A Burglary Alarm
Proprietary & Confidential 4 Burglary Protection Silencing the Alarm Sounder (for False Alarms) If the system is in an active alarm state, any person with an active, four- digit user code can silence the sounder by disarming the system. If you disarm the system BEFORE the Abort Window Dialer Delay countdown expires, the system cancels the alarm and stops the alarm report from being transmitted to the... - Page 37 Clearing an Alarm how the Alarm Cancel Time setting is If an alarm occurs while you are away, the GC3 Panel's Piezo Sounder will configured on your system. For compliance sound for a preset amount of time (as defined by the Burglary Bell Cutoff withANSI/SIA CP-01-2010, the factory Time and/or the Fire Bell Cutoff Time).
- Page 38 & C ARBON ONOXIDE ROTECTION This chapter includes the following information: Overview Important Concepts National Fire Alarm and Signaling Code Recommended Smoke Alarm Placement Safety Tips Emergency Action Plan In the Event of a Fire Alarm Silence a False Fire Alarm In the Event of a Carbon Monoxide Alarm Clear the Alarm History Copyright ©...
-
Page 39: Overview
5 Fire & Carbon Monoxide Protection Proprietary & Confidential Do NOT mount a smoke alarm in a location where air flow is Overview obstructed by curtains, furniture, or other items. During setup, a professional installer typically configures a variety of Do NOT mount a smoke alarm where dirt, dust, or grease can wireless and wired sensors to provide the dwelling with continuous, 24- collect and block the sensor. -
Page 40: Recommended Smoke Alarm Placement
Proprietary & Confidential 5 Fire & Carbon Monoxide Protection Recommended Smoke Alarm Placement Early warning fire detection is best achieved when fire detection equipment is installed in all rooms and areas of the premises. Equipment should be installed as follows: A smoke alarm should be located between the sleeping Indicates a required smoke alarm area and the rest of the family living unit. -
Page 41: In The Event Of A Carbon Monoxide Alarm
Clear Alarm History button will not permit you upright, since smoke rises and may overcome you. Air is typically to clear any history until the GC3 Panel receives a clearest near the floor. message from the sensor that it has returned to 7. -
Page 42: Clear The Alarm History
Proprietary & Confidential 5 Fire & Carbon Monoxide Protection industry professional to evaluate all possible sources of CO gas in the dwelling. Clear the Alarm History After an alarm is activated on the system while you are way, a notification message appears in the Alarm History. To clear the alarm history: 1. - Page 43 5 Fire & Carbon Monoxide Protection Proprietary & Confidential THIS PAGE INTENTIONALLY LEFT BLANK Copyright © 2015 Nortek Security & Control LLC...
-
Page 44: Emergency Features
MERGENCY EATURES This chapter includes the following information: 24-Hour Alarm Buttons Activate a Manual Panic, Fire, or Emergency Alarm Copyright © 2015 Nortek Security & Control LLC... -
Page 45: 24-Hour Alarm Buttons
Emergency Report to the Central Station. Activate a Manual Panic, Fire, or Emergency Alarm You can activate a panic, fire, or emergency alarm using the GC3 Panel. To activate a manual alarm: 1. Press the Alarm button on the GC3 Panel. - Page 46 Proprietary & Confidential 6 Emergency Features default. However, some systems may be configured to hide one or more of these buttons. Copyright © 2015 Nortek Security & Control LLC...
- Page 47 6 Emergency Features Proprietary & Confidential THIS PAGE INTENTIONALLY LEFT BLANK Copyright © 2015 Nortek Security & Control LLC...
-
Page 48: Remote Control
EMOTE ONTROL This chapter includes the following information: Remote Control Devices Operate the System with a Key Fob Copyright © 2015 Nortek Security & Control LLC... -
Page 49: Remote Control Devices
The GC3 Security & Automation System can be on your key fob, or it might be configured to activate an paired to work with a maximum of 32 wireless key fobs. - Page 50 MART ONTROLS This chapter includes the following information: About the Smart Home Controls Menu Navigate to the Smart Home Controls Menu Lights Locks Thermostats Scenes Add a New Room Copyright © 2015 Nortek Security & Control LLC...
-
Page 51: Smart Home Controls
About the Smart Home Controls Menu The Smart Home Controls menu gives users the ability to control Z- Wave smart home devices at the GC3 Panel. The system supports a maximum of 232 Z-Wave devices. Navigate to the Smart Home Controls Menu To navigate to the Smart Home Controls menu: 1. -
Page 52: Scenes
Proprietary & Confidential 8 Smart Home Controls Figure 6 Scenes > Edit Scenes Scenes Use the Scenes screen to create scenarios that define simple rules for 4. At the Scenes screen, tap Add New Scene. how your Z-Wave home automation devices work together. There is no functional limit on the number of scenes that you can create to control lights, home automation devices, and other alarm sensors. - Page 53 8 Smart Home Controls Proprietary & Confidential Figure 10 Add or Remove Items > Lights Figure 13 Scene 11. Tap t when finished. 9. Tap the plus (+) sign that corresponds to the desired device in the list. Execute a Scene For example, tap the plus (+) sign next to the device named Home Theater Light.
-
Page 54: Add A New Room
Proprietary & Confidential 8 Smart Home Controls 1. Navigate to the Smart Home Controls menu. See "Navigate to the Smart Home Controls Menu" on page 51. 2. At the Smart Home Controls menu, tap Edit Scenes. Figure 19 Rooms Screen Figure 16 Scenes > Edit Scenes E x a m p l e s : W h e n... - Page 55 8 Smart Home Controls Proprietary & Confidential 3. At the Rooms screen, tap Edit Rooms. 7. At the drop-down list, tap the type of device to add. For example, tap Lights. Figure 21 Rooms > Edit Rooms Figure 24 Add or Remove Items—Device Types 4.
- Page 56 Proprietary & Confidential 8 Smart Home Controls 4. Tap the button for the desired room. For example, tap Home Theater. Figure 30 Delete Room Name Message Figure 27 Rooms 5. When the Room <Name> was Executed message appears, tap OK or wait a few seconds for the message to close automatically.
- Page 57 8 Smart Home Controls Proprietary & Confidential THIS PAGE INTENTIONALLY LEFT BLANK Copyright © 2015 Nortek Security & Control LLC...
-
Page 58: System Info And Usage
YSTEM NFO AND SAGE This chapter includes the following information: System Info and Usage Sensors History Dealer Info Copyright © 2015 Nortek Security & Control LLC... -
Page 59: Sensors
You can filter the list in the History screen to show or hide alarms, conditions are triggered and cleared. bypasses, or alerts. Alerts: Keeps a record of when the GC3 Panel or a zone issue an alert. For example, low battery, AC power loss, or tamper conditions. *Programming Mode Started/Terminated: Keeps a record of when the installer accesses and exits the Installer Toolbox. -
Page 60: Dealer Info
Proprietary & Confidential 9 System Info and Usage Service Request: Tap this button to submit a service request to Dealer Info your 2GIG alarm dealer. See "Dealer Info" above. The Dealer Info screen shows basic contact information for your 2GIG Dealer Name: Reveals the company name for your 2GIG alarm alarm dealer. - Page 61 9 System Info and Usage Proprietary & Confidential THIS PAGE INTENTIONALLY LEFT BLANK Copyright © 2015 Nortek Security & Control LLC...
-
Page 62: Settings
10 S S YSTEM ETTINGS This chapter includes the following information: Users Sounds Bypass Sensors Smart Home Settings Learn Controller Shift Controller Associating Z-Wave Devices Screen Date/Time System Tests Network Settings System Info USB Update Copyright © 2015 Nortek Security & Control LLC... -
Page 63: Users
10 System Settings Proprietary & Confidential Users The Users menu lets you add, edit, and delete users from the system. NOTE: This feature is PIN-protected. To use this feature, you must know the four-digit Master User Code. Types of User Codes There are different types of user codes to provide users with access to various system features: 5. - Page 64 Proprietary & Confidential 10 System Settings 1. At the Home page, tap System Settings. slide control to the right. This is the factory default setting. 2. Enter your four-digit user code to access the System Settingsmenu. 3. Tap Users. 4. Tap the pencil icon next to the desired user. Change a User Name To change a user name: 1.
- Page 65 10 System Settings Proprietary & Confidential If a user requires access to your dwelling on a recurring schedule, you can create a schedule for that user. For example, a housekeeper or tutor might need recurring access to your home on certain days of the week. To add a recurring schedule: a.
-
Page 66: Sounds
Proprietary & Confidential 10 System Settings during business hours for a few weeks. NOTE: This feature is PIN-protected. To use this feature, To add a date range schedule: you must know the four-digit Master User Code. a. Tap Date Range. b. Tap Set Start Date. Scroll to the desired Month, Day, Adjust the Volume and Year and tap Set. -
Page 67: Bypass Sensors
10 System Settings Proprietary & Confidential 2. At the Enter Your Code to Access the System Settings screen, enter an active, four-digit user code. Figure 4 Sounds Screen 4. Swipe up or down to move the desired sound control into view. Figure 6 Enter Your Code to Access the System Settings 5. -
Page 68: Smart Home Settings
Proprietary & Confidential 10 System Settings configurations only make this feature available to the installer. NOTE: This feature is PIN-protected. To use this feature, you must know the four-digit Master User Code. Adding a Z-Wave Device to the Network To add a Z-Wave device to the network: Figure 9 System Ready to Arm (BYPASS) Status 1. - Page 69 10 System Settings Proprietary & Confidential The newly discovered device appears in the Listening for Devices to Add screen. Devices to Add. Any device information captured during the discovery process appears below the device name. Removing a Device from the Network Figure 13 New Device Added To remove a device from the network: 1.
- Page 70 Proprietary & Confidential 10 System Settings 1. At the Home screen, tap System Settings. The Listening for Devices to Remove screen appears. 2. Enter the Master User Code to access the System Settings menu. 6. Walk to and trigger the device to transmit. TIP: Typically, you can trigger a device on the 3.
- Page 71 10 System Settings Proprietary & Confidential 6. Tap Start. The system scans the network for failed nodes. This can take several minutes and some of the Z-Wave functions will be unavailable until the network check is complete. Rediscovering the Network After adding or removing devices from the network, (see "Adding a Z- Wave Device to the Network"...
- Page 72 Proprietary & Confidential 10 System Settings 1. Navigate to the Installer Toolbox menu. Then tap Smart Home Settings. 2. At the Home screen, tap System Settings. 3. At the System Settings menu, tap Smart Home Settings. NOTE: Consult your installer to determine if this feature is available.
-
Page 73: Learn Controller
5. At the Smart Home Settings menu, tap Advanced Settings. Learn Controller The GC3 Panel can be added to an existing Z-Wave network as a "secondary" controller (this process is also called "copy" or "replication"). When the GC3 Panel acts as a secondary controller, devices can only be added to or removed from the Z-Wave network at the primary controller. -
Page 74: Associating Z-Wave Devices
Proprietary & Confidential 10 System Settings 1. At the Home screen on the both the existing controller and the 5. At the Advanced Settings menu on the original primary new controller, tap System Settings. controller, tap Shift Controller. 6. At the Advanced Settings menu on the new primary controller, tap Controller Learn. -
Page 75: Screen
3. At the System Settings menu, tap Screen. NOTE: Refer to device documentation for information about the association groups supported by the device. The following association groups are available in the GC3 Panel: Group 1: Lifeline Maximum number of nodes supported: 20. Group 2 Armed (On):... - Page 76 Proprietary & Confidential 10 System Settings Figure 27 System Settings > Screen Adjusting the Backlight Timeout To adjust the timeout interval for the backlight: This reveals the Screen screen. 1. Navigate to the Screen screen. See "Navigating to Screen" on the previous page. Adjusting the Screen Brightness Adjust the screen brightness to improve the readability of the text and images on the touchscreen and to avoid eye discomfort in darker...
-
Page 77: Date/Time
1. At the Home screen, tap System Settings. Date/Time The Date/Time screen lets you modify the time displaying on the GC3 Panel's touchscreen. The date and time are also logged on system alarms and reports. - Page 78 2. Tap Sensors Test. Tests" on the previous page. This places the GC3 Panel into Walk Test Mode and transmits a Walk Test Started report to the Central Station. 3. At the Sensors Test screen, review the list of sensors installed with your system.
-
Page 79: Network Settings
7. Repeat the above steps for each listed Button LED test. 8. Scroll down the screen and tap Siren Audio Test. This tests the internal siren on the GC3 Panel. When the test is complete, tap one of these buttons: Tap this button if you did not hear the siren. -
Page 80: System Info
For the GC3 Panel to work properly, special firmware is required. This firmware contains the background programming information that tells the GC3 Panel how to do things. As 2GIG makes improvements to the system, new firmware updates are released and can be installed as described here. - Page 81 Update Firmware System Icon 2. At the Update Firmware screen, tap Update Firmware. Figure 41 Update Firmware Screen The GC3 Panel turns BLACK and in a few moments, the Updating Firmware message appears. IMPORTANT: During the update process, do NOT...
-
Page 82: Home Settings
11 S MART ETTINGS This chapter includes the following information: About the Smart Home Settings Menu Navigate to the Smart Home Settings Menu Add a New Device Rename a Device Remove a Device Check the Network Rediscover the Network View All Devices Force Remove a Device Reset the Controller Replace... -
Page 83: About The Smart Home Settings Menu
Smart Home Settings menu, users who know the Master your system. Typically, this button is grayed out and User code can access a variety of Z-Wave settings for the GC3 Security & not available because the factory default setting for Automation System. -
Page 84: Rename A Device
Proprietary & Confidential 11 Smart Home Settings 1. Add a device to the Controller's network. See "Add a New TIP: Typically, you can trigger a device on the Device" on the previous page. network by either powering the device OFF/ON, 2. At the Listening for Devices to Add screen, tap Rename. pressing a button once or twice, or flipping a switch on the device. -
Page 85: Check The Network
11 Smart Home Settings Proprietary & Confidential 1. Navigate to the Smart Home Settings menu. See "Navigate to the Smart Home Settings Menu" on page 83. 2. At the Smart Home Settings menu, tap Check Network. Figure 13 Smart Home Settings—Remove Devices The Listening for Devices to Remove screen appears. -
Page 86: View All Devices
Proprietary & Confidential 11 Smart Home Settings Figure 19 Smart Home Settings—Rediscover Network Figure 22 Smart Home Settings—View All Devices 3. At the Rediscover Network screen, tap Start. 3. At the Smart Home Devices screen, review the list of devices. If you have added several devices, you can swipe up and down to move through the list. -
Page 87: Reset The Controller
Reset the Controller NOTE: Resetting the controller will delete all node information from the GC3 Control Panel. Any You can reset the Z-Wave controller to remove all Z-Wave devices from devices that were part of the mesh network will need the network and to reset the controller to its factory default state. -
Page 88: Replace
Proprietary & Confidential 11 Smart Home Settings Figure 31 Reset the Z-Wave Controller—Working Figure 34 View All Devices—Failed Device 5. When the controller is reset, the following message appears. Tap 4. Tap the list expander button. OK or wait a few seconds for the message to close automatically. Figure 35 Failed Device—List Expander Button Figure 32... -
Page 89: Basic Control Of Unsupported Devices
11 Smart Home Settings Proprietary & Confidential Figure 42 Unknown Device—Configure 6. In the confirmation dialog box, tap the Set Value button. Figure 38 Listening for Replacement Device 8. Activate the learn mode on the replacement device. Figure 43 Unknown Device—Set Value Button Basic Control of Unsupported Devices 7. -
Page 90: Index
INDEX 2-way voice 11 installation 12 microphone 11 24-hour backup battery 11 keyfob programming 11 accessories 12 alarm dealers 9 microphone 11 alarms false 14 alerts 13 antennas 12 navigation touchscreen 9 cellular radio module 11 programming zone 11 date 11 distributors 9 document conventions 9 radios 12... - Page 91 technical support 9 time 11 touchscreen display 11 navigation 9 trouble alerts 13 typographic conventions 9 usb port 11 location 11 vocabulary 11 weather 11 Z-Wave devices 11 zone 13 programming 11 Copyright © 2015 Nortek Security & Control LLC...
- Page 93 A L A R M D E A L E R I N F O R M A T I O N Company Name: Your Account Number: Installation Date: R E M O T E S E R V I C E P R O V I D E R Company Name: Your Account Number:...
Need help?
Do you have a question about the GC3 and is the answer not in the manual?
Questions and answers