Table of Contents
Advertisement
Safety Information
Please use this device only for the intended uses described in this User Guide.
Before using this system to test your blood glucose, please read instructions thoroughly. Do a
quality check on the system following the instructions and consult with your healthcare
professionals about questions or problems.
Be aware of the safety of young children or handicapped persons near you when you
conduct a glucose test using this system.
SOLUS test strips can only be used with the Solus V2 meter.
Please keep the test strip bottle away from children. The test strips and bottle cap can
present a choking hazard.
Please be cautious when removing the lancet. Always place the protective cap back on the
exposed lancing device.
Never try to disassemble the meter in any circumstance. If your meter is not working
properly, or if you need technical support, please contact our Technical Support Team at (877)
592-3922.
Rev. Date: 06/2012 6131SL-M01A2
Advertisement
Table of Contents
Troubleshooting

Summary of Contents for Solus V2
- Page 1 Be aware of the safety of young children or handicapped persons near you when you conduct a glucose test using this system. SOLUS test strips can only be used with the Solus V2 meter. Please keep the test strip bottle away from children. The test strips and bottle cap can present a choking hazard.
- Page 2 The Solus V2 Blood Glucose Management System is not intended for the diagnosis of or screening for diabetes mellitus, nor for use in neonates.
- Page 3 Page 1: Safety Information Page 2: Introduction Contents Chapter 1: Understanding Your New System Solus V2 Audible Blood Glucose Management System Installing/Replacing the Batteries Meter Setup Setting the Volume Level and Language Selection LCD Screen Overview ...
- Page 4 Chapter 5: Maintenance and Troubleshooting Storing and Handling Your Meter Cleaning Your Meter Interpreting Error Messages Troubleshooting Your Meter Accessing Customer Service Chapter 6: Technical Information Methodology of Reagents Limitations Product Specifications ...
- Page 5 5. Protective Case 10. Package Inserts for Test Strips, Control Solution, and Lancets/ Lancing Device The SOLUS V2 Glucose Meter uses SOLUS Test Strips only. Neither the meter nor the test strips will work when used with any other brand.
- Page 6 (10) 1. Test Strip Port - Insert the test strip here and the meter will turn on automatically for testing. 2. LCD Display - Large screen with large numbers and symbols that makes testing simple and easy. Guides the user through the test using symbols and simple messages.
- Page 7 4. Dispose used batteries according to your local ordinances. Meter Setup Solus V2 allows you to personalize your meter to meet your healthcare needs. Below are features that you can customize: Volume Level ...
- Page 8 When the meter is in the “OFF” position, the voice volume of the meter can be adjusted by pressing the “Up” or “Down” buttons. There are eight (8) different volume settings ranging from OFF (0) to a volume level of seven (7). To mute the volume, simply set the meter to “0”...
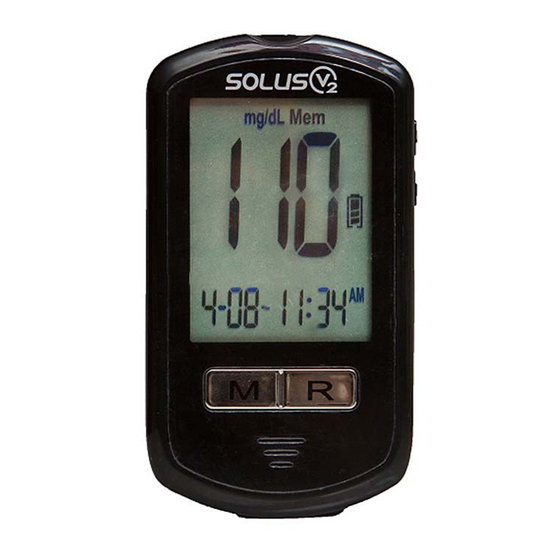
- Page 9 LCD Screen Overview Below is the appearance of the LCD screen: (1) Measurement Units (2) Memory (3) Setting (4) A/b/C: After Meals, Before Meals, and Control Test Indicators (5) Blood drop Symbol (6) Battery Symbol (7) Voice Symbol (8) Day Average (9) Alarm Reminder (10) Month (11) Day...
- Page 10 “R” right function button and the meter will audibly speak the current date and time (for example: Two Thousand Eleven, February Twenty-first, Four Forty pm) Setting the Meter *Note: The Solus V2 is able to have the date and time updated by automatically from your computer. To learn how, visit www.BioSenseMD.com. To SET the meter: 1.
- Page 11 Figure 1-12, 1-13, 1-14, 1-15). 3. Set the Month- Press the “Up” or “Down” button on the right side of the meter until the desired month appears. Each time you adjust the month, you will hear “The month is XXX.” Press the “R”...
- Page 12 1-17 1-18 7. Set the Alarm Reminder: You will hear: “Please set the alarm. Alarm off. Press the up button to turn alarm on.” or “Please set the alarm. Alarm on. Alarm set for XX:XX. Press the up button to turn alarm off.” 7A Turn Alarm Reminder Off: When you hear “Please set the alarm.
- Page 13 1-19 1-20 Note: Once the Alarm Reminder is SET, the meter will beep for 60 seconds every day at the set Alarm Reminder time. To silence the alarm, press the “R” right function button once. 8. Set the measurement unit: Press the “Up” or “Down” button on the right side of the meter until the desired measurement appears.
- Page 14 and you will receive a confirmation: “Are you sure you want to delete all records? Press the down button again to delete all records.” Press the “Down” button a second time to delete all records. If you want to skip this memory deletion step, press the “R” right function button when you first hear “Ready to delete memory records.”...
- Page 15 “AVG” results. 1. Insert a strip into the meter and you will hear: “Hello, Solus is ready.” You will then hear: “Apply blood now.”...
- Page 16 3. Use only Solus V2 control solution with the Solus V2 Glucose Meter. 4. Solus V2 control solutions are used to confirm the accuracy of the meter and the test strips.
- Page 17 (2)The control solution is expired or contaminated. (3)The test strips are damaged or expired. (4)The meter is malfunctioning.
- Page 18 Chapter 3: Testing Your Blood Sugar Preparing the Solus V2 Lancing Device Note: To reduce the chance of infection: Never share a lancet or a lancing device with anyone. Always use a new, sterile lancet. Lancets are for single use only.
- Page 19 “Hello, Solus is ready” (see Figure 3-7). 5. Retrieve the loaded lancing device or single-use lancet (see Figure 3-8). 6. Apply blood to the front edge of the test strip after you hear: “Apply blood now” (see Figure 3-9). You will also see a flashing blood drop on the LCD screen of your meter. If enough blood is obtained you will hear: “Testing in process.”...
- Page 20 2. It is more than two (2) hours after the last meal. 3. It is more than two (2) hours after exercise. *DO NOT use AST if you are pregnant or if your blood sugars are not stable. *DO NOT use AST if you think your blood glucose is low or if your AST results do not match the way you feel.
- Page 21 Highlighting Your Results as Before and After Meals Tests 1. To flag a before-meal test, press the “R” right function button two (2) times after you hear: “Apply blood now.” You will then hear: “Ready for test before meal.” Apply blood to the edge of the strip.
- Page 22 Solus V2 meter gives plasma equivalent results. Symptoms of High or Low Blood Sugar Being aware of the symptoms of high or low blood sugar can help you understand your test results and decide what to do if they seem unusual.
- Page 23 testing steps. Sugar”. 5. If Your blood sugar results still don’t 5.Contact your doctor and follow his or match the way you feel. her instructions. Note: Make sure that you always follow your doctor’s or healthcare professional’s instructions. If your strips have expired, contact your supplier for a new bottle of strips. If your control test results are outside of the range listed on the test strip bottle, contact the BioSense Medical Devices and speak to one of our customer support representatives at toll free (877) 592-3922 for assistance.
- Page 24 Viewing the Averages Note: The average will have all test results including those flagged as “Before-Meals” tests, “After-Meals” tests and those not flagged at all. When the meter displays “---” on the screen, it indicates there are no readings stored in memory. 1.
- Page 25 7, 14, 28, 60 and 90 calendar days preceding the current date and time settings. Downloading Your Test Results with the MyMeterLink System The Solus V2 Glucose Meter allows you to transfer test results stored in its memory to an online database called MyMeterLink. You will need a standard mini-USB cable to connect your Solus V2 to your PC.
- Page 26 Cleaning Your Meter Cleaning your Solus V2 Glucose Meter is easy. We recommend that you clean the meter after every use. Gently wipe and clean its surface with a soft cloth that has been slightly dampened with 70 percent alcohol (ethyl alcohol), or 70 percent rubbing alcohol (isopropyl alcohol).
- Page 27 H I: The test result is higher than 600 mg/dL. (Audible message: “The glucose level is too high.”) LO: The test result is lower than 20mg/dL. (Audible message: “The glucose level is too low.”)
- Page 28 Troubleshooting Your Meter Error Messages Message Audible Message Possible Cause Solution The meter is operating in an ambient temperature below The temperature is too C or 50 F, which is the The system operation low. lowest range of operating range is 10 C to 40 temperature.
- Page 29 (33.3 mmol/L). process. If you see “HI” again, please call your medical doctor for advice immediately. Problem in Operation Problem Possible Cause Solution 1) Make sure the arrow on the inserted strip is facing towards the meter, and that blood icon 1) The meter is defective or the on the strip is facing up.
- Page 30 Accessing Customer Service BioSense Medical Devices offers 24/7 customer support. If you need assistance with your Solus V2 Glucose Management System, please contact: BIOSENSE MEDICAL DEVICES, LLC 6555 Sugarloaf Parkway, Suite 307-168, Duluth, GA 30097 TOLL FREE: 877-592-3922 FAX: 888-620-2345...
- Page 31 tested by a healthcare professional in a hospital or lab setting. Do not test with a home-use blood glucose device when suffering from severe dehydration. 8. Test results below 70 mg/dL indicate low blood glucose (hypoglycemia). Test results greater than 240 mg/dL indicate high blood glucose (hyperglycemia). If you get results below 70 mg/dL or above 240 mg/dL, repeat the test, and if the results are still below 70 mg/dL or above 240 mg/dL, please consult your healthcare professional immediately.
- Page 32 Warranty Information The Solus V2 Glucose Meter is warranted to be free from defects for five (5) years from date of purchase. For warranty assistance, please contact: BIOSENSE MEDICAL DEVICES, LLC 6555 Sugarloaf Parkway, Suite 307-168, Duluth, GA 30097 TOLL FREE: 877-592-3922...
Need help?
Do you have a question about the V2 and is the answer not in the manual?
Questions and answers