Table of Contents
Advertisement
Advertisement
Table of Contents

Related Manuals for Manhattan 525756


Summary of Contents for Manhattan 525756
-
Page 1: User Manual
300N R IRELESS ANGE XTENDER USER MANUAL MODEL 525756 MH‐525756‐UM‐0515‐01... -
Page 2: Table Of Contents
TABLE OF CONTENTS Introduction .................................. 3 What Is the Manhattan Wireless 300N Range Extender? .................. 3 Package Contents .............................. 3 Hardware ‐ Housing .............................. 4 Device Status LEDs .............................. 5 Installation as Wireless Range Extender ........................... 6 Installation Using WPS ............................. 6 Manual Installation .............................. 8 Configuration Options .............................. 11 ... -
Page 3: Introduction
1. I NTRODUCTION 300N ? HAT S THE ANHATTAN IRELESS ANGE XTENDER Thank you for purchasing the Manhattan Wireless 300N Range Extender. A wireless range extender is the ideal solution for boosting your WiFi signal and eliminating dead spots. Better wireless signal strength means you stay connected longer and reduce your 3G/4G mobile data bill. Better wireless signal strength also means that your wireless connection speed will be faster over a larger area. Enjoy a lag‐free online gaming experience or watch streaming video in full HD. Even better, the range extender is quick and easy to set up. ACKAGE ONTENTS ‐ Wireless 300N Range Extender ‐ Ethernet Cat5 RJ45 cable ‐ Quick installation guide ‐ User manual - 3 -... -
Page 4: Hardware - Housing
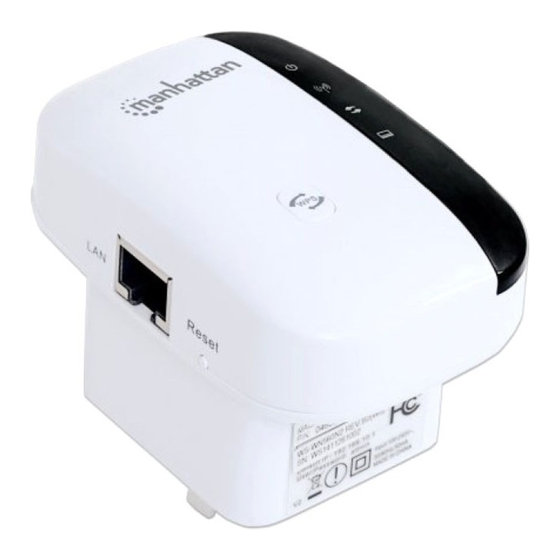
‐ ARDWARE OUSING LAN Network Port The wireless range extender is equipped with a high‐speed network port, to which you can connect your computer for the initial setup, in case your wireless router does not support WPS — for example Verizon FIOS® wireless routers. You can use the included network cable for that purpose, but it is okay to use any standard Ethernet network cable that meets or exceeds the Cat5 specification. If you are not sure about this, don’t worry. Any standard network cable purchased from various retailers or online shops will work just fine. WAN/LAN Network Port If you set the wireless range extender to router mode, then you need to connect your ISPs modem to this port. WPS Push Button Wi‐Fi Protected Setup (WPS) is a computing standard that attempts to allow easy establishment of secure wireless home‐ network connections. Created by the Wi‐Fi Alliance and introduced in 2007, the goal of the protocol is to allow home users who know little of wireless security and may be intimidated by the available security options to set up the encryption method WPA2, as well as making it easy to add new devices to an existing network without entering long passphrases. So, what does this all mean for you? If your wireless router is a newer device, there is a good chance that it is equipped with a WPS push‐button, in which case you are in luck, because adding the wireless range extender to your network will just be a matter of a couple of minutes. If the router is a little bit older and does not support WPS, the setup will have to be done with your web browser. While that takes a little bit longer, the procedure is also quite easy. Reset Button In order to reset the device to its factory default settings, press the reset button for 10 seconds while the device is powered on. Power Outlet Connector The wireless range extender plugs directly into a power wall outlet. It supports 110 V / 60 Hz for the U.S. and 230 V / 50 Hz for European power outlets. The plug type will vary depending on your location. The illustration above depicts the EU version. - 4 -... -
Page 5: Device Status Leds
EVICE TATUS The Manhattan Wireless 300N Range Extender is equipped with four LEDs that provide information about the operational status of the device. LED Status Function Power Off The device is turned off. On The device is connected to a working power outlet and operational. Note: The range extender does not have a power switch. It will turn on as soon as you plug it into a power outlet. LAN Off No device is connected to the LAN port. Note: If a computer or laptop is connected to the LAN port but the LAN LED remains off, the problem could be one of the following: a) The network cable used for the connection is faulty. b) The network adapter in the computer or laptop is disabled. On A device is connected to the LAN port and an active link has been established. Flashing A device is connected to the LAN port, an active link has been established and data is being transmitted. This is the normal operational state if a computer or laptop is connected to the LAN port. WLAN Off The wireless LAN interface is disabled in the system settings. On ... -
Page 6: Installation As Wireless Range Extender
2. I NSTALLATION AS IRELESS ANGE XTENDER The Manhattan Wireless 300N Range Extender can be installed in one of two ways. The first way involves the aforementioned WPS, while the second (we call it the manual method) uses a more traditional setup process. Both ways lead to the same result, and it is only a matter of convenience as to why you would use WPS over the manual method, provided your router supports WPS. WPS NSTALLATION SING If your wireless router is equipped with a WPS button (sometimes referred to as N‐connect), then you can connect the range extender to your network literally just by pushing two buttons. Here is how it works. Step 1: Plug the wireless range extender into the wall outlet. The position of the wall outlet must be chosen carefully. Make sure that you are close enough to your wireless router, so that the wireless signal is still relatively strong. If you move too far away from the wireless router and the wireless signal is already quite weak in that location, you will not be able to achieve good results. Use a wireless device and check the signal strength in the location where you plan to install the range extender. Note: If the signal strength is below 60%, you should move closer to the wireless router. Step 2: Wait for about 60 seconds to allow the wireless range extender to complete its startup sequence. Verify that the power LED is illuminated. ... - Page 7 Step 4: Within two minutes of performing Step 3, press the WPS button on the wireless range extender for five seconds. This action will trigger the WPS connection process. It may take up to a minute to complete. While the connection is being established, the WPS LED will flash. Once the process is completed, the WPS LED turns on and remains on. Step 5: User a wireless device to connect to your wireless network. You need to connect to the same wireless network as before because the Manhattan Wireless 300N Range Extender re‐broadcasts the existing wireless network, including the existing wireless network name (called SSID) and the existing wireless security (for instance, the WPA2 encryption key). Note: If you want to change the SSID of the amplified wireless network of the Manhattan Wireless 300N Range Extender, you can do that in the administrator settings with any standard Web browser. See Section 4 – “Configuration Options” for further details. Should you run into problems with the WPS Push Button installation method, even though your wireless router supports WPS, proceed with setting up the range extender manually, as described in the next section. Users of the Verizon FIOS® Internet service should note that, while the wireless router provided by the ISP does indeed feature a WPS button on the front of the housing, it is disabled in the firmware. As of January 2015, the WPS feature cannot be enabled. - 7 -...
-
Page 8: Manual Installation
ANUAL NSTALLATION If you need to install the Manhattan Wireless 300N Range Extender manually, you will need to have the following items before you can begin. You need to know the name of your wireless network (it is also referred to as the SSID). If your wireless network is protected by an encryption key, you need to know what that password is. It is the same password you need to enter on your laptop or tablet when you connect to your wireless network for the first time. A desktop or laptop computer running Microsoft Windows, Mac OS or Linux that has a standard Web browser installed (Firefox, Safari, Chrome or Internet Explorer). A standard network cable; e.g., the cable provided in the packaging of the Manhattan Wireless 300N Range Extender. Step 1: Connect the Manhattan Wireless 300N Range Extender to your computer’s LAN using the included network cable. Start the computer and allow it to finish booting. Confirm that the LAN LED on the wireless range extender is illuminated. Step 2: Launch your Web browser and direct it to http://manhattan.repeater. In case this fails, you can also enter http://192.168.2.2. Log in with the user name “admin” and password “1234.” Note: If the login window does not appear, the IP address settings of your computer’s network adapter may not be compatible with the wireless range extender. Refer to Section 5 – Appendix A: “Changing the IP Address of a Network Adapter” to solve the problem. Step 3: Click “Repeater” ... - Page 9 Step 4: Wait while the wireless range extender scans for available networks. This process can take up to a minute. Step 5: The Manhattan Wireless 300N Range Extender shows all wireless networks within range. If you live in an apartment building or in a neighborhood with many houses in close proximity, this list can be quite extensive. Once you have located your wireless home network, select it. Step 6: On this screen, you need to type in the wireless encryption key that is required to connect to your wireless home network. You needn’t worry about selecting the correct encryption type, authentication mode or cipher suite: The range extender fills that out for you automatically. The wireless password must be entered in the “Security key” field. Be sure to type the password correctly. You can activate the “unmask” option to see the password in clear text. In the two fields below you can type in the SSID (wireless network name) of the 2.4 GHz and 5 GHz (AC) network. You can type in the same name as your wireless network at home, i.e., “Manhattan”, but it may be a g good idea to modify the SSID, so that you can quickly see, which wireless network is from your home network, and which one is the repeater network. In the example shown here, we append “24RP” and “50RP” respectively, to differentiate the networks. Click “Apply” when done. - 9 -...
- Page 10 Step 7: If all goes well, you will see the main screen again. The setup is now complete. Step 8: You can join the wireless network “ManhattanRP” (or, if you have a Wireless AC compatible WLAN adapter, the network “Manhattan50RP”) and enjoy the increased signal strength. Below you can see the original wireless network named “Manhattan”, and the newly created wireless network “ManhattanRP”. You can also see that the signal strength of the new network is quite a bit stronger, because it is the range extended network. Click on “Connect” to join the network. Type in the security key of your wireless network, and then click “Ok” to connect. - 10 -...
-
Page 11: Configuration Options
3. C ONFIGURATION PTIONS In this section, we explain everything there is to know about the additional configuration options of the Manhattan Wireless 300N Range Extender. But before we begin, a word of caution: The information presented is quite technical at times and not easily understandable by users without any experience in setting up computers and networks. If terms like IP address, DHCP server, WPA, SSID or WPS are unknown to you, some of the information in this section will leave you confused. Also, ask yourself if any of the statements below apply to you. If not, there is really no need to continue reading this section. You should read this section if you want to change the names (SSIDs) of the wireless networks so that you can differentiate the original wireless home network from the range extender networks. want to use this product as a regular wireless access point rather than a range extender. want to change the IP address of the range extender to be in the same range as the rest of your network. are a geek and want to know everything. ONNECTING TO THE DMINISTRATOR EB NTERFACE The default IP address of the Manhattan Wireless 300N Range Extender is 192.168.2.2. Any computer that has a matching IP address — i.e., in the range 192.168.2.3 – 192.168.2.254 — can connect to the range extender Web UI with any standard Web browser at http://192.168.2.2. Alternatively you can open http://manhattan.repeater. The user name is “admin” and the default password is “1234.” Typically, the computer’s network adapter is set up to automatically receive IP address information from a DHCP server, such as your wireless router at home. Unless you have changed this, there is no need to make a change to the network adapter configuration if you want to set up the range extender manually as described in the previous section. However, if you do run a network adapter with static IP settings, you will need to either adjust these settings or change the settings to automatic DHCP. See Section 5 – Appendix A: “Changing the IP Address of a Network Adapter” for details. ... - Page 12 How to connect AP/Repeater Disabled 192.168.2.2 The SSID will be Once the wireless range extender is set up and the same as the operates as a repeater, it receives its IP address DHCP requests name of the from the wireless router in your network – just like from any client wireless network any of your PCs, laptops, phones or tablets. In will be passed on that is being order to access the Web admin UI, open the to the wireless extended. address http://manhattan.repeater in your web network and will browser. Alternatively, you can check your wireless be answered by router’s DHCP log to see which IP address the the main DHCP wireless range extender has received from the server; i.e., the wireless router. wireless router in your network. Operation mode: Device is set up as a wireless access point. Mode DHCP Server Device IP SSID How to connect AP/Repeater Disabled ...
-
Page 13: How-Tos
‐T In this section, we discuss some of the most common actions you are likely to consider. 3.3.1 Changing the name of the wireless network name (SSID) First, you need to log in to the Web admin UI of the wireless range extender. See Section 4.1. Next, click “Basic Settings.” Keep in mind that the wireless range extender is a device, which means it has to wireless radios, which you can configure independently. Change the SSID to the desired value, and then click “Apply” to save and activate the settings. 3.3.2 Setting up the device as an access point In addition to being a wireless range extender, the device can also function as a regular access point. An access point connects wireless and wired devices so that they can communicate in a network. That is exactly what a typical wireless router in a home network does, except the wireless router also manages the connection to the Internet of multiple devices at the same time. That is something a regular wireless access point cannot do. Note: The Manhattan Wireless 300N Range Extender can act as a regular access point, but it can fulfill the role of a wireless router, once the mode selector switch is set to router mode. Log in to the Web admin UI of the wireless range extender. On the main screen, click “AP”. - 13 -... - Page 14 This screen contains the main configuration options for the wireless access point mode. SSID: The service set identifier (SSID) is used as a unique identifier for a wireless LAN. It’s commonly called the network name. Here you enter the name you wish to use for this wireless network. Since this is a device equipped with two independently operating wireless radios, you can define both the 2.4 GHz and the AC (5 GHz) network names here. Security Type: Unless you do not want to lock down your wireless network in any way, shape or form and allow anyone free access, you will want to enable wireless security. Your choices are “WEP,” “WPA PSK”. “WPA/WPA2 PSK” and “WPA2 PSK.” WEP encryption is highly insecure. It should not be used if you want the security encryption to provide actual security. WPA2 is what should be used in almost all cases. If you have older wireless devices that have trouble with WPA2 encryption, you can enable WPA/WPA2 encryption. This mode activates both WPA TKIP (less secure) and WPA2 (AES) (more secure), which diminishes performance and weakens the security of your network. While still much better than WEP, WPA2 PSKis by far the better option. If you are unsure about which wireless clients you have, and if they all will be able to connect, we recommend to start with WPA2, and only drop down to WPA/WPA2 PSK if clients have problems joining. Once you select WPA2, you need to provide a wireless password. Check the unmask option to view the password in clear text. The password must be at least eight characters in length, and for maximum compatibility, we recommend refraining from using any spaces (blank characters) in the password. - 14 -...
-
Page 15: Changing The Ip Address Of The Wireless Range Extender
3.3.3 Changing the IP address of the wireless range extender The LAN interface setup is an optional part of the settings. For the access point to function, its IP settings are largely irrelevant. The IP address of the access point is merely used to connect to the device’s Web admin interface. So, if you want to be able to connect to the access point’s admin interface without changing the wireless settings of your network adapter, or if you want to use the aforementioned scheduler, then here is what you do: 1. Find out what the IP address is of the wireless router in your network; for example, the quite common 192.168.0.1. 2. Find out what the DHCP range is of the wireless router. In this example we use 192.168.0.100 to 192.168.0.200. 3. Set the local IP address to 192.168.0.201. Once this is done, you can click “Apply” to save the settings. After the restart, the Web admin interface will be at http://192.168.0.201 – and you can connect to it from any computer in the network without changing its IP address settings. The second option on the interface is the DHCP function. The Dynamic Host Configuration Protocol (DHCP) is a standardized network protocol used on Internet Protocol (IP) networks for dynamically distributing network configuration parameters, such as IP addresses for interfaces and services. With DHCP, computers request IP addresses and networking parameters automatically from a DHCP server, reducing the need for a network administrator or a user to configure these settings manually. If you still have no idea what DHCP means, and we wouldn’t blame you, just know that a DHCP server enables your computer, laptop, smart phone and tablet to communicate with each other, and also access the Internet. There are three settings to choose from: Disable: The DHCP server function is turned off. The wireless range extender will not provide IP address information to any of the connected computers or networking devices. Server: The DHCP server function is activated. Connected networking devices obtain IP address information from the ... -
Page 16: Using The Wireless Schedule Function
3.3.4 Using the wireless schedule function The Wireless 300N Range Extender is equipped with an integrated scheduler, which allows activating or deactivating wireless service at specified times. How can this function be used? One example is setting up this device as a wireless access point (see Section 3.3.2) for your children and, perhaps, their friends. You also have a WPA2 secured wireless router in your home providing around‐the‐clock wireless and Internet access. Of course, you may “neglect” to tell your kids what the password for the wireless router is, and you only tell them the password for the Manhattan wireless access point. So if they want to connect to the Internet, it has to be done via the Manhattan device. And that is where the schedule function comes in. The example below illustrates how to set up a schedule that allows wireless access from 6 am to 10 pm from Sunday night to Thursday night, and 6 am to midnight on Friday and Saturday night. To get started, you need to log in to the Web admin UI of the wireless range extender. See Section 4.1. Next, click “Schedule”. Click the Enabled/Disabled button to activate the scheduler, then select the day of the week for which you wish to create the first schedule. In our example, that would be “Sun.” Next, define the time window (from … to), in which wireless service is available. In our example that would be 06:00 (6 am) to 22:00 (10 pm). Check the enable box to activate this schedule. Repeat the steps for the other days, as shown on the left. Click “Apply” to save the settings. - 16 -... -
Page 17: Changing Wireless Security
If you want to change the wireless encryption settings, you can easily do that by going to the basic wireless settings. Here you have access to the various encryption methods (WEP, WPA and WPA2), the different cipher types (TKIP or AES) and the wireless key itself, called pre‐shared key. For maximum security, we recommend using WPA2 – AES encryption. Activating the less secure “TKIP” instead of “AES”, or “WPA” instead of “WPA2” should only be done, if older wireless clients experience difficulties connecting to the wireless network. WEP should really only be used if you have legacy equipment so old it won’t even support WPA encryption. 3.3.6 Saving and reloading settings Your Manhattan Wireless 300N Range Extender allows you to save the configuration to a file that you can reload at a later time. This can come in handy if you had performed a hardware reset and don’t want to manually re‐enter all of the previous settings. To get started, click “Save/Reload Settings.” You have two choices here. First, you can save all the current settings to a file (click “Save …”); second, you can load a previously saved file from your computer’s HDD (click “Browser,” select the file, then click “Upload“). - 17 -... -
Page 18: Reset The Device To Factory Default Settings
3.3.7 Reset the device to factory default settings If you want to restore the factory default settings, you can do this two ways. a) Factory reset using the Reset button The easiest and quickest way is to press the reset button while the wireless range extender is powered on. Press the reset button for 10 seconds using a paper clip, then release. The device will reboot and 30 seconds later the device is set back to factory default values. b) Factory reset using administration Web UI In the administrator interface, click “Save/Reload Settings.” Next, click “Load default,” then confirm by clicking “OK” to perform the hardware reset. When you see the message below, the wireless range extender is being reset to factory default values. After the restart is completed, the device be accessible again. - 18 -... -
Page 19: Time Settings
3.3.8 Time Settings In order to use the schedule function (see Section 3.3.4), you need to make sure that the wireless range extender is set to the correct date and time. It’s quite easy to do that. First, click on “Time Zone settings”. Click on “Copy computer time”, then click “Apply.” 3.3.9 Changing the administrator password In order to prevent unauthorized access to the Web admin UI, we recommend that you change the password as soon as possible. To do that, you first need to login to the Web admin UI, then click on “Password.” Type in user name “admin”, and then the new password in the field below. Repeat the new password in the third field, and then click “Apply.” After this you will need to re‐login to the device with the new password. - 19 -... -
Page 20: Upgrade The Firmware
3.3.10 Upgrade the firmware From time to time, there may be new firmware available for the Manhattan Wireless 300N Range Extender. New firmware can be downloaded from the Manhattan website (manhattanproducts.com) by searching for the keyword “525756.” If new firmware is available, you can download it right from the Product Details page. Save it on the computer hard drive and unzip the file. In order to install new firmware, proceed as follows: After you log in to the Web admin UI, select “Upgrade firmware.” Click “Browse …,” then select the file you previously downloaded and uncompressed. Click “Upload” to begin the upgrade process. A progress bar will slowly fill up as the upgrade takes place. This process must not be interrupted! The device could be damaged beyond repair. Once the process is complete, you will be redirected to the login page. - 20 -... -
Page 21: Appendix A: Changing The Ip Address Of A Network Adapter
4. A PPENDIX HANGING THE DDRESS OF A ETWORK DAPTER The Manhattan Wireless 300N Range Extender HD operates on the IP address 192.168.2.2. For your computer to access the advanced configuration interface, the IP address of the network adapter in your computer has to be in the same range; e.g., 192.168.2.50. Refer to the instructions that came with your computer for information on how to change the IP address on the network adapter in your computer for any operating system that is not explained in this user manual. 4.1 W 8 INDOWS 1. If you are using a PC, move the mouse cursor to the bottom or top right corner of the screen and select the cog icon for Settings. If you are using a tablet, swipe left from the right side of the screen and select Settings. 2. Click “Control Panel.” 3. Select “Small icons.” 4. Open “Network and Sharing Center.” - 21 -... - Page 22 5. Click “Change adapter settings.” 6. Right‐click your network adapter and select “Properties.” 7. Select “Internet Protocol Version 4” from the list and click “Properties.” 8. Select “Internet Protocol Version 4” from the list and click “Properties.” 9. Enter the information as shown below, then click “OK” to save the settings. - 22 -...
-
Page 23: Windows 7
4.2 W 7: INDOWS 1. Open the Network and Sharing Center. 2. Click on “Change adapter settings.” 3. Right‐click your network adapter and select “Properties.” 4. Select “Internet Protocol Version 4” from the list and click “Properties.” 5. Enter the information as shown below, then click “OK” to save the settings. - 23 -... -
Page 24: Windows Xp
4.3 W XP: INDOWS 1. Double‐click the “Network Connections” icon in the control panel. 2. Right‐click the connection (e.g., Local Area Connection) and select “Properties.” 3. Select “Internet Protocol (TCP/IP)” from the list and click “Properties.” 4. Enter the information as shown below, then click “OK” to save the settings. - 24 -... -
Page 25: Mac Osx
4.4 M X AC 1. Open the System Preferences page. 2. In the Internet & Network section, click the Network icon. 3. Select either Built‐in Ethernet or AirPort, depending on how you connect to the wireless range extender, then click “Configure… .” 4. Set the value for Configure IPv4 to “Manually” and enter 192.168.2.50 in the IP Address field. Click “Apply Now” (not shown in screen shot) to save the settings. - 25 -... -
Page 26: Appendix B: Troubleshooting
5. A PPENDIX ROUBLESHOOTING Symptom How to address The Power LED is not lit. Make sure that the power switch on the wireless range extender is properly inserted into the power outlet. In addition, check and make sure that the power outlet provides power. The LAN LED does not light up. Check the network connection between the wireless range extender and the Ethernet port of the device you’re connecting. The network cable must be inserted properly and the Ethernet device must be turned on. Try using a different network cable, if available. The WLAN LED is not lit. The WLAN LED should always light, whether a wireless connection has been established or not. It essentially indicates that the wireless module has started successfully. If the LED is off, it means that the wireless function has been disabled in the wireless settings, either manually or by means of the wireless scheduler. If the wireless function is enabled in the wireless setting, but the LED is off and you cannot connect to any wireless network, the wireless range extender needs to be replaced through your dealer (place of purchase). If the LED is off yet you have a working wireless connection, the LED may simply have failed. The hardware reset is not The reset button needs to be pressed for 10 seconds while the wireless working. range extender is powered on. If it still does not work, the reset button could be malfunctioning. My router has a WPS button, WPS may be disabled in the router settings, or you have not pressed the but the WPS setup does not WPS button on the wireless range extender within 120 seconds of work as described in this pushing the button on the router. Refer to Section 2.2 – “Manual ... -
Page 27: Appendix C: Specifications
6. A PPENDIX PECIFICATIONS Standards • IEEE 802.11b (11 Mbps Wireless LAN) • IEEE 802.11g (54 Mbps Wireless LAN) • IEEE 802.11b (11 Mbps Wireless LAN) • IEEE 802.11g (54 Mbps Wireless LAN) • IEEE 802.11n (300 Mbps Wireless LAN) General • LAN port : 10/100 Mbps RJ45 connector • WPS and Reset button • Flash memory: 16 MB • SDRAM: 128 MB • Certifications: FCC Class B, CE, RoHS Wireless • Wireless 2.4 GHz link speed: up to 300 Mbps • Wireless security: ‐ WEP encryption (64/128 bit) ‐ WPA TKIP ‐ WPA2 AES ‐ WPA2 mixed LEDs • Power • LAN • WPS • WiFi Power • Internal 110 – 230 V AC, 50 – 60 Hz • Power consumption: 2.3 watts max. Environmental • Dimensions: 80 (L) x 53 (W) x 73 (H) [mm] / 3.15 (L) x 2.09 (W) x 2.87 (H) [in] • Weight: 0.1 kg (0.26 lb.) ... -
Page 28: Appendix D: Warranty Information
7. A PPENDIX ARRANTY NFORMATION Deutsch Garantieinformationen finden Sie hier unter intellinetnetwork.com/warranty. English For warranty information, go to intellinetnetwork.com/warranty. Español Si desea obtener información sobre la garantía, visite intellinetnetwork.com/warranty. Français Pour consulter les informations sur la garantie, rendezvous à l’adresse intellinetnetwork.com/warranty. Italiano Per informazioni sulla garanzia, accedere a intellinetnetwork.com/warranty. Polski Informacje dotyczące gwarancji znajdują się na stronie intellinetnetwork.com/warranty. México Póliza de Garantía Intellinet — Datos del importador y responsable ante el consumidor IC Intracom México, S.A.P.I. de C.V. • Av. Interceptor Poniente # 73, Col. Parque Industrial La Joya, Cuautitlan Izcalli, Estado de México, C.P. 54730, México. • Tel. (55)1500‐4500 La presente garantía cubre los siguientes productos contra cualquier defecto de fabricación en sus materiales y mano de obra. A. Garantizamos cámaras IP y productos con partes móviles por 3 años. B. Garantizamos los demás productos por 5 años (productos sin partes móviles), bajo las siguientes condiciones: 1. Todos los productos a que se refiere esta garantía, ampara su cambio físico, sin ningún cargo para el consumidor. 2. El comercializador no tiene talleres de servicio, debido a que los productos que se garantizan no cuentan con reparaciones, ni refacciones, ya que su garantía es de cambio físico. 3. La garantía cubre exclusivamente aquellas partes, equipos o sub‐ensambles que hayan sido instaladas de fábrica y no incluye en ningún caso el equipo adicional o cualesquiera que hayan sido adicionados al mismo por el usuario o distribuidor. Para hacer efectiva esta garantía bastará con presentar el producto al distribuidor en el domicilio donde ue adquirido o en el domicilio de IC Intracom México, S.A.P.I. de C.V., junto con los accesorios contenidos n su empaque, acompañado de su ... - Page 29 manhattanproducts.com © IC Intracom. All rights reserved. Intellinet is a trademark of IC Intracom, registered in the U.S. and other countries. - 29 -...
Need help?
Do you have a question about the 525756 and is the answer not in the manual?
Questions and answers