Table of Contents
Advertisement
Advertisement
Table of Contents

Summary of Contents for Pazzles Inspiration Vue
- Page 1 Quick Start Guide...
- Page 2 Visit us on the web for online chat support, forums FAQs, videos and more Websites: www.pazzles.com www.pazzlescraftroom.com Inspiration Vūe Quick Start Guide Version 1.0.0 ™ This Quick Start Guide is Copyright 2014 by Pazzles , Inc. All Rights © ® Reserved.
-
Page 3: Table Of Contents
Contents What’s in the Box Setting up the Inspiration Vūe ™ Selecting a Location Clearance Lighting Proximity Setting up the Software InVūe ™ Windows 7+ Mac OSX 10.9+ Connecting the Inspiration Vūe ™ Getting to know the Inspiration Vūe ™ Parts of the Inspiration Vūe ™... -
Page 4: What's In The Box
What’s in the Box 1. Inspiration Vūe 2. Power Adapter 3. USB Cable 4. Blade Holder 5. Print & Cut Mat 6. Warranty, Technical Support & End User License Booklet 7. InVūe Software Technical Support, End User License, & Warranty Quick Start Guide (Not Information Pictured) -
Page 5: Setting Up The Inspiration Vūe
Setting up the Inspiration Vūe ™ Selecting a Location Clearance Ensure that there will be at least 9” (23cm) behind and 12” (31cm) in front of the Inspiration Vūe™ clear of any obstructions. 9” 12” Lighting Direct sunlight can cause fading and interfere with the operation of the sensor on the Inspiration Vūe ™... -
Page 6: Setting Up The Software
Setting up the Software InVūe ™ Windows 7+ Insert the InVūe CD into your computer. ™ If an Autoplay window pops up select “Run InVue_Installer.exe”. From the InVūe Software ™ Installation Window, click on the InVūe icon. ™ Follow the on screen installation process to complete the... -
Page 7: Mac Osx 10.9
Mac OSX 10.9+ Insert the InVūe CD into your computer. ™ A Finder window similar to the one pictured here should pop up. Double-click on InVue_Installer. From the InVūe Software Installation Window, click ™ on the InVūe icon. ™ A dialog box will notify you when the installation is complete. -
Page 8: Connecting The Inspiration Vūe
Connecting the Inspiration Vūe ™ Connect the Power Adapter to the Inspiration Vūe™. Plug the power adapter into an available power source. Tip: Pazzles® strongly recommends using a surge protected power source to prevent accidental damage to the Inspiration Vūe ™... - Page 9 Connect the USB cable to the Inspiration Vūe ™ Important! Do not connect your Inspiration Vūe to your ™ computer until you have completed the software installation!
-
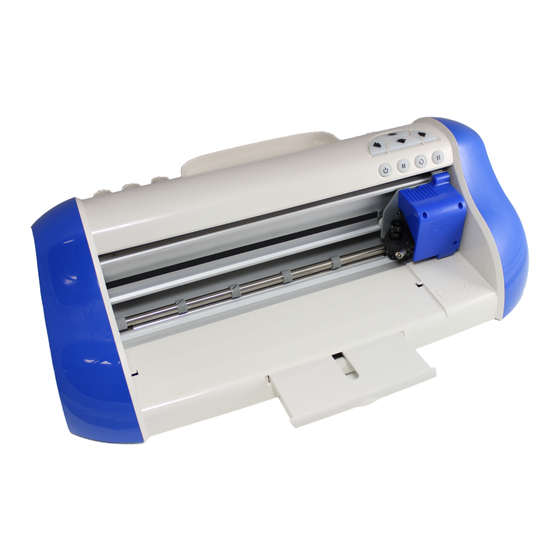
Page 10: Getting To Know The Inspiration Vūe
Getting to know the Inspiration Vūe ™ Parts of the Inspiration Vūe ™ Tool holders: Use to store additional tools (ex. Pen Tool). Accessory tray. Position adjustment buttons: Use the up and down arrows to adjust the position of your mat. Use the left and right arrows to adjust the position of your blade carriage. -
Page 11: Inspiration Vūe™ Carriage
Roller Bar: This bar moves your mat through the Inspiration™ as it is cutting. Mat loading area: This is the proper area to load your mat into before pressing the Load button (see #7). Slide out tray: This helps support your mat as it travels in and out of the machine. -
Page 12: Inspiration Vūe ™ Blade Holder
the bottom of the blade holder. Loosen the Thumbscrew on the Cradle enough for the thumb- screw to swing to the right. Be careful not to loosen the Thumb- screw too much or it will fall out! The Cradle should easily swing open to the left. Insert the Blade Holder so that the middle section of the Blade Holder is resting in the Cradle. -
Page 13: Inspiration Vūe ™ Print & Cut Mat
Changing Blades The blade is the part that does all the cutting and will need to periodically be replaced. To replace the blade: Remove the blade holder from your Inspiration Vūe ™ Grasp the blade holder with thumb and middle finger while depressing the push button on the top of the blade holder with your index finger. -
Page 14: Mat Preparation
In order to ensure the best possible experience when using the mat, Pazzles strongly recommends preparing your mat prior to first use. Mat preparation is recommended in order to maximize the life of your mat. -
Page 15: Caring For The Inspiration Vūe
Caring for the Inspiration Vūe ™ Keep the Inspiration clean and free of dust. Periodically clean the Inspiration Vūe ’s roller bar and the ™ grips attached to the roller bar with a damp cloth. Store in a dry, clean, temperate environment. Do not operate or store the Inspiration Vūe outside. -
Page 16: Cutting For The First Time
Cutting for the First Time Use InVūe to Create ™ InVūe ™ Open the InVūe software. If this is the first time you have started ™ InVūe , you will be prompted to enter a registration number. This ™ number can be found in the CD case for your software. After entering your registration number, you will see the Create New Page dialog. - Page 17 Click on the image gallery icon in the top left corner. This icon looks like a set of pictures. The Image Gallery window will pop up. Double click on Local, Pazzles Media, and then InVue Exclusive Images. Select a category and...
- Page 18 To place the selected image into your document click on the import icon beside your selected image. After clicking the import button you may notice your selected image appearing on your document. Close out of the Image Gallery by selecting the close button. At this time you can move, rotate, or resize your selected shape as desired.
- Page 19 You can also use the arrow keys to move an image once it is selected. Move your image to the upper right hand corner of the document. Select the Cut Control Panel Button from the top menu. The Cut Control Panel Button looks like a mini Inspiration Vue.
- Page 20 The Cut Control Panel will open and you will see your image as a wire frame (without the fill color). On the right side of the screen is a list of cutting options. Beginning at the top, make your selections. For your first cut leave your selections in the default mode: Action: Cut Material: Cardstock (Smooth)
-
Page 21: Preparing To Cut
Note the recommended blade length. If you do not remember how to set the blade length, see “Inspiration Vūe™ Blade Holder” on page In the filters section, select which color you are cutting first. For the image we have selected we are going to cut the outside wrapper. Click on the light teal box and only the items with that color pen lines will appear on your screen. -
Page 22: Cutting
Slide your mat under the tabs on either side of the mat loading area and gently push the mat up against the rollers. Push the load/unload button and the Inspiration Vūe will automati- ™ cally feed your mat into the proper position. You are now ready to cut! Cutting With the mat loaded and an image prepared you are now ready to cut your first image. -
Page 23: Print & Cut
Print & Cut Print & Cut is an advanced technique that allows you to print a design and then cut around it. Print & Cut is recommended for those who have mastered the basics and are ready to explore the more advanced capabilities of the Inspiration Vūe ™... -
Page 24: Calibrating The Inspiration Vūe
Calibrating the Inspiration Vūe ™ Place the calibration paper that you printed on your print & cut mat so that the upper right hand corner of the sheet is in the upper right hand corner of the black side of the mat. Set the blade length on the blade holder. - Page 25 The load/unload button should be flashing. Insert your mat with the calibration sheet on it into the mat loading area, being careful to slide the mat under the mat securing tabs. While gently holding the mat against the rollers, press the load/unload button.
-
Page 26: Your First Print & Cut Project
Your First Print & Cut Project Create a new document. When selecting the document size, select the size that corresponds to the paper size that you will be printing on. In this example we will be using a letter sized sheet of paper and so will select 8.5”x 11”... - Page 27 To view the printer margins, click on the View menu and select “Display Printer Margins”. This will show you which parts of your document will print on your home printer. Click on your image to select it once again and drag it on the screen so it fits within the printer margins which begin at the top right point of your mat.
- Page 28 Now we are going to setup an outline around our image so that we can cut around it. Start by selecting the outline tool. Select the image and then check the “Contour” checkbox. You should see an outline around your image. To approve this outline, click on the green checkmark below the image.
- Page 29 ated. Click on the drop down menu under Line Type and select “Cut”. In the Line Type area, uncheck the print- able check box. This will ensure that we do not print the cut line we just created. Deselect your newly created cut line. From the top menu bar, select the registration mark button.
- Page 30 Tip: Place the registration mark close to the image you are cutting to improve accuracy. If you are having difficulties getting an accurate cut, try moving the registration mark to a different location. From the “File” menu select “Print Preview”. If everything looks right, select the printer icon to print the document.
- Page 31 Place the printed page on your print & cut mat so that the upper right hand corner of the page covers the small gray triangle in the upper right hand corner of the black side of the mat. Tip: Don’t worry about getting the paper on the mat exactly straight and right at the edge of the grid.
- Page 32 In the cut control panel, verify that only the cut line for your image are displayed. Select the appropriate settings for the material you are cutting. Check the “Print/Cut” checkbox. Click “Send” to start the cut! After the Inspiration Vūe ™...
-
Page 33: Tips For Designing Print & Cut Images
Tips for Designing Print & Cut Images ½ No Print Zones ” ½ ” The Inspiration Vūe print & cut system works ™ by sensing the edge and angle of the paper on the mat. To do this there are two area on the paper that need to be free of print.
Need help?
Do you have a question about the Inspiration Vue and is the answer not in the manual?
Questions and answers