Miele CERAMIC COOKTOP WITH INDUCTION KM 5753 Operating And Installation Instructions
Ceramic cooktop with induction
Hide thumbs
Also See for CERAMIC COOKTOP WITH INDUCTION KM 5753:
- Product dimensions (1 page) ,
- Operating and installation instruction (72 pages) ,
- Operating and installation instructions (56 pages)

Related Manuals for Miele CERAMIC COOKTOP WITH INDUCTION KM 5753


Summary of Contents for Miele CERAMIC COOKTOP WITH INDUCTION KM 5753
- Page 1 Operating and Installation Instructions Ceramic Cooktop with Induction KM 5753 KM 5758 en - US, CA To prevent accidents and machine damage, read the Operating Manual before installation or use. M.-Nr. 06 766 201...
-
Page 2: Table Of Contents
Turning on the cooktop ........ - Page 3 Installing the cooktop........
-
Page 4: Important Safety Instructions
Only for frame/facet cooktops: A small gap will be visible between cooktop and countertop for the first days after installation. The gap will decrease as the cooktop is used. The electrical safety of your appliance is warrantied despite the small gap. - Page 5 Be sure to use the proper type of cookware. Follow the manufacturer's instructions. If the cooktop is installed above a pyrolytic oven it should not be used during the pyrolytic process. The overheating protection feature of the cooktop might be activated.
- Page 6 IMPORTANT SAFETY INSTRUCTIONS Injury prevention Children should not be left unattended in an area where the cooktop is in use. Never allow children to sit or stand on any part of the cooktop. Caution: Do not store items of interest to children in cabinets above the cooktop.
- Page 7 Some cleaners may produce toxic fumes if applied to a hot surface. When wiping spills on a hot cooktop with a wet sponge or cloth, be careful to avoid steam burns. Do not let flammable materials, i.e.
- Page 8 Never place hot pots or pans on the touch controls, this may damage the electronics. Do not drop anything on the ceramic surface of the cooktop. Even lightweight objects may cause damage. Do not use pots or pans with pronounced edges or ridges on the ceramic cooktop.
-
Page 9: Appliance Safety
In the event of any damage to the appliance, it must be turned off immediately and disconnected from the main power supply. Contact Miele’s Technical Service Department. Do not use the appliance until it has been repaired. Ensure power is not supplied to the appliance until repair work is completed. -
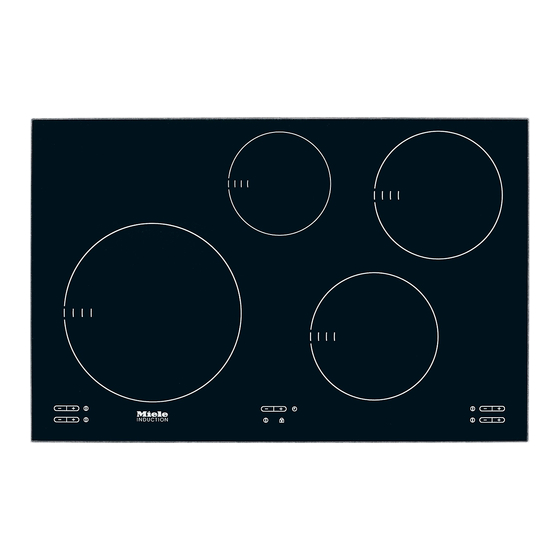
Page 10: Guide To The Cooktop
Guide to the cooktop Cooktop a Burner with double booster bcd Burners with single booster e Burner controls and displays f Timer controls and display g Child safety lock indicator h Child safety lock control i Cooktop On/Off control j Cooktop "On" indicator... -
Page 11: Burner Controls And Displays
= Single booster function activated = Double booster function activated (only front left burner) = Fault (see "Safety cut-out feature") = Auto-heat with extended power level P0 etc. = Program (see "Programming") S0 etc. = Status (see "Programming") Guide to the cooktop... -
Page 12: Timer Control And Display
Guide to the cooktop Timer control and display a Touch control to: - turn the timer on/off, - switch between functions, and - select a burner for "automatic switch-off". b Touch control for setting the time c Time display d Automatic switch-off indicator... -
Page 13: Induction
3 minutes. Be careful not to place cutlery or other metal objects on the cooktop. When the appliance is switched on, or when there is residual heat present, there is the risk of metal objects heating up quickly. -
Page 14: Noises
The appliance has a cooling fan to help extend the life of the electronics. When the cooktop is being used at high levels for a long period of time, this will come on and you will hear a whirring sound. -
Page 15: Cookware
– glass, ceramic or earthenware pots and pans To test whether a pot or pan is suitable for use on an induction cooktop, hold a magnet to the base of the pan. If the magnet sticks, the pan is suitable. -
Page 16: Before Using For The First Time
^ Before using for the first time, clean the appliance with a damp cloth and dry with a soft cloth. Heat the cooktop Metal components of the cooktop have a protective coating which may give off a slight odor the first time the appliance is heated. -
Page 17: Use
On/Off indicator will light. If a setting is not chosen within a few seconds the cooktop will turn itself off as a safety measure. Turning on a burner ^ Touch the s On/Off touch control for the desired burner. -
Page 18: Settings
Settings Use for Melting butter Dissolving gelatine Thickening sauces containing egg yolk and/or butter Warming small quantities of food/liquid Cooking rice Thaw frozen vegetables (blocks) Warming liquid and half-set foods Thickening sauces, e.g. Hollandaise Making oatmeal Preparing omelettes, lightly fried eggs Steaming fruit Defrosting deep frozen food Steaming vegetables, fish... -
Page 19: Auto-Heat
Auto-heat When Auto-heat has been activated, the burner switches on automatically at the highest setting and then switches to the continued power level which was selected. The "heat-up" time depends on which continued power level has been chosen (see table). Taking a pan off the zone while Auto-heat is in operation interrupts the function. - Page 20 Activating Auto-heat ^ Press the - sensor until the desired continued power level appears, e.g. 6. During the heat-up time a dot will light to the right of the continued power level, and go out when it is completed. At any point during the Auto-heat time you can use + or - to lower or increase the continued power level.
-
Page 21: Booster Function
Booster function Each burner is equipped with a booster function to temporarily increase the power level. The front left burner is equipped with a double booster. When the booster function is on, the burners increase to power level 9 for 10 minutes. - Page 22 Single booster (all burners) ^ Turn on the relevant burner. ^ Select a power level. ^ Take your finger off the sensor. ^ Touch the + and - sensor briefly at the same time. The indicator for the booster will light and I will appear in the burner display.
-
Page 23: Turning Off A Burner
The display will show - for a few seconds. If the burner is still hot the residual heat indicator will show. Turning off the cooktop ^ Touch the s On/Off control for the cooktop. All burners are turned off. If any burners are still hot the residual heat indicator will show in the respective display. -
Page 24: Timer
Timer The cooktop is fitted with a timer which can be used to time kitchen activities and/or to switch off the burners automatically. You can set a time from 1 minute (01) to 9 ½ hours (9.^). If the time is more than... -
Page 25: Automatic Switch-Off
All burners can be programmed at the same time. If the programmed time is greater than the maximum operating hours permitted, the cooktop will eventually switch-off automatically. See "Safety cut-out feature" for more information". ^ Turn the desired burner on, e.g. rear right, and select a power level. -
Page 26: Combi Mode
Timer Combi mode The timer and automatic switch-off functions can be used at the same time. If you have programmed in one or more switch-off times, and would like to use the timer as well: Touch the m sensor repeatedly until the timer indicator flashes. -
Page 27: Safety Features
Child Safety Lock Keep children away from the cooktop for their own safety. The cooktop has a Child Safety Lock to prevent children from turning on the burners or changing settings. The Child Safety Lock can be activated while the cooktop is on or off. -
Page 28: Stop And Go
If the feature is not deactivated, the cooktop will turn off after 1 hour. If you wish to use this feature, you will need to alter the factory setting (see "Programming - P1"). -
Page 29: Safety Cut-Out Feature
^ Clean the touch controls or remove the object covering it. This will turn off the signal tone and the displayed F will go out. ^ Turn the cooktop on again with the s touch control. The burners can now be used. Safety features... -
Page 30: Overheating Protection
This prevents the induction coils and cooling element from overheating. This mechanism works on the affected burner or on the entire cooktop in the following ways: – If the booster function is being used, this will be switched off. -
Page 31: Cleaning And Care
^ Turn the burner off. ^ Using a shielded scraper blade, scrape the melted item immediately off the burner while it is still hot. Use caution: Danger of burns! ^ Allow the cooktop to cool and clean as previously described. -
Page 32: Programming
Programming The cooktop's default settings can be adjusted (see table). ^ While the cooktop is turned off, touch the On/Off "s" control and Child Safety Lock "$" control at the same time until the Child Safety Lock indicator flashes. The burner display shows P (Program) and S (Status) with a number. - Page 33 Programming Table Program* Demonstration mode and factory default settings Stop and Go Power level range Warning tone when there is no pan or the pan is unsuitable Keypad tone when a control is touched Timer tone volume * Programs / status not shown are not allocated. ** The factory default setting is printed in bold.
- Page 34 ** The factory default setting is printed in bold. Status** Setting One finger lock using $ Three finger lock using $ and + on the two right-hand burners Manual activation Automatic activation 5 minutes after cooktop is turned off Normal (300 ms) Fast...
-
Page 35: Frequently Asked Questions
The cookware is not suitable for an induction cooktop. What if a single burner or the whole cooktop switches itself off? The Safety cut-out or Overheating protection feature has been activated. See "Safety features". What if food does not cook when using auto-heat? - Page 36 Interrupt the power supply to the cooktop for approx. 1 minute. If the problem persists after reconnecting the appliance to the power supply, please contact the Miele Technical Service department.
-
Page 37: Technical Service
Miele Service department, Extended Service Contracts offered by other providers for Miele products will not be recognized by Miele. Our goal is to prevent unauthorized (and untrained) service personnel from working on your Miele products, possibly doing further damage to them, you and/or your home. -
Page 39: Installation Instructions
Installation Instructions IMPORTANT: SAVE FOR THE LOCAL ELECTRICAL INSPECTOR'S USE To prevent accidents and machine damage read these instructions before installation or use. -
Page 40: Important Safety Instructions
A minimum distance of 2" (50 mm) from the cooktop to the rear wall and a side wall or cabinet must be maintained for safety. The countertop must be bonded with heat resistant (212 °F/100 °C) -
Page 41: Safety Distances Above The Appliance
However, under certain conditions it may be possible for installation in these applications. Please contact the Miele Technical Service Department with specific requirements. The cooktop must not be permanently sealed into the countertop when installed. -
Page 42: Installation
Installation Cooktops flush with the countertop Frame/Facet cooktops a Wall b Wall covering c Back splash d Countertop e Countertop cut-out f 2" (50 mm) minimum distance... -
Page 43: Installation Dimensions
( 7 9 4 2 " ( 5 0 ( 6 5 a Front of cooktop b Installation height c Installation height power supply c Power cord encased by flexible metal conduit Length = 3' 11" (1200 mm) C =... -
Page 44: Ventilation
Installation Ventilation (700mm) a Front of cooktop b Cut-out at the rear wall of the cabinet for ventilation c Protective base If a protective base is fitted, there must be a distance of atleast 4 ½" (110 mm) between the top of the protective base and the top of the countertop, for proper ventilation of the appliance. -
Page 45: Installing The Cooktop
This is important to ensure an effective seal. Do not use sealant. ^ Connect the cooktop to the main power supply. ^ Turn the cooktop on and check the function. Installation... - Page 46 The sealing strip under the edge of the cooktop provides a sufficient seal for the countertop. If the cooktop is sealed into position, the countertop or appliance could be damaged if the cooktop needs to be removed for maintenance or...
-
Page 47: Electrical Connection
This data must correspond to prevent appliance damage. Consult an electrician if in doubt. Only operate the cooktop after it has been installed into the countertop. Installer: Please leave these instructions with the consumer. -
Page 48: Help Protect Our Environment
Help protect our environment Disposal of packing materials The cardboard box and packing materials are biodegradable and recyclable. Please recycle. Ensure that any plastic wrappings, bags, etc. are disposed of safely and kept out of the reach of children. Danger of suffocation! Disposal of an old appliance Old appliances contain materials that can be recycled. - Page 52 Alterations rights reserved / 1008 M.-Nr. 06 766 201 / 00 For the most updated manual see the Miele web site.