
Related Manuals for Shoprider Vienna S-UL7


Summary of Contents for Shoprider Vienna S-UL7
- Page 1 Vienna Model No: S-UL7 USER MANUAL Please ensure this manual is read and understood before using the scooter. KB&S16119 Sept 2011...
-
Page 2: Table Of Contents
Contents Page Introduction Intended Use Technical Specification Feature Guide Safety Advice Adjustments Footrest Settings Arm Adjustments Seat Height & Back Angle Controls 7- 8 Electro-magnetic Brake Release (Freewheel Operation) Starting to Drive Getting started Moving off and steering ... -
Page 3: Introduction
INTRODUCTION ® Congratulations on your purchase of the Shoprider power wheelchair. This model incorporates style and comfort with the latest in technological innovation. This powerchair is a compact powerchair and therefore very manoeuvrable. It is possible to climb obstacles of up to 2.5cm (1”). Direct drive twin motors and electromagnetic brakes give a safe and efficient drive. -
Page 4: Feature Guide
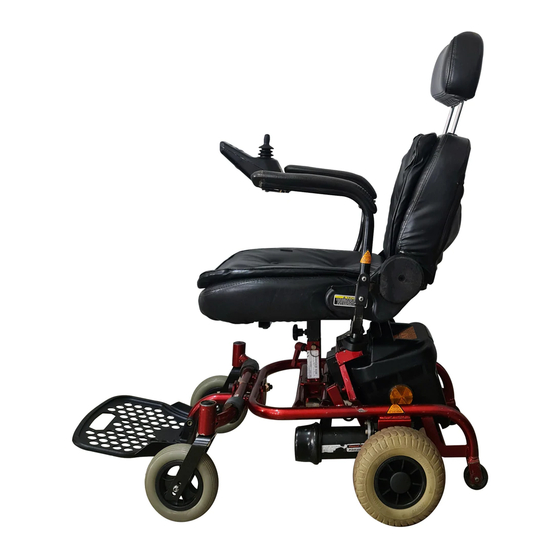
FEATURE GUIDE 1. Adjustable width and fold-down armrests 2. VSI Joystick controller 3. Adjustable height, reclining ‘Captains’ seat 4. Flip up footplate 5. 20cm Centre drive wheels 6. Lap belt 7. Adjustable height headrest... -
Page 5: Safety Advice
SAFETY ADVICE Read this manual carefully before using your powerchair Turn the controller off when transferring to and from the powerchair Select a slow speed when going down steep gradients of 6° (10%) or less Keep your feet on the footplate when you are moving. Never stand on the footplate. -
Page 6: Adjustments
ADJUSTMENTS Footrest The footrest on the powerchair can be adjusted for angle. To adjust the angle flip up the footplate and adjust the bolt (1) until the required angle is reached. Armrest Width Under the seat there are two hand knobs. Undo a few turns and set the armrests at the required width. - Page 7 Joystick Arm Control (VSI Controller) Battery Gauge (1) This is a 10-segment display, which indicates if the VSI is switched on and gives the state of charge of the battery. Also, any faults in your power chair’s electrical system are also indicated by this display.
-
Page 8: Electro-Magnetic Brake Release (Freewheel Operation)
Continued….. VSI ‘Lock’ Function Your VSI controller is equipped with a lock function to prevent any unauthorised use. To lock the controller: When the power is on, press and hold the power button for about 1 second until the system bleeps. ... -
Page 9: Controls
STARTING TO DRIVE YOUR POWER WHEELCHAIR Getting Started Select an area with plenty of space. Ensure that when seated in the in the powerchair you are in a comfortable position and can easily and freely operate the controls. Moving off and steering Turn the power on and check that your batteries are fully charged. -
Page 10: Reaching And Stretching
Continued….. Kerb Descent We do not recommend that you descend a kerb (up to 2.5cm) in reverse or forward mode. Please use a ramp/drop-kerb not exceeding 2.5cm in forward motion to descend. If a kerb descent is absolutely necessary in these circumstances an attendant must be present to aid the manoeuvre. -
Page 11: Dis-Assembly And Assembly
Disassembly & Assembly Warning: We advise caution when disassembling and lifting items. You must ensure that the person undertaking the action is able to safely and correctly handle the weight to avoid any personal injury. Ensure that the power is switched off and the joystick is dis-connected before dismantling. -
Page 12: Batteries And Battery Charger
Batteries and Battery Charger Batteries The powerchair is supplied with two maintenance free, sealed lead acid AGM batteries. These are fitted under the seat on the scooter. Battery performance can be affected by low temperatures, rough terrain and the weight of the user. Your battery gauge is a guide only on the level of charge remaining in the batteries. -
Page 13: Maintenance
MAINTENANCE Cleaning the Powerchair When cleaning the vehicle please pay attention to the following points: Only use a damp cloth and gentle detergent. Do not use any abrasive products. Do not use a hose or pressure washing equipment. ... -
Page 14: Troubleshooting
TROUBLESHOOTING Circuit Breaker Your powerchair is fitted with electronic controls that are programmed to protect the electrical system from overload. Fitted for extra protection is a circuit breaker. Should there be a situation where your powerchair stops for no apparent reason please check that the circuit breaker has not tripped. The circuit breaker is located on the battery pack. -
Page 15: Further Information
VSI Error Codes Your VSI controller has the ability to diagnose possible errors in the electrical system, which may prevent your powerchair from operating. These are displayed on the battery gauge. The fault is shown against the number of lights flashing on the display. Battery Gauge Possible Fault 10 bars flash... - Page 16 Continued….. General Use Take heed of the information given in this manual regarding safety and the maintenance of your powerchair. If adhered to, your powerchair should give you years of reliable mobility. Storage and General Care We recommend that the powerchair is always stored in a dry environment away from damp, preferably in the home to protect the chassis and other components from corrosion or water damage.
- Page 17 Continued….. Adjustment of your lap belt Ensure that you are sitting back fully into the seat with the pelvis as upright as possible and not leaning to one side. Close the buckle and position the belt so that the hipbones can be felt above the lap belt.
- Page 18 Notes...
- Page 19 Notes...
- Page 20 York Road, Bridgend Industrial Estate, Bridgend CF31 3TB Tel: 01656 674488 Fax: 01656 674499 Email: sales@romamedical.co.uk www.romamedical.co.uk Shoprider reserve the right to change specifications without prior notice Manufactured by: Phisiang Machinery MFG. CO. LTD No. 108 Hsin-He Rd, Hsin-Feng Hsiang, Hsinchu County, Taiwan...
Need help?
Do you have a question about the Vienna S-UL7 and is the answer not in the manual?
Questions and answers