
Related Manuals for Midland X-Tra Talk GXT1000 Series


Summary of Contents for Midland X-Tra Talk GXT1000 Series
- Page 1 GXT1000/1050 Series GMRS/FRS Radio OWNER'S MANUAL www.midlandradio.com...
-
Page 3: Table Of Contents
Model GXT1000/1050 Series TABLE OF CONTENTS Introduction Important Notice, FCC Licensing LCD Display Controls Battery Installation Installing the Belt Clip Charging the Optional Battery Pack Low Battery Level Indicator Operating Your Radio External Speaker/Microphone Jack Troubleshooting Guide Use and Care Specifications and Frequency Charts Warranty Information MIDLAND Family Products... -
Page 4: Introduction
To maintain compliance with FCC’s RF exposure guidelines, for body-worn operation, this radio has been tested and meets the FCC RF exposure guidelines when used with Midland Radio Corp. accessories supplied or designated for this product. Use of other accessories may not ensure compliance with FCC RF exposure guidelines. -
Page 5: Important Notice, Fcc Licensing
IMPORTANT: Changes or modifications to this unit not expressly approved by MIDLAND RADIO CORP. could void your right to operate this unit. Your radio is set up to transmit a regulated signal on an assigned frequency. It is against the law to alter or adjust the settings inside the COMMUNICATOR to exceed those limitations. -
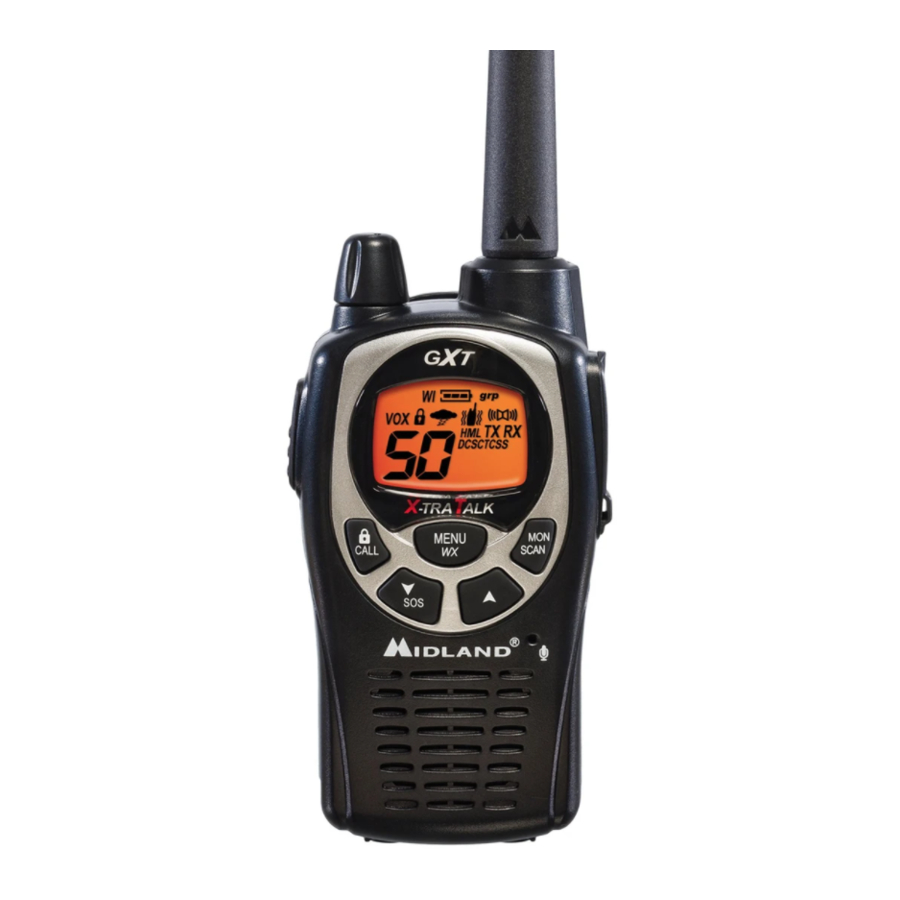
Page 6: Lcd Display
Model GXT1000/1050 Series LCD DISPLAY CONTROLS Page 6 1. BATTERY METER – Indicates the battery level. 2. WHISPER ICON – Indicates when the Whisper feature is on. 3. KEY LOCK ICON – Indicates KEY LOCK mode is on. 4. VOX ICON – Indicates when VOX mode is active. -
Page 7: Battery Installation
Model GXT1000/1050 Series BATTERY INSTALLATION Your GXT1000/1050 Series radio operates with either 4 AA alkaline batteries or an optional NiMH battery pack. The belt clip should be removed (see below) to ease installation or removal of the batteries. To install the batteries: 1. -
Page 8: Charging The Optional Battery Pack
Model GXT1000/1050 Series CHARGING THE OPTIONAL BATTERY PACK Your GXT1000/1050 Series is equipped for using an optional rechargeable NiMH battery pack (included) which can be recharged using a desktop charger (included). Initial charge time is 24 hours with a charge time of 12 hours thereafter. For maximum battery life, we recommend charging the battery pack when the low battery icon comes on. -
Page 9: Operating Your Radio
Model GXT1000/1050 Series OPERATING YOUR RADIO POWER ON/OFF AND VOLUME Rotate the POWER/VOLUME knob clockwise to turn the radio on and increase the volume level. Rotate the control counter-clockwise to reduce the volume level and to turn the radio off. During Power On, the radio will beep 2 times with different tones, the LCD will display all icons for 1 second and the LCD display will indicate the last channel selected. -
Page 10: Quick Reference Chart
Model GXT1000/1050 Series GXT1000/1050 SERIES QUICK REFERENCE CHART MENU Channel Group Mode 1~50 Press and hold the MENU MENU button for Privacy 5 seconds WX Scan 1~10 WX Channel 1~10 CTCSS WX Alert On/Off *** Only on Ch 1 ~ 22 MONITOR Pressing and holding the MONITOR button for 1 second will let you hear noise so you can adjust the volume level of the radio when not... -
Page 11: Using Radio In Group Mode
Model GXT1000/1050 Series SOS SIREN To activate the SOS SIREN function, press and hold the DOWN/ SOS SIREN button for 5 seconds. The SOS SIREN icon will appear on the display, the radio will send out a loud siren sound and the display backlight will flash. -
Page 12: Setting The Id Number
Model GXT1000/1050 Series Note : To communicate between two GXT1000/1050 Series radios in Group Mode, the radios in your group must be set to the same channel and Group Code selections. Note : The GROUP Mode function only operate in channels 1~22. SETTING THE RADIO TO GROUP MODE To turn the GROUP MODE on, press the MENU button until the display shows “Gr”... -
Page 13: Setting The Ring Tone
Model GXT1000/1050 Series SETTING THE CALLER ID NUMBER You can select your individual 4-digit Caller ID Number to indicate you when making “direct call” to other radios within your group. To set your Caller ID Number within the current channel, Group Code and ID number press the MENU button while in Group Mode 5 times, and then press the buttons to select “1 ~ 9”... -
Page 14: Setting Privacy Codes
Model GXT1000/1050 Series USING THE RADIO IN STANDARD MODE You can set your GXT1000/1050 Series to Standard Mode to communicate with radios which do not have the Group Mode feature. SETTING THE RADIO TO STANDARD MODE To turn the STANDARD MODE on, press the MENU button until the display shows “Gr”... -
Page 15: Transmit (Tx) Power Level Selection
Model GXT1000/1050 Series TRANSMIT (TX) POWER LEVEL SELECTION Your GXT1000/1050 Series has 3 power level settings. To select the power level on channels 1~7, 15~33 and 38~42, press the MENU button until a “Pr” icon will appear blinking on the display. Then press buttons to select TRANSMIT POWER LEVEL icon (H: Hi/ M: Mid/L: Lo). -
Page 16: Call Alert Selection
Model GXT1000/1050 Series ROGER BEEP (end of transmission) TONE When the PTT button is released, the radio will beep to confirm to other users that your transmission has finished. To turn the ROGER BEEP tone on, press the MENU button until the display shows an “rb”... -
Page 17: Whisper Function
Model GXT1000/1050 Series WHISPER FUNCTION Your GXT1000/1050 Series has a WHISPER function, to enable user to transmit a high sound level even if he is whispering on the microphone. To turn the WHISPER on, press the MENU button until the display will show the WHISPER icon blinking, while on the right of the CHANNEL NUMBER, an “oF”... -
Page 18: Noaa Weather Alert
Model GXT1000/1050 Series To stop the NOAA WEATHER (WX) SCAN and set the channel manually on the WX Band, press the MENU button during NOAA WEATHER (WX) SCAN. The radio will stop scanning and the display will show the current WX Band channel setting and the WX Band icon. -
Page 19: Dual Watch Function
Model GXT1000/1050 Series DUAL WATCH FUNCTION Your GXT1000/1050 Series has a DUAL WATCH function, to enable user to scan 2 channels for any activity. The first channel will be the current channel setting and the second channel will be the selected channel on the MENU. -
Page 20: Troubleshooting Guide
Model GXT1000/1050 Series TROUBLESHOOTING GUIDE PROBLEM No Power Cannot Receive Messages Radio is not responding to button presses Display is dim Charger not functioning USE AND CARE 1. Use a soft damp cloth to clean the radio 2. Do not use alcohol or cleaning solutions to clean the radio. 3. -
Page 21: Gmrs/Frs Frequency Chart (Mhz)
Model GXT1000/1050 Series SPECIFICATIONS Channels 50 GMRS/FRS Channels +246 Privacy Codes 10 NOAA Weather (WX) Band Channels Operating Frequency UHF 462.5500 ~ 467.7125 MHz Power Source 4 AA Alkaline or 6.0V Rechargeable Ni-MH battery pack GMRS/FRS FREQUENCY CHART (MHz) CH. No CH. -
Page 22: Dcs Privacy Code Chart
Model GXT1000/1050 Series DCS PRIVACY CODE CHART CODE Note: Privacy codes can be programmed for use on Channels 1~22 only Page 22 CODE CODE www.midlandradio.com... -
Page 23: Limited Warranty
Model GXT1000/1050 Series LIMITED WARRANTY Midland Radio Corporation will repair or replace, at its option without charge, any Midland FRS/GMRS transceiver which fails due to a defect in material or workmanship within Three Years following the initial consumer purchase. This warranty does not apply to water damage, battery leak or abuse. -
Page 24: Midland Family Products
Model GXT1000/1050 Series Page 24 www.midlandradio.com... -
Page 25: Accessories
Model GXT1000/1050 Series ACCESSORIES Accessories can be purchased at www.midlandradio.com or fill in the form on the following page and mail it to our address. A A V V P P -1 1 - 2 Over the Ear Mic. Headsets w/ PTT - $19.99 A A V V P P -H H 1 1 - 1 Open Face Helmet... -
Page 26: Accessories Order Form
ACCESSORIES ORDER FORM Please send Money Order or fill in Visa/MasterCard information and mail to the address below. Please DO NOT send cash or checks. Make Money Order to Midland Radio Corporation. Name: _____________________________________________________ Address: ___________________________________________________ City: _____________________ State _____Zip Code _____________ Tel: ______________________ email: ___________________________ CC# _____________________ Type: __________ Exp. - Page 28 M I I D D L L A A N N D D R R A A D D I I O O C C O O R R P P O O R R A A T T I I O O N N visit us at http://www.midlandradio.com Note: Features &...
Need help?
Do you have a question about the X-Tra Talk GXT1000 Series and is the answer not in the manual?
Questions and answers
How can I tell if the battery charging unit is charging the battery?
When the Midland X-Tra Talk GXT1000 Series battery charging unit is charging the battery, the LED indicator will light up in red, indicating the charging function.
This answer is automatically generated
how to reset
@nadine mcdowell
To reset the Midland X-Tra Talk GXT1000 Series, turn the radio off and then turn it back on.
This answer is automatically generated