Table of Contents
Advertisement
Advertisement
Table of Contents

Related Manuals for RJM mastermind pbc


Summary of Contents for RJM mastermind pbc
- Page 1 Mastermind PBC User’s Manual RJM Music Technology, Inc.
- Page 3 Mastermind PBC User’s Manual Version 2.0 11/12/2015 RJM Music Technology, Inc. 2525 Pioneer Ave. Suite 1 Vista, CA 92081 +1-760-597-9450 email: support@rjmmusic.com web: www.rjmmusic.com...
- Page 4 Copyright © 2015 RJM Music Technology, Inc. All Rights Reserved RJM, RG-16, Amp Gizmo, Effect Gizmo, Rack Gizmo, Switch Gizmo, Mastermind, Mastermind PBC and the RJM logo are trademarks of RJM Music Technology, Inc. All other trademarks are the property of their respective holders.
-
Page 5: Table Of Contents
Editing Songs ......................................... 27 Editing Setlists ........................................27 Using a Setlist ......................................... 27 Expression Pedals .................................... 29 The Mission Engineering SP1-RJM ................................. 29 Expression Pedal Setup ...................................... 29 Setting Up The Expression Pedal Position Switch ............................ 30 External Switches .................................... 31 Remote Mode and Expander Mode ............................. - Page 6 Edit Device Menu ......................................43 Edit Presets ..........................................44 Audio Settings ........................................45 Fn Switch Settings ........................................ 45 MIDI Settings .......................................... 45 System Functions Menu ..................................... 46 Expression Pedal Menu ...................................... 46 Specifications ....................................48 Mastermind PBC MIDI Implementation Chart ........................... 49...
-
Page 7: Introduction
MIDI input & output connections, powered by the MIDI "brain" of our Mastermind GT controller • USB device port for connection to a PC or Mac. This allows the Mastermind PBC to send MIDI commands to a • computer, and to communicate with the Mastermind PBC editor software USB host port for use with a USB thumb drive. -
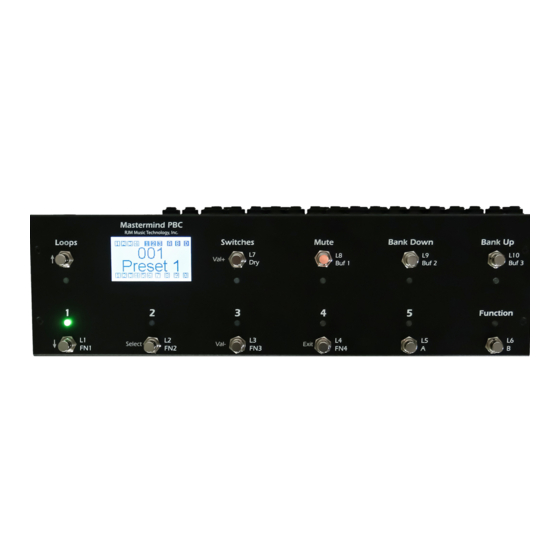
Page 8: Front Panel
MIDI commands. Holding buttons 1 and 3 enters Setup Mode. Bank Up / Bank Down –The 640 presets in the Mastermind PBC are arranged in banks of 5, and these buttons allow you to select which bank of 5 you’d like to access. -
Page 9: Main Display
Main Display The main display shows the current preset or song name as well as status of the PBC’s loops, switches, buffers and outputs. 1 2 3 4 1 2 3 Preset 001 1 2 3 4 5 6 7 8 9 0 1. -
Page 10: Rear Panel
¼” TRS (tip-ring-sleeve) cable. These switches are fully configurable using the Mastermind PBC editor software and can perform all of the operations the on-board switches can. Refer to the External Switch section for more details. - Page 11 USB -> PC – This USB port is designed to connect to a PC or Mac. When connected, the Mastermind PBC will appear as a MIDI interface connected to the computer.
-
Page 12: Audio And Switching Features
There are three audio buffers in the Mastermind PBC: one in front of loop 1, one before loop 7, and one after loop 10. -
Page 13: Internal Line Mixer
The Mastermind PBC allows you to choose which loops are in series and which are in parallel for each preset. This is done by entering loop selection mode (press the Loops button), then holding the desired loop (7 through 10). This will switch the loop from series to parallel (or from parallel to series). -
Page 14: Outputs A And B
Function Switching a.k.a. Controlling Your Amp The Mastermind PBC has the ability to control footswitchable features on many amps. This could be channel switching, reverb, tremolo, etc. – anything that is controlled by a 1⁄4-inch footswitch jack. The Func Sw 1/2 and Func Sw 3/4 jacks are be used for function switching purposes. - Page 15 TRS 1⁄4-inch cable – this allows you to control two functions on an amp with each switching jack, providing access to all four function switches. This connection is typically used with amps that have two button footswitches. Insert cable – an insert cable is a 1⁄4-inch cable that has a TRS (aka stereo) connector on one side and two 1/4-inch mono connectors on the other end.
-
Page 16: Wiring Diagrams
Wiring Diagrams The following pages show a few examples of ways you can wire the Mastermind PBC to control your guitar rig. These are only a few suggestions – there are many other possible ways to do it. -
Page 22: Basic Operation
Preset Mode When you power up the Mastermind PBC, you start off in the preset and bank selection mode. The Mastermind PBC has 768 presets that you can choose from, and they’re arranged in banks of five. Pressing one of the five preset buttons (1 –... -
Page 23: Programming A Preset
Use the buttons to turn on the desired switches as described in the section above. Hold the Loops button for 3 seconds to store. 10. Press the Loops button to return to preset mode. You can repeat this for each of the Mastermind PBC’s 768 presets. -
Page 24: Midi & Preset Setup
Adding a Device The first thing that needs to be done is to add a device entry to the Mastermind PBC for each device you wish to control. Once in the setup menu, select the Edit Devices option by using the down arrow button to highlight the option, and the Select button to select the item. -
Page 25: Assigning Program Changes
If your device is listed, the Mastermind PBC can set up many of the device parameters for you. What it can do varies from device to device. At the minimum, it can set up the device name and the number of presets and banks the device has. - Page 26 To do this, enter setup mode by holding the 1 and 3 buttons for 3 seconds. After entering Setup Mode, select the Edit Presets option: Setup Menu Current Pg Set List None Edit Devices Edit Presets Audio Settings Fn Switch Settings You’ll be presented with a list of presets: Select a Preset Global Preset...
-
Page 27: Song And Setlist Mode
Please note! Even though you can specify up to 16 presets per song, you can only access as many presets as you have preset buttons on your Mastermind PBC. By default that means you can use 5 presets per song. If you use the Mastermind PBC editor, you can convert more of the buttons to preset buttons if needed, and you can use two Mastermind PBCs together in Expander mode, which would allow you to use preset buttons on both units. - Page 28 In the menu that pops up, you can either choose your desired set list, choose “All Songs” which puts all 1008 songs in one large setlist, or choose “None” to select no setlist and return to normal preset and bank mode.
-
Page 29: Expression Pedals
You can also use a standard volume pedal as an expression pedal. For this you need a 1/4” Y-cable, also known as an insert cable. The stereo end of the Y cable plugs into the Mastermind PBC and the two mono ends plug into the input... -
Page 30: Setting Up The Expression Pedal Position Switch
Currently, this function is only programmable using the Mastermind PBC editor software. You will, however, need to use the Mastermind PBC to choose at what point in the pedal’s travel the switch happens. Move the pedal to that spot (typically not quite all the way down or not quite all the way up), then press Set Switch Position. The pedal position will be remembered and the selected function will switch on and off as you move the pedal up and down. -
Page 31: External Switches
There is an external switch jack on the rear of the Mastermind PBC labeled “Ext Switch”. This jack can take a single switch or a double switch with a TRS (tip-ring-sleeve) plug. A single switch should use a TRS plug with the switch connected to the tip and ground, and the ring conductor unconnected to anything. -
Page 32: Remote Mode And Expander Mode
In Remote Mode, one Mastermind PBC can act as a remote control for another. Simply connect the Remote In port of your Mastermind PBC to the MIDI Out of the unit that should act as a remote control. If needed, you can even chain more PBCs in this way, connecting the Remote In of one unit to the MIDI Out of the next. - Page 33 When using Expander mode, your presets will be spread across the preset buttons on both units, starting on PBC #1 in the diagram above, and then continuing to PBC #2. You can put the bank and page selection buttons on either unit or both.
-
Page 34: External Midi Control
External MIDI Control The Mastermind PBC can also be controlled by an external MIDI device such as a computer, sequencer or other type of MIDI controller. To enable this feature, set the MIDI Rx Ch parameter in the MIDI Settings menu to the desired MIDI channel. - Page 35 Loop 10 series/parallel 0-63 series, 64-127 parallel Buffer 1 disable/enable 0-63 off, 64-127 on Buffer 2 disable/enable 0-63 off, 64-127 on Buffer 3 disable/enable 0-63 off, 64-127 on Function Switch 1 off/on 0-63 off, 64-127 on Function Switch 2 off/on 0-63 off, 64-127 on Function Switch 3 off/on 0-63 off, 64-127 on...
-
Page 36: Other Special Features
Using the setup menu, you can also set it to be a tap tempo button that sends MIDI clock (see below). A third option is to have the Function button control a Mini Effect Gizmo that’s connected to the Mastermind PBC. This allows you to add five more loops to your pedalboard. -
Page 37: Global Preset
“None” (the default), “Master” or “Slave”. When set to “Master”, the Mastermind PBC will send a MIDI clock signal out of all MIDI outputs, including the USB port. The tempo will be adjusted any time a tap tempo button is used. Tempo can also be set on a per-song and per-preset basis. -
Page 38: Loading And Saving Settings To A Usb Flash Drive
Select. Please refer to the Setup Mode Reference section for information on how text is edited on the Mastermind PBC. If a file of that same name exists, you will be asked if it’s okay to overwrite the file. If you answer Yes (or if there is no pre-existing file to overwrite), the settings file will be saved to the top level directory of the flash drive. -
Page 39: Connecting To A Computer
In addition to the USB flash drive support, the Mastermind PBC’s USB -> PC port allows you to connect your controller to a PC or Mac with a USB port. The Mastermind PBC is a class-compliant USB MIDI device, which means it doesn’t need additional driver software. -
Page 40: Updating Firmware
The firmware update process is simple: first, download the firmware file from the RJM Music website using your PC or Mac. Copy the downloaded file to a USB flash drive. All RJM firmware files end in the extension “.rjf”, so it will be easy to tell which files are the ones you want. -
Page 41: Setup Mode Reference
Setup Mode Reference Setup mode allows you to perform basic configuration of the Mastermind PBC. This on-board editing is designed to allow configuration of the most common functionality and features. Complete editing is available using the Mastermind PBC editor software available for Mac and PC. -
Page 42: Main Menu
Start Last Prst – When this is turned on, the Mastemind PBC will start up on the last preset you selected before turning the PBC off. When this is turned off, the Mastermind PBC will always start up on preset 1. -
Page 43: Edit Devices
300 msec (0.3 seconds). Bank Scroll mSec – When you enter bank selection by pressing a bank up or bank down button, the Mastermind PBC will scroll through all of the presets in the currently selected bank, displaying the preset’s name and lighting up the button that selects the preset. -
Page 44: Edit Presets
IA button is pressed. Send PC– When set to “On”, the Mastermind PBC will be allowed to send PC messages to the device. When set to “Off”, PC messages will not be allowed. Setting this to “Off” will disable some of the PC and Bank related items in the Edit Device menu. -
Page 45: Audio Settings
MIDI Settings MIDI Rx Ch – Sets the MIDI channel that the Mastermind PBC will listen to. Any program and/or bank changes received on this channel will cause the Mastermind PBC to jump to the selected preset and send all of the MIDI messages corresponding to that preset. -
Page 46: System Functions Menu
MIDI chain. Remote – Turning this on enables remote mode. This allows more than one Mastermind PBC to be connected together and have them all synchronized together. Refer to the Remote and Expander Mode section for more information. - Page 47 Calibrate – Enters pedal calibration. You are asked to move the pedal all the way up and all the way down. This insures that the pedal will work optimally with the Mastermind PBC. Press the Done soft button when you are finished. This parameter is only available when editing the global pedal parameters from the Main Menu.
-
Page 48: Specifications
Specifications Dimensions 17.5" (w) x 5.5" (d) x 3.33" (h) / 44.5 cm (w) x 14.0 cm (d) x 8.38 (h) Weight 4 lbs / 1.8kg Power 9VDC 500mA or 12VDC 400mA 5.5mm OD, 2.1mm ID x 9.5mm barrel connector (BOSS-style) Note: use the 12VDC 400mA output on Voodoo Lab Pedal Power products. -
Page 49: Mastermind Pbc Midi Implementation Chart
Mastermind PBC MIDI Implementation Chart MIDI Implementation Char t v 2.0 (Page 1 of 3) Manufactur er : RJM Music Technology, Inc. Model: Mastermind PBC Ver sion: 1 Date: November 12, 2015 Tr ansmit/Expor t Recognize/Impor t Remar ks 1. Basic Information... - Page 50 MIDI Implementation Char t v 2.0 (Page 2 of 3) Manufactur er : RJM Music Technology, Inc. Model: Mastermind PBC Ver sion: 1 Date: November 12, 2015 Contr ol # Function Tr ansmitted (Y/N) Recognized (Y/N) Remar ks Bank Select (MSB)
- Page 51 MIDI Implementation Char t v 1.0 (Page 3 of 3) Manufactur er : RJM Music Technology, Inc. Model: Mastermind PBC Ver sion: 1 Date: November 12, 2015 Contr ol # Function Tr ansmitted (Y/N) Recognized (Y/N) Remar ks Sustain Pedal...
Need help?
Do you have a question about the mastermind pbc and is the answer not in the manual?
Questions and answers