Table of Contents
Advertisement
hygena
Operating Instructions -
Important -
Please read these instructions fully before using
These instructions contain important information which will help you get the best from your
appliance and help to ensure safe and correct installation, use and maintanence.
If you need help or have damaged or missing parts, call the Customer Helpline: 0845 600 4632
Built-in pyrolytic oven
Please keep for future reference
AE6BSMP
Advertisement
Table of Contents

Subscribe to Our Youtube Channel
Summary of Contents for hygena AE6BSMP
- Page 1 Built-in pyrolytic oven Operating Instructions - AE6BSMP Please keep for future reference Important - Please read these instructions fully before using These instructions contain important information which will help you get the best from your appliance and help to ensure safe and correct installation, use and maintanence.
-
Page 2: Table Of Contents
Customer Helpline 0845 600 4632 Parts Safety Information Installation Positioning Cabinet cut-out sizes Electrical connection User instructions 8-14 Using the oven 8-11 Using the timer 12-13 Accessories Cleaning and Maintenance Cleaning and Maintenance Product code Transporting the oven AE6BSMP Trouble Shooting Technical specifications Guarantee... -
Page 3: Parts
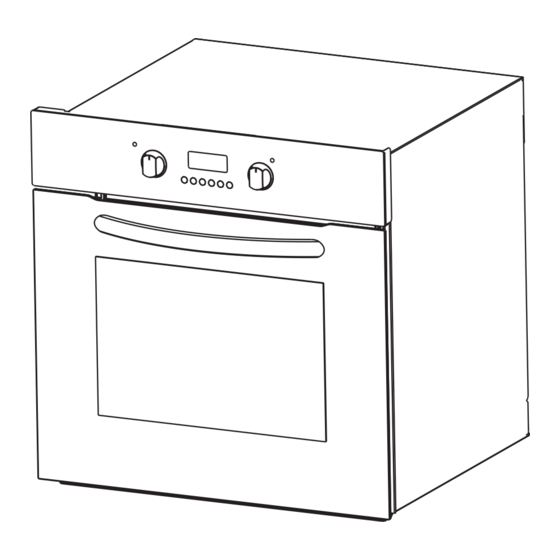
Parts If you have damaged or missing parts, call the Customer Helpline: 0845 600 4632 Please familiarise yourself with the parts and accessories listed below 1. Control panel 5. Oven rack support 2. Oven door handle 6. Fan cover 3. Oven door 7. -
Page 4: Safety Information
-WARNING: Danger of fire: do READ THESE INSTRUCTIONS CAREFULLY AND COMPLETELY BEFORE USING YOUR APPLIANCE, AND KEEP IT IN A not store items on the cooking CONVENIENT PLACE FOR REFERENCE WHEN NECESSARY. THIS MANUAL IS PREPARED FOR MORE THAN ONE MODEL IN surfaces. - Page 5 -WARNING: Ensure that the immediately. As the materials used for packaging (nylon, staplers, styrofoam...etc) may cause harmful effects to appliance is switched off before children, they should be collected and removed immediately. replacing the lamp to avoid the -Protect your appliance against atmospheric effects. Do not expose it to effects such as sun, rain, snow etc.
-
Page 6: Installation
Installation Customer Helpline 0845 600 4632 Positioning We hope that this modern, functional oven, which is made with quality parts and materials will meet your cooking needs. Make sure you read the manual to help to ensure successful results and also to help prevent problems with the appliance in the future. -
Page 7: Cabinet Cut-Out Sizes
Installation Customer Helpline 0845 600 4632 Cabinet cut-out sizes OPTION 2: Flush Installation OPTION 1: Regular Installation Min 25mm You can use either cabinet 1 or cabinet 2 cut-out sizes A DETAIL B DETAIL Countertop Built-in hob Distance between Min.25mm countertop and control panel Min. -
Page 8: Electrical Connection
Installation Customer Helpline 0845 600 4632 Electrical connection Wiring and safety of the oven The instructions given below must be followed without fail during wiring : IMPORTANT - The earthing cable must be connected via the screw with the earthing mark. -
Page 9: User Instructions
User Instructions Customer Helpline 0845 600 4632 Using the oven 9 10 11 12 13 1. Thermostat indicator light 8. Button 1 - Minute minder 2. Manual operation symbol 9. Button 2 - Manual operation 3. Minute minder symbol 10. Button 3 - End cook 4. - Page 10 User Instructions Customer Helpline 0845 600 4632 Oven Function Control Knob: Select the oven functions by turning the control knob (Figure 3). You need to adjust the function selection button and the oven thermostat knob together to a temperature value you wish to select-Otherwise the function stage you selected will not operate.
- Page 11 User Instructions Customer Helpline 0845 600 4632 The static cooking function emits heat, Double grill and Fan function ensuring even cooking of the lower and upper food. This is ideal for making pastries, cakes, The oven 's thermostat and warning lights will baked pasta, lasagne and pizza.
- Page 12 User Instructions Customer Helpline 0845 600 4632 Pyrolytic Cleaning 1 - The oven cavity is coated with a special emanel resistant to high temperatures. 2 - During the pyrolytic cleaning operation, the temperature inside the oven can reach about 475 C does burning food residuals. For your security, during the pyrolytic cleaning operation, the oven door automaticly locks.
-
Page 13: Using The Timer
User Instructions Customer Helpline 0845 600 4632 Using the timer After your appliance is connected to your Use the thermostat control knob to set the mains supply for the first time, the numbers on temperature that you require.The manual the timer display will flash. Before you can operation symbol will appear on the display. - Page 14 User Instructions Customer Helpline 0845 600 4632 that you have selected and show it on the Adjusting the audible signal display. Once the display has got to the time of day that To adjust the level of the audible signal, when it you want the oven to stop cooking, let go of the is sounding, press the button 5 and it will adjust button 5 and 6.
-
Page 15: Accessories
User Instructions Customer Helpline 0845 600 4632 Accessories You can use other cooking utensils, but they must WARNING- Fit the be heat and flame resistant. You can also use grid correctly into glass dishes, cake molds, special oven trays that any correspondent rack in the oven are appropriate for use in oven. -
Page 16: Cleaning And Maintenance
Cleaning and Maintenance Customer Helpline 0845 600 4632 Cleaning & Maintenance Cleaning Maintenance Before starting to clean your oven, be sure that Replacing the Oven Light all control buttons are off and your appliance has cooled. Unplug the appliance. It is recommended that you leave this operation to the Authorized Service agent. -
Page 17: Trouble Shooting
Trouble Shooting Customer Helpline 0845 600 4632 Basic troubleshooting before contacting service Problem Possible cause Solution - Oven does not turn on. - Power is turned off. - Make sure tthe electrical connections are operational and - Timer has not adjusted to the switches are set to the open/ day of time. -
Page 18: Technical Specifications
Technical Specifications Customer Helpline 0845 600 4632 Model/Item AE6BSMP Power supply (230)V~/50 Hz Maximum power 3200 W Size(H x W x D) 595x595x570 mm Cut-Out Dimensions(H xW x D) 600x600x580 mm Net weight 37.5 kg. 56 lt. Oven Volume Electric Cooker energy rating Energy Comsumption according 0.89 / 0.79... -
Page 19: Guarantee
52098132 01/13 52093022 01/13...
Need help?
Do you have a question about the AE6BSMP and is the answer not in the manual?
Questions and answers